DROPS Belle
DROPS Belle
53% Cotton, 33% Viscose, 14% Linen
from 2.00 £ /50g
Get the yarn to make this pattern from 18.00£.

The yarn cost is calculated from the pattern’s smallest size and the yarn’s cheapest product type. Looking for an even better price? You might find it on the DROPS Deals!

DROPS SS24

Carter

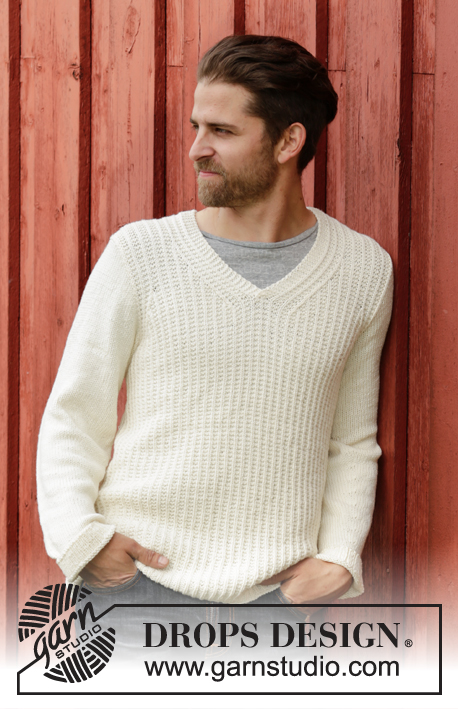
Men's knitted jumper in DROPS Belle, with raglan and worked top down. Size: S - XXXL.

DROPS Extra 0-1131
DROPS design: Pattern no vs-004
Yarn group B
----------------------------------------------------------
Size: S - M - L - XL - XXL - XXXL
Materials:
DROPS BELLE from Garnstudio
450-550-600-650-750-800 g colour no 09, beige

DROPS DOUBLE POINTED NEEDLES AND CIRCULAR NEEDLE (40 and 80 cm) SIZE 4 mm - or size needed to get 21 sts x 28 rows in stocking st = 10 x 10 cm.
DROPS DOUBLE POINTED NEEDLES and CIRCULAR NEEDLE (40 and 80 cm) SIZE 3.5 mm - for rib.

-------------------------------------------------------

Alternative Yarn – See how to change yarns here
Yarn Groups A to F – Use the same pattern and change the yarn here
Yarn usage using an alternative yarn – Use our yarn converter here

-------------------------------------------------------

DROPS Belle
DROPS Belle
53% Cotton, 33% Viscose, 14% Linen
from 2.00 £ /50g
Get the yarn to make this pattern from 18.00£.

The yarn cost is calculated from the pattern’s smallest size and the yarn’s cheapest product type. Looking for an even better price? You might find it on the DROPS Deals!

Pattern instructions

NOTE: This pattern is written in British English. All measurements in charts are in cm. For conversion from cm to inches - click here. There are different terms for crocheting in British and American English. If this pattern includes crochet, click for "crochet terms" here. For this pattern in American English, please click here.
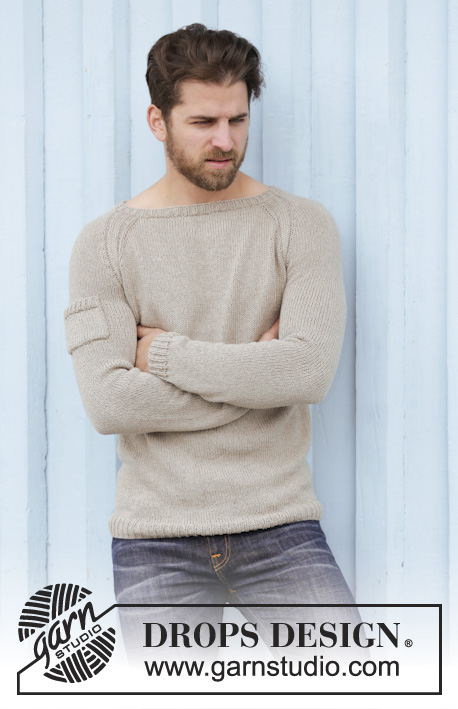
GARTER ST (back and forth):
K all rows. 1 ridge = 2 rows K.

RAGLAN:
Inc for raglan by working a YO on each side of A.1 in every raglan. On next round K YOs twisted to avoid holes.

PATTERN:
See diagram A.1.

DECREASE TIP:
Dec 1 st before marker as follows: Work until 2 sts remain before marker, slip 1 st as if to K, K 1, psso.
Dec 1 st after marker as follows: K 2 tog.
----------------------------------------------------------

JUMPER:
Worked in the round on circular needle, top down. Cast on 114-117-120-123-126-129 sts on circular needle size 3.5 mm with Belle. K 1 round. Then work rib (= K 1/P 2). Switch to circular needle size 4 mm when piece measures 2 cm. Now continue piece in stocking st. On first round dec 18-17-16-15-14-13 sts evenly = 96-100-104-108-112-116 sts (this is done to give the garment better shape). On next round, inc 24-26-30-40-48-70 sts evenly = 120-126-134-148-160-186 sts. Insert 1 marker at beg of round = mid back. On next round work as follows from mid back: K 17-18-20-24-27-33 (= half back piece), A.1, K 6, A.1 (= sleeve), K 34-37-41-48-54-67 (= front piece), A.1, K 6, A.1 (= sleeve ), K 17-19-21-24-27-34 (= half back piece). Continue pattern like this while AT THE SAME TIME working an elevation in the back as follows: Work 8 sts past marker, turn, tighten yarn and work 16 sts back, turn, tighten yarn and work 24 sts, turn, continue to work 8 sts more for every turn until a total of 64 sts have been worked after last turn, turn and work 1 round over all sts until mid back again. On next round start inc for RAGLAN – see explanation above - NOTE: Inc differently on body and sleeves. REMEMBER THE KNITTING TENSION

RAGLAN BODY:
Inc every round 0-4-4-4-4-4 times in total, then every other round 28-27-29-30-32-33 times. There are 90-99-107-116-126-141 sts on front and back piece.

RAGLAN SLEEVE:
Inc every other round 16-19-21-22-24-27 times, then every 4th round 6-5-5-5-5-4 times. There are 70-74-78-80-84-88 sts for each sleeve.

When all inc are done there are 320-346-370-392-420-458 sts on needle. On next round, work as follows: K 45-49-53-58-63-70, slip the next 70-74-78-80-84-88 sts on a stitch holder for sleeve, cast on 8 new sts under sleeve (insert a marker in the middle of these new sts), K 90-99-107-116-126-141, slip the next 70-74-78-80-84-88 sts on a stitch holder for sleeve, cast on 8 new sts under sleeve (insert a marker in the middle of these new sts), K 45-50-54-58-63-71 = 196-214-230-248-268-298 sts. NOW MEASURE PIECE FROM HERE!

BODY:
When piece measures 4 cm, dec 1 st on each side of markers in the side - READ DECREASE TIP (= 4 sts dec). Repeat dec every 14-14-14-30-30-30 cm 2-2-2-1-1-1 more times = 184-202-218-240-260-290 sts. When piece measures 42-43-44-45-46-47 cm, K 1 round while AT THE SAME TIME inc 20-17-16-15-16-13 sts evenly = 204-219-234-255-276-303 sts. Switch to circular needle size 3.5 mm. Work rib = K 1/P 2. When rib measures 4 cm, loosely cast off K over K and P over P.

SLEEVE:
Worked in the round on double pointed needles.
Slip the 70-74-78-80-84-88 sts from stitch holder back on double pointed needles size 4 mm. Cast on 8 new sts under sleeve, insert 1 marker in the middle of the new sts = 78-82-86-88-92-96 sts. NOW MEASURE PIECE FROM HERE! Work in stocking st AT THE SAME TIME continue A.1 as follows: Inc 1 YO before A.1 up towards middle of sleeve, K 2 tog after A.1 towards under sleeve (i.e. the 8 new sts cast on under sleeve). This is done so that A.1 meets under sleeve and disappears, repeat dec every other round until all sts in both A.1 are gone. K YO twisted on next round, it should not make holes. When piece measures 4 cm, dec 1 st on each side of marker - READ DECREASE TIP. Repeat dec every 3½-3½-3-3-2½-2½ cm 11-12-13-13-14-15 more times = 54-56-58-60-62-64 sts.

Work in stocking st until piece measures 51-50-50-50-49-49 cm. K 1 round while AT THE SAME TIME inc 6-4-5-3-4-2 sts evenly = 60-60-63-63-66-66 sts. Switch to double pointed needles size 3.5 mm and work rib = K 1/P 2. Cast off when piece measures 55-54-54-54-53-53 cm (shorter measurements in the larger sizes because of wider shoulders). Work the other sleeve the same way.

POCKET:
Cast on 23 sts (incl 1 edge st in each side) on double pointed needles size 4 mm with Belle. Continue in stocking st back and forth with 1 edge st in GARTER ST - see explanation above - in each side of piece. When piece measures 8 cm, adjust so that next row is from WS, inc 4 sts evenly from WS = 27 sts. Switch to double pointed needles size 3.5 mm and work as follows from RS: 1 edge st in garter st, rib = K 1/P 2 until 2 sts remain, finish with K 1 and 1 edge st in garter st. When piece measures 10 cm, cast off K over K and P over P.

ASSEMBLY:
Sew the openings under the sleeves. Sew the pocket on the left sleeve, approx 45 cm from cast off edge.

Diagram

symbols = K from RS, P from WS
symbols = P from RS, K from WS
diagram
diagram

Each of our patterns has specific tutorial videos to help you.

Do you have a question? See a list of frequently asked questions (FAQ)

Knitting tension is what determines the final measurements of your work, and is usually measured per 10 x 10 cm. It is provided like so: number of stitches in width x number of rows in height - eg: 19 stitches x 26 rows = 10 x 10 cm.

The knitting tension is very individual; some people knit/crochet loosely while others work tightly. You adjust the knitting tension with the needle size, which is why the suggested needle size is only meant as a guide! You need to adjust this (up or down) to ensure that YOUR knitting tension matches the knitting tension provided in the pattern. If you work with a different knitting tension than provided you will have a different yarn consumption, and your work will have different measurements than what the pattern suggests.

The knitting tension also determines which yarns can replace each other. As long as you achieve the same knitting tension you can replace one yarn with another.

See DROPS lesson: How to measure your tension/gauge

See DROPS video: How to make a gauge tension swatch

The required amount of yarn is provided in grams, eg: 450 g. To calculate how many balls you’ll need you first need to know how many grams are in 1 ball (25g, 50g or 100g). This information is available if you click on the individual yarn quality on our pages. Divide the amount required with the amount of each ball. For example, if each ball is 50g (the most common amount), the calculation will be as follows: 450 / 50 = 9 balls.

The important thing when changing from one yarn to another is that the knitting/crochet tension remains the same. This is so that the measurements of the finished piece will be the same as on the sketch provided. It is easier to achieve the same knitting tension using yarns from the same yarn group. It is also possible to work with multiple strands of a thinner yarn to achieve the knitting tension of a thicker one. Please try our yarn converter. We recommend you to always work a test swatch.

Please NOTE: when changing yarn the garment might have a different look and feel to the garment in the photo, due to individual properties and qualities of each yarn.

See DROPS lesson: Can I use a different yarn than the one mentioned in the pattern?

All our yarns are categorised into yarn groups (from A to F) according to thickness and knitting tension – group A contains the thinnest yarns and group F the thickest. This makes it easier for you to find alternative yarns to our patterns, should you wish to switch yarn. All yarns within the same group have a similar knitting tension and can easily replace each other. However, different yarn qualities have different structures and properties which will give the finished work a unique look and feel.

Click here for an overview of the yarns in each yarn group

At the top of all our patterns you’ll find a link to our yarn calculator, which is a helpful tool should you wish to use a different yarn than suggested. By filling in the yarn quality you wish to replace, the amount (in your size) and number of strands, the calculator will present good alternative yarns with the same knitting tension. Additionally it will tell you how much you’ll require in the new qualities and whether you’ll need to work with multiple strands. Most skeins are 50g (some are 25g or 100g).

If the pattern is worked with multiple colours, every colour will have to be calculated separately. Similarly, if the pattern is worked with several strands of different yarns (for example 1 strand Alpaca and 1 strand Kid-Silk) you will have to find alternatives for each, individually.

Click here to see our yarn calculator

Since different yarns have different qualities and textures we have chosen to keep the original yarn in our patterns. However, you can easily find options among our available qualities by using our yarn calculator, or simply pick a yarn from the same yarn group.

It is possible that some retailers still have discontinued yarns in stock, or that someone has a few skeins at home that they would like to find patterns for.

The yarn calculator will provide both alternative yarn as well as required amount in the new quality.

If you think it's hard to decide what size to make, it can be a good idea to measure a garment you own already and like the size of. Then you can pick the size by comparing those measures with the ones available in the pattern's size chart.

You'll find the size chart at the bottom of the pattern.

See DROPS lesson: How to read size chart

The needle size provided in the pattern serves only as a guide, the important thing is to follow the knitting tension. And since knitting tension is very individual, you will have to adjust the needle size to ensure that YOUR tension is the same as in the pattern – maybe you’ll have to adjust 1, or even 2 needle sizes, up or down to achieve the correct tension. For this, we recommend that you work test swatches.

Should you work with a different knitting tension than the one provided, the measurements of the finished garment might deviate from the measurement sketch.

See DROPS lesson: How to measure your tension/gauge

See DROPS video: How to make a tension/gauge swatch

Working a garment top-down provides more flexibility and room for personal adjustment. For example it is easier to try the garment on while working, as well as making adjustments to length of yoke and shoulder caps.

The instructions are carefully explaining every step, in the correct order. Diagrams are adjusted to the knitting direction and are worked as usual.

The diagram depicts all rows/rounds, and every stitch seen from the right side. It is read from bottom to top, from right to left. 1 square = 1 stitch.

When working back and forth, every other row is worked from the right side and every other row is worked from the wrong side. When working from the wrong side, the diagram will have to be worked reversed: from left to right, knit stitches are purled, purl stitches are knit etc.

When working in the round every round is worked from the right side and the diagram are worked from right to left on all rounds.

See DROPS lesson: How to read knitting diagrams

The diagram depicts all rows/rounds, and every stitch seen from the right side. It is worked from bottom to top, from right to left.

When working back and forth every other row is worked from the right side: from right to left and every other row is worked from the wrong side: from left to right.

When working in the round, every row in the diagram are worked from the right side, from right to left.

When working a circular diagram you start in the middle and work your way outwards, counter clockwise, row by row.

The rows usually start with a given number of chain stitches (equivalent to the height of the following stitch), this will either be depicted in the diagram or explained in the pattern.

See DROPS lesson: How to read crochet diagrams

Instructions for working several diagrams after each other on the same row/round, will often be written like so: “work A.1, A.2, A.3 a total of 0-0-2-3-4 times". This means you work A.1 once, then A.2 is worked once, and A.3 is repeated (in width) the number of times provided for your size – in this case like so: S = 0 times, M = 0 times, L=2 times, XL= 3 times and XXL = 4 times.

The diagrams are worked as usual: begin with the first row in A.1, then work the first row in A.2 etc.

See DROPS lesson: How to read knitting diagrams

See DROPS lesson: How to read crochet diagrams

The total width of the garment (from wrist-to-wrist) will be larger in the larger sizes, despite the actual sleeves being shorter. The larger sizes have longer sleeve caps and wider shoulders, so there will be a good fit in all sizes.

The measurement sketch/schematic drawing provides information regarding the full length of the garment. If it’s a jumper or a jacket the length is measured from the highest point on the shoulder closest to the neckline, and straight down to the bottom of the garment. It is NOT measured from the tip of shoulder. Similarly, the length of yoke is measured from the highest point on the shoulder and down to where yoke is split into body and sleeves.

On a jacket measures are never taken along bands, unless specifically stated. Always measure inside band stitches when measuring the length.

See DROPS lesson: How to read a schematic drawing

Diagrams are often repeated on the round or in height. 1 repeat is the diagram the way it appears in the pattern. If it says to work 5 repeats of A.1 in the round, then you work A.1 a total of 5 times after/next to each other in the round. If it says to work 2 repeats of A.1 vertically/in height you work the entire diagram once, then begin again at the start and work the entire diagram one more time.

Chain stitches are slightly narrower than other stitches and to avoid working the cast-on edge too tight, we simply chain more stitches to begin with. The stitch count will be adjusted on the following row to fit the pattern and measurement sketch.

The rib edge is more elastic and will contract slightly compared to, for example, stocking stitch. By increasing before the rib edge, you avoid a visible difference in width between the rib edge and the rest of the body.

It’s very easy to cast off too tightly, and by making yarn overs while casting off (and simultaneously casting these off) you avoid a too tight cast off edge.

See DROPS video: How to bind off with yarn overs (yo)

To achieve an even increase (or decrease) you can increase on, for example: every 3rd and 4th row alternately, like so: work 2 rows and increase on the 3rd row, work 3 rows and increase on the 4th. Repeat this until the increase is complete.

See DROPS lesson: Increase or decrease 1 st on every 3rd and 4th row alternately

Should you prefer to work in the round instead of back and forth, you may of course adjust the pattern. You’ll need to add steeks mid-front (usually 5 stitches), and follow the instructions. When you would normally turn and work from the wrong side, simply work across the steek and continue in the round. At the end you’ll cut the piece open, pick up stitches to work bands, and cover the cut edges.

See DROPS video: How to knit steeks and cut open

Should you prefer to work back and forth instead of in the round, you may of course adjust the pattern so you work the pieces separately and then assemble them at the end. Divide the stitches for the body in 2, add 1 edge stitch in each side (for sewing) and work the front and back pieces separately.

See DROPS lesson: Can I adapt a pattern for circular needles into straight needles?

Pattern repeats can vary slightly in the different sizes, in order to get the correct proportions. If you’re not working the exact same size as the garment in the photo, yours might deviate slightly. This has been carefully developed and adjusted so that the complete impression of the garment is the same in all sizes.

Make sure to follow instructions and diagrams for your size!

If you have found a pattern you like which is available in women’s size it’s not very difficult to convert it to men’s size. The biggest difference will be the length of sleeves and body. Start working on the women size that you think would fit across the chest. The additional length will be worked right before you cast off for the armhole/sleeve cap. If the pattern is worked top-down you can add the length right after the armhole or before the first decrease on sleeve.

Regarding additional yarn amount, this will depend on how much length you add, but it is better with a skein too many than too few.

All yarns will have excess fibres (from production) that might come off as lint or shedding. Brushed yarns (ie hairier yarns) have more of these loose, excess fibres, causing more shedding.

Shedding also depends on what is worn under or over the garment, and whether this pulls at the yarn fibres. It’s therefore not possible to guarantee that there will be no shedding

Below are some tips on how to get the best result when working with hairier yarns:

1. When the garment is finished (before you wash it) shake it vigorously so the looser hairs come off. NOTE: do NOT use a lint roller, brush or any method that pulls at the yarn.

2. Place the garment in a plastic bag and put it in your freezer - the temperature will cause the fibres to become less attached to each other, and excess fibres will come off easier.

3. Leave in the freezer for a few hours before taking it out and shaking it again.

4. Wash the garment according to the instructions on the yarn label.

Pilling is a natural process that happens to even the most exclusive of fibers. It's a natural sign of wear and tear that is hard to avoid, and that is most visible in high friction areas of your garment like a sweater's arms and cuffs.

You can make your garment look as new by removing the pilling, using a fabric comb or a pill/lint remover.

Still can't find the answer you need? Then scroll down and leave your question so one of our experts can try to help you. This will be done normally within 5 to 10 working days.
In the meantime, you can read the questions and answers that others have left to this pattern or join the DROPS Workshop on Facebook to get help from fellow knitters/crocheters!

You might also like...

Post a comment to pattern DROPS Extra 0-1131

We would love to hear what you have to say about this pattern!

If you want to leave a question, please make sure you select the correct category in the form below, to speed up the answering process. Required fields are marked *.

Comments / Questions (65)

country flag Barbara wrote:

Bonjour Il me semble étrange lorsque nous arrivons aux côtes du dos et du devant d'effectuer des augmentations alors que nous sommes sur un modèle top down ?? Merci pour votre réponse et Merci pour votre site Cordialement Barbara

16.12.2016 - 10:30

DROPS Design answered:

Bonjour Barbara, on augmente avant de tricoter les côtes sur aiguilles 3,5 pour conserver la largeur souhaitée. Bon tricot!

16.12.2016 - 13:37

country flag Tina Poulsen wrote:

Hvordan kan tage ind under ærmet til der ikke er flere masker tilbage i A1, når man skal strikke de 2 masker FØR og EFTER A1 sammen under ærmet? Så tager man jo ind i de 8 masker, man har slået op, da man startede på ærmet, og kan derfor kun tage ind 4 gange i hver side.

09.11.2016 - 03:50

DROPS Design answered:

Hej Tina. Ja, det er ogsaa det der staar: Fortsæt således på hver 2.omg med indtagninger mod mærketråden under ærmet og med udtagninger mod m ovenpå ærmet til du ikke har flere masker i A.1. Saa de 8 masker forsvinder under aermet "forsvinder".

09.11.2016 - 14:25

country flag Debergue wrote:

Ok plus clair merci beaucoup et pour les augmentations manches 5x tous les 4 tours je les place où ? Merci

13.10.2016 - 16:36

DROPS Design answered:

Bonjour Mme Debergue, les augmentations des manches vont se faire après A.1 au début de la manche, et avant A.1 à la fin de la manche. Comme celles du dos et du devant, vous les faites après A.1, au début du dos/du devant et avant A.1 à la fin du dos/du devant. Bon tricot!

14.10.2016 - 08:54

country flag Debergue wrote:

Pourriez vous me donner le détail pour les 4 1er tours svp car vraiment perdue ;( merci

13.10.2016 - 12:09

DROPS Design answered:

Bonjour Mme Debergue, en taille M, diminuez ainsi: Tour1: diminuez uniquement sur le devant et le dos = 4 dim par tour (après A.1 au début du devant et du dos + avant A.1 à la fin du devant et du dos). Tour2: Diminuez 8 m: 1 m avant et après chaque A.1. Répétez 2x fois ces 2 tours = vous avez maintenant diminué 4 fois tous les tours pour le dos et le devant et 2 fois pour la manche tous les 2 rangs. Tricotez ensuite 1 tour sans augm, 1 tour avec 8 augm et répétez ces 2 tours 17 fois en tout (= les 19 x tous les 2 tours pour les manches sont faites). Continuez ensuite les augm. comme indiqué. Bon tricot!

13.10.2016 - 13:37

country flag Debergue wrote:

Arrivé au raglan dos et devant c'est clair par contre pour les manches ex 19x tout les 2 tous et 5 fois tous les 4 tours On fait donc 2 augmentation avant et après le A1???? Merci

13.10.2016 - 11:21

DROPS Design answered:

Bonjour Mme Debergue, vous devez augmenter différemment pour le dos & le devant (= 4x tous les tours puis 27x tous les 2 tours) et pour les manches (19x tous les 2 tours et 5x tous les 4 tours). Pour augmenter, augmentez après A.1 au début du dos/du devant/de la manche, et augmentez avant A.1 à la fin du dos/du devant/de la manche. Quand on augmente 8 m par tour, on va augmenter avant et après chaque A.1. Si on augmente que pour le dos & le devant, on augm. après A.1 au début du dos/devant et avant A.1 à la fin du dos/devant (idem pour les manches). Bon tricot!

13.10.2016 - 11:47

country flag Debergue wrote:

J'ai compris pour les raglans ^^ il faut faire dos/devant en même temps que les manches ?

09.10.2016 - 14:57

DROPS Design answered:

Bonjour Mme Debergue, comme on tricote de haut en bas, on va effectivement tricoter les manches, le dos et le devant en même temps, mais les augmentations du raglan vont se faire différemment - voir réponse précédente. Bon tricot!

10.10.2016 - 10:23

country flag Debergue wrote:

Bonjour merci pour les explications mais je me trouve face à un nouveau problème ^^ est-il possible de m'expliquer les augmentations pour le raglan dos&devant et raglan manche svp merci beaucoup

09.10.2016 - 13:27

DROPS Design answered:

Bonjour Mme Debergue, vous allez augmenter différemment sur le dos/le devant et sur les manches. Ces augmentations se font avant A.1 ou après A.1 sur la pièce à augmenter, ainsi quand on doit augmenter pour les manches/le dos/le devant, on augmente après A.1 au début de la manche/du dos/du devant et avant A.1 à la fin de la manche/du dos/du devant. Notez bien les augm. pour la taille suivie pour qu'elles tombent juste. Bon tricot!

10.10.2016 - 09:41

country flag Debergue wrote:

Comment répartir les diminutions et augmentations???? Merci 1er travail sur aiguilles circulaires

07.10.2016 - 10:12

DROPS Design answered:

Bonjour Mme Debergue, vous trouverez ici comment répartir des augmentations et des diminutions. Bon tricot!

07.10.2016 - 11:29

country flag Luca Papis wrote:

Buongiorno, ho un dubbio sulla lavorazione del sottomanica. Per fare scomparire il motivo A1 sotto la manica non mi è chiaro se, una volta accavallate tutte le 8 maglie aggiunte, devo continuare ad accavallare le maglie del motivo fino alla loro scomparsa, aumentando contemporaneamente con una maglia gettata per mantenere costante il numero di maglie. Vi ringrazio per il chiarimento Luca

26.07.2016 - 11:16

DROPS Design answered:

Buongiorno Luca. Sì, il numero delle m sulla manica deve rimanere lo stesso. Quando la manica misura 4 cm (dal segno inserito quando si inizia a lavorare la manica dopo aver separato le maniche dal davanti/dietro) inizia a diminuire ai due lati del segno. Buon lavoro!

26.07.2016 - 11:38

country flag Jeanétte Zeybrandt wrote:

En väldigt rolig modell... MEN tyvärr så räckte inte garnet. Beställt 600gram till stl L enl beskrivningen, men fick beställa ett nystan till. stickar enligt beskrivningen och måtten. Blev tyvärr en extrakostnad och väntetid... Mvh Jeanétte

20.04.2016 - 11:16