
Oblíbené kategorie
Hledáte přízi?


|
||||||||||||||||
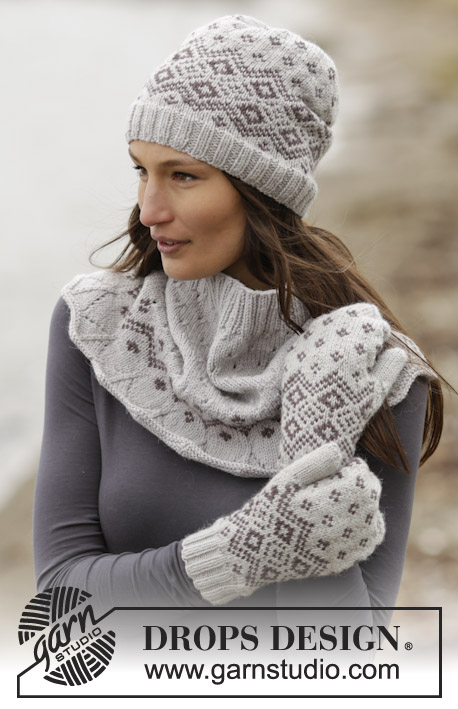
Winter Melody Set |
||||||||||||||||
 |
 |
|||||||||||||||
DROPS souprava: rukavice – palčáky, nákrčník a čepice s vyplétaným vzorem pletené z příze "Lima". Velikost: jednotná.
DROPS 165-19 |
||||||||||||||||
|
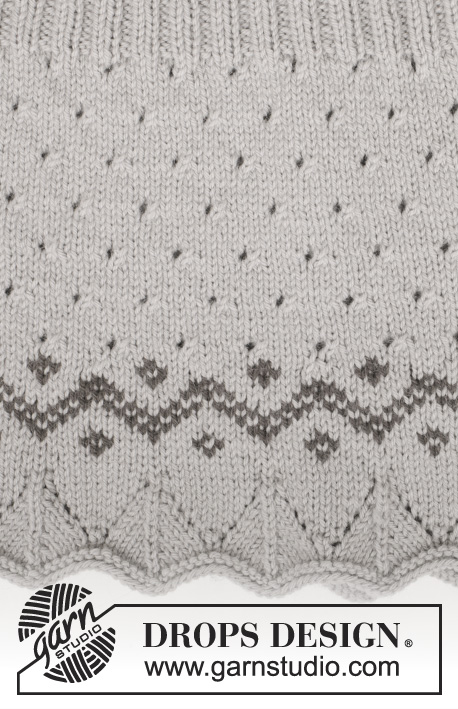
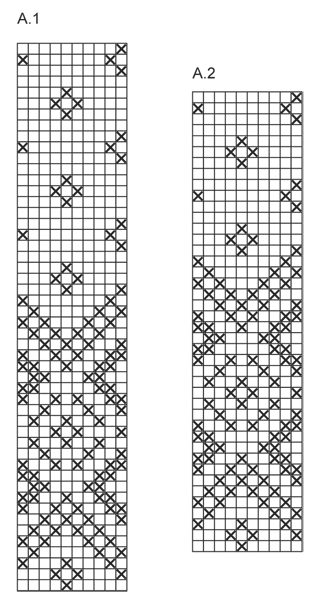
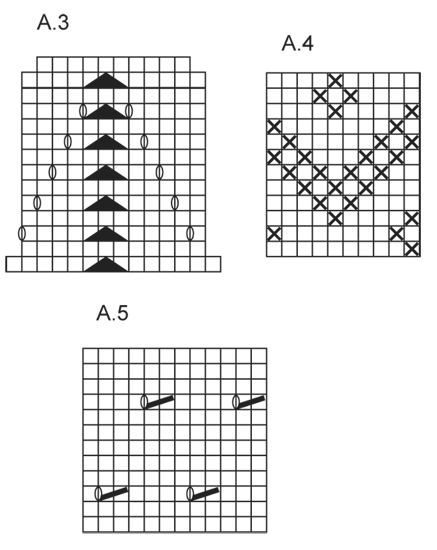
RUKAVICE: VZOR: Viz schéma A.1; celý vzor pleteme lícovým žerzejem. -------------------------------------------------------- PRAVÁ RUKAVICE: Pleteme v kruhových řadách na ponožkových jehlicích. Na ponožkové jehlice č.3 nahodíme světle šedou přízí 48 ok a pleteme pružným vzorem 2/2 (tj. střídáme 2 oka hladce, 2 obrace) do výše 5 cm. Pak pleteninu převedeme na ponožkové jehlice č. 3,5. Upleteme 1 kruhovou řadu a SOUČASNĚ přidáme rovnoměrně 2 oka = 50 ok. NYNÍ MĚŘÍME DÍL OD TOHOTO MÍSTA! Poté pleteme vzor A.1 (= v kruhové řadě máme 5 sekvencí vzoru). Ve výši 4 cm si označíme 2. oko v kruhové řadě (= palec). Ve výši 6 cm začneme tvarovat klínek pro palec, takto: přidáme 1 oko na každé straně označeného oka – přidáváme nahozením, v následující kruhové řadě pleteme nahození hladce za zadní nit, aby se v pletenině netvořily dírky. Toto přidávání opakujeme v každé 2. kruhové řadě, celkem 6x (všechna přidaná oka pleteme světle šedou přízí) = 13 ok palce a 62 ok celkem. Ve výši 10 cm odložíme 13 ok palce na pomocnou jehlici. V následující kruhové řadě nahodíme za těmito odloženými oky 1 oko nové = v kruhové řadě máme celkem 50 ok. Po dokončení 1 celé sekvence vzoru A.1 (na výšku) vložíme na každou stranu rukavice 1 značku (= mezi značkami leží 25 ok). Pokračujeme světle šedou přízí. V následující kruhové řadě ujímáme na každé straně, takto: pleteme po poslední 3 oka před značkou, 2 oka spleteme hladce, 2 oka upleteme hladce (značka leží mezi nimi), 1 oko sejmeme hladce, 1 upleteme hladce a sejmuté přes ně přetáhneme; toto ujímání opakujeme v každé 2. kruhové řadě, celkem 5x, pak ujímáme v každé kruhové řadě , celkem 4x = 14 ok. Přízi odstřihneme, protáhneme zbylými oky, stáhneme a zapošijeme. Rukavice měří asi 23 cm. PALEC: Odložených 13 ok palce vrátíme na ponožkové jehlice č.3,5 a navíc nabereme 3 oka z okraje za nimi = 16 ok. Pleteme lícovým žerzejem v kruhových řadách světle šedou přízí do výše asi 6 cm; pak spleteme každá 2 oka hladce. Přízi odstřihneme, protáhneme zbylými 8 oky, stáhneme a zapošijeme. LEVÁ RUKAVICE: Pleteme stejně jako pravou rukavici, jen pro klínek pro palec přidáváme na každé straně předposledního oka v kruhové řadě. ---------------------------------------------------------- ČEPICE: VZOR: Viz schéma A.2; celý vzor pleteme lícovým žerzejem. ---------------------------------------------------------- ČEPICE: Pleteme v kruhových řadách na kruhové jehlici, v případě potřeby převedeme pleteninu na ponožkové jehlice. Na kruhovou jehlici č.3,5 nahodíme světle šedou přízí 116 ok a pleteme pružným vzorem 2/2 do výše 4 cm. Pleteninu převedeme na kruhovou jehlici č.4. Upleteme 1 kruhovou řadu hladce a SOUČASNĚ ujmeme rovnoměrně 6 ok = 110 ok. Nyní pleteme vzor A.2 (= v kruhové řadě máme 11 sekvencí vzoru). Po dokončení 1 celé sekvence vzoru A.2 (na výšku) pokračujeme světle šedou přízí lícovým žerzejem. Pleteme 1 kruhovou řadu hladce a SOUČASNĚ umístíme do pleteniny 10 značek s rozestupy 11 ok. V následující kruhové řadě ujmeme ZA za každou značkou 1 oko (= spleteme 2 oka hladce). Toto ujímání opakujeme v každé 2. kruhové řadě, celkem 9x = v kruhové řadě zbývá 20 ok. V následující kruhové řadě splétáme každá 2 oka hladce = v kruhové řadě máme 10 ok. Přízi odstřihneme, protáhneme zbylými oky, stáhneme a zapošijeme. Čepice je vysoká asi 25 cm. ---------------------------------------------------------- NÁKRČNÍK: VZOR: Viz schémata A.3-A.5; celý vzor pleteme lícovým žerzejem. ---------------------------------------------------------- NÁKRČNÍK: Pleteme v kruhových řadách na kruhové jehlici. Na kruhovou jehlici č.4 nahodíme světle šedou přízí 266 ok a upleteme 1 kruhovou řadu hladce, 1 obrace a 1 hladce. Pak pleteme vzor A.3 (= v kruhové řadě máme 19 sekvencí vzoru). Po dokončení 1 celé sekvence vzoru A.3 (na výšku) máme v kruhové řadě 190 ok. Pleteme vzor A.4. Po jeho dokončení pleteme vzor A.5 a SOUČASNĚ v 1. kruhové řadě vzoru A.5 ujmeme rovnoměrně 10 ok = 180 ok. Vzor A.5 pleteme do výše 25 cm. Pak pleteme nad všemi oky lem pružným vzorem 2/2. Když je pružný lem vysoký 5 cm (celková výše nákrčníku = 30 cm), všechna oka dle vzoru uzavřeme. |
||||||||||||||||
Vysvětlivky ke schématu |
||||||||||||||||
|
||||||||||||||||
|
||||||||||||||||
|
||||||||||||||||
|
Vyrobili jste si tento nebo nějaký jiný z našich modelů? Přidejte ke svým fotkám na sociálních sítích tag #dropsdesign - díky tomu je uvidíme i my! Potřebujete s tímto návodem poradit?Otevřete-li si návod na stránce garnstudio.com, najdete tam výukových video-ukázek, Komentáře/Dotazy a další užitečné informace. © 1982-2024 DROPS Design A/S. Vyhrazujeme si veškerá práva. Tento dokument, včetně všech jeho dílčích částí, podléhá autorským právům. Podrobnější komentář k možnostem užití našich návodů najdete dole pod každým návodem na našich stránkách. |
||||||||||||||||


V oblasti pletené a háčkované módy působí DROPS Design více než 40 let. Díky tomu vám můžeme nabídnout jednu z nejrozsáhlejších kolekcí modelů s bezplatnými návody dostupnými na internetu - navíc v 17 jazycích. K dnešnímu dni máme na 304 katalogů a 11422 návodů celkem - z nich je už 6297 dostupných v češtině.
Komentáře / Otázky (11)
Hi, im Diagramm A3 verringert sich die Maschenzahl in Reihe 2 und 14. In der Anleitung steht aber nichts von Abnahme!? Wie muss ich das stricken? Liebe Grüße eure Claudia
27.09.2022 - 07:19DROPS Design answered:
Liebe Claudia, es werden 266 Maschen angeschlagen und die 14 Maschen in A.3 werden 19 Mal gestrickt - nehmen Sie im A.3 wie gezeigt, so sind es nur noch 10 Maschen x 19 Mal = 190 Maschen sind noch übrig nach A.3. Viel Spaß beim stricken!
27.09.2022 - 09:28The pattern says 50g for mittens but after finishing one of the mittens I see that 50g won't be enough. Otherwise, a simple but lovely pattern!
11.12.2021 - 23:55Kan jag sticka dessa vantar i Drops Alpaca utan att räkna om mönstret?
27.04.2020 - 12:53DROPS Design answered:
Hej Nej det kan du dessvärre inte, DROPS Alpaca tillhör garngrupp A och detta mönster är stickat med ett garn ur garngrupp B. Vill du sticka med ett annat garn så får du alltså välja ett ur garngrupp B. Mvh DROPS Design
27.04.2020 - 13:07I don't knit with diagrams. Is each row represented in the diagram or do you do a 'purl' row in between? Do I start at top or bottom of diagram?
17.12.2019 - 12:17DROPS Design answered:
Dear Mrs Quinn, please see a question 9 in the list of frequently asked questions (FAQ) here. Happy knitting!
17.12.2019 - 15:02Yuliya wrote:
Hello! When knitting the neck warmer do I need to dec 10 stitches only one time in the 1st row of A5 or on every 1st row of A5? My finished piece has 180 stitches at the end and it looks too wide and almost not functional
02.12.2016 - 06:48DROPS Design answered:
Dear Yuliya, that's right so, you dec 10 sts on 1st row in A.5 = 180 then work A.5 on these 180 sts and finish with ribbing also over the 180 sts. Happy knitting!
02.12.2016 - 08:51I votteoppskriften burde det stå at man hopper over maske 2 i mønsteret når tommelmaskene strikkes. Ser at Johanna fra Sverige har spurt om dette uten å få et riktig svar. Når man øker til tommelen strikkes maske 1 i mønsteret, økningene, og så maske 3 i mønsteret. (Maske to i mønstret er jo midtmasken på tommelen som skal strikkes i grått uansett). Etter tommelen strikkes mønsteret som i diagrammet. Håper dere retter dette i oppskriften?
31.01.2016 - 09:29Hur gör jag vid tumkilen med de olika färgerna för att mönstret ska passa även efter? Att omslaget ska stickas i ljusgrått är jag med på, men ska de in i mönstret så maska 1 i mönster stickas, sedan omslag, sedan maska 2 i mönstret, sedan omslag och sedan vidare i mönster? Eller ska det göras på annat sätt? Tack!
26.09.2015 - 11:11DROPS Design answered:
Hej Johanna, nej de nya m stickas inte in i mönstret, de skall sticka i ljusgrått. Lycka till!
01.10.2015 - 16:06J'espère qu'ils seront retenus pour aller avec le pull!!
13.06.2015 - 08:34Schönes Muster!
05.06.2015 - 09:57Le snood est très réussi. Belle forme, beaux accords de couleur. Superbe !
01.06.2015 - 14:06