DROPS Air
DROPS Air
65% Alpaca, 28% Polyamide, 7% Wool
from 6.45 $ /50g
Get the yarn to make this pattern from 38.70$.

The yarn cost is calculated from the pattern’s smallest size and the yarn’s cheapest product type. Looking for an even better price? You might find it on the DROPS Deals!

DROPS SS24

Lakeside

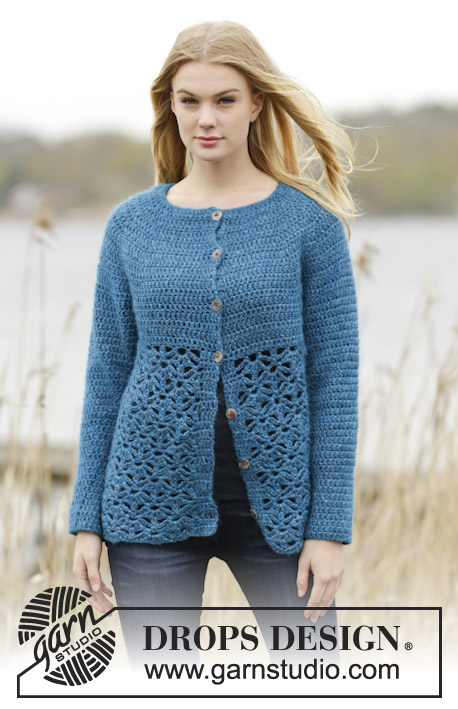
Crochet DROPS jumper with double crochet, lace pattern and round yoke, worked top down in ”Air”.

DROPS 164-31
DROPS design: Pattern no ai-010
Yarn group C or A + A
----------------------------------------------------------
Size: S - M - L - XL - XXL - XXXL

Materials:
DROPS AIR from Garnstudio
300-350-400-450-450-500 g color no 11, peacock blue

DROPS Hook size 6 mm / J/10 - or size needed to get 12 dc x 7 rows = 4'' x 4'' (10 x 10 cm), or 1 repetition of A.2 = width 8 cm / 3 1/8''.

-------------------------------------------------------

Alternative Yarn – See how to change yarns here
Yarn Groups A to F – Use the same pattern and change the yarn here
Yarn usage using an alternative yarn – Use our yarn converter here

-------------------------------------------------------

DROPS Air
DROPS Air
65% Alpaca, 28% Polyamide, 7% Wool
from 6.45 $ /50g
Get the yarn to make this pattern from 38.70$.

The yarn cost is calculated from the pattern’s smallest size and the yarn’s cheapest product type. Looking for an even better price? You might find it on the DROPS Deals!

Pattern instructions

NOTE: This pattern is written in American English. All measurements in charts are in cm. For conversion from inches to cm - click here. There are different terms for crocheting in American and British English. If this pattern includes crochet, click for "crochet terms" here. For this pattern in British English, please click here.
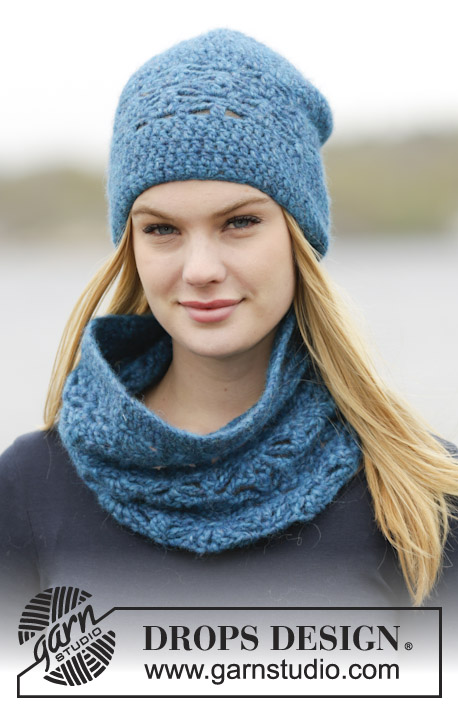
CROCHET INFO:
Replace first sc at beg of every sc round with 1 ch. Finish every round with 1 sl st in ch from beg of round.
Replace first dc at beg of every dc round with 3 ch. Finish round with 1 sl st in 3rd ch at beg of round.

PATTERN:
See diagrams A.1 and A.2.

CROCHET 2 DC TOG (in dc):
Work 1 dc in next dc but wait with last pull through, work 1 dc more in same dc, but on last pull through, pull through all sts on hook.

CROCHET 2 DC TOG (around ch):
Work 1 dc around the middle ch in dc-group but wait with last pull through, work 1 dc more around same ch, but on last pull through, pull through all sts on hook.

DC-GROUP:
Work a dc-group around ch-space as follows: Work * 1 dc, 1 ch *, repeat from *-* 2 more times around same ch-space, 1 dc around same ch-space.

INCREASE TIP:
Inc 1 dc by working 2 dc in 1 sc/dc.

DECREASE TIP:
Dec 1 dc at beg and end of round as follows: Work 1 dc (= 3 ch), * work 1 dc but wait with last pull through (= 2 sts on hook), then work next dc but on last pull through, pull yarn through all sts on hook *, repeat from *-* when 3 dc remain on round = 1 st dec on each side of marker.
----------------------------------------------------------

JUMPER:
The piece is worked top down. Worked in the round, round beg mid back.

YOKE:
Work 66-69-75-82-84-90 loose ch on hook size 6 mm / J/10 with Air and form a ring with 1 sl st. Work first round as follows:
ROUND 1: Work 1 ch - READ CROCHET INFO, work 1 sc in each of the first 1-4-2-1-3-1 ch, * skip ch 1, work 1 sc in each of the next 7 ch *, repeat from *-* 7-7-8-9-9-10 more times = 58-61-66-72-74-79 sc.
ROUND 2: Work 1 dc in every sc while AT THE SAME TIME inc 6-8-8-9-12-23 dc evenly - READ INCREASE TIP = 64-69-74-81-86-102 dc.
Now insert 8 markers in the piece for raglan inc without working sts. Insert 4 marker in each side from beg of round so that it is reversed from mid front: Insert a marker after 10-10-10-11-12-15 dc, insert next marker after 2 dc, then insert next marker after 8-10-12-14-14-17 dc, and finish with last marker after 2 dc. There are now 20-21-22-23-26-30 dc between the 2 middle markers towards front piece on jumper. Now continue with 1 dc in every dc, AT THE SAME TIME inc 1 dc on right side of each of the 8 markers. Then inc alternately on right and left side of every marker. Repeat inc every round 9-9-11-12-13-16 more times, and every other round 2-3-2-2-2-0 times = 160-173-186-201-214-238 dc on round. Piece measures approx. 20-23-23-24-26-27 cm / 8"-9"-9"-9½"-10 1/4"-10½". REMEMBER THE CROCHET GAUGE! On next round work as follows: Work 21-23-25-28-30-34 dc (= half back piece), 8 ch (under sleeve), skip 38-40-42-45-47-50 dc from previous row (= sleeve), 42-47-52-55-60-70 dc (= front piece), 8 ch (under sleeve), skip 38-40-42-45-47-50 dc from previous row (= sleeve) and 21-23-25-27-30-34 dc (= half back piece). Insert a marker, now measure piece from here!

BODY:
There are now 100-109-118-127-136-154 sts for body. NOW MEASURE THE PIECE FROM HERE. Work 1 round with 1 dc in every dc/ch. Then work PATTERN - see explanation above, as follows: NOTE: Work from 1st round in A.1-A.2.
ROUND 1: Work 3 ch (= A.1) - remember crochet info. Then work A.2 as follows: * Work 2 dc TOG (in dc) - see explanation above, ch 5, skip 2 dc, 1 sc in next dc, ch 3, skip 2 dc, 1 sc in next dc, ch 5, skip 2 dc *, repeat from *-* 10-11-12-13-14-16 more times. Finish with 1 sl st in 3rd ch on round (= A.1).
ROUND 2: Work ch 1, * work 1 sc in the 2 dc worked tog, ch 3, skip 1 ch-space, work 1 dc-GROUP - see explanation above, around next ch-space, ch 3, skip 1 ch-space *, repeat from *-* 10-11-12-13-14-16 more times. Finish with 1 sl st in 1st ch on round.
ROUND 3: Work ch 1, * ch 2, 1 sc around next ch-space, ch 5, work 2 dc TOG (around ch-space) - see explanation above, ch 5, 1 sc around next ch after dc-group, 1 ch *, repeat from *-* 10-11-12-13-14-16 more times. Finish with 1 sl st in 1st ch on round.
ROUND 4: Work ch 3, work (1 ch, 1 dc, ch 1, 1 dc) around first ch-space, ch 3, skip 1 ch-space, 1 sc in the 2 dc worked tog, ch 3, skip 1 ch-space, * (1 dc, ch 1, 1 dc, ch 1, 1 dc, ch 1, 1 dc) around next ch-space, ch 3, skip 1 ch-space, 1 sc in the 2 dc worked tog, ch 3, skip 1 ch-space *, repeat from *-* 9-10-11-12-13-15 more times, (1 dc, ch 1, 1 dc) around last ch-space. Finish with 1 sl st in 3rd ch on round.
ROUND 5: Work ch 3, * work 2 dc TOG (around ch), ch 5, work 1 sc around ch-space after dc-group, ch 3, 1 sc around next ch-space, 5 ch *, repeat from *-* 10-11-12-13-14-16 more times. Finish with 1 sl st in 3rd ch on round.
Continue like this and repeat A.X (= 2nd-5th round) until piece measures approx. 32 cm / 12½'' in all sizes - adjust to finish after 2nd or 4th round in A.1-A.2. Piece measures 56-60-60-62-64-66 cm / 22"-23½"-23½"-24½"-25 1/4"-26" in total.

SLEEVE:
Sleeve is worked in the round, top down. NOW MEASURE THE PIECE FROM HERE. Insert a marker in the middle of the 8 ch worked under sleeve. Let marker follow in piece until finished measurements. Fasten yarn with 1 sl st in the 5th ch of the 8 ch worked in armhole on body. Work 3 ch (= 1 dc) continue with 1 dc in each of the next ch 3, 1 dc in each of the dc for sleeve and then 1 dc in the remaining 4 ch under sleeve = 46-48-50-53-55-58 dc - remember CROCHET INFO! Continue with 1 dc in every dc AT THE SAME TIME when piece measures approx. 4 cm / 1½'' beg dec - READ DECREASE TIP. Repeat dec every 3rd-2nd-2nd-2nd-2nd-1st round 8-9-10-10-11-12 more times = 28-28-28-31-31-32 dc remain. When sleeve measures 46-44-44-43-42-40 cm / 18"-17 1/4"-17 1/4"-17"-16½"-15 3/4", sleeve is finished. Work the other sleeve the same way.
----------------------------------------------------------
Hat and neck warmer:
See DROPS 164-32 or "Related patterns" in pattern on website.
----------------------------------------------------------

Diagram

All measurements in charts are in cm.

symbols = 1 dc
symbols = 1 ch
symbols = 1 sc in st
symbols = Work 2 dc tog as follows: Work 1 dc in next dc but wait with last pull through, work 1 dc more in same dc, but on last pull through, pull through all YOs on hook.
symbols = Work 2 dc tog as follows:
Work 1 dc around the middle ch in dc-group but wait with last pull through, work 1 dc more around same ch, but on last pull through, pull through all YOs on hook.
symbols = Work a dc-group around ch-space as follows: Work * 1 dc, 1 ch *, repeat from *-* 2 more times around same ch-space, 1 dc around same ch-space.
symbols = 1 sc around ch-space
symbols = 1 dc around ch-space
symbols = 1 sl st
diagram
diagram
Do you have a question? See a list of frequently asked questions (FAQ)

Knitting tension is what determines the final measurements of your work, and is usually measured per 10 x 10 cm. It is provided like so: number of stitches in width x number of rows in height - eg: 19 stitches x 26 rows = 10 x 10 cm.

The knitting tension is very individual; some people knit/crochet loosely while others work tightly. You adjust the knitting tension with the needle size, which is why the suggested needle size only serve as a guide! You need to adjust this (up or down) to ensure that YOUR knitting tension matches the knitting tension provided in the pattern. If you work with a different knitting tension than provided you will have a different yarn consumption, and your work will have different measurements than what the pattern suggests.

The knitting tension also determines which yarns can replace each other. As long as you achieve the same knitting tension you can replace one yarn with another.

See DROPS lesson: How to measure your tension/gauge

See DROPS video: How to make a gauge tension swatch

The required amount of yarn is provided in grams, eg: 450 g. To calculate how many balls you’ll need you first need to know how many grams are in 1 ball (25g, 50g or 100g). This information is available if you click on the individual yarn quality on our pages. Divide the amount required with the amount of each ball. For example, if each ball is 50g (the most common amount), the calculation will be as follows: 450 / 50 = 9 balls.

The important thing when changing from one yarn to another is that the knitting/crochet tension remains the same. This is so that the measurements of the finished piece will be the same as on the sketch provided. It is easier to achieve the same knitting tension using yarns from the same yarn group. It is also possible to work with multiple strands of a thinner yarn to achieve the knitting tension of a thicker one. Please try our yarn converter. We recommend you to always work a test swatch.

Please NOTE: when changing yarn the garment might have a different look and feel to the garment in the photo, due to individual properties and qualities of each yarn.

See DROPS lesson: Can I use a different yarn than the one mentioned in the pattern?

All our yarns are categorised into yarn groups (from A to F) according to thickness and knitting tension – group A contains the thinnest yarns and group F the thickest. This makes it easier for you to find alternative yarns to our patterns, should you wish to switch yarn. All yarns within the same group have a similar knitting tension and can easily replace each other. However, different yarn qualities have different structures and properties which will give the finished work a unique look and feel.

Click here for an overview of the yarns in each yarn group

At the top of all our patterns you’ll find a link to our yarn converter, which is a helpful tool should you wish to use a different yarn than suggested. By filling in the yarn quality you wish to replace, the amount (in your size) and number of strands, the converter will present good alternative yarns with the same knitting tension. Additionally it will tell you how much you’ll require in the new qualities and whether you’ll need to work with multiple strands. Most skeins are 50g (some are 25g or 100g).

If the pattern is worked with multiple colours, every colour will have to be converted separately. Similarly, if the pattern is worked with several strands of different yarns (for example 1 strand Alpaca and 1 strand Kid-Silk) you will have to find alternatives for each, individually.

Click here to see our yarn converter

Since different yarns have different qualities and textures we have chosen to keep the original yarn in our patterns. However, you can easily find options among our available qualities by using our yarn converter, or simply pick a yarn from the same yarn group.

It is possible that some retailers still have discontinued yarns in stock, or that someone has a few skeins at home that they would like to find patterns for.

The yarn converter will provide both alternative yarn as well as required amount in the new quality.

If you think it's hard to decide what size to make, it can be a good idea to measure a garment you own already and like the size of. Then you can pick the size by comparing those measures with the ones available in the pattern's size chart.

You'll find the size chart at the bottom of the pattern.

See DROPS lesson: How to read size chart

The needle size provided in the pattern serves only as a guide, the important thing is to follow the knitting tension. And since knitting tension is very individual, you will have to adjust the needle size to ensure that YOUR tension is the same as in the pattern – maybe you’ll have to adjust 1, or even 2 needle sizes, up or down to achieve the correct tension. For this, we recommend that you work test swatches.

Should you work with a different knitting tension than the one provided, the measurements of the finished garment might deviate from the measurement sketch.

See DROPS lesson: How to measure your tension/gauge

See DROPS video: How to make a gauge tension swatch

Working a garment top-down provides more flexibility and room for personal adjustment. For example it is easier to try the garment on while working, as well as making adjustments to length of yoke and shoulder caps.

The instructions are carefully explaining every step, in the correct order. Diagrams are adjusted to the knitting direction and are worked as usual.

The diagram depicts all rows/rounds, and every stitch seen from the right side. It is read from bottom to top, from right to left. 1 square = 1 stitch.

When working back and forth, every other row is worked from the right side and every other row is worked from the wrong side. When working from the wrong side, the diagram will have to be worked reversed: from left to right, knit stitches are purled, purl stitches are knit etc.

When working in the round every round is worked from the right side and the diagram are worked from right to left on all rounds.

See DROPS lesson: How to read knitting diagrams

The diagram depicts all rows/rounds, and every stitch seen from the right side. It is worked from bottom to top, from right to left.

When working back and forth every other row is worked from the right side: from right to left and every other row is worked from the wrong side: from left to right.

When working in the round, every row in the diagram are worked from the right side, from right to left.

When working a circular diagram you start in the middle and work your way outwards, counter clockwise, row by row.

The rows usually start with a given number of chain stitches (equivalent to the height of the following stitch), this will either be depicted in the diagram or explained in the pattern.

See DROPS lesson: How to read crochet diagrams

Instructions for working several diagrams after each other on the same row/round, will often be written like so: “work A.1, A.2, A.3 a total of 0-0-2-3-4 times". This means you work A.1 once, then A.2 is worked once, and A.3 is repeated (in width) the number of times provided for your size – in this case like so: S = 0 times, M = 0 times, L=2 times, XL= 3 times and XXL = 4 times.

The diagrams are worked as usual: begin with the first row in A.1, then work the first row in A.2 etc.

See DROPS lesson: How to read knitting diagrams

See DROPS lesson: How to read crochet diagrams

The total width of the garment (from wrist-to-wrist) will be larger in the larger sizes, despite the actual sleeves being shorter. The larger sizes have longer sleeve caps and wider shoulders, so there will be a good fit in all sizes.

The measurement sketch/schematic drawing provides information regarding the full length of the garment. If it’s a jumper or a jacket the length is measured from the highest point on the shoulder (usually closest to the neckline), and straight down to the bottom of the garment. It is NOT measured from the tip of shoulder. Similarly, the length of yoke is measured from the highest point on the shoulder and down to where yoke is split into body and sleeves.

See DROPS lesson: How to read a schematic drawing

Diagrams are often repeated on the round or in height. 1 repeat is the diagram the way it appears in the pattern. If it says to work 5 repeats of A.1 in the round, then you work A.1 a total of 5 times after/next to each other in the round. If it says to work 2 repeats of A.1 vertically/in height you work the entire diagram once, then begin again at the start and work the entire diagram one more time.

Chain stitches are slightly narrower than other stitches and to avoid working the cast-on edge too tight, we simply chain more stitches to begin with. The stitch count will be adjusted on the following row to fit the pattern and measurement sketch.

The rib edge is more elastic and will contract slightly compared to, for example, stocking stitch. By increasing before the rib edge, you avoid a visible difference in width between the rib edge and the rest of the body.

It’s very easy to cast off too tightly, and by making yarn overs while casting off (and simultaneously casting these off) you avoid a too tight cast off edge.

See DROPS video: How to bind off with yarn overs (yo)

To achieve an even increase (or decrease) you can increase on, for example: every 3rd and 4th row alternately, like so: work 2 rows and increase on the 3rd row, work 3 rows and increase on the 4th. Repeat this until the increase is complete.

See DROPS lesson: Increase or decrease 1 st on every 3rd and 4th row alternately

Should you prefer to work in the round instead of back and forth, you may of course adjust the pattern. You’ll need to add steeks mid-front (usually 5 stitches), and follow the instructions. When you would normally turn and work from the wrong side, simply work across the steek and continue in the round. At the end you’ll cut the piece open, pick up stitches to work bands, and cover the cut edges.

See DROPS video: How to knit steeks and cut open

Should you prefer to work back and forth instead of in the round, you may of course adjust the pattern so you work the pieces separately and then assemble them at the end. Divide the stitches for the body in 2, add 1 edge stitch in each side (for sewing) and work the front and back pieces separately.

See DROPS lesson: Can I adapt a pattern for circular needles into straight needles?

Pattern repeats can vary slightly in the different sizes, in order to get the correct proportions. If you’re not working the exact same size as the garment in the photo, yours might deviate slightly. This has been carefully developed and adjusted so that the complete impression of the garment is the same in all sizes.

Make sure to follow instructions and diagrams for your size!

If you have found a pattern you like which is available in women’s size it’s not very difficult to convert it to men’s size. The biggest difference will be the length of sleeves and body. Start working on the women size that you think would fit across the chest. The additional length will be worked right before you cast off for the armhole/sleeve cap. If the pattern is worked top-down you can add the length right after the armhole or before the first decrease on sleeve.

Regarding additional yarn amount, this will depend on how much length you add, but it is better with a skein too many than too few.

All yarns will have excess fibres (from production) that might come off as lint or shedding. Brushed yarns (ie hairier yarns) have more of these loose, excess fibres, causing more shedding.

Shedding also depends on what is worn under or over the garment, and whether this pulls at the yarn fibres. It’s therefore not possible to guarantee that there will be no shedding

Below are some tips on how to get the best result when working with hairier yarns:

1. When the garment is finished (before you wash it) shake it vigorously so the looser hairs come off. NOTE: do NOT use a lint roller, brush or any method that pulls at the yarn.

2. Place the garment in a plastic bag and put it in your freezer - the temperature will cause the fibres to become less attached to each other, and excess fibres will come off easier.

3. Leave in the freezer for a few hours before taking it out and shaking it again.

4. Wash the garment according to the instructions on the yarn label.

Pilling is a natural process that happens to even the most exclusive of fibers. It's a natural sign of wear and tear that is hard to avoid, and that is most visible in high friction areas of your garment like a sweater's arms and cuffs.

You can make your garment look as new by removing the pilling, using a fabric comb or a pill/lint remover.

Still can't find the answer you need? Then scroll down and leave your question so one of our experts can try to help you. This will be done normally within 5 to 10 working days.
In the meantime, you can read the questions and answers that others have left to this pattern or join the DROPS Workshop on Facebook to get help from fellow knitters/crocheters!

You might also like...

Post a comment to pattern DROPS 164-31

We would love to hear what you have to say about this pattern!

If you want to leave a question, please make sure you select the correct category in the form below, to speed up the answering process. Required fields are marked *.

Comments / Questions (41)

Marisa Serra wrote:

Sorry for coming back on this but I cannot figure it out. I’ve never crocheted a top-down sweater before and these instructions are not clear to me. I’ve understood that there are 12 rows in the yoke. Round 2 = 64 dc. And we’re supposed to reach 160dc by the end of row 12. How am I to increase by 96 stitches over 10 rows?? The math doesn’t add up. Thank you for your help.

04.12.2018 - 15:23

DROPS Design answered:

Dear Mrs Serra, you start with 64 dc and increase 8 sts on each of the next 10 rounds = 80 sts increased + 64 dc = 144 dc. Then you will increase 8 sts every other round a total of 2 times (= 4 rounds x 8 sts inc) = 8 sts x 2 times = 16 sts inc + 144 sts = 160 sts. Yoke should now measure approx. 20 cm. Happy crocheting!

04.12.2018 - 15:44

Marisa wrote:

Hello, For size small, could you please clarify this sentence: Repeat inc every round 9 more times, and every other round 2times = 160 dc. What does "every other round" mean? How do I evenly increase from round 3? i.e get from 72 dc to 160 dc? Thank you very much in advance

03.12.2018 - 22:21

DROPS Design answered:

Dear Marisa, you will increase at each marker (= 1st increase at the right of the markers = before each marker - 2nd increase at the left of the markers = after each marker = 8 stitches increased on each increase round) first every round a total of 10 times (work 10 rounds inc alternately before and after each marker) then increase a total of 2 times every other round (= work 1 round without dec, 1 round with dec, repeat these 2 rounds a total of 2 times). Happy crocheting!

04.12.2018 - 07:41

country flag Coldwind wrote:

Superschöner Pullover. Grösse S fällt sehr klein aus, passt meiner 10jährigen wie angegossen. Habe das muster an den ärmeln wiederholt.

29.08.2018 - 20:28

Mary Manoly wrote:

Need chart to how to place the markers shal i place them right and left from starting points? Thank you

26.09.2017 - 09:50

DROPS Design answered:

Dear Mary, yes you will insert them from beg of round on the right and on the left, so that you will have a total of 8 markers and 20-21-22-23-26-30 tr (UK-En)/dc (US-En) between markers on front piece. Happy crocheting!

26.09.2017 - 13:14

country flag Knaxgurke wrote:

Danke, die letzte Erklärung war dann doch noch hilfreich. Wenn Sie eigentlich 10 Rd mit je 8 Zunahmen statt 10 Zunahmen pro Rd meinen ist die Formulierung in der Anleitung nach deutscher Grammatik und Syntax aber leider einfach falsch & unnötig irreführend. Dort steht "Zunahmen IN JEDER Rd nach dem 1. Mal noch weitere 9 Mal wiederholen" = 9 Wiederholungen pro Runde. Nicht 9 Wiederholungen der (Zunahme-)Runde oder R3+4 x Mal wiederholen, was anscheinend eigentlich gemeint ist.

25.09.2017 - 14:39

country flag Knaxgurke wrote:

(Meinen Sie vielleicht eigentlich 10 Runden mit je 8 Zunahmen statt 10 Zunahmen pro Runde?) Was meinen Sie mit "in jeder 2. Rd 2 x arb"? Zwei Mal WAS arbeiten? Bitte schreiben Sie doch einfach Runde für Runde auf, was zu tun ist. R3: 8x Zunahme je rechts der Markierer (72M) R4: 8x Zunahme je links der Markierer (80M) R5: ? R6: ? ...

25.09.2017 - 12:53

DROPS Design answered:

Ja genau, 8 Zunahmen in jeder der nächsten 10 Runde, dann in jeder 2. Runde = (Eine Runde ohne Zunahme, Eine Runde mit Zunahme), von (bis) insgesamt 2 x wiederholen. Runde 1: 64+8 rechts aller Markierung = 72 M, Rd2: 72+8 M links aller Markierung = 80 M, usw bis Runde 10: 144 M; dann, nächste Runde: keine Zunahme, Rd 12: 144 + 8 = 152 M. Rd 13: keine Zunahme. Rd 14: 152+8= 160 M. Viel Spaß beim stricken!

25.09.2017 - 13:27

country flag Knaxgurke wrote:

Danke, das Video habe ich gesehen, mir ist auch klar wie ich 2 Stb in eins häkele, aber das hilft mir leider wie gesagt null weiter, genau wie Ihre Antworten. Wie soll ich bei 8 Markierern und 1 Zunahme pro Markierer 10 Zunahmen pro Runde machen? Wo kommen denn bitte die anderen 2 Zunahmen her/hin? Und warum schreiben Sie dann wieder, dass in jeder Zunahmerunde 8M gearbeitet werden? Was denn jetzt? Können Sie sich nicht enscheiden oder können Sie sich nur nicht ausdrücken?

25.09.2017 - 12:51

DROPS Design answered:

Liebe Frau Knaxgurke, es sind 8 Markierungen, so werden 8 M pro Zunahmenrunde zugenommen, dh 1 vor/nach jeder Markierung: zuerst in jeder Runde 8 M insgesamt 10 x abwechselnd vor/nach jeder Markierung, dann in jeder 2. Runde 8 M insgesamt 2 x (in der 1. Größe) vor/nach jeder Markierung zunehmen, dann haben Sie 8 M x 10 + 8 M x 2 zugenommen (= 80+16= 96 M zugenommen + die 64 M von Beginn = es sind 160 M. Hoffentlich hilft es!

25.09.2017 - 13:23

country flag Knaxgurke wrote:

Ich wäre Ihnen sehr verbunden wenn Sie mir verständlich erklären könnten, was in Ihrer konfusen Anleitung gemeint ist und diese bei Gelegenheit verständlich überarbeiten könnten. So habe ich jedenfalls keine Lust, Ihre Anleitungen in Zukunft bei der Auswahl meiner Projekte zu berücksichtigen, wenn die alle so geschrieben sind, dass man sich den Frust und die Mühe gleich sparen kann. Die kurze Kommentarfunktion spricht jedenfalls auch für sich, bzw. gegen Sie.

24.09.2017 - 15:12

DROPS Design answered:

Liebe Frau Knaxgurke, schauen Sie mal bitte die verschieden Antwort und das Video. Sollten Sie weitere Frage haben, dann melden Sie sich bitte einfach wieder. Viel Spaß beim häkeln!

25.09.2017 - 10:51

country flag Knaxgurke wrote:

Ich habe bis jetzt (R2: 64 Maschen) R3: 8x Zunahme je rechts der Markierer (72M) R4: 8x Zunahme je links der Markierer (80M) Aber jetzt hängt's. Ich kann 9 Runden weiter abwechselnd rechts/links zunehmen (9*8=72 + 80 wären dann 152 Maschen statt der angestrebten 160), aber das ergibt mit "in jeder Runde noch 9x wiederholen" keinen Sinn, und mit "jede 2. Runde 2x arbeiten" (Was soll das überhaupt heißen?) erst Recht nicht.

24.09.2017 - 15:11

country flag Knaxgurke wrote:

Warum können Sie nicht einfach Reihe für Reihe schreiben, was zu tun ist? Wie soll ich denn 12x (in meinem Fall 9x) mal zunehmen, wenn ich nur an jedem der 8 Markierer eine Zunahme mache?! Es ergibt einfach keinen Sinn. Da müsste ich doch an weiteren Stellen Zunahmen machen, aber WO?! ("Gleichmäßig verteilt zunehmen" finde ich übrigens auch eine ganz tolle Angabe, das zeugt für mich nur von Faulheit, die Anleitung richtig auszuarbeiten.)

24.09.2017 - 15:11

DROPS Design answered:

Liebe Frau Knaxgurke, bei der 1. Größe sollen Sie abwechselnd vor und nach allen Markierungen (=rechts und linkes aller Markierungen) in jeder Rd 10 x zunehmen, dann in jeder 2. Rd 2 x arb = 160 Stb - es wird 8 M in jeder Zunahmenrunde gearbeitet, so hatten Sie 64 Stb + (8 M x 10 + 8 M x 2 = 96 Zunahmen) = 160 Stb.

25.09.2017 - 10:49