DROPS Air
DROPS Air
65% Alpaca, 28% Polyamide, 7% Wool
from 4.80 £ /50g
Get the yarn to make this pattern from 38.40£.

The yarn cost is calculated from the pattern’s smallest size and the yarn’s cheapest product type. Looking for an even better price? You might find it on the DROPS Deals!

DROPS SS24

Sigrid Jacket

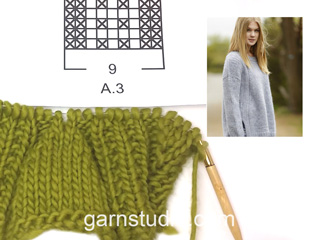
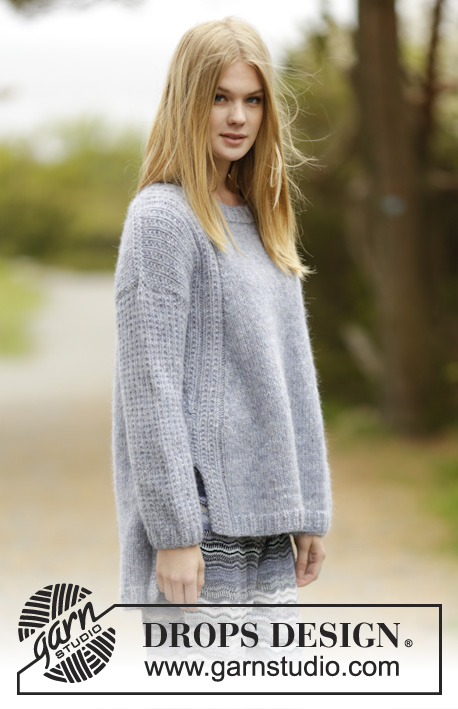
Knitted DROPS jacket with false raglan, vent and textured pattern in ”Air”. Size: S - XXXL.

DROPS 166-11
DROPS design: Pattern no ai-020
Yarn group C or A + A
----------------------------------------------------------
Size: S - M - L - XL - XXL - XXXL
Materials:
DROPS AIR from Garnstudio
400-450-450-500-550-600 g colour no 10, fog

DROPS CIRCULAR NEEDLE (60 cm) SIZE 5.5 mm - or size needed to get 16 sts x 20 rows in stocking st = 10 x 10 cm.
DROPS CIRCULAR NEEDLE (60 cm) SIZE 5 mm – for rib.
DROPS MOTHER-OF-PEARL BUTTON: Round (blue), NO 612: 6 pieces in all sizes

-------------------------------------------------------

Alternative Yarn – See how to change yarns here
Yarn Groups A to F – Use the same pattern and change the yarn here
Yarn usage using an alternative yarn – Use our yarn converter here

-------------------------------------------------------

DROPS Air
DROPS Air
65% Alpaca, 28% Polyamide, 7% Wool
from 4.80 £ /50g
Get the yarn to make this pattern from 38.40£.

The yarn cost is calculated from the pattern’s smallest size and the yarn’s cheapest product type. Looking for an even better price? You might find it on the DROPS Deals!

Pattern instructions

NOTE: This pattern is written in British English. All measurements in charts are in cm. For conversion from cm to inches - click here. There are different terms for crocheting in British and American English. If this pattern includes crochet, click for "crochet terms" here. For this pattern in American English, please click here.
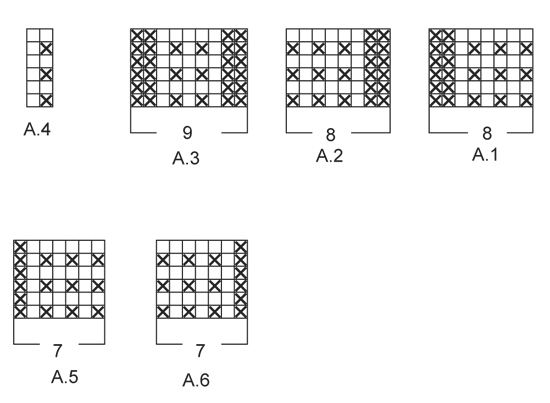
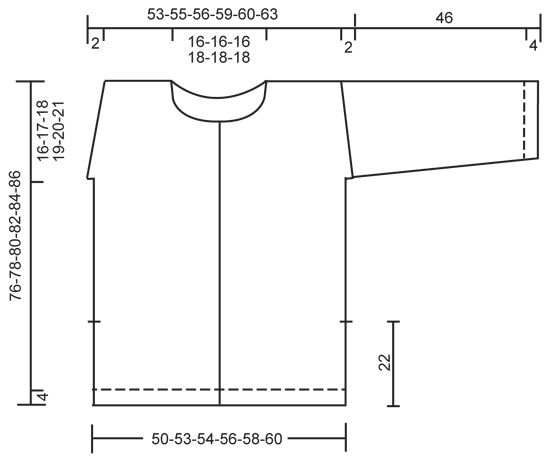
GARTER ST (back and forth):
K all rows. 1 ridge = 2 rows K.

PATTERN:
See diagrams A.1 to A.6. The diagrams show all rows in pattern seen from RS.

INCREASE TIP:
Inc 1 st by making 1 YO. On next row work YOs twisted, i.e. work in the back loop of st instead of front to avoid holes. NOTE: Work the inc sts gradually in diagram A.4.

DECREASE TIP:
Dec 1 sts as follows: All dec are done from RS!
Dec as follows after A.3: K 2 tog.
Dec as follows before A.3: Work until 2 sts before A.3, slip 1 st as if to K, K 1, psso.

BUTTONHOLES:
Dec for buttonholes on right band. 1 buttonhole = K tog third and fourth st from edge and make 1 YO.
Dec for buttonholes when piece measures:
SIZE S: 25, 33, 41, 49, 57 and 65 cm.
SIZE M: 25, 33, 42, 50, 59 and 67 cm.
SIZE L: 27, 35, 44, 52, 61 and 69 cm.
SIZE XL: 28, 37, 45, 54, 62 and 71 cm.
SIZE XXL: 28, 37, 46, 55, 64 and 73 cm.
SIZE XXXL: 30, 39, 48, 57, 66 and 75 cm.
----------------------------------------------------------

JACKET:
Worked back and forth on circular needle and sewn tog when finished.

BACK PIECE:
Cast on 95-98-101-107-113-116 sts on circular needle size 5 mm with Air. Work rib as follows: A.1 (= 8 sts), K 1, * P 2, K 1 *, repeat from *-* until 8 sts remain on row, A.2 (= 8 sts). Continue like this back and forth until piece measures 4 cm. On next row from RS switch to circular needle size 5.5 mm and work as follows: A.1, stocking st over the next 79-82-85-91-97-100 sts, AT THE SAME TIME dec 15-14-15-17-21-20 sts evenly, A.2 = 80-84-86-90-92-96 sts on needle in total. Continue in stocking st, work A.1 and A.2 in each side as before until piece measures 22 cm. REMEMBER THE KNITTING TENSION At the end of the next 2 rows cast on 2 new sts (marks vent) = 84-88-90-94-96-100 sts. Now work as follows: 1 edge st in GARTER ST - see explanation above, A.3 (= 9 sts) stocking st until A.2, work A.3 over A.2 and next to last st and finish with 1 edge st in garter st. When piece measures 26-24-24-23-23-23 cm, beg displacement of A.3 towards mid back. Work 1 edge st in garter st, inc 1 st - READ INCREASE TIP, A.3, dec 1 st - READ DECREASE TIP, stocking st until 2 sts remain before A.3, dec 1 st, A.3, inc 1 st, 1 edge st in garter st. Repeat displacement of A.3 every 4th row 17-19-20-21-22-24 more times. NOTE: Inc is always inside 1 edge st in garter st in each side. AT THE SAME TIME when piece measures 60-61-62-63-64-65 cm, cast on 1 new st at the end of the next 2 rows for armholes = 86-90-92-96-98-102 sts. Now continue pattern inside 1 edge st in garter st and 1 st in stocking st in each side. Work the 82-86-88-92-94-98 middle sts in pattern as before. When piece measures 74-76-78-80-82-84 cm, cast off the middle 24-24-24-26-26-26 sts for neck and finish each shoulder separately. On next row from the neck, cast off 1 st = 30-32-33-34-35-37 sts remain on each shoulder. When piece measures 76-78-80-82-84-86 cm, work 1 ridge over all sts. Cast off. Work the other shoulder the same way.

RIGHT FRONT PIECE:
Cast on 55-55-58-61-64-64 sts on circular needle size 5 mm with Air. Work rib as follows: A.5 (= band), K 1, * P 2, K 1 *, repeat from *-* until 8 sts remain, A.2. Continue like this back and forth until piece measures 4 cm. On next row from RS switch to circular needle size 5.5 mm and work as follows: A.5 (= 7 sts), stocking st until 8 sts remain, AT THE SAME TIME dec 8-6-8-9-11-9 sts evenly over these sts, A.2 = 47-49-50-52-53-55 sts. Continue in stocking st, work A.5 over band and A.2 in the side as before until piece measures 22 cm. Now cast on 2 new sts in the side (= marks vent) = 49-51-52-54-55-57 sts. REMEMBER BUTTONHOLES! Now work A.3 over A.2 and next to last st on needle and work 1 edge st in garter st in the side. When piece measures 26-24-24-23-23-23 cm, beg displacement of A.3 towards mid front. Dec 1 st before A.3 and inc 1 st before last st on needle. Repeat displacement of A.3 every 4th row 17-19-20-21-22-24 more times. NOTE: Inc is always inside 1 edge st in garter st in the side. AT THE SAME TIME when piece measures 60-61-62-63-64-65 cm, cast on 1 new st at the end of next row from RS for armhole = 50-52-53-55-56-58 sts. Continue pattern as before with 1 edge st in garter st and 1 st in stocking st in the side. When piece measures 64-66-68-69-71-73 cm, slip the first 14-14-14-15-15-15 sts on a stitch holder for neck. Then cast off sts on every row from neck as follows: 3 sts 1 time, 2 sts 1 time and 1 st 1 time = 30-32-33-34-35-37 sts remain for shoulder. Work edge st towards neck in garter st. When piece measures 76-78-80-82-84-86 cm, work 1 ridge over all sts. Cast off.

LEFT FRONT PIECE:
Cast on and work as right front piece but reversed. I.e. work as follows on first row: A.1, K 1, * P 2, K 1 *, repeat from *-* until 7 sts remain, A.6 (= band). When piece measures 22 cm, cast on 2 new sts in the side (marks vent). Now work A.3 over the 2nd st on row and A.1. When piece measures 26-24-24-23-23-23 cm, beg displacement of A.3 towards mid front. Inc 1 st after 1 edge st in garter st in the side and dec 1 st after A.3. Continue displacement the same way as on right front piece AT THE SAME TIME cast on 1 new st for armhole and dec for neck. - adjust according to right front piece. When piece measures 64-66-68-69-74-73 cm, slip the first 14-14-14-15-15-15 sts seen from WS on a stitch holder for neck. Then cast off sts on every row from neck as follows: 3 sts 1 time, 2 sts 1 time and 1 st 1 time = 30-32-33-34-35-37 sts. Work edge st towards neck in garter st. When piece measures 76-78-80-82-84-86 cm, work 1 ridge over all sts. Cast off.

SLEEVE:
Work back and forth on circular needle. Cast on 39-41-43-43-43-45 sts on circular needle size 5 mm with Air. Work rib as follows: 1 edge st in garter st, K 1, * P 1, K 1 *, repeat from *-* until 1 st remains, 1 edge st in garter st. When rib measures 4 cm, switch to circular needle size 5.5 mm and continue pattern as follows: 1 edge st in garter st, work last st in A.4, repeat A.4 until 1 st remains, 1 edge st in garter st. When piece measures 10 cm, inc 1 st inside 1 edge st in garter st in each side. Work the inc sts in pattern A.4: Repeat inc every approx. 5½-4½-4½-3½-3-3 cm 6-7-7-9-11-11 more times = 53-57-59-63-67-69 sts. When sleeve measures 46 cm in all sizes, work a sleeve cap with short rows as follows from RS: Work until 8-9-9-10-11-12 sts remain, turn and work until 8-9-9-10-11-12 sts remain, turn and work until 17-19-19-21-22-23 sts remain, turn and work until 17-19-19-21-22-23 sts remain. Turn and work all sts on needle, turn and work over all sts. Cast off with K from RS. Knit another sleeve.

ASSEMBLY:
Sew the shoulder seams tog. Sew sleeves to body inside 1 edge st in garter st. Sew underarm seams and side seams in one inside 1 edge st in garter st but leave 22 cm for vent at the bottom of body. Sew the buttons on to left band.

NECK EDGE:
Beg from RS on right front piece and pick up approx. 120-130 sts (incl sts on stitch holders the front). K 1 round from WS while adjusting no of sts to 90-90-90-96-96-96 sts - but not over band sts, work these as before. Now work rib (K 1/P 2) inside band sts in each side, finish with K 1 before last band. When rib measures 3 cm, cast off with K over K and P over P.

This pattern has been corrected.

Updated online: 21.01.2016
RIGHT FRONT PIECE:... AT THE SAME TIME dec 8-6-8-9-11-9 sts evenly over these sts, A.2 = 47-49-50-52-53-55 sts. Continue in stocking st, work A.5 over band and A.2 in the side as before until piece measures 22 cm. Now cast on 2 new sts in the side (= marks vent) = 49-51-52-54-55-57 sts.

Diagram

symbols = K from RS, P from WS
symbols = P from RS, K from WS
diagram
diagram

Each of our patterns has specific tutorial videos to help you.

Do you have a question? See a list of frequently asked questions (FAQ)

Knitting tension is what determines the final measurements of your work, and is usually measured per 10 x 10 cm. It is provided like so: number of stitches in width x number of rows in height - eg: 19 stitches x 26 rows = 10 x 10 cm.

The knitting tension is very individual; some people knit/crochet loosely while others work tightly. You adjust the knitting tension with the needle size, which is why the suggested needle size is only meant as a guide! You need to adjust this (up or down) to ensure that YOUR knitting tension matches the knitting tension provided in the pattern. If you work with a different knitting tension than provided you will have a different yarn consumption, and your work will have different measurements than what the pattern suggests.

The knitting tension also determines which yarns can replace each other. As long as you achieve the same knitting tension you can replace one yarn with another.

See DROPS lesson: How to measure your tension/gauge

See DROPS video: How to make a gauge tension swatch

The required amount of yarn is provided in grams, eg: 450 g. To calculate how many balls you’ll need you first need to know how many grams are in 1 ball (25g, 50g or 100g). This information is available if you click on the individual yarn quality on our pages. Divide the amount required with the amount of each ball. For example, if each ball is 50g (the most common amount), the calculation will be as follows: 450 / 50 = 9 balls.

The important thing when changing from one yarn to another is that the knitting/crochet tension remains the same. This is so that the measurements of the finished piece will be the same as on the sketch provided. It is easier to achieve the same knitting tension using yarns from the same yarn group. It is also possible to work with multiple strands of a thinner yarn to achieve the knitting tension of a thicker one. Please try our yarn converter. We recommend you to always work a test swatch.

Please NOTE: when changing yarn the garment might have a different look and feel to the garment in the photo, due to individual properties and qualities of each yarn.

See DROPS lesson: Can I use a different yarn than the one mentioned in the pattern?

All our yarns are categorised into yarn groups (from A to F) according to thickness and knitting tension – group A contains the thinnest yarns and group F the thickest. This makes it easier for you to find alternative yarns to our patterns, should you wish to switch yarn. All yarns within the same group have a similar knitting tension and can easily replace each other. However, different yarn qualities have different structures and properties which will give the finished work a unique look and feel.

Click here for an overview of the yarns in each yarn group

At the top of all our patterns you’ll find a link to our yarn calculator, which is a helpful tool should you wish to use a different yarn than suggested. By filling in the yarn quality you wish to replace, the amount (in your size) and number of strands, the calculator will present good alternative yarns with the same knitting tension. Additionally it will tell you how much you’ll require in the new qualities and whether you’ll need to work with multiple strands. Most skeins are 50g (some are 25g or 100g).

If the pattern is worked with multiple colours, every colour will have to be calculated separately. Similarly, if the pattern is worked with several strands of different yarns (for example 1 strand Alpaca and 1 strand Kid-Silk) you will have to find alternatives for each, individually.

Click here to see our yarn calculator

Since different yarns have different qualities and textures we have chosen to keep the original yarn in our patterns. However, you can easily find options among our available qualities by using our yarn calculator, or simply pick a yarn from the same yarn group.

It is possible that some retailers still have discontinued yarns in stock, or that someone has a few skeins at home that they would like to find patterns for.

The yarn calculator will provide both alternative yarn as well as required amount in the new quality.

If you think it's hard to decide what size to make, it can be a good idea to measure a garment you own already and like the size of. Then you can pick the size by comparing those measures with the ones available in the pattern's size chart.

You'll find the size chart at the bottom of the pattern.

See DROPS lesson: How to read size chart

The needle size provided in the pattern serves only as a guide, the important thing is to follow the knitting tension. And since knitting tension is very individual, you will have to adjust the needle size to ensure that YOUR tension is the same as in the pattern – maybe you’ll have to adjust 1, or even 2 needle sizes, up or down to achieve the correct tension. For this, we recommend that you work test swatches.

Should you work with a different knitting tension than the one provided, the measurements of the finished garment might deviate from the measurement sketch.

See DROPS lesson: How to measure your tension/gauge

See DROPS video: How to make a tension/gauge swatch

Working a garment top-down provides more flexibility and room for personal adjustment. For example it is easier to try the garment on while working, as well as making adjustments to length of yoke and shoulder caps.

The instructions are carefully explaining every step, in the correct order. Diagrams are adjusted to the knitting direction and are worked as usual.

The diagram depicts all rows/rounds, and every stitch seen from the right side. It is read from bottom to top, from right to left. 1 square = 1 stitch.

When working back and forth, every other row is worked from the right side and every other row is worked from the wrong side. When working from the wrong side, the diagram will have to be worked reversed: from left to right, knit stitches are purled, purl stitches are knit etc.

When working in the round every round is worked from the right side and the diagram are worked from right to left on all rounds.

See DROPS lesson: How to read knitting diagrams

The diagram depicts all rows/rounds, and every stitch seen from the right side. It is worked from bottom to top, from right to left.

When working back and forth every other row is worked from the right side: from right to left and every other row is worked from the wrong side: from left to right.

When working in the round, every row in the diagram are worked from the right side, from right to left.

When working a circular diagram you start in the middle and work your way outwards, counter clockwise, row by row.

The rows usually start with a given number of chain stitches (equivalent to the height of the following stitch), this will either be depicted in the diagram or explained in the pattern.

See DROPS lesson: How to read crochet diagrams

Instructions for working several diagrams after each other on the same row/round, will often be written like so: “work A.1, A.2, A.3 a total of 0-0-2-3-4 times". This means you work A.1 once, then A.2 is worked once, and A.3 is repeated (in width) the number of times provided for your size – in this case like so: S = 0 times, M = 0 times, L=2 times, XL= 3 times and XXL = 4 times.

The diagrams are worked as usual: begin with the first row in A.1, then work the first row in A.2 etc.

See DROPS lesson: How to read knitting diagrams

See DROPS lesson: How to read crochet diagrams

The total width of the garment (from wrist-to-wrist) will be larger in the larger sizes, despite the actual sleeves being shorter. The larger sizes have longer sleeve caps and wider shoulders, so there will be a good fit in all sizes.

The measurement sketch/schematic drawing provides information regarding the full length of the garment. If it’s a jumper or a jacket the length is measured from the highest point on the shoulder closest to the neckline, and straight down to the bottom of the garment. It is NOT measured from the tip of shoulder. Similarly, the length of yoke is measured from the highest point on the shoulder and down to where yoke is split into body and sleeves.

On a jacket measures are never taken along bands, unless specifically stated. Always measure inside band stitches when measuring the length.

See DROPS lesson: How to read a schematic drawing

Diagrams are often repeated on the round or in height. 1 repeat is the diagram the way it appears in the pattern. If it says to work 5 repeats of A.1 in the round, then you work A.1 a total of 5 times after/next to each other in the round. If it says to work 2 repeats of A.1 vertically/in height you work the entire diagram once, then begin again at the start and work the entire diagram one more time.

Chain stitches are slightly narrower than other stitches and to avoid working the cast-on edge too tight, we simply chain more stitches to begin with. The stitch count will be adjusted on the following row to fit the pattern and measurement sketch.

The rib edge is more elastic and will contract slightly compared to, for example, stocking stitch. By increasing before the rib edge, you avoid a visible difference in width between the rib edge and the rest of the body.

It’s very easy to cast off too tightly, and by making yarn overs while casting off (and simultaneously casting these off) you avoid a too tight cast off edge.

See DROPS video: How to bind off with yarn overs (yo)

To achieve an even increase (or decrease) you can increase on, for example: every 3rd and 4th row alternately, like so: work 2 rows and increase on the 3rd row, work 3 rows and increase on the 4th. Repeat this until the increase is complete.

See DROPS lesson: Increase or decrease 1 st on every 3rd and 4th row alternately

Should you prefer to work in the round instead of back and forth, you may of course adjust the pattern. You’ll need to add steeks mid-front (usually 5 stitches), and follow the instructions. When you would normally turn and work from the wrong side, simply work across the steek and continue in the round. At the end you’ll cut the piece open, pick up stitches to work bands, and cover the cut edges.

See DROPS video: How to knit steeks and cut open

Should you prefer to work back and forth instead of in the round, you may of course adjust the pattern so you work the pieces separately and then assemble them at the end. Divide the stitches for the body in 2, add 1 edge stitch in each side (for sewing) and work the front and back pieces separately.

See DROPS lesson: Can I adapt a pattern for circular needles into straight needles?

Pattern repeats can vary slightly in the different sizes, in order to get the correct proportions. If you’re not working the exact same size as the garment in the photo, yours might deviate slightly. This has been carefully developed and adjusted so that the complete impression of the garment is the same in all sizes.

Make sure to follow instructions and diagrams for your size!

If you have found a pattern you like which is available in women’s size it’s not very difficult to convert it to men’s size. The biggest difference will be the length of sleeves and body. Start working on the women size that you think would fit across the chest. The additional length will be worked right before you cast off for the armhole/sleeve cap. If the pattern is worked top-down you can add the length right after the armhole or before the first decrease on sleeve.

Regarding additional yarn amount, this will depend on how much length you add, but it is better with a skein too many than too few.

All yarns will have excess fibres (from production) that might come off as lint or shedding. Brushed yarns (ie hairier yarns) have more of these loose, excess fibres, causing more shedding.

Shedding also depends on what is worn under or over the garment, and whether this pulls at the yarn fibres. It’s therefore not possible to guarantee that there will be no shedding

Below are some tips on how to get the best result when working with hairier yarns:

1. When the garment is finished (before you wash it) shake it vigorously so the looser hairs come off. NOTE: do NOT use a lint roller, brush or any method that pulls at the yarn.

2. Place the garment in a plastic bag and put it in your freezer - the temperature will cause the fibres to become less attached to each other, and excess fibres will come off easier.

3. Leave in the freezer for a few hours before taking it out and shaking it again.

4. Wash the garment according to the instructions on the yarn label.

Pilling is a natural process that happens to even the most exclusive of fibers. It's a natural sign of wear and tear that is hard to avoid, and that is most visible in high friction areas of your garment like a sweater's arms and cuffs.

You can make your garment look as new by removing the pilling, using a fabric comb or a pill/lint remover.

Still can't find the answer you need? Then scroll down and leave your question so one of our experts can try to help you. This will be done normally within 5 to 10 working days.
In the meantime, you can read the questions and answers that others have left to this pattern or join the DROPS Workshop on Facebook to get help from fellow knitters/crocheters!

You might also like...

Post a comment to pattern DROPS 166-11

We would love to hear what you have to say about this pattern!

If you want to leave a question, please make sure you select the correct category in the form below, to speed up the answering process. Required fields are marked *.

Comments / Questions (73)

country flag Elin Wittendorff Ibsen wrote:

Er det meningen,at man skal strikke nye masker ret og derefter A3? Altså kantmaske en eller flere masker glat derefter A3. Ellers synes jeg bare, at mønsteret bliver i siden. På forhånd tak for svar

02.11.2015 - 15:39

DROPS Design answered:

Hej Elin. De nye masker strikkes löbende ind i A4? UDTAGNINGSTIPS: Der tages 1 m ud ved at slå om. På næste p strikkes omslagen drejet (dvs strik i bagerste led af m i stedet for i forreste) så der ikke bliver hul. OBS: De nye m strikkes løbende ind i diag A.4! Det gaelder for siden :-)

05.11.2015 - 11:29

country flag Jenny Grillaert wrote:

Ik wil graag dit vest breien, maar begrijp de boordsteek niet goed. Er wordt alleen gewag gemaakt vaan de heengaande toer nml. 1r *2av,1r* Er staat ga zo heen en weer, maar moet boven r dan av komen? Dan kom je toch niet aan de boordsteek zoals op de foto. Ook heb ik een probleem met het telpatroon. Gaat die van recht naar links of van links naar rechts.; m.a.w. hoe begin je : met 2 st.av of 1st.av.?

16.10.2015 - 17:43

DROPS Design answered:

Hoi Jenny. Brei je 1 r, 2 av, 1 r op de goede kant, dan brei je 1 av, 2 r, 1 av op de verkeerde kant. Hier kan je lezen hoe je onze telpatronen moet lezen

23.10.2015 - 13:38

country flag Irma wrote:

Hallo, ik wil dit vest gaan breien maar ik zie nergens aanwijzingen over de hoeveelheid garen dat je hiervoor nodig hebt. Stel ik kies Drops Air, maat XL, hoeveel bollen heb ik dan nodig? Mvg. Irma

15.10.2015 - 10:54

DROPS Design answered:

Hoi Irma. Kijk aan de kop van het patroon. Hier staat: Maat: S - M - L - XL - XXL - XXXL, DROPS AIR van Garnstudio 400-450-450-500-550-600 gr. kleur nr. 10, mist

15.10.2015 - 14:17

country flag Beate Fagervold wrote:

Er snart ferdig med bakstykket på Sigrid jakken. Så ser jeg at på bildet ser det ut som at A3 ikke forflytter seg når jeg øker/feller , men heller "utvider" seg til også å innbefatte de maskene jeg legger opp hver 4. pinne. Hvis dette stemmer, er det utrolig knotete forklart i oppskriften. Ser at flere har spurt om det samme, men jeg forstår ikke svarene

05.10.2015 - 18:02

DROPS Design answered:

Hej Beate, Jo A.3 forflytter sig når du øker/feller ifølge opskriften. God fornøjelse!

06.10.2015 - 14:35

country flag Claire wrote:

Modele 166-11 taille S : N'y a t'il pas une erreur concernant la hauteur de l'emmanchure : 16 cm soit 32 cm en largeur de manche totale? Quelqu'un peut m'aider ? Merci et bon tricot Claire

04.10.2015 - 19:03

DROPS Design answered:

Bonjour Claire, c'est bien exact, on a 16 cm de hauteur d'emmanchures en taille S - cliquez ici pour lire le schéma des mesures et trouver la taille à tricoter. Bon tricot!

05.10.2015 - 10:11

country flag Lillian Frønæs wrote:

Er det mulig å få et bilde av denne jakken bak?

12.09.2015 - 15:36

DROPS Design answered:

Hej Lillian, nej desværre men da DROPS 166-18 er en genser med samme mønster kan du se hvordan den ser ud. God fornøjele!

17.09.2015 - 10:50

country flag Anne-Britt wrote:

Hei! Har begynt å strikke denne fine jakken. For det første savner jeg et bilde av bakstykket. Mulig å få det? Er det slik at mønsteret A3 skal gradvis gå inn mot midten? Eller skal det strikkes A3 i hver side og rettstrikk i mellom? Takknemlig for svar. Mvh Anne-Britt

03.09.2015 - 17:24

DROPS Design answered:

Hej Anne-Britt, ja det stemmer, forflytningen sker gradvis på hver 4. pind. Således står det i opskriften: Når arb måler 26-24-24-23-23-23 cm starter forflytningen av A.3 mot midt bak. Strikk 1 kant-m rille, øk 1 m - LES ØKETIPS, A.3, fell 1 m - LES FELLETIPS, glstrikk til det gjenstår 2 m før A.3, fell 1 m, A.3, øk 1 m, 1 kant-m rille. Gjenta forflytningen av A.3 på hver 4.p 17-19-20-21-22-24 ganger til. NB: Økningen skjer alltid innenfor 1 kant-m rille i hver side! God fornöjelse!

03.09.2015 - 19:05

country flag Cora Meijer-Lammerse wrote:

Heeft u ook een foto van de achterkant? Dat verduidelijkt waarschijnlijk ook een heleboel. Alvast bedankt, Cora Meijer

28.08.2015 - 10:47

DROPS Design answered:

Hoi Cora. Nee, helaas. Dit is de enige foto die we hebben

28.08.2015 - 11:30

country flag Cora Meijer-Lammerse wrote:

Hallo, ik ben dit vest aan het breien maar er staat een stukje andere taal in en daardoor snap ik niet wat er staat. Bij beschrijving achterpand staat er op een gegeven moment: Brei de garter st and 1 st in stocking in each side. Work the .... middelste st in patroon als hiervoor. Wat wordt hier bedoeld? Nog een andere vraag: Wat wordt bedoeld met het verschuiven van A3 middenachter? Alvast bedankt, groeten: Cora Meijer

28.08.2015 - 10:45

DROPS Design answered:

Hoi Cora. Ja, helaas is een stukje Engels blijven hangen, maar het patroon is nu aangepast. Verschuiven van A.3 betekent dat je het blijft minderen en meerderen aan de zijkanten van het patroon zoals beschreven. Als je dat blijft doen, dan zal je zien dat het patroon verschuift.

28.08.2015 - 11:31

Nergis Fagerstedt wrote:

Stickar Sigrid jacket med air garnet. Har problem att förstå mönstret för det är oklart hur mönstret går t.ex på bakstycket är det rät, avigt helavägen till A3 och mellan mönstren räta? Hur blir det med ärmarna? Nu har jag stickat nästan hela bakstycket 76 cm, jag har stickat räta på rätsidan utom mönstret a3 hela vägen alltså räta, på aviga sidan är det alltså aviga på min stickning. Hoppas ni kan belysa mig hur det hänger i hop, tråkigt att sprätta. Med vänlig hälsning, Nergis

30.07.2015 - 11:27

DROPS Design answered:

Hej Nergis, Jag är inte helt säker på hur frågan är... men ja du stickar slätst mellan mönster A.3 på ryggen. Du stickar hela ärmen enligt A.4. Lycka till!

10.08.2015 - 11:32