
Popular categories
Looking for a yarn?


|
||||||||||||||||||||||||||||||||||||||||||||||||||||||||||
Sea Glass |
||||||||||||||||||||||||||||||||||||||||||||||||||||||||||
 |
 |
|||||||||||||||||||||||||||||||||||||||||||||||||||||||||
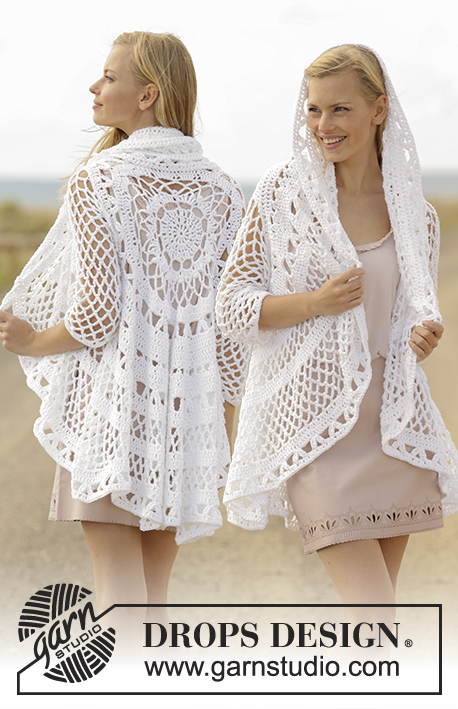
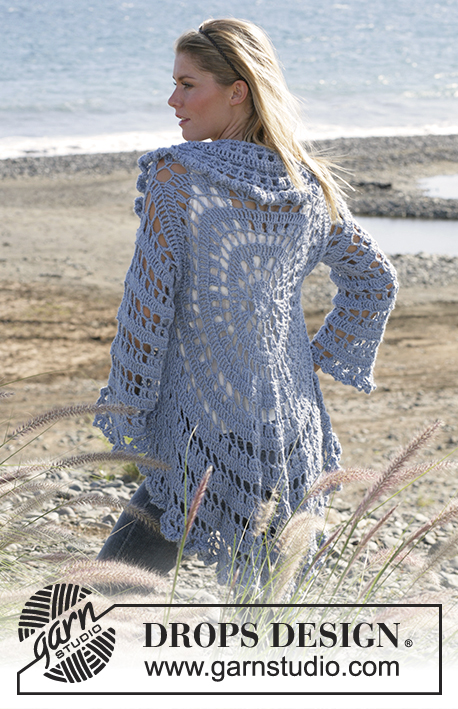
Crochet jacket worked in a circle with lace pattern in DROPS Merino Extra Fine or DROPS Sky. Size: S - XXXL.
DROPS 164-16 |
||||||||||||||||||||||||||||||||||||||||||||||||||||||||||
|
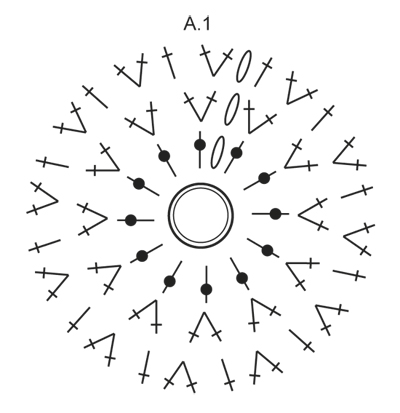
CROCHET INFO: Beg every round with tr with 3 ch and finish with 1 sl st in 3rd ch at beg of round, ch does not replace first tr. Beg every tr row with 3 ch. DECREASE TIP: Dec 1 tr by working the next 2 tr tog as follows: Work 1 tr but wait with last pull through (= 2 sts on hook), then work next tr but on last pull through, pull yarn through all 3 sts on hook. PATTERN: See diagrams A.1-A.10. Diagram A.8 shows how round beg and ends. NOTE: In diagram A.2-A.4, A.6 and A.10 first round in diagram is last round on previous diagram, it is not worked but shows how to continue. ---------------------------------------------------------- CIRCLE: Work 5 ch on hook size 5 mm with Merino Extra Fine or Sky and form 1 ring with 1 sl st in first ch. Then work A.1 as follows: ROUND 1: Work 3 ch - READ CROCHET INFO, 12 tr in ch-ring, finish with 1 sl st in 3rd ch. ROUND 2: Work 2 tr in back loop of every tr = 24 tr. ROUND 3: Work * 2 tr in back loop of first/next tr, 1 tr in back loop of next tr *, repeat from *-* the entire round = 36 tr. REMEMBER THE CROCHET TENSION! Then work A.2 6 times in total on round. NOTE: A.8 in same diagram shows how every round beg and ends. Note if tr is worked in back loop, in or around st (applies for all diagrams). When A.2 has been worked 1 time vertically, there are 96 tr and 24 ch on round (= 120 sts in total). Piece measures approx. 28 cm in diameter. Then work A.3 12 times in total on round. When 2-3-4 rounds of A.3 have been worked (circle measures approx. 36-38-40 cm in diameter), there are 156-168-192 sts on round (= 156-168-96 tr and 0-0-96 ch). Now work armholes in the different sizes: SIZE S/M: Round now deviates from diagram because of armhole. Work as follows: Work 3rd round in A.3 as follows (all tr on this round are worked in back loop of tr): Work 3 ch, * 2 tr in first tr, 1 tr in each of the next 8 tr *, repeat from *-* 4 more times, 26 ch, skip 26 tr (= armhole), repeat from *-* 6 times in total, 1 tr in each of the next 5 tr AT THE SAME TIME inc 1 tr, 26 ch, skip 26 tr (= armhole), finish with 1 sl st in 3rd ch at beg of round = 116 tr (= 26 ch for each sleeve, 168 sts in total). Work 4th round in A.3 as follows (all tr worked in tr, are worked in back loop on this round): Work 3 ch, ** 1 tr in first/next tr/ch, 1 ch, * 1 tr in next tr/ch, 1 ch, skip 1 tr/ch *, repeat from *-* 4 more times, 1 tr in next tr/ch, 1 ch, 1 tr in next tr/ch, 1 ch, skip 1 tr/ch **, repeat from **-** 11 more times, work like this over ch-spaces (= sleeve) too, finish with 1 sl st in 3rd ch at beg of round = 96 tr and 96 ch (= 192 sts in total). Then work A.3 as before. When A.3 has been worked 1 time vertically, there are 192 tr on round. Then work A.4 24 times in total on round. SIZE L/XL: Round now deviates from diagram because of armhole. Work as follows: Work 4th round in A.3 as follows (all tr worked in tr, are worked in back loop on this round): Work 3 ch, ** 1 tr in first/next tr, 1 ch, * 1 tr in next tr, 1 ch, skip 1 tr *, repeat from *-* 4 more times, 1 tr in next tr, 1 ch, 1 tr in next tr, 1 ch, skip 1 tr **, repeat from **-** 2 more times, work 1 tr in next tr, 1 ch, 1 tr in next tr, 1 ch, skip 1 tr, 1 tr in next tr, 1 ch, skip 1 tr, 1 tr in next tr, work 28 ch, skip 28 tr (= armhole), repeat from **-** 4 times in total, work 1 tr in next tr, 1 ch, 1 tr in next tr, 1 ch, skip 1 tr, 1 tr in next tr, * 1 ch, skip 1 tr, 1 tr in next tr *, repeat from *-* 1 more time, work 28 ch, skip 28 tr (= armhole), finish with 1 sl st in 3rd ch at beg of round = 65 tr and 119 ch (= 28 ch for each sleeve, 184 sts in total). Work 5th round in A.3 as follows (all tr worked in tr, are worked in back loop on this round): Work 1 tr in every tr and 1 tr in every ch. Over ch-space for each sleeve work as follows: Work * 1 tr in each of the first 6 ch, 2 tr in next ch *, repeat from *-* 3 more times, finish with 1 sl st in 3rd ch at beg of round = 192 tr. Continue working diagram A.3. When A.3 has been worked 1 time vertically, there are 192 tr on round. Then work A.4 24 times in total on round. SIZE XXL/XXXL: Round now deviates from diagram because of armhole. Work as follows: Work 5th round in A.3 as follows (all tr worked in tr, are worked in back loop on this round): Work 3 ch, * 1 tr in first/next tr, 1 tr around next ch *, repeat from *-* 24 more times, 1 tr in next tr, 30 ch, skip 15 tr and 15 ch (= 30 sts in total) for armhole, * work 1 tr around next ch, 1 tr in next tr *, repeat from *-* 39 more times, 1 tr around next ch, 30 ch, skip the last 15 tr and 15 ch (= armhole), finish with 1 sl st in 3rd ch at beg of round = 132 tr and 30 ch for each sleeve (= 192 sts in total). Then work A.4 24 times in total on round. Work first round as follows: Work 3 ch, * 3 ch, skip 3 tr/ch, 1 tr in next tr/ch, 3 ch, skip 3 tr/ch, 1 tr in next tr/ch *, repeat from *-* 23 more times, work like this over ch-spaces (= sleeves) too, finish with 1 sl st in 3rd ch at beg of round = 48 ch-spaces. ALL SIZES: When A.4 has been worked 1 time vertically, there are 240 tr on round. Piece measures approx. 54 cm in diameter. Then work A.5 24 times in total on round. When A.5 has been worked 1 time vertically, there are 336 tr on round. Piece measures approx. 76 cm in diameter. Then work A.6 42 times in total on round AT THE SAME TIME on last round of A.6 inc 2 tr evenly by working 2 tr in same tr. When A.6 has been worked 1 time vertically, there are 380 tr on round. Then work A.5 38 times in total on round as follows in the different sizes: SIZE S/M: Work 5 rounds of A.5 = 494 tr. Then work 1 tr in back loop of every tr AT THE SAME TIME inc 42 tr evenly (inc approx. 1 tr in every 12th tr) = 536 tr on round. Piece now measures approx. 110 cm in diameter. Then work A.6 67 times in total on round. Fasten off when the first 2 rounds of A.6 have been worked. Piece measures approx. 114 cm in diameter. SIZE L/XL: Work A.5. When A.5 has been worked 1 time vertically, there are 532 tr on round. Then work 1 tr in back loop of every tr AT THE SAME TIME inc 36 tr evenly (inc approx. 1 tr in every 15th tr) = 568 tr. Piece measures approx. 118 cm in diameter. Then work A.6 71 times in total on round. Fasten off when the first 2 rounds of A.6 have been worked. Piece measures approx. 122 cm in diameter. SIZE XXL/XXXL: Work A.5. When A.5 has been worked 1 time vertically, there are 532 tr on round. Then work 1 tr in back loop of every tr AT THE SAME TIME inc 36 tr evenly (inc approx. 1 tr in every 15th tr) = 568 tr. Piece measures approx. 118 cm in diameter. Then work A.6 71 times in total on round. When A.6 has been worked 1 time vertically, there are 639 tr on round. Piece measures approx. 125 cm in diameter. Work 1 round with 1 tr in back loop of every tr AT THE SAME TIME inc 9 tr evenly = 648 tr. Work A.6 81 times in total on round. Fasten off when the first 2 rounds of A.6 have been worked. Piece measures approx. 130 cm in diameter. SLEEVE: Worked back and forth, top down. First work a sleeve cap. Work A.7 - remember CROCHET INFO. When A.7 has been worked 1 time, there are 25 tr on round. Fasten off. Work 14-16-18 loose ch, then work 1 tr in every tr from A.7, finish with 17-19-21 ch (incl 3 ch to turn with). Insert 1 marker in piece, NOW MEASURE PIECE FROM HERE. Work 1 tr in 4th ch from hook, 1 tr in each of the next 13-15-17 ch, 1 tr in every tr, 1 tr in every ch = 53-57-61 tr. Then work 1 tr in every tr. When piece measures 4 cm, dec 1 tr in each side of piece by working the first 2 tr tog and the last 2 tr tog (= 2 tr dec) – SEE DECREASE TIP! Repeat dec every 3-3-3½ cm 10-10-9 more times = 31-35-41 tr. When piece measures 38-39-40 cm, work piece in the round as follows: Work A.9 6-7-8 times in total on round AT THE SAME TIME on first round dec 1-0-1 tr = 30-35-40 tr. On last round in A.9 dec 2-3-4 tr evenly = 28-32-36 tr. Then work A.10 7-8-9 times in total on round. Fasten off when A.10 has been worked 1 time vertically. Piece measures approx. 63-64-65 cm in total. Work another sleeve the same way. ASSEMBLY: Sew sleeves into circle in outer loop of edge sts. Sew underarm seam. |
||||||||||||||||||||||||||||||||||||||||||||||||||||||||||
Diagram explanations |
||||||||||||||||||||||||||||||||||||||||||||||||||||||||||
|
||||||||||||||||||||||||||||||||||||||||||||||||||||||||||
|
||||||||||||||||||||||||||||||||||||||||||||||||||||||||||

|
||||||||||||||||||||||||||||||||||||||||||||||||||||||||||

|
||||||||||||||||||||||||||||||||||||||||||||||||||||||||||

|
||||||||||||||||||||||||||||||||||||||||||||||||||||||||||

|
||||||||||||||||||||||||||||||||||||||||||||||||||||||||||
|
Have you made this or any other of our designs? Tag your pictures in social media with #dropsdesign so we can see them! Do you need help with this pattern?You'll find tutorial videos, a Comments/Questions area and more by visiting the pattern on garnstudio.com. © 1982-2024 DROPS Design A/S. We reserve all rights. This document, including all its sub-sections, has copyrights. Read more about what you can do with our patterns at the bottom of each pattern on our site. |
||||||||||||||||||||||||||||||||||||||||||||||||||||||||||


With over 40 years in knitting and crochet design, DROPS Design offers one of the most extensive collections of free patterns on the internet - translated to 17 languages. As of today we count 304 catalogues and 11422 patterns - 11422 of which are translated into English (UK/cm).
We work hard to bring you the best knitting and crochet have to offer, inspiration and advice as well as great quality yarns at incredible prices! Would you like to use our patterns for other than personal use? You can read what you are allowed to do in the Copyright text at the bottom of all our patterns. Happy crafting!
Comments / Questions (190)
Size s/m:....., 1 dc in each of the next 5 dc AT THE SAME TIME inc 1 dc, ....I can't understand this part... please explain
16.06.2020 - 20:40DROPS Design answered:
Dear Mrs Arundhati, you work 1 dc in each of the next 5 dc but you have to increase 1 stitch over these sts, this means you will for example work: (1 dc in each of the first 2 dc, 2 dc in next dc, 1 dc in each of the next 2 dc) = you have now increased 1 stitch = 6 dc over the 5 dc from previous round. Happy crocheting!
17.06.2020 - 08:06I'm not finding the amount of yarn I will need to make the Sea Glass Jacket in a L/XL. I will be using the yarn suggested. Can you please provide me the number of skeins I need to order from you folks so that I can get it ordered right away. Thank you so much.
01.06.2020 - 17:16DROPS Design answered:
Dear Mrs Hayes, you will find amount of yarn required just below name of yarn: 850 g DROPS Merino Extra Fine / 50 a ball = 17 balls in size L/XL. Happy crocheting!
02.06.2020 - 10:24Hi, I'm working on A6 and the stitch count doesn't match. There are 84 chain spaces x 4dc + 84dc in the sc from prev round. That equals 336+84=420. How am I supposed to get 380sts? Thanks
02.05.2020 - 21:34DROPS Design answered:
Dear Lucy, you crochet A.6 a total of 42 times in the round = A.6 = 9 sts on last round x 42= 378 sts and you increase 2 sts evenly on last round = 380 sts. Happy crocheting!
04.05.2020 - 12:26I have a 4 mm needle and corresponding yarn. How can I make adjustments to current design, I am size L/XL. Can I do triple crochet instead of double crochet (where ever mentioned) and follow the pattern as per diagram? Please help
25.04.2020 - 23:49DROPS Design answered:
Dear Gayathiri Mani, Please understand, that we cannot modify our patterns for each individual request. However, I would not suggest using longer stitches, as the given increases in rows would not be enough and your circle might not lie flat. However, as a genera advice, first of all, please check your crochet tension, you might find that you crochet looser than the average, which would result in a bigger piece. Second, I would try to crochet the largest size, the difference in measurements / gauge might be enough. Happy Crocheting!
26.04.2020 - 20:42Hi. I am new and i got directed to this page when i searched on how to make a cardigan, i love this design. I am big bodied and I am trying to make this for myself the XXXXL size. My question is, when the pattern talks about " Then work A.2 6 times in total on round" does this mean that i repeat the pattern of diagram A.2 six times? When do i get to go to diagram A.3? I will appreciate any help I can get.
01.04.2020 - 00:13DROPS Design answered:
Dear Yes, " A.2 6 times in total on round" means exactly what you think, repeat the pattern six times- including the first repeat. You start pattern A.3, when you finished all the rows / rounds of pattern A.2. Happy Crafting! A.6 and A.10 first round in diagram is last round on previous diagram, it is not worked but shows how to continue
01.04.2020 - 00:20I’m on size S/M. The sentence that starts with Work ch 3, * 2 dc in first dc, 1dc in each of the next 8 dc *, repeat from *-* 4 more times, 26 ch, skip 26 dc, repeat from *-* 6 times in total, ... is confusing. Repeat the 10 dc 4 more times? 26 ch, skip 26 dc repeated 6 times? But what is attached to the garment between the sets of 26? Help!
01.03.2020 - 03:53DROPS Design answered:
Dear Mrs Conrad, you repeat from *-* 4 more times (= 5 times) and later a total of 6 times ie you will repeat the repeat with stars: *2 dc in first dc, 1 dc in each of the next 8 dc* a total of 5-6 times = there will be 10 sts x 5-6 (over 9 stsx5-6 sts). Happy crocheting!
02.03.2020 - 11:43So I’m only adding 2 stitches in the entire round? Or 2 in each of the 42 sections so a total of 84 increases?
06.02.2020 - 02:44DROPS Design answered:
Dear Mrs Dempsey, you increase only 2 stitches in the round, you are repeating 42 times A.6 (= 9 sts on last round) = 378 sts + 2 sts increased = 380 sts. Happy crocheting!
06.02.2020 - 10:39I am about to start A-6. The otter. Says to work A-6 42 times and AT THE SAME TIME of last round increase 2dc evenly by working 2dc in same dc. Does this mean to do a dc in EVERY dc in the round? I don’t understand when to do the inc.
05.02.2020 - 03:29DROPS Design answered:
Dear Mrs Dempsey, you will find how to increase evenly here - simply crochet 1 more stitch than shown in diagram on 2 different places (there is no double crochet on previous round). Happy crocheting!
05.02.2020 - 08:29I made this sweater a few years ago, and this was my first time wearing it. Also my first time seeing the written pattern. I am trying to make it again, but for my 15 month old granddaughter. I Love this pattern!
10.12.2019 - 05:08I am not understanding how the sleeve is done. Once I fasten off A7, I'm not sure where the 18 chain goes? Nor how we get to over 50 double crochet. I am missing something. Do you have an photos of how the sleeves look as you work them?
31.10.2019 - 02:49DROPS Design answered:
Dear Mrs Alvarenga, after you cut the yarn after A.7, start the next row crocheting 18 chains, then work 1 double crochet over the 25 stitches of last row in A.7 and crochet 21 chains, turn, and crochet next row with 1 dc in 4th ch from hook, 1 dc in each of the next 17 chains (= 18 dc before the 25 sts), 1 dc in each of the next 25, 1 dc in each of the 18 ch = 18+25+18= 61 double crochets. Happy crocheting!
04.11.2019 - 13:57