
Popular categories
Looking for a yarn?


|
||||||||||||||||||||||||||||||||||||||||||||||||||||||||||
Sea Glass |
||||||||||||||||||||||||||||||||||||||||||||||||||||||||||
 |
 |
|||||||||||||||||||||||||||||||||||||||||||||||||||||||||
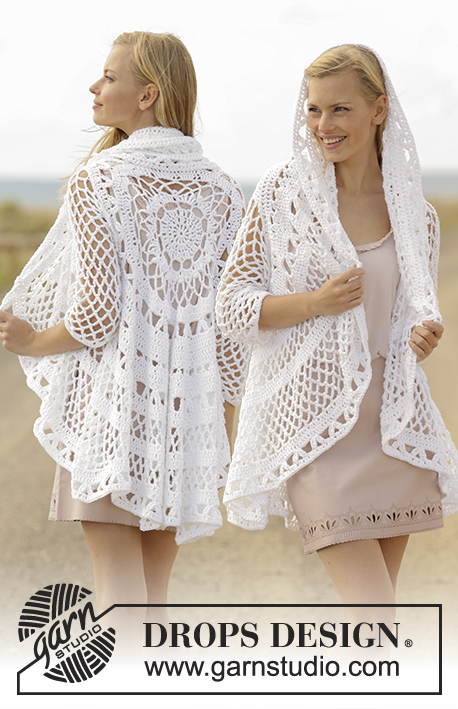
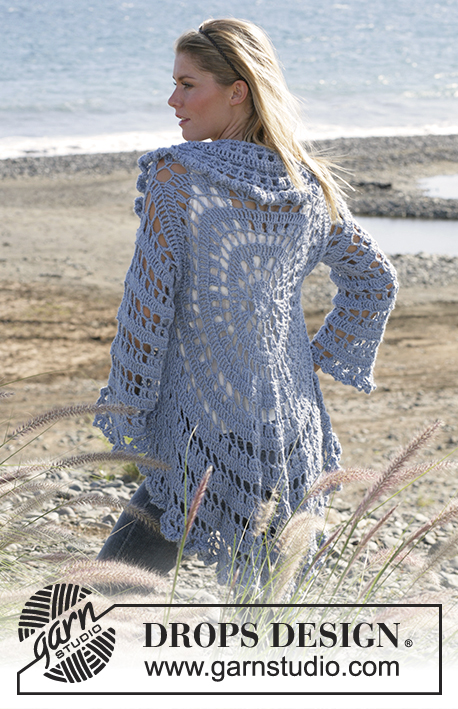
Crochet DROPS jacket worked in a circle with lace pattern in ”Merino Extra Fine”. Size: S - XXXL.
DROPS 164-16 |
||||||||||||||||||||||||||||||||||||||||||||||||||||||||||
|
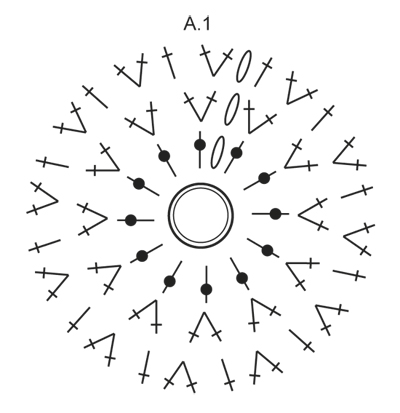
CROCHET INFO: Beg every round with dc with 3 ch and finish with 1 sl st in 3rd ch at beg of round, ch does not replace first dc. Beg every dc row with 3 ch. DECREASE TIP: Dec 1 dc by working the next 2 dc tog as follows: Work 1 dc but wait with last pull through (= 2 sts on hook), then work next dc but on last pull through, pull yarn through all 3 sts on hook. PATTERN: See diagrams A.1-A.10. Diagram A.8 shows how round beg and ends. NOTE: In diagram A.2-A.4, A.6 and A.10 first round in diagram is last round on previous diagram, it is not worked but shows how to continue. ---------------------------------------------------------- CIRCLE: Work 5 ch on hook size 5 mm / H/8 with Merino Extra Fine and form 1 ring with 1 sl st in first ch. Then work A.1 as follows: ROUND 1: Work 3 ch - READ CROCHET INFO, 12 dc in ch-ring, finish with 1 sl st in 3rd ch. ROUND 2: Work 2 dc in back loop of every dc = 24 dc. ROUND 3: Work * 2 dc in back loop of first/next dc, 1 dc in back loop of next dc *, repeat from *-* the entire round = 36 dc. REMEMBER THE CROCHET GAUGE! Then work A.2 6 times in total on round. NOTE: A.8 in same diagram shows how every round beg and ends. Note if dc is worked in back loop, in or around st (applies for all diagrams). When A.2 has been worked 1 time vertically, there are 96 dc and 24 ch on round (= 120 sts in total). Piece measures approx. 28 cm / 11'' in diameter. Then work A.3 12 times in total on round. When 2-3-4 rounds of A.3 have been worked (circle measures approx. 36-38-40 cm / 14 1/4"-15"-15 3/4" in diameter), there are 156-168-192 sts on round (= 156-168-96 dc and 0-0-96 ch). Now work armholes in the different sizes: SIZE S/M: Round now deviates from diagram because of armhole. Work as follows: Work 3rd round in A.3 as follows (all dc on this round are worked in back loop of dc): Work ch 3, * 2 dc in first dc, 1 dc in each of the next 8 dc *, repeat from *-* 4 more times, 26 ch, skip 26 dc (= armhole), repeat from *-* 6 times in total, 1 dc in each of the next 5 dc AT THE SAME TIME inc 1 dc, 26 ch, skip 26 dc (= armhole), finish with 1 sl st in 3rd ch at beg of round = 116 dc (= 26 ch for each sleeve, 168 sts in total). Work 4th round in A.3 as follows (all dc worked in dc, are worked in back loop on this round): Work ch 3, ** 1 dc in first/next dc/ch, ch 1, * 1 dc in next dc/ch, ch 1, skip 1 dc/ch *, repeat from *-* 4 more times, 1 dc in next dc/ch, ch 1, 1 dc in next dc/ch, ch 1, skip 1 dc/ch **, repeat from **-** 11 more times, work like this over ch-spaces (= sleeve) too, finish with 1 sl st in 3rd ch at beg of round = 96 dc and 96 ch (= 192 sts in total). Then work A.3 as before. When A.3 has been worked 1 time vertically, there are 192 dc on round. Then work A.4 24 times in total on round. SIZE L/XL: Round now deviates from diagram because of armhole. Work as follows: Work 4th round in A.3 as follows (all dc worked in dc, are worked in back loop on this round): Work ch 3, ** 1 dc in first/next dc, ch 1, * 1 dc in next dc, ch 1, skip 1 dc *, repeat from *-* 4 more times, 1 dc in next dc, ch 1, 1 dc in next dc, ch 1, skip 1 dc **, repeat from **-** 2 more times, work 1 dc in next dc, ch 1, 1 dc in next dc, ch 1, skip 1 dc, 1 dc in next dc, ch 1, skip 1 dc, 1 dc in next dc, work 28 ch, skip 28 dc (= armhole), repeat from **-** 4 times in total, work 1 dc in next dc, ch 1, 1 dc in next dc, ch 1, skip 1 dc, 1 dc in next dc, * ch 1, skip 1 dc, 1 dc in next dc *, repeat from *-* 1 more time, work 28 ch, skip 28 dc (= armhole), finish with 1 sl st in 3rd ch at beg of round = 65 dc and 119 ch (= 28 ch for each sleeve, 184 sts in total). Work 5th round in A.3 as follows (all dc worked in dc, are worked in back loop on this round): Work 1 dc in every dc and 1 dc in every ch. Over ch-space for each sleeve work as follows: Work * 1 dc in each of the first ch 6, 2 dc in next ch *, repeat from *-* 3 more times, finish with 1 sl st in 3rd ch at beg of round = 192 dc. Continue working diagram A.3. When A.3 has been worked 1 time vertically, there are 192 dc on round. Then work A.4 24 times in total on round. SIZE XXL/XXXL: Round now deviates from diagram because of armhole. Work as follows: Work 5th round in A.3 as follows (all dc worked in dc, are worked in back loop on this round): Work ch 3, * 1 dc in first/next dc, 1 dc around next ch *, repeat from *-* 24 more times, 1 dc in next dc, 30 ch, skip 15 dc and 15 ch (= 30 sts in total) for armhole, * work 1 dc around next ch, 1 dc in next dc *, repeat from *-* 39 more times, 1 dc around next ch, 30 ch, skip the last 15 dc and 15 ch (= armhole), finish with 1 sl st in 3rd ch at beg of round = 132 dc and 30 ch for each sleeve (= 192 sts in total). Then work A.4 24 times in total on round. Work first round as follows: Work ch 3, * ch 3, skip 3 dc/ch, 1 dc in next dc/ch, ch 3, skip 3 dc/ch, 1 dc in next dc/ch *, repeat from *-* 23 more times, work like this over ch-spaces (= sleeves) too, finish with 1 sl st in 3rd ch at beg of round = 48 ch-spaces. ALL SIZES: When A.4 has been worked 1 time vertically, there are 240 dc on round. Piece measures approx. 54 cm / 21 1/4'' in diameter. Then work A.5 24 times in total on round. When A.5 has been worked 1 time vertically, there are 336 dc on round. Piece measures approx. 76 cm / 30'' in diameter. Then work A.6 42 times in total on round AT THE SAME TIME on last round of A.6 inc 2 dc evenly by working 2 dc in same dc. When A.6 has been worked 1 time vertically, there are 380 dc on round. Then work A.5 38 times in total on round as follows in the different sizes: SIZE S/M: Work 5 rounds of A.5 = 494 dc. Then work 1 dc in back loop of every dc AT THE SAME TIME inc 42 dc evenly (inc approx. 1 dc in every 12th dc) = 536 dc on round. Piece now measures approx. 110 cm / 43½'' in diameter. Then work A.6 67 times in total on round. Fasten off when the first 2 rounds of A.6 have been worked. Piece measures approx. 114 cm / 45'' in diameter. SIZE L/XL: Work A.5. When A.5 has been worked 1 time vertically, there are 532 dc on round. Then work 1 dc in back loop of every dc AT THE SAME TIME inc 36 dc evenly (inc approx. 1 dc in every 15th dc) = 568 dc. Piece measures approx. 118 cm / 46½'' in diameter. Then work A.6 71 times in total on round. Fasten off when the first 2 rounds of A.6 have been worked. Piece measures approx. 122 cm / 48'' in diameter. SIZE XXL/XXXL: Work A.5. When A.5 has been worked 1 time vertically, there are 532 dc on round. Then work 1 dc in back loop of every dc AT THE SAME TIME inc 36 dc evenly (inc approx. 1 dc in every 15th dc) = 568 dc. Piece measures approx. 118 cm / 46½'' in diameter. Then work A.6 71 times in total on round. When A.6 has been worked 1 time vertically, there are 639 dc on round. Piece measures approx. 125 cm / 49'' in diameter. Work 1 round with 1 dc in back loop of every dc AT THE SAME TIME inc 9 dc evenly = 648 dc. Work A.6 81 times in total on round. Fasten off when the first 2 rounds of A.6 have been worked. Piece measures approx. 130 cm / 51½'' in diameter. SLEEVE: Worked back and forth, top down. First work a sleeve cap. Work A.7 - remember CROCHET INFO. When A.7 has been worked 1 time, there are 25 dc on round. Fasten off. Work 14-16-18 loose ch, then work 1 dc in every dc from A.7, finish with 17-19-21 ch (includes 3 ch to turn with). Insert 1 marker in piece, NOW MEASURE PIECE FROM HERE. Work 1 dc in 4th ch from hook, 1 dc in each of the next 13-15-17 ch, 1 dc in every dc, 1 dc in every ch = 53-57-61 dc. Then work 1 dc in every dc. When piece measures 4 cm / 1½'', dec 1 dc in each side of piece by working the first 2 dc tog and the last 2 dc tog (= 2 dc dec) – SEE DECREASE TIP! Repeat dec every 3-3-3½ cm / 1"-1"-1 1/4" 10-10-9 more times = 31-35-41 dc. When piece measures 38-39-40 cm / 15"-15 1/4"-15 3/4", work piece in the round as follows: Work A.9 6-7-8 times in total on round AT THE SAME TIME on first round dec 1-0-1 dc = 30-35-40 dc. On last round in A.9 dec 2-3-4 dc evenly = 28-32-36 dc. Then work A.10 7-8-9 times in total on round. Fasten off when A.10 has been worked 1 time vertically. Piece measures approx. 63-64-65 cm / 24 3/4"-25 1/4"-25½" in total. Work another sleeve the same way. ASSEMBLY: Sew sleeves into circle in outer loop of edge sts. Sew underarm seam. |
||||||||||||||||||||||||||||||||||||||||||||||||||||||||||
Diagram explanations |
||||||||||||||||||||||||||||||||||||||||||||||||||||||||||
|
||||||||||||||||||||||||||||||||||||||||||||||||||||||||||
|
||||||||||||||||||||||||||||||||||||||||||||||||||||||||||

|
||||||||||||||||||||||||||||||||||||||||||||||||||||||||||

|
||||||||||||||||||||||||||||||||||||||||||||||||||||||||||

|
||||||||||||||||||||||||||||||||||||||||||||||||||||||||||

|
||||||||||||||||||||||||||||||||||||||||||||||||||||||||||
|
Have you made this or any other of our designs? Tag your pictures in social media with #dropsdesign so we can see them! Do you need help with this pattern?You'll find tutorial videos, a Comments/Questions area and more by visiting the pattern on garnstudio.com. © 1982-2024 DROPS Design A/S. We reserve all rights. This document, including all its sub-sections, has copyrights. Read more about what you can do with our patterns at the bottom of each pattern on our site. |
||||||||||||||||||||||||||||||||||||||||||||||||||||||||||


With over 40 years in knitting and crochet design, DROPS Design offers one of the most extensive collections of free patterns on the internet - translated to 17 languages. As of today we count 304 catalogs and 11422 patterns - 11417 of which are translated into English (US/in).
We work hard to bring you the best knitting and crochet have to offer, inspiration and advice as well as great quality yarns at incredible prices! Would you like to use our patterns for other than personal use? You can read what you are allowed to do in the Copyright text at the bottom of all our patterns. Happy crafting!
Comments / Questions (190)
Gracie wrote:
Hello! So I've finished the sweater and am ready to start the sleeves, just to clarify, the sleeves are crocheted separately and then sewn to sweater after completed? Or are the sleeves crocheted onto the sweater and worked as one piece? Thank you so much for your help!!! Best regards, gracie
15.01.2017 - 14:00DROPS Design answered:
Dear Gracie, sleeves are worked separately, from top down (from sleeve cap to cuff) and are then sewn tog to the jacket (armholes). Happy crocheting!
16.01.2017 - 09:53Just found this pattern and love it, but where does it tell you how much yarn you need for a L/XXL ?? I must be over looking it. Thank you Rose
28.12.2016 - 17:26DROPS Design answered:
Hi Rose! For the size L/XL you will need 850 g of yarn, and for XXL/XXXL 950 g. How to choose the right size please see the lesson How to read a schematic drawing. Happy knitting!
28.12.2016 - 23:011: Can this pattern be done left handed? Read symbol pattern left to right instead right to left? 2: I'm stuck on A.2 row 5... Where A8 moves over to the left... So do I (sl st) to where the next round beginning starts?
28.11.2016 - 00:55DROPS Design answered:
Dear Jessi, depending on how you are used to work you may have to adjust your own way reading diagrams. All our diagrams are starting on the bottom corner right on the right side (from RS - reading diagram from the right towards the left to the end of row). On row 5 in A.8 sl st to the first ch-space to start working the 4 dc in 1st ch-space. Happy crocheting!
28.11.2016 - 09:49Patty Lambkin wrote:
I love the look of this jacket. When doing A. 3 do I complete round 5 and then work the rounds for the sleeves? Also do I work both round 4 and round 5 for the size large/xl and then do one whole complete A3 again befor going into A4? Thanks for your time
19.11.2016 - 02:04DROPS Design answered:
Dear Mrs Lambkin, the armholes in size L/XL are worked on roundn 4 in A.3 -see under 'SIZE L/XL" how to crochet this round, it will be worked a different way as in the diagram because you will create armhole on this round. Then work round 5 as in diagram. A.3 is worked only 1 time in height = 192 sts at the end of A.3. Now work A.4 1 time in height (24 times in width). Happy crocheting!
21.11.2016 - 09:02Bonjour, Ce modèle me plaît beaucoup, je l'ai téléchargé et m'apprête à commander la laine, mais avant de commencer, j'aime bien comprendre les explications: je ne vois pas comment se montent les manches sur le cercle, qu'est-ce qui, sur le cercle correspond aux trous des emmanchures? Merci de votre aide.
26.09.2016 - 16:54DROPS Design answered:
Bonjour Karine, les manches se crochètent de haut en bas en commençant par l'arrondi de la manche (A.7) - cette partie sera cousue en haut de l'emmanchure (là où l'espace entre les 2 chaînettes des emmanchures sera le plus étroit, comme on le voit dans le schéma). Bon crochet!
26.09.2016 - 17:05Ada Elliott wrote:
How do you start the sleeve cap. Please explain. Thank you
21.09.2016 - 12:25DROPS Design answered:
Dear Mrs Elliott, Work first diagram A.7 then cut the yarn. Crochet 14-16-18 ch, work 1 tr (UK-English) in each tr on last row in A.7, and crochet 17-19-21 ch at the end of row, then work as explained: 1 tr in 4th ch from hook, ... Happy crocheting!
21.09.2016 - 13:450n row 4 of diagram A2 the count you have is 96 but I come up with 92! What is going wrong?
20.09.2016 - 21:01DROPS Design answered:
Dear Mrs Goffinet, when A.2 is worked 1 time in height, you should have 96 dc and 24 ch (= 1 ch, 4 dc, 1 ch, 4 dc, 1 ch, 4 dc, 1 ch, 4 dc) x 6 times around = [(4x4 dc = 16 dc) + (4x1ch = 4 ch)] x 6 = 96 dc + 24 ch. Happy crocheting!
21.09.2016 - 09:35Hallo. Ich verzweifle gerade bei Runde 4 von A.3 in Gr. S/M. Ich komme nicht auf 96 Stb sondern weniger. Reihe 3 passt mit 116 Stb und 26 M für den Armausschnitt. Wenn ich mich an den Ausschnitt der Häkelschrift halte - wie oft muss ich diesen häkeln und wie häkel ich über die Armausschnitte?
15.09.2016 - 22:10DROPS Design answered:
Liebe Daniela, Runde 4 muss laut schriftliche Anleitung gehäkelt werden, dh: 3 Lm, ** 1 Stb in das erste/nächste Stb bzw. in die erste/nächste Lm, 1 Lm, * 1 Stb in das nächste Stb bzw. die nächste Lm, 1 Lm, 1 Stb/Lm überspringen *, von *-* weitere 4 x wdh, 1 Stb in das nächste Stb bzw. die nächste Lm, 1 Lm, 1 Stb in das nächste Stb bzw. die nächste Lm, 1 Lm, 1 Stb/Lm überspringen ** (= Sie häkelen hier über 14 Stb/Lm von Runde 3 und haben von **-** 8 Stb und 8 Lm), dann wiederholen Sie von **-** weitere 11 x = 12 x 8 Stb und 8 Lm = 96 Stb und 96 Lm.
16.09.2016 - 09:01Ik eindig na A2 met 100 stokjes en ik snap werkelijk niet waar het fout gaat.
15.09.2016 - 16:05DROPS Design answered:
Hoi Wes. Als je kan aangeven welke maat je maakt, dan zal ik proberen verder te kijken. Bvd.
16.09.2016 - 16:11Is there a size chart with measurement related to size?
11.09.2016 - 15:47DROPS Design answered:
Dear Lilian, scrolling down the page you can find a measurement chart: compare them woth a garment you have and you like and you'll find the right size. Happy crocheting!
11.09.2016 - 21:15