DROPS Cotton Merino
DROPS Cotton Merino
50% Wool, 50% Cotton
from 4.45 $ /50g
Get the yarn to make this pattern from 53.40$.

The yarn cost is calculated from the pattern’s smallest size and the yarn’s cheapest product type. Looking for an even better price? You might find it on the DROPS Deals!

DROPS SS24

Blue September

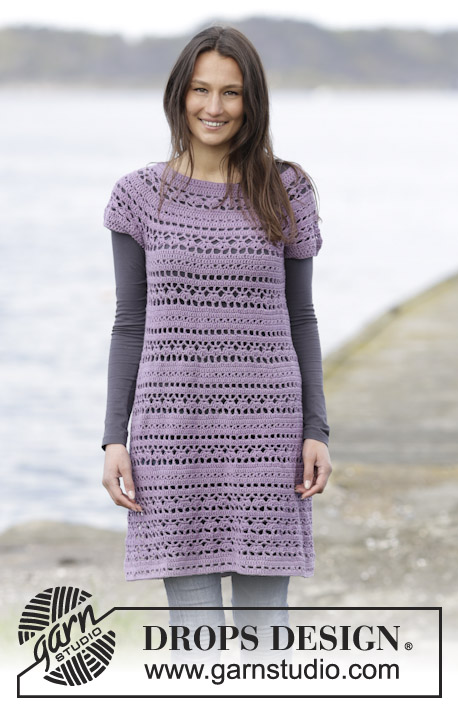
Knitted DROPS dress with raglan and lace pattern in ”Cotton Merino”. Size: S - XXXL.

DROPS 165-46
DROPS design: Pattern no cm-031
Yarn group B
----------------------------------------------------------
Size: S - M - L - XL - XXL - XXXL

Materials:
DROPS COTTON MERINO from Garnstudio
600-650-750-800-900-950 g color no 16, denim blue

DROPS DOUBLE POINTED NEEDLES AND CIRCULAR NEEDLE (60 or 80 cm / 60 or 80 cm / 24'' or 32'') SIZE 4 mm/US 6 - or size needed to get 21 sts x 28 rows in stockinette st = 4'' x 4'' (10 x 10 cm).

-------------------------------------------------------

Alternative Yarn – See how to change yarns here
Yarn Groups A to F – Use the same pattern and change the yarn here
Yarn usage using an alternative yarn – Use our yarn converter here

-------------------------------------------------------

DROPS Cotton Merino
DROPS Cotton Merino
50% Wool, 50% Cotton
from 4.45 $ /50g
Get the yarn to make this pattern from 53.40$.

The yarn cost is calculated from the pattern’s smallest size and the yarn’s cheapest product type. Looking for an even better price? You might find it on the DROPS Deals!

Pattern instructions

NOTE: This pattern is written in American English. All measurements in charts are in cm. For conversion from inches to cm - click here. There are different terms for crocheting in American and British English. If this pattern includes crochet, click for "crochet terms" here. For this pattern in British English, please click here.
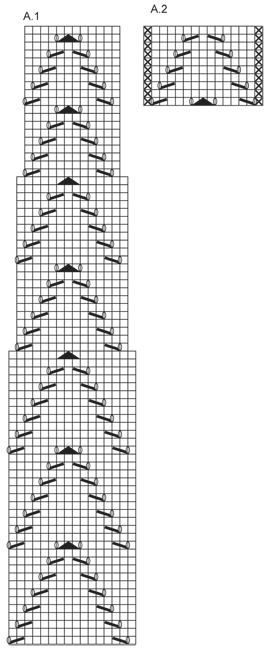
GARTER ST (in the round on circular needle):
* K 1 round and P 1 round *, repeat from *-*. 1 ridge = 2 rounds.
PATTERN:
See diagrams A.1 and A.2.

DECREASE TIP:
Dec 1 st before 1st and 3rd marker as follows: Work until 2 sts remain before marker, slip 1 st as if to K, K 1, psso.
Dec 1 st after 2nd and 4th marker as follows: K 2 tog.

RAGLAN:
Dec 2 sts in every transition between body and sleeves.
Dec as follows:
Beg 3 sts before marker and work as follows: K 2 tog, K 2 (marker is between these 2 sts), slip 1 st as if to K, K 1, psso.
----------------------------------------------------------

DRESS:
Worked in the round on circular needle from bottom up.
Cast on 224-240-288-304-336-368 sts on needle size 4 mm / US 6 with Cotton Merino. Work 1 ridge in GARTER ST over all sts – see explanation above, then work A.1 over all sts (= 14-15-18-19-21-23 repetitions in width). When A.1 has been worked one time vertically, 168-180-216-228-252-276 sts remain on round and piece measures approx. 26 cm / 10 1/4''. K 1 round while adjusting the no of sts to 168-182-210-224-252-280. Continue with stockinette st, AT THE SAME TIME insert 4 markers in the piece as follows: Work 24-25-29-31-34-38 sts, insert 1st marker, work 36-41-47-50-58-64 sts, insert 2nd marker, work 48-50-58-62-68-76 sts, insert 3rd marker, work 36-41-47-50-58-64 sts, insert 4th marker, work the remaining 24-25-29-31-34-38 sts. The 1st and 2nd marker is on front piece, and 3rd and 4th marker is on back piece. Move the markers upwards when working. On next round, dec 1 st at every marker – Read DECREASE TIP = 4 sts dec on round. NOTE: No of sts mid front and mid back is the same, dec in side sts. Repeat dec every 6 cm / 2 3/8'' 4 more times = 148-162-190-204-232-260 sts. The piece now measures approx. 50 cm / 19 3/4'' in all sizes. Remove the first 4 markers. Insert 1 new marker in each side; 1 at the beg of round and one after 74-81-95-102-116-130 sts (= sides). When piece measures 56 cm / 22'' in all sizes, inc 1 st on each side of each marker (= 4 sts inc), repeat inc every 4-4½-4½-5-5-5½ cm / 1½"-1 3/4"-1 3/4"-2"-2"-2 1/4" 3 more times = 164-178-206-220-248-276 sts. When piece measures 71-72-73-74-75-76 cm / 28"-28½"-28 3/4"-29"-29½"-30", bind off for armholes in each side as follows: bind off the first 4 sts on round, work until 4 sts remain before the other marker, bind off the next 8 sts, work until 4 sts remain, bind off these 4 sts. There are 74-81-95-102-116-130 sts on back piece and front piece. Put piece aside and knit the sleeves.

SLEEVE:
Worked in the round on double pointed needles. Cast on 45-47-49-51-53-55 sts on double pointed needles size 4 mm / US 6 with Cotton Merino. Work 2 ridges. Insert 1 marker at the beg of round. Then work as follows: K 15-16-17-18-19-20, A.2 (= 15 sts), K 15-16-17-18-19-20. Continue this pattern upwards AT THE SAME TIME when piece measures 8 cm / 3 1/8'', inc 1 st on each side of marker. Inc every 3½-3-3-2½-2-2 cm / 1 1/4"-1"-1"-7/8"-3/4"-3/4" 11-12-13-14-16-17 more times = 69-73-77-81-87-91 sts. Work inc sts in stockinette st. When piece measures 51-50-50-49-49-48 cm / 20"-19 3/4"-19 3/4"-19 1/4"-19 1/4"-19" (NOTE! Shorter measurements in the larger sizes because of longer raglan dec and larger neck width) bind off the 4 sts on each side of marker = 61-65-69-73-79-83 sts. Put piece aside and make another sleeve.

YOKE:
Slip sleeves on to same circular needle as body where armholes were bound off = 270-292-328-350-390-426 sts. Insert 1 marker in all transitions between sleeves and body (= 4 markers). Continue in stockinette st over sts on body and pattern and in stockinette st as before on sleeves, AT THE SAME TIME on next round beg dec for RAGLAN – see explanation above (= 8 sts dec). Repeat dec on every other round 20-22-23-23-23-24 more times and then on every round 0-0-1-3-6-7 times. After all dec for raglan 102-108-128-134-150-170 sts remain on round. Work 2 ridges while AT THE SAME TIME on first round dec 7-7-23-25-37-53 sts evenly = 95-101-105-109-113-117 sts. Bind off.

ASSEMBLY: Sew the openings under the sleeves.

Diagram

All measurements in charts are in cm.

symbols = k
symbols = p
symbols = slip 1 st as if to K, K 1, psso
symbols = K 2 tog
symbols = slip 1 st as if to K, K 2 tog, psso
symbols = 1 YO between 2 sts
diagram
diagram

Each of our patterns has specific tutorial videos to help you.

Do you have a question? See a list of frequently asked questions (FAQ)

Knitting tension is what determines the final measurements of your work, and is usually measured per 10 x 10 cm. It is provided like so: number of stitches in width x number of rows in height - eg: 19 stitches x 26 rows = 10 x 10 cm.

The knitting tension is very individual; some people knit/crochet loosely while others work tightly. You adjust the knitting tension with the needle size, which is why the suggested needle size only serve as a guide! You need to adjust this (up or down) to ensure that YOUR knitting tension matches the knitting tension provided in the pattern. If you work with a different knitting tension than provided you will have a different yarn consumption, and your work will have different measurements than what the pattern suggests.

The knitting tension also determines which yarns can replace each other. As long as you achieve the same knitting tension you can replace one yarn with another.

See DROPS lesson: How to measure your tension/gauge

See DROPS video: How to make a gauge tension swatch

The required amount of yarn is provided in grams, eg: 450 g. To calculate how many balls you’ll need you first need to know how many grams are in 1 ball (25g, 50g or 100g). This information is available if you click on the individual yarn quality on our pages. Divide the amount required with the amount of each ball. For example, if each ball is 50g (the most common amount), the calculation will be as follows: 450 / 50 = 9 balls.

The important thing when changing from one yarn to another is that the knitting/crochet tension remains the same. This is so that the measurements of the finished piece will be the same as on the sketch provided. It is easier to achieve the same knitting tension using yarns from the same yarn group. It is also possible to work with multiple strands of a thinner yarn to achieve the knitting tension of a thicker one. Please try our yarn converter. We recommend you to always work a test swatch.

Please NOTE: when changing yarn the garment might have a different look and feel to the garment in the photo, due to individual properties and qualities of each yarn.

See DROPS lesson: Can I use a different yarn than the one mentioned in the pattern?

All our yarns are categorised into yarn groups (from A to F) according to thickness and knitting tension – group A contains the thinnest yarns and group F the thickest. This makes it easier for you to find alternative yarns to our patterns, should you wish to switch yarn. All yarns within the same group have a similar knitting tension and can easily replace each other. However, different yarn qualities have different structures and properties which will give the finished work a unique look and feel.

Click here for an overview of the yarns in each yarn group

At the top of all our patterns you’ll find a link to our yarn converter, which is a helpful tool should you wish to use a different yarn than suggested. By filling in the yarn quality you wish to replace, the amount (in your size) and number of strands, the converter will present good alternative yarns with the same knitting tension. Additionally it will tell you how much you’ll require in the new qualities and whether you’ll need to work with multiple strands. Most skeins are 50g (some are 25g or 100g).

If the pattern is worked with multiple colours, every colour will have to be converted separately. Similarly, if the pattern is worked with several strands of different yarns (for example 1 strand Alpaca and 1 strand Kid-Silk) you will have to find alternatives for each, individually.

Click here to see our yarn converter

Since different yarns have different qualities and textures we have chosen to keep the original yarn in our patterns. However, you can easily find options among our available qualities by using our yarn converter, or simply pick a yarn from the same yarn group.

It is possible that some retailers still have discontinued yarns in stock, or that someone has a few skeins at home that they would like to find patterns for.

The yarn converter will provide both alternative yarn as well as required amount in the new quality.

If you think it's hard to decide what size to make, it can be a good idea to measure a garment you own already and like the size of. Then you can pick the size by comparing those measures with the ones available in the pattern's size chart.

You'll find the size chart at the bottom of the pattern.

See DROPS lesson: How to read size chart

The needle size provided in the pattern serves only as a guide, the important thing is to follow the knitting tension. And since knitting tension is very individual, you will have to adjust the needle size to ensure that YOUR tension is the same as in the pattern – maybe you’ll have to adjust 1, or even 2 needle sizes, up or down to achieve the correct tension. For this, we recommend that you work test swatches.

Should you work with a different knitting tension than the one provided, the measurements of the finished garment might deviate from the measurement sketch.

See DROPS lesson: How to measure your tension/gauge

See DROPS video: How to make a gauge tension swatch

Working a garment top-down provides more flexibility and room for personal adjustment. For example it is easier to try the garment on while working, as well as making adjustments to length of yoke and shoulder caps.

The instructions are carefully explaining every step, in the correct order. Diagrams are adjusted to the knitting direction and are worked as usual.

The diagram depicts all rows/rounds, and every stitch seen from the right side. It is read from bottom to top, from right to left. 1 square = 1 stitch.

When working back and forth, every other row is worked from the right side and every other row is worked from the wrong side. When working from the wrong side, the diagram will have to be worked reversed: from left to right, knit stitches are purled, purl stitches are knit etc.

When working in the round every round is worked from the right side and the diagram are worked from right to left on all rounds.

See DROPS lesson: How to read knitting diagrams

The diagram depicts all rows/rounds, and every stitch seen from the right side. It is worked from bottom to top, from right to left.

When working back and forth every other row is worked from the right side: from right to left and every other row is worked from the wrong side: from left to right.

When working in the round, every row in the diagram are worked from the right side, from right to left.

When working a circular diagram you start in the middle and work your way outwards, counter clockwise, row by row.

The rows usually start with a given number of chain stitches (equivalent to the height of the following stitch), this will either be depicted in the diagram or explained in the pattern.

See DROPS lesson: How to read crochet diagrams

Instructions for working several diagrams after each other on the same row/round, will often be written like so: “work A.1, A.2, A.3 a total of 0-0-2-3-4 times". This means you work A.1 once, then A.2 is worked once, and A.3 is repeated (in width) the number of times provided for your size – in this case like so: S = 0 times, M = 0 times, L=2 times, XL= 3 times and XXL = 4 times.

The diagrams are worked as usual: begin with the first row in A.1, then work the first row in A.2 etc.

See DROPS lesson: How to read knitting diagrams

See DROPS lesson: How to read crochet diagrams

The total width of the garment (from wrist-to-wrist) will be larger in the larger sizes, despite the actual sleeves being shorter. The larger sizes have longer sleeve caps and wider shoulders, so there will be a good fit in all sizes.

The measurement sketch/schematic drawing provides information regarding the full length of the garment. If it’s a jumper or a jacket the length is measured from the highest point on the shoulder (usually closest to the neckline), and straight down to the bottom of the garment. It is NOT measured from the tip of shoulder. Similarly, the length of yoke is measured from the highest point on the shoulder and down to where yoke is split into body and sleeves.

See DROPS lesson: How to read a schematic drawing

Diagrams are often repeated on the round or in height. 1 repeat is the diagram the way it appears in the pattern. If it says to work 5 repeats of A.1 in the round, then you work A.1 a total of 5 times after/next to each other in the round. If it says to work 2 repeats of A.1 vertically/in height you work the entire diagram once, then begin again at the start and work the entire diagram one more time.

Chain stitches are slightly narrower than other stitches and to avoid working the cast-on edge too tight, we simply chain more stitches to begin with. The stitch count will be adjusted on the following row to fit the pattern and measurement sketch.

The rib edge is more elastic and will contract slightly compared to, for example, stocking stitch. By increasing before the rib edge, you avoid a visible difference in width between the rib edge and the rest of the body.

It’s very easy to cast off too tightly, and by making yarn overs while casting off (and simultaneously casting these off) you avoid a too tight cast off edge.

See DROPS video: How to bind off with yarn overs (yo)

To achieve an even increase (or decrease) you can increase on, for example: every 3rd and 4th row alternately, like so: work 2 rows and increase on the 3rd row, work 3 rows and increase on the 4th. Repeat this until the increase is complete.

See DROPS lesson: Increase or decrease 1 st on every 3rd and 4th row alternately

Should you prefer to work in the round instead of back and forth, you may of course adjust the pattern. You’ll need to add steeks mid-front (usually 5 stitches), and follow the instructions. When you would normally turn and work from the wrong side, simply work across the steek and continue in the round. At the end you’ll cut the piece open, pick up stitches to work bands, and cover the cut edges.

See DROPS video: How to knit steeks and cut open

Should you prefer to work back and forth instead of in the round, you may of course adjust the pattern so you work the pieces separately and then assemble them at the end. Divide the stitches for the body in 2, add 1 edge stitch in each side (for sewing) and work the front and back pieces separately.

See DROPS lesson: Can I adapt a pattern for circular needles into straight needles?

Pattern repeats can vary slightly in the different sizes, in order to get the correct proportions. If you’re not working the exact same size as the garment in the photo, yours might deviate slightly. This has been carefully developed and adjusted so that the complete impression of the garment is the same in all sizes.

Make sure to follow instructions and diagrams for your size!

If you have found a pattern you like which is available in women’s size it’s not very difficult to convert it to men’s size. The biggest difference will be the length of sleeves and body. Start working on the women size that you think would fit across the chest. The additional length will be worked right before you cast off for the armhole/sleeve cap. If the pattern is worked top-down you can add the length right after the armhole or before the first decrease on sleeve.

Regarding additional yarn amount, this will depend on how much length you add, but it is better with a skein too many than too few.

All yarns will have excess fibres (from production) that might come off as lint or shedding. Brushed yarns (ie hairier yarns) have more of these loose, excess fibres, causing more shedding.

Shedding also depends on what is worn under or over the garment, and whether this pulls at the yarn fibres. It’s therefore not possible to guarantee that there will be no shedding

Below are some tips on how to get the best result when working with hairier yarns:

1. When the garment is finished (before you wash it) shake it vigorously so the looser hairs come off. NOTE: do NOT use a lint roller, brush or any method that pulls at the yarn.

2. Place the garment in a plastic bag and put it in your freezer - the temperature will cause the fibres to become less attached to each other, and excess fibres will come off easier.

3. Leave in the freezer for a few hours before taking it out and shaking it again.

4. Wash the garment according to the instructions on the yarn label.

Pilling is a natural process that happens to even the most exclusive of fibers. It's a natural sign of wear and tear that is hard to avoid, and that is most visible in high friction areas of your garment like a sweater's arms and cuffs.

You can make your garment look as new by removing the pilling, using a fabric comb or a pill/lint remover.

Still can't find the answer you need? Then scroll down and leave your question so one of our experts can try to help you. This will be done normally within 5 to 10 working days.
In the meantime, you can read the questions and answers that others have left to this pattern or join the DROPS Workshop on Facebook to get help from fellow knitters/crocheters!

You might also like...

Post a comment to pattern DROPS 165-46

We would love to hear what you have to say about this pattern!

If you want to leave a question, please make sure you select the correct category in the form below, to speed up the answering process. Required fields are marked *.

Comments / Questions (14)

country flag Annette Kjeltoft wrote:

Hej - jeg skal til at strikke denne kjole Blue September til mit voksne barnebarn, men hun vil have kjolen helt glat uden mønsteret. Da indtagene jo er glemt i mønsteret i skørtet, har jeg lidt problemer med at finde ud af, hvordan jeg får taget ind, så det bliver pænt? Kan en hjælpe mig? Eller måske findes der en anden opskrift, men hun har jo købt garnet, så det må passe.\\r\\nPå forhånd tak Bedstemor

08.01.2019 - 12:31

DROPS Design answered:

Hei Annette. Om du hadde strikket etter mønster hadde du strikket A.1 nederst på skjørtet, her er det lagt inn fellinger på omgang 37 og 59 - du kan se at det ikke er noen kast på sidene av fellingen (= 2 masker felt per A.1). Om du strikker i glattstrikk kan du likevel følge disse fellingene. Du feller altså 2 masker per rapport av A.1 på omgang 39 og 57, og det er 14-15-18-19-21-23 rapporter av A.1 i bredden. Videre kan du felle som forklart i oppskriften. God fornøyelse

15.01.2019 - 07:59

Oana wrote:

Thank you :) Have a great weekend! and thank you for the amazing pattern

21.10.2016 - 14:18

Oana wrote:

Hi there, I have a question regarding the cast off bit. I did cast off as per the pattern but my stitch remains in the middle of the 8 cast off stitches. So basically when I will need to slip the sleeve on the same circular needles as the dress I am not sure how to continue from there. Shouldn't the cast off start in the previous row and do 4 cast off before marker so that working stitch will remain just before the 8 cast off and not in the middle? Thank you.

21.10.2016 - 11:44

DROPS Design answered:

Dear Mrs Oana, you can cast off the first 4 sts at beg of round + the 4 sts at the end of round, then pull thread through last st - or cast off the last 4 sts + the first 4 sts on round. Happy knitting!

21.10.2016 - 14:15

Ariane wrote:

Hi and thanks for anothwr wonderful project! After the first dec on A1, the next round of pattern is on the ws. Meaning instead of k2tog i need to p2tog, and instead of ssk, it's ppk? Thanks in advance, a.

22.08.2016 - 11:10

DROPS Design answered:

Dear Ariane, A.1 is worked in the round, so that all rows with dec and yos will be worked from RS. Happy knitting!

22.08.2016 - 13:06

Ariane wrote:

Hi and thanks for anothwr wonderful project! After the first dec on A1, the next round of pattern is on the ws. Meaning instead of k2tog i need to p2tog, and instead of ssk, it's ppk? Thanks in advance, a.

21.08.2016 - 12:04

DROPS Design answered:

Dear Ariane, diagram A.1 is worked in the round, so that every row in diagram will be worked from RS with K2 tog and ssk. Happy knitting!

22.08.2016 - 09:36

country flag Karin wrote:

Hoi, nog een vraagje, kleedje is bijna af maar de onderkant krult om door de ribbelsteek. Is dit op te lossen? Alvast bedankt voor je antwoord

08.12.2015 - 11:57

DROPS Design answered:

Hoi Karin. Was de jurk volgens de aanwijzingen en laat hem plaat drogen, zorg dan ook voor om de rand in vorm te brengen en laten drogen. Is dat niet genoeg kan je de rand strijken (met een theedoek tussen)

08.12.2015 - 16:39

country flag Karolien wrote:

Hallo Is er een mogelijkheid om de hals anders te breien? De voorkant zit nl. even hoog als de achterkant, terwijl de achterkant hoger hoort te zitten en de voorkant lager. Alvast bedankt voor het antwoord. Groetjes van Karolien

03.12.2015 - 12:25

DROPS Design answered:

Hoi Karolien. Natuurlijk, kijk eventueel op onze site voor het soort hals die je leuk vindt en pas het aan voor dit patroon.

09.12.2015 - 13:19

country flag Karin wrote:

Hartelijk bedankt, ik begrijp nu dat de minderingen niet naast mekaar, maar op een aantal steken van mekaar gebeuren. Deels op het achterpand en deels op het voorpand. Nog eens bedankt voor uw snelle reactie.

26.11.2015 - 16:57

country flag Karin wrote:

Hallo, Een vraagje. Volgens de uitleg mag er middenvoor en middenachter niet geminderd worden, enkel aan de zijkanten. Maar toch moet ik aan elke markeerder 1 steek minderen. Omdat er 4 markeerders zijn, denk ik toch dat er dan toch middenvoor en middenachter geminderd wordt. Ook tip voor het minderen zegt dat er aan elke markeerder 1 steek moet geminderd worden. Help!!! Ik zou graag verder breien. Alvast bedankt

25.11.2015 - 20:18

DROPS Design answered:

Hoi Karin. Ik zal het proberen uitleggen. Je hebt 4 markeerders; 2 in het voorpand en 2 in het achterpand. Je mindert 1 st bij elke markeerder. Deze st moet alleen worden geminderd richting de zijkant en niet richting het midden. Dus als je breit begin je bij eerst markeerder voorpand, hier minder je VOOR en bij de tweede markeerder voorpand minder je NA de markeerder. Hetzelfde op het achterpand. Is het nu duidelijk wat er wordt bedoeld?

26.11.2015 - 15:48

country flag Karolien wrote:

Hallo! Is het mogelijk om dit jurkje op 2 nld. te breien ipv. rondbreinld? Hoe doe ik dat dan met de minderingen in het midden van het jurkje? Alvast bedankt!

06.11.2015 - 13:37

DROPS Design answered:

Hoi Karolien. Het is in sommige gevallen mogelijk om het patroon aan te passen naar rechte naalden, lees meer hier. Bij deze jurk zou ik aanraden om gewoon te breien zoals beschreven voor het mooiste resultaat.

06.11.2015 - 15:36