
Popular categories
Looking for a yarn?


|
|
DROPS 69-5 |
|
 |
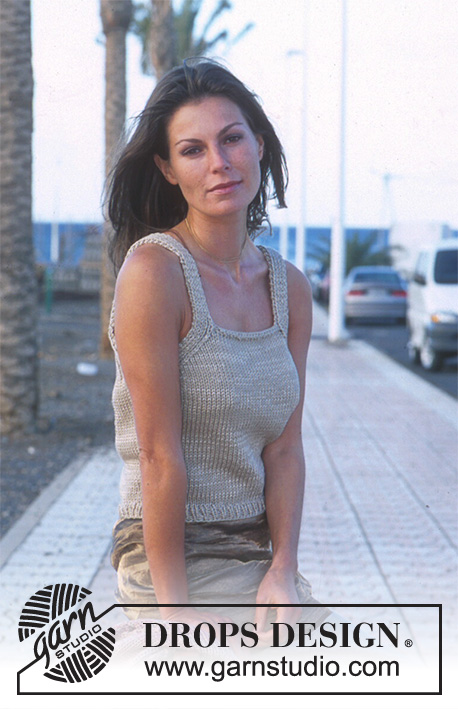 |
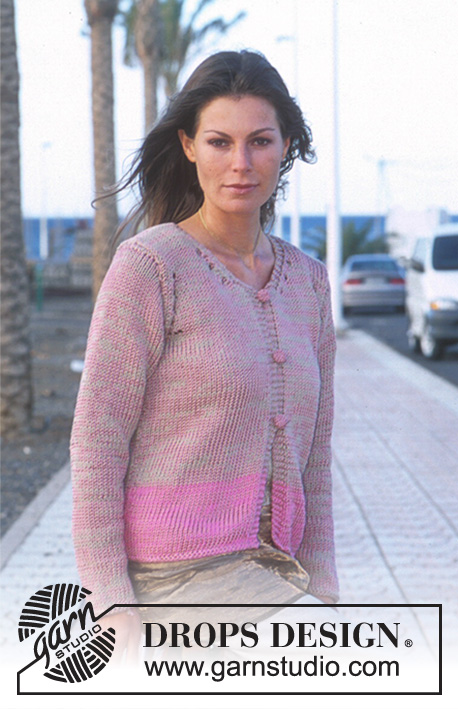
DROPS jacket and top in "Paris" and "Cotton Viscose".
DROPS 69-5 |
|
|
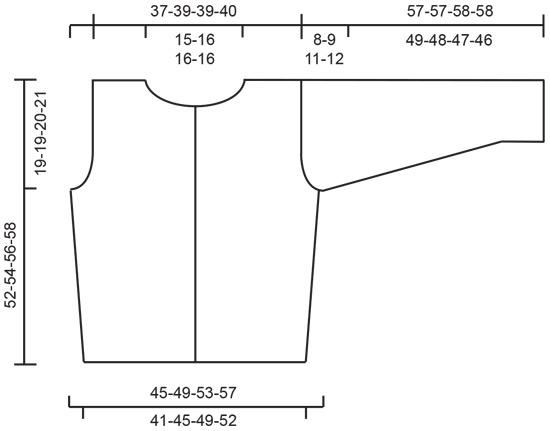
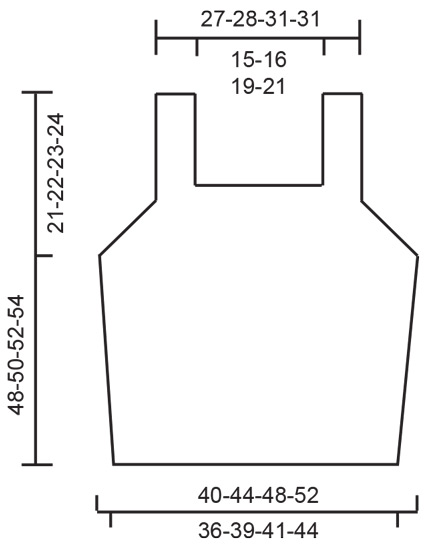
Ridge (Back and forth on needle): 1 ridge of garter st = 2 rows. 1st row K, 2nd row K. Decrease tip (for sleeves and neck): All casting off is on RS. Decrease on the inside of 3 sts worked in stocking st for the armhole and in garter st for the neck. There are 2 types of decrease, 1 with holes and 1 without. 1st decrease = dec with holes: Dec 3 sts before 3 sts: 1 YO, K 3 tog. Dec after 3 sts: Slip 1 st, K 2 tog and lift the slip st over, 1 YO. 2nd decrease = dec without holes: Dec 2 sts before 3 sts: K 2 tog. Dec after 3 sts: Slip 1 st, K 1 and lift the slip st over. Back piece: Cast on 64-70-76-80 sts (incl. 1 edge st in each side) on needle size 5 mm with 1 strand pink Paris + 1 strand pink Cotton Viscose. Work 1 ridge. Change to needles size 6 mm and work stocking st upwards. Remember the knitting tension! When the piece measures 6 cm inc in each side: 1 st 3-3-3-4 times, every 8th-8.5th-9th-7th cm = 70-76-82-88 sts. At the same time when the piece measures 12-13-14-15 cm change to 1 strand beige Paris + 1 strand pink Cotton Viscose. When the piece measures 33-35-36-37 cm cast off 3-4-3-3 sts for the armholes in each side = 64-68-76-82sts. Continue to cast off as follows: Size S: Decrease 1 st 4 times every 4th row - see decrease tips, repeat 1st decrease upwards = 4 holes along the armhole. There are now 56 sts remaining on needle. Size M: Decrease 1 st 5 times every 4 th row - see decrease tips, repeat 1st decrease upwards = 5 holes along the armhole. There are now 58 sts remaining on needle. Size L: Decrease 1 st 9 times every 2nd row - see decrease tips, repeat 1st and 2nd decrease alternately upwards = 5 holes along the armhole. There are now 58 sts remaining on needle. Size XL: Decrease 1 st 11 times every 2nd row - see decrease tips, repeat 1st and 2nd decrease alternately upwards = 6 holes along the armhole. There are now 60 sts remaining on needle. When the piece measures 49-51-53-55 cm work 1 ridge across the middle 28-30-30-30 sts. On the next row, cast off the middle 22-24-24-24 sts for the neck = 17-17-17-18 sts left for each shoulder. Work stocking st with 3 sts towards neck. Cast off when the piece measures 52-54-56-58 cm. Right front piece: Cast on 33-36-39-41 sts (incl. 1 edge st in the side and 4 band sts towards mid front) on needle size 5 mm with 1 strand pink Paris + 1 strand pink Cotton Viscose. Work 1 ridge, change to needles size 6 mm and continue with stocking st, but the 4 band sts towards mid front are worked in ridges upwards. When the piece measures 6 cm, inc in the side as for back piece = 36-39-42-45 sts. At the same time, when the piece measures 12-13-14-15 cm change to 1 strand beige Paris + 1 strand pink Cotton Viscose. When the piece measures 33-35-36-37 cm, decrease for the armhole in the side as for back piece. At the same time, when the piece measures 39-41-43-45 cm work 1 ridge across 9 sts towards mid front (incl. band sts), on next row cast off the first 6 sts towards mid front for the neck. Continue to decrease towards the neck every 2nd row inside 3 sts which are worked in ridges - see decrease tips: 1 st 6-7-7-7 times - repeat 1st and 2nd decrease alternately upwards = 3-4-4-4 holes around the neck. Continue with stocking st and 3 sts with ridges towards neck until the piece measures 52-54-56-58 cm. Cast off the remaining 17-17-17-18 sts on shoulder. Left front piece: Cast on and work as Right front piece, but decrease for armhole and neck on opposite side. Sleeves: Cast on 34-36-38-40 sts (incl. 1 edge st in each side) on needle size 5 mm with 1 strand beige Paris + 1 strand pink Cotton Viscose. Work 1 ridge. Change to needles size 6 mm and work stocking st. When piece measures 5-5-6-6 cm inc in each side: 1 st 10-9-9-10 times every 4.5th-5th-4.5th-4th cm = 54-54-56-60 sts. When the sleeve measures 49-48-47-46 cm cast off for sleeve cap in each side every 2nd row: 3 sts 1-1-1-1 time, 2 sts 3-3-1-1 times, 1 st 1-3-7-9 times, continue to cast off 2 sts until piece measures 56-56-57-57 cm and then cast off 3 sts 1 time. The piece measures approx. 57-57-58-58 cm, cast off the remaining sts. Assembly: Sew shoulder seams. Sew in sleeves. Sew sleeve and side seams in one inside the 1 edge st. Button loops: Crochet on hook size 3 mm with beige Paris. 1 loop = 1 dc in outermost band st, 5 ch, fasten with 1 dc 1 cm further down. Start at top of right band and work 3 loops with approx 8 cm gap. Crocheted buttons: Crocheted on hook size 3 mm with pink Cotton Viscose, round buttons as follows: Crochet 4 ch, form them as a ring with 1 sl st. Continue as follows: 1st round: 6 dc in the ring, 2nd round: Inc. 1 dc in each dc from previous round = 12 dc. 3rd round: Inc. 1 dc every other dc from previous round = 18 dc. 4th round: Crochet 1 dc in every dc from previous round = 18 dc. 5th round: Dec 6 dc by jumping over every 3rd dc from previous round = 12 dc. 6th round: Dec 6 dc by jumping over every other dc from previous round = 6 dc. Turn the little “hood” so that WS faces out. Put the button inside and pull the strand through the remaining sts, pull together and fasten securely. Crochet 3 buttons and sew them on the left band of the jacket. ________________________________________ DROPS top in "Paris" and "Cotton Viscose". Sizes: S - M - L - XL Materials: DROPS Paris from Garnstudio 200-200-250-250 g colour no. 26, dark beige and use: DROPS Cotton Viscose from Garnstudio 150-150-200-200 g colour no.17, light beige. DROPS Double pointed needles sizes 4 and 6. Tension: 15 sts x 22 row with 1 strand Paris + 1 strand Cotton Viscose on needle size 6 mm and stocking st = 10 x 10 cm. Remember needle size is only a guide! Rib: * K 1, P 1 *, repeat from *-*. Ridges (Back and forth on needle): 1 ridge of garter st = 2 rows. 1st row K, 2nd row K. Decrease tips: Dec for the armhole inside 7 sts. Dec on RS as follows: Before the 7 edge sts: K 2 tog. After the 7 edge sts: Slip 1 st, K 1 and lift the slip st over. Dec on WS as follows: Before the 7 edge sts: P 2 tog. After the 7 edge sts: P 2 twisted tog. Front piece: Cast on 56-60-64-68 sts (incl 1 edge st in each side) on needle size 4 mm with 1 strand Paris + 1 strand Cotton Viscose. Work rib for 3 cm, but 1 edge st in each side is worked in ridges. Change to needle size 6 mm and work stocking st upwards. Remember knitting tension! When the piece measures 5 cm, inc in each side: 1 st 3-4-5-6 times every 6th-5th-4th-3.5th cm = 62-68-74-80 sts. When the piece measures 27-28-29-30 cm dec 1 edge st in each side = 60-66-72-78 sts. Continue to work the 7 outermost sts in each side as follows, from the edge (seen from RS): 1 st ridge, K 1, P 1, K 1, P 1, K 1, P 1. At the same time dec for the armholes in each side inside these 7 sts - see decrease tips: 1 st 5-6-7-8 times on each row and 1 st 5-6-6-6 times every 2nd row = 40-42-46-50 sts remaining on needle. Now work 1 row P over the middle 24-26-30-34 sts, the stitches on each side are worked in rib as previously described. On the next row, cast off the middle 22-24-28-32 sts – cast them off in P seen from RS. There are now 9 sts remaining on each side of the piece. These are worked in rib as before with 1 st ridge in each side. Cast off when the straps measure approx. 28-28-28-30 cm. Back piece: Cast on and work as for front piece, but after working 1 row P across the middle 24-26-30-34 sts cast off all the remaining sts, rib sts are cast off with K over K and P over P. Assembly: Sew side seams inside the 1 edge st. Fasten straps at the back. |
|
|
|
|
|
|
Have you made this or any other of our designs? Tag your pictures in social media with #dropsdesign so we can see them! Do you need help with this pattern?You'll find tutorial videos, a Comments/Questions area and more by visiting the pattern on garnstudio.com. © 1982-2024 DROPS Design A/S. We reserve all rights. This document, including all its sub-sections, has copyrights. Read more about what you can do with our patterns at the bottom of each pattern on our site. |
|


With over 40 years in knitting and crochet design, DROPS Design offers one of the most extensive collections of free patterns on the internet - translated to 17 languages. As of today we count 304 catalogues and 11422 patterns - 11422 of which are translated into English (UK/cm).
We work hard to bring you the best knitting and crochet have to offer, inspiration and advice as well as great quality yarns at incredible prices! Would you like to use our patterns for other than personal use? You can read what you are allowed to do in the Copyright text at the bottom of all our patterns. Happy crafting!