DROPS Cotton Merino
DROPS Cotton Merino
50% Wool, 50% Cotton
from 4.45 $ /50g
Get the yarn to make this pattern from 26.70$.

The yarn cost is calculated from the pattern’s smallest size and the yarn’s cheapest product type. Looking for an even better price? You might find it on the DROPS Deals!

DROPS SS24

Tourmaline

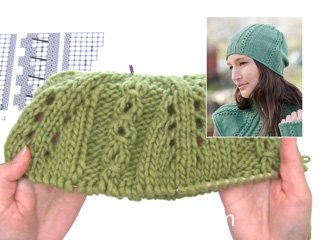
Set consists of: Knitted DROPS hat, wrist warmers and neck warmer with small cables and rib in ”Cotton Merino”.

DROPS 164-39
DROPS design: Pattern no cm-034
Yarn group B
----------------------------------------------------------
HAT:
Size: One-size
Head circumference: approx. 56/58 cm / 22"/22 3/4"
Materials:
DROPS COTTON MERINO from Garnstudio
100 g color no 11, forest green

DROPS DOUBLE POINTED NEEDLES and CIRCULAR NEEDLE (40 cm / 16'') SIZE 4 mm/US 6 - or size needed to get 21 sts x 28 rows in stockinette st = 4'' x 4'' (10 x 10 cm).
DROPS CIRCULAR NEEDLE (40 cm / 16'') SIZE 3.5 mm/US 4 – for rib.

WRIST WARMERS:
Size: One-size
Measurements: approx. 20 cm / 8'' wide and 22 cm / 8 3/4'' long
Materials:
DROPS COTTON MERINO from Garnstudio
50 g color no 11, forest green

DROPS DOUBLE POINTED NEEDLES size 3.5 mm / US 4 - or size needed to get 22 sts x 30 rows in stockinette st = 4'' x 4'' (10 x 10 cm).

NECK WARMER:
Size: S/M - L/XL
Measurements: height approx. 24 cm / 9½''
Materials:
DROPS COTTON MERINO from Garnstudio
150-200 g color no 11, forest green

DROPS CIRCULAR NEEDLE (40 cm / 16'') SIZE 4 mm/US 6 - or size needed to get 21 sts x 28 rows in stockinette st = 4'' x 4'' (10 x 10 cm).

-------------------------------------------------------

Alternative Yarn – See how to change yarns here
Yarn Groups A to F – Use the same pattern and change the yarn here
Yarn usage using an alternative yarn – Use our yarn converter here

-------------------------------------------------------

DROPS Cotton Merino
DROPS Cotton Merino
50% Wool, 50% Cotton
from 4.45 $ /50g
Get the yarn to make this pattern from 26.70$.

The yarn cost is calculated from the pattern’s smallest size and the yarn’s cheapest product type. Looking for an even better price? You might find it on the DROPS Deals!

Pattern instructions

NOTE: This pattern is written in American English. All measurements in charts are in cm. For conversion from inches to cm - click here. There are different terms for crocheting in American and British English. If this pattern includes crochet, click for "crochet terms" here. For this pattern in British English, please click here.
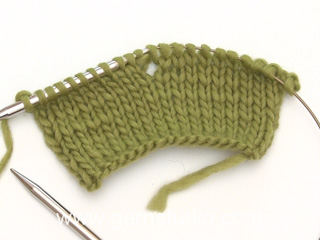
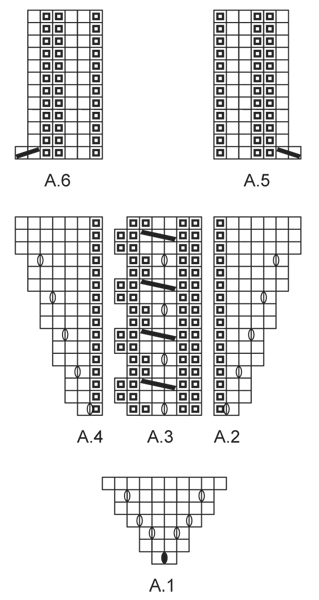
GARTER ST (worked in the round):
* K 1 round and P 1 round *, repeat from *-*. 1 ridge = 2 rounds.

PATTERN HAT:
See diagrams A.1 to A.6.

PATTERN WRIST WARMER:
See diagram A.7. The diagram shows all rows in pattern seen from RS.

BIND OFF WITH YOs (applies to wrist warmer):
To get a nice finish on wrist warmer bind off with YOs like this with K: * bind off 2 sts, 1 YO, bind off YO, 1 YO, bind off YO, 1 YO, bind off YO *, repeat from *-*.

PATTERN NECK WARMER:
See diagram A.3, A.8, A9 and A.10.
----------------------------------------------------------

HAT:
Worked top down in the round on double pointed needles and then circular needle. Cast on 6 sts evenly on 3 double pointed needle size 4 mm / US 6 with Cotton Merino.
Work 2 sts in each st the entire round (work alternately in front and back loop of st) = 12 sts. K 1 round. Insert a marker at the beg of the round. Then work according to diagram A.1 (= 6 repetitions on round). Switch to 4 double pointed needles or circular needle when needed. When diagram has been worked 1 time vertically, there are 60 sts on needle. REMEMBER THE KNITTING GAUGE Now work as follows over A.1: * Work A.2 over 2 sts, A.3 over 6 sts, A.4 over 2 sts *, repeat from *-* the entire round = 6 repetitions on round. When diagram has been worked 1 time vertically, there are 120 sts on needle. Continue to work as last round in A.2 over A.2, work A.3 as before and work as last round in A.4 over A.4 until piece measures 19 cm / 7½'' in total, adjust so that last round is a round without YO. Switch to circular needle size 3.5 mm / US 4 and work A.5 over A.2, work A.3 as before and work A.6 over A.4 = 108 sts. When diagram has been worked 1 time vertically, use double yarn and bind off with K over K and P over P.
----------------------------------------------------------

WRIST WARMERS:
Worked in the round on double pointed needles. Cast on 40 sts on double pointed needles size 3.5 mm / US 4 with Cotton Merino. Work 2 ridges in GARTER ST - see explanation above. Then work according to diagram A.7 (= 5 repetitions on round), insert a marker at beg of round. REMEMBER THE KNITTING GAUGE When piece measures approx. 14 cm / 5½'', adjust so that last round is round with arrow in diagram. Work the first 3 sts in diagram (= P 2, K 1; the middle of a cable). Turn piece and work back and forth according to diagram over all sts. Where piece is divided the sts in diagram are worked without YO and without cable. This is thumb gusset. Continue to work back and forth like this until diagram has been worked 3 times vertically. Put piece tog, work in the round as before thumb hole. Work like this until piece measures approx. 20 cm / 8''. Work 2 ridges and BIND OFF WITH YOs - see explanation above. Knit another wrist warmer the same way.
----------------------------------------------------------

NECK WARMER:
Worked in the round on circular needle, top down. Cast on 102-119 sts on circular needle size 4 mm / US 6 with Cotton Merino. Work as follows: * Diagram A.8 over 4 sts, diagram A.3 over 6 sts, diagram A.9 over 1 st and diagram A.3 over 6 sts *, repeat from *-* the entire round until piece measures approx. 10 cm / 4''. REMEMBER THE KNITTING GAUGE Then work pattern as before over A.8 and A.3 but work according to A.10 over A.9. K YOs on next round to make holes. Continue to work pattern as before and inc as shown in A.10 until piece measures 22 cm / 8 3/4'' in total. K 2 rounds, P 1 round and K 1 round. P and loosely bind off on next round.

Diagram

All measurements in charts are in cm.

symbols = K from RS, P from WS
symbols = P from RS, K from WS
symbols = 1 YO between 2 sts
symbols = 2 YO between 2 sts, K first YO and K second YO twisted on next row
symbols = K 3, pull first st over the last 2 sts
symbols = K 2 tog
symbols = slip 1 st as if to K, K 1, psso
diagram
diagram

Each of our patterns has specific tutorial videos to help you.

Do you have a question? See a list of frequently asked questions (FAQ)

Knitting tension is what determines the final measurements of your work, and is usually measured per 10 x 10 cm. It is provided like so: number of stitches in width x number of rows in height - eg: 19 stitches x 26 rows = 10 x 10 cm.

The knitting tension is very individual; some people knit/crochet loosely while others work tightly. You adjust the knitting tension with the needle size, which is why the suggested needle size only serve as a guide! You need to adjust this (up or down) to ensure that YOUR knitting tension matches the knitting tension provided in the pattern. If you work with a different knitting tension than provided you will have a different yarn consumption, and your work will have different measurements than what the pattern suggests.

The knitting tension also determines which yarns can replace each other. As long as you achieve the same knitting tension you can replace one yarn with another.

See DROPS lesson: How to measure your tension/gauge

See DROPS video: How to make a gauge tension swatch

The required amount of yarn is provided in grams, eg: 450 g. To calculate how many balls you’ll need you first need to know how many grams are in 1 ball (25g, 50g or 100g). This information is available if you click on the individual yarn quality on our pages. Divide the amount required with the amount of each ball. For example, if each ball is 50g (the most common amount), the calculation will be as follows: 450 / 50 = 9 balls.

The important thing when changing from one yarn to another is that the knitting/crochet tension remains the same. This is so that the measurements of the finished piece will be the same as on the sketch provided. It is easier to achieve the same knitting tension using yarns from the same yarn group. It is also possible to work with multiple strands of a thinner yarn to achieve the knitting tension of a thicker one. Please try our yarn converter. We recommend you to always work a test swatch.

Please NOTE: when changing yarn the garment might have a different look and feel to the garment in the photo, due to individual properties and qualities of each yarn.

See DROPS lesson: Can I use a different yarn than the one mentioned in the pattern?

All our yarns are categorised into yarn groups (from A to F) according to thickness and knitting tension – group A contains the thinnest yarns and group F the thickest. This makes it easier for you to find alternative yarns to our patterns, should you wish to switch yarn. All yarns within the same group have a similar knitting tension and can easily replace each other. However, different yarn qualities have different structures and properties which will give the finished work a unique look and feel.

Click here for an overview of the yarns in each yarn group

At the top of all our patterns you’ll find a link to our yarn converter, which is a helpful tool should you wish to use a different yarn than suggested. By filling in the yarn quality you wish to replace, the amount (in your size) and number of strands, the converter will present good alternative yarns with the same knitting tension. Additionally it will tell you how much you’ll require in the new qualities and whether you’ll need to work with multiple strands. Most skeins are 50g (some are 25g or 100g).

If the pattern is worked with multiple colours, every colour will have to be converted separately. Similarly, if the pattern is worked with several strands of different yarns (for example 1 strand Alpaca and 1 strand Kid-Silk) you will have to find alternatives for each, individually.

Click here to see our yarn converter

Since different yarns have different qualities and textures we have chosen to keep the original yarn in our patterns. However, you can easily find options among our available qualities by using our yarn converter, or simply pick a yarn from the same yarn group.

It is possible that some retailers still have discontinued yarns in stock, or that someone has a few skeins at home that they would like to find patterns for.

The yarn converter will provide both alternative yarn as well as required amount in the new quality.

If you think it's hard to decide what size to make, it can be a good idea to measure a garment you own already and like the size of. Then you can pick the size by comparing those measures with the ones available in the pattern's size chart.

You'll find the size chart at the bottom of the pattern.

See DROPS lesson: How to read size chart

The needle size provided in the pattern serves only as a guide, the important thing is to follow the knitting tension. And since knitting tension is very individual, you will have to adjust the needle size to ensure that YOUR tension is the same as in the pattern – maybe you’ll have to adjust 1, or even 2 needle sizes, up or down to achieve the correct tension. For this, we recommend that you work test swatches.

Should you work with a different knitting tension than the one provided, the measurements of the finished garment might deviate from the measurement sketch.

See DROPS lesson: How to measure your tension/gauge

See DROPS video: How to make a gauge tension swatch

Working a garment top-down provides more flexibility and room for personal adjustment. For example it is easier to try the garment on while working, as well as making adjustments to length of yoke and shoulder caps.

The instructions are carefully explaining every step, in the correct order. Diagrams are adjusted to the knitting direction and are worked as usual.

The diagram depicts all rows/rounds, and every stitch seen from the right side. It is read from bottom to top, from right to left. 1 square = 1 stitch.

When working back and forth, every other row is worked from the right side and every other row is worked from the wrong side. When working from the wrong side, the diagram will have to be worked reversed: from left to right, knit stitches are purled, purl stitches are knit etc.

When working in the round every round is worked from the right side and the diagram are worked from right to left on all rounds.

See DROPS lesson: How to read knitting diagrams

The diagram depicts all rows/rounds, and every stitch seen from the right side. It is worked from bottom to top, from right to left.

When working back and forth every other row is worked from the right side: from right to left and every other row is worked from the wrong side: from left to right.

When working in the round, every row in the diagram are worked from the right side, from right to left.

When working a circular diagram you start in the middle and work your way outwards, counter clockwise, row by row.

The rows usually start with a given number of chain stitches (equivalent to the height of the following stitch), this will either be depicted in the diagram or explained in the pattern.

See DROPS lesson: How to read crochet diagrams

Instructions for working several diagrams after each other on the same row/round, will often be written like so: “work A.1, A.2, A.3 a total of 0-0-2-3-4 times". This means you work A.1 once, then A.2 is worked once, and A.3 is repeated (in width) the number of times provided for your size – in this case like so: S = 0 times, M = 0 times, L=2 times, XL= 3 times and XXL = 4 times.

The diagrams are worked as usual: begin with the first row in A.1, then work the first row in A.2 etc.

See DROPS lesson: How to read knitting diagrams

See DROPS lesson: How to read crochet diagrams

The total width of the garment (from wrist-to-wrist) will be larger in the larger sizes, despite the actual sleeves being shorter. The larger sizes have longer sleeve caps and wider shoulders, so there will be a good fit in all sizes.

The measurement sketch/schematic drawing provides information regarding the full length of the garment. If it’s a jumper or a jacket the length is measured from the highest point on the shoulder (usually closest to the neckline), and straight down to the bottom of the garment. It is NOT measured from the tip of shoulder. Similarly, the length of yoke is measured from the highest point on the shoulder and down to where yoke is split into body and sleeves.

See DROPS lesson: How to read a schematic drawing

Diagrams are often repeated on the round or in height. 1 repeat is the diagram the way it appears in the pattern. If it says to work 5 repeats of A.1 in the round, then you work A.1 a total of 5 times after/next to each other in the round. If it says to work 2 repeats of A.1 vertically/in height you work the entire diagram once, then begin again at the start and work the entire diagram one more time.

Chain stitches are slightly narrower than other stitches and to avoid working the cast-on edge too tight, we simply chain more stitches to begin with. The stitch count will be adjusted on the following row to fit the pattern and measurement sketch.

The rib edge is more elastic and will contract slightly compared to, for example, stocking stitch. By increasing before the rib edge, you avoid a visible difference in width between the rib edge and the rest of the body.

It’s very easy to cast off too tightly, and by making yarn overs while casting off (and simultaneously casting these off) you avoid a too tight cast off edge.

See DROPS video: How to bind off with yarn overs (yo)

To achieve an even increase (or decrease) you can increase on, for example: every 3rd and 4th row alternately, like so: work 2 rows and increase on the 3rd row, work 3 rows and increase on the 4th. Repeat this until the increase is complete.

See DROPS lesson: Increase or decrease 1 st on every 3rd and 4th row alternately

Should you prefer to work in the round instead of back and forth, you may of course adjust the pattern. You’ll need to add steeks mid-front (usually 5 stitches), and follow the instructions. When you would normally turn and work from the wrong side, simply work across the steek and continue in the round. At the end you’ll cut the piece open, pick up stitches to work bands, and cover the cut edges.

See DROPS video: How to knit steeks and cut open

Should you prefer to work back and forth instead of in the round, you may of course adjust the pattern so you work the pieces separately and then assemble them at the end. Divide the stitches for the body in 2, add 1 edge stitch in each side (for sewing) and work the front and back pieces separately.

See DROPS lesson: Can I adapt a pattern for circular needles into straight needles?

Pattern repeats can vary slightly in the different sizes, in order to get the correct proportions. If you’re not working the exact same size as the garment in the photo, yours might deviate slightly. This has been carefully developed and adjusted so that the complete impression of the garment is the same in all sizes.

Make sure to follow instructions and diagrams for your size!

If you have found a pattern you like which is available in women’s size it’s not very difficult to convert it to men’s size. The biggest difference will be the length of sleeves and body. Start working on the women size that you think would fit across the chest. The additional length will be worked right before you cast off for the armhole/sleeve cap. If the pattern is worked top-down you can add the length right after the armhole or before the first decrease on sleeve.

Regarding additional yarn amount, this will depend on how much length you add, but it is better with a skein too many than too few.

All yarns will have excess fibres (from production) that might come off as lint or shedding. Brushed yarns (ie hairier yarns) have more of these loose, excess fibres, causing more shedding.

Shedding also depends on what is worn under or over the garment, and whether this pulls at the yarn fibres. It’s therefore not possible to guarantee that there will be no shedding

Below are some tips on how to get the best result when working with hairier yarns:

1. When the garment is finished (before you wash it) shake it vigorously so the looser hairs come off. NOTE: do NOT use a lint roller, brush or any method that pulls at the yarn.

2. Place the garment in a plastic bag and put it in your freezer - the temperature will cause the fibres to become less attached to each other, and excess fibres will come off easier.

3. Leave in the freezer for a few hours before taking it out and shaking it again.

4. Wash the garment according to the instructions on the yarn label.

Pilling is a natural process that happens to even the most exclusive of fibers. It's a natural sign of wear and tear that is hard to avoid, and that is most visible in high friction areas of your garment like a sweater's arms and cuffs.

You can make your garment look as new by removing the pilling, using a fabric comb or a pill/lint remover.

Still can't find the answer you need? Then scroll down and leave your question so one of our experts can try to help you. This will be done normally within 5 to 10 working days.
In the meantime, you can read the questions and answers that others have left to this pattern or join the DROPS Workshop on Facebook to get help from fellow knitters/crocheters!

You might also like...

Post a comment to pattern DROPS 164-39

We would love to hear what you have to say about this pattern!

If you want to leave a question, please make sure you select the correct category in the form below, to speed up the answering process. Required fields are marked *.

Comments / Questions (20)

Emily wrote:

Could you please explain by the wrist warmers what is meant : turn the piece and work back and forth? And what row should I start working back and forth? Is it by the row with the arrow or the row after that? Thanks

22.08.2016 - 07:10

DROPS Design answered:

Dear Emily, work wrist warmer until it measures approx. 14 cm (adjust length so that last round is last round in A.7 (= the one with the arrow) - you will now create the opening for thumb working back and forth for some rows: work the first 3 sts in diagram, turn and work now in rows following diagram as before (nb: remember to work now diagram back and forth) for 3 repeats in height. Then join again in the round for the top of wrist warmers (there is now a hole for thumb). Happy knitting!

22.08.2016 - 09:51

country flag Jardé wrote:

Bonjour, Je pense avoir décelé une erreur. Au début il est dit de prendre des aiguilles doubles pointes 4 et quelques lignes plus bas on nous demande de changer pour des aiguilles doubles pointes 4 également .

11.06.2016 - 13:56

DROPS Design answered:

Bonjour Mme Jardé, on commence avec 3 aiguilles doubles pointes 4 puis on continue avec 4 aiguilles doubles pointes, puis avec l'aiguille circulaire 4 (le texte a été modifié pour être plus clair). Bon tricot!

06.09.2016 - 13:21

country flag Risoue wrote:

Suite à votre réponse du 15/12,je vous remercie mais j'émets toujours le même doute, en lisant l'intitulé du diagramme à côté du petit carré noir et petit rond il est noté= 1 m.envers sur l'endroit et 1 maille endroit sur l'envers, donc en toute logique, le 2ème tour se trouve sur l'envers de l'ouvrage. juste ou pas juste??

15.12.2015 - 20:36

DROPS Design answered:

Bonjour Mme Risoue, quand on tricote en rond, on tricote toujours sur l'endroit, donc on va tricoter le petit carré noir (2ème symbole de la légende) tous les tours à l'envers. Ceci s'applique lorsque l'on tricote les mitaines en allers et retours. Pour le bonnet, le tour de cou, et les mitaines, quand on tricote en rond, on tricote toujours sur l'endroit. Bon tricot!

16.12.2015 - 09:07

country flag Risoue wrote:

Bjr Mme, j'ai tout démonté, et reviens sur votre réponse du 05/11/ pour le 2ème tour ( sur explic.du diagramme; différent si endroit ou envers du tricot A3 es-ce que ce n'est pas 2m end.3m.env.2m.end.?? puisque je suis sur l'envers au 2ème tour. merci pour votre aide. Cordialement risoue

14.12.2015 - 19:50

DROPS Design answered:

Bonjour Mme Risoue, A.3 se tricote en rond pour le bonnet et pour le tour de cou, au 1er tour, on a 2 m env, 1 m end, 1 jeté, 1 m end; au 2ème tour: 2 m env, 3 m end, 2 m env, au 3ème tour: 2 m env, 3 m end, passer la 1ère m par-dessus les 2 dernières m, 2 m env, au 4ème tour: 2 m env, 2 m end, 2 m env. Bon tricot!

15.12.2015 - 08:44

country flag Risoue wrote:

Merci pour votre réponse de ce jour, cependant sur la photo, on voit aussi des triangles au point jersey, ne manquerait-il pas qq chose ds les explications? autre que les diagrammes

05.11.2015 - 11:25

DROPS Design answered:

Bonjour Mme Risoue, le tour de cou se tricote de haut en bas: quand on a tricoté 10 cm ainsi avec 1 m de A.9, on tricote A.10 au-dessus de A.9 (au 1er rang de A.10 = 1 jeté, 1 m end, 1 jeté) - A.10 correspond au triangle jersey entre les motifs. Bon tricot!

05.11.2015 - 14:07

country flag Risoue wrote:

T DE COU.A8 au dessus des 4M suivantes?? dessus de quoi?si je suis le diagramme ds les explications: A8 au-dessus des 4m suiv.A3 au dessus des 6M;suivantesA9 au dessus de la m.suiv;ET a3 Etc. répéter de *à* ça c'est pour 1 rang complet, le rgs suivant. 3m.passer le lère m.par-dessus les 2dernières m.et 2m.end c'est aussi pour le rgs complet ?3ème rgs sur l'end: 2 m.env 3m end.2env.répété de * à* et 4ème rgs sur l'env.: 2 m end.1m.env.1jeté 1m.env.2 m;end.répéter *= à10cm h

04.11.2015 - 21:47

DROPS Design answered:

Bonjour Mme Risoue, Vous tricotez les différents diagrammes en même temps: 4 m en A.8 (= 1 m env, 2 m end, 1 m env), puis 6 m en A.3 (= 1er rang: 2 m env, 1 m end, 1 jeté, 1 m end, 2 m env), puis la maille de A.9 (= 1 m end), et encore 1 fois les 6 m de A.3 = 17 m que vous répétez jusqu'à la fin du tour, soit 6-7 fois. Au tour suivant, tricotez le 2ème tour de chaque diagramme, soit pour A.3: 2 m env, 3 m end, 2 m env. Au tour suivant, tricotez le 3ème tour de chaque diagramme. Continuez ainsi en répétant les diagrammes en hauteur jusqu'à ce que l'ouvrage mesure 10 cm. Bon tricot!

05.11.2015 - 08:51

country flag Frida wrote:

Hej! Jag försöker sticka pulsvärmarna i mönstret Tourmaline. Men jag förstår inte diagrammet. Det ska göras ett omslag på sista varvet i diagrammet, men är inte omslag en ökning? Och ska man öka en maska på näst sista varvet? Jag är lite förvirrad. Tacksam för hjälp. Varma hälsningar Frida

17.10.2015 - 18:19

DROPS Design answered:

Hej. Du gör omslag på första varvet i diagrammet, vilket då innebär att det blir en extra maska (det är omslaget som gör att det blir ett hålmönster sen när du på nästa varv stickar omslaget som en rät maska). Sen på tredje varvet så minskar du en maska genom att sticka 2 räta m tillsammans. Lycka till!

20.10.2015 - 08:01

country flag Sophie DROMARD wrote:

J'aime beaucoup le point. Le bonnet et les mitaines sont magnifiques.

13.06.2015 - 08:31

country flag Franca wrote:

Per prima cosa cambierei il colore, ma il set mi piace

02.06.2015 - 17:41

country flag Johanna G wrote:

Love this set, the colour is gorgeous! I want to make both the hat and the wristwarmers =)

29.05.2015 - 08:32