DROPS Brushed Alpaca Silk
77% Alpaca, 23% Silk
from 3.10 € /25g
Get the yarn to make this pattern from 31.00€.

The yarn cost is calculated from the pattern’s smallest size and the yarn’s cheapest product type. Looking for an even better price? You might find it on the DROPS Deals!

DROPS SS24

Sweet Winter Poncho

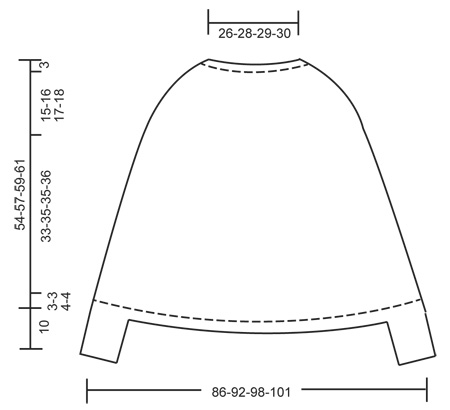
Knitted DROPS poncho in 2 strands ”Brushed Alpaca Silk” or 1 strand ”Melody” with Nordic pattern, rib and round neckline worked top down. Size: S - XXXL.

DROPS 164-6
DROPS design: Pattern no as-041
Yarn group C+C (or D)
----------------------------------------------------------

PONCHO:
Size: S/M - L/XL - XXL - XXXL
Materials:
DROPS BRUSHED ALPACA SILK from Garnstudio
100-150-150-150 g colour no 03, grey
75-75-75-100 g colour no 01, off white
50-50-50-50 g, colour no 08, heather
25-25-25-25 g colour no 02, light grey

Or use:
DROPS MELODY from Garnstudio
100-150-150-150 g colour no 04, grey
100-100-100-100 g colour no 01, off white
50-50-50-50 g colour no 10, heather
50-50-50-50 g colour no 03, pearl grey

DROPS CIRCULAR NEEDLE (40 and 80 cm) SIZE 6 mm - or size needed to get 13 sts x 17 rows in stocking st with 2 strands ”Brushed Alpaca Silk” or 1 strand ”Melody” = 10 x 10 cm.
DROPS DOUBLE POINTED NEEDLES and CIRCULAR NEEDLE (40 and 80 cm) SIZE 5.5 mm - for rib.

-------------------------------------------------------

Alternative Yarn – See how to change yarns here
Yarn Groups A to F – Use the same pattern and change the yarn here
Yarn usage using an alternative yarn – Use our yarn converter here

-------------------------------------------------------

DROPS Brushed Alpaca Silk
77% Alpaca, 23% Silk
from 3.10 € /25g
Get the yarn to make this pattern from 31.00€.

The yarn cost is calculated from the pattern’s smallest size and the yarn’s cheapest product type. Looking for an even better price? You might find it on the DROPS Deals!

Pattern instructions

KNITTING TIP:
To avoid the knitting tension to tighten when working pattern, it is important not to tighten the strands on back side of piece. Switch to a higher needle no when working pattern if the pattern is somewhat tight.

DOUBLE YARN TIP:
Use yarn from both inside and outside of the ball. When switching to a new ball, try to avoid switching both strands at the same time - to avoid a thick yarn when fastening.

PATTERN:
See diagrams A.1 and A.2. Work all pattern sts in stocking st with 2 strands Brushed Alpaca Silk (= BAS) or 1 strand Melody (= M).


INCREASE TIP:
Inc as follows before marker: Work until 1 st before marker, 1 YO.
Inc as follows after marker: 1 st in stocking st, 1 YO.
On next round K YO twisted (i.e. work in the back loop of st instead of front) to avoid holes.
----------------------------------------------------------

PONCHO:
Work in the round on circular needle, top down - READ KNITTING TIP AND DOUBLE YARN TIP. Rounds start mid back.

Cast on 76-80-80-84 sts on circular needle size 5.5 mm with 2 strands grey Brushed Alpaca Silk or 1 strand grey Melody. Work rib = K 2/P 2 for 3 cm. Switch to circular needle size 6 mm and work 1 round in stocking st while AT THE SAME TIME dec 8-7-5-6 sts evenly = 68-73-75-78 sts. On next round, inc 14-15-17-20 sts evenly = 82-88-92-98 sts. NOTE: Dec and inc like this to get a better shape on neck. Now insert 8 markers in the piece as follows: Work the first 6-6-8-10 sts, insert a marker, then insert 7 markers 10-11-11-11 sts apart, 6-5-7-11 sts remain on round after last marker. On next round beg inc - READ INCREASE TIP! Repeat inc alternately on right and left side of every marker every other round 7-8-13-14 more times, and every 4th round 2-2-0-0 times = 162-176-204-218 sts. REMEMBER THE KNITTING TENSION
When piece measures 18-19-20-21 cm from cast-on edge, continue with A.1 (= 12 sts) over all sts AT THE SAME TIME inc as follows:
On 2nd round, inc 18-16-12-10 sts evenly = 180-192-216-228 sts. (There are now 15-16-18-19 repetitions on round.)
On 10th round, inc 12-12-12-0 sts evenly = 192-204-228-228 sts. (There are now 16-17-19-19 repetitions on round.)
On 23rd round, inc 12 sts evenly in all sizes = 204-216-240-240 sts. (There are now 17-18-20-20 repetitions on round.)
On 36th round, inc 12 sts evenly in all sizes = 216-228-252-252 sts. (There are now 18-19-21-21 repetitions on round.)
When A.1 has been worked vertically, continue with A.2. On 1st round, inc 8-12-4-12 sts evenly = 224-240-256-264 sts. (There are now 28-30-32-33 repetitions on round.)
When A.2 has been worked vertically, continue with grey (2 strands Brushed Alpaca Silk/ 1 strand Melody) until finished measurements. Work 0-3-3-5 rounds in stocking st. Switch to circular needle size 5.5 mm and work 1 round in stocking st and inc 24-28-40-48 sts evenly = 248-268-296-312 sts. Now work rib as follows: K 1, * P 2, K 2 *, repeat from *-* until 3 sts remain and finish with P 2 and K 1. When rib measures 3-3-4-4 cm, work as follows: Cast off with K over K and P over P over the first 57-61-69-73 sts, work the next 20 sts before slipping them on a stitch holder (= cuff), cast off with K over K and P over P over the next 94-106-118-126 sts, work the next 20 sts before slipping them on a stitch holder (= cuff), cast off with K over K and P over P over the remaining 57-61-69-73 sts.

CUFFS:
Worked in the round on double pointed needles with grey (2 strands Brushed Alpaca Silk/ 1 strand Melody).
Slip sts from one of the stitch holder on double pointed needle size 5.5 mm and cast on 12 new sts on needle = 32 sts. Continue rib in the round (= K 2/P 2). When cuff measures 10 cm, cast off with K over K and P over P.
Work the other cuff the same way.
----------------------------------------------------------
HAT AND NECK WARMER:
See DROPS 164-7 or related patterns in the pattern online.
----------------------------------------------------------

This pattern has been corrected.

Updated online: 02.11.2015
Yarn amount of light gray and off white (Brushed AlpacaSilk) and pearl grey and off white (Melody) had changed places:

DROPS BRUSHED ALPACA SILK from Garnstudio
75-75-75-100 g colour no 01, off white
25-25-25-25 g colour no 02, light grey

DROPS MELODY from Garnstudio
100-100-100-100 g colour no 01, off white
50-50-50-50 g colour no 03, pearl grey

Diagram

symbols = 2 strands heather BAS or 1 strand heather M
symbols = 2 strands light grey BAS or 1 strand pearl grey M
symbols = 2 strands off white BAS or 1 strand off white M
symbols = 2 strands grey BAS or 1 strand grey M
symbols = increase round - see explanation in pattern
diagram
diagram
diagram

Each of our patterns has specific tutorial videos to help you.

Do you have a question? See a list of frequently asked questions (FAQ)

Knitting tension is what determines the final measurements of your work, and is usually measured per 10 x 10 cm. It is provided like so: number of stitches in width x number of rows in height - eg: 19 stitches x 26 rows = 10 x 10 cm.

The knitting tension is very individual; some people knit/crochet loosely while others work tightly. You adjust the knitting tension with the needle size, which is why the suggested needle size is only meant as a guide! You need to adjust this (up or down) to ensure that YOUR knitting tension matches the knitting tension provided in the pattern. If you work with a different knitting tension than provided you will have a different yarn consumption, and your work will have different measurements than what the pattern suggests.

The knitting tension also determines which yarns can replace each other. As long as you achieve the same knitting tension you can replace one yarn with another.

See DROPS lesson: How to measure your tension/gauge

See DROPS video: How to make a gauge tension swatch

The required amount of yarn is provided in grams, eg: 450 g. To calculate how many balls you’ll need you first need to know how many grams are in 1 ball (25g, 50g or 100g). This information is available if you click on the individual yarn quality on our pages. Divide the amount required with the amount of each ball. For example, if each ball is 50g (the most common amount), the calculation will be as follows: 450 / 50 = 9 balls.

The important thing when changing from one yarn to another is that the knitting/crochet tension remains the same. This is so that the measurements of the finished piece will be the same as on the sketch provided. It is easier to achieve the same knitting tension using yarns from the same yarn group. It is also possible to work with multiple strands of a thinner yarn to achieve the knitting tension of a thicker one. Please try our yarn converter. We recommend you to always work a test swatch.

Please NOTE: when changing yarn the garment might have a different look and feel to the garment in the photo, due to individual properties and qualities of each yarn.

See DROPS lesson: Can I use a different yarn than the one mentioned in the pattern?

All our yarns are categorised into yarn groups (from A to F) according to thickness and knitting tension – group A contains the thinnest yarns and group F the thickest. This makes it easier for you to find alternative yarns to our patterns, should you wish to switch yarn. All yarns within the same group have a similar knitting tension and can easily replace each other. However, different yarn qualities have different structures and properties which will give the finished work a unique look and feel.

Click here for an overview of the yarns in each yarn group

At the top of all our patterns you’ll find a link to our yarn calculator, which is a helpful tool should you wish to use a different yarn than suggested. By filling in the yarn quality you wish to replace, the amount (in your size) and number of strands, the calculator will present good alternative yarns with the same knitting tension. Additionally it will tell you how much you’ll require in the new qualities and whether you’ll need to work with multiple strands. Most skeins are 50g (some are 25g or 100g).

If the pattern is worked with multiple colours, every colour will have to be calculated separately. Similarly, if the pattern is worked with several strands of different yarns (for example 1 strand Alpaca and 1 strand Kid-Silk) you will have to find alternatives for each, individually.

Click here to see our yarn calculator

Since different yarns have different qualities and textures we have chosen to keep the original yarn in our patterns. However, you can easily find options among our available qualities by using our yarn calculator, or simply pick a yarn from the same yarn group.

It is possible that some retailers still have discontinued yarns in stock, or that someone has a few skeins at home that they would like to find patterns for.

The yarn calculator will provide both alternative yarn as well as required amount in the new quality.

If you think it's hard to decide what size to make, it can be a good idea to measure a garment you own already and like the size of. Then you can pick the size by comparing those measures with the ones available in the pattern's size chart.

You'll find the size chart at the bottom of the pattern.

See DROPS lesson: How to read size chart

The needle size provided in the pattern serves only as a guide, the important thing is to follow the knitting tension. And since knitting tension is very individual, you will have to adjust the needle size to ensure that YOUR tension is the same as in the pattern – maybe you’ll have to adjust 1, or even 2 needle sizes, up or down to achieve the correct tension. For this, we recommend that you work test swatches.

Should you work with a different knitting tension than the one provided, the measurements of the finished garment might deviate from the measurement sketch.

See DROPS lesson: How to measure your tension/gauge

See DROPS video: How to make a tension/gauge swatch

Working a garment top-down provides more flexibility and room for personal adjustment. For example it is easier to try the garment on while working, as well as making adjustments to length of yoke and shoulder caps.

The instructions are carefully explaining every step, in the correct order. Diagrams are adjusted to the knitting direction and are worked as usual.

The diagram depicts all rows/rounds, and every stitch seen from the right side. It is read from bottom to top, from right to left. 1 square = 1 stitch.

When working back and forth, every other row is worked from the right side and every other row is worked from the wrong side. When working from the wrong side, the diagram will have to be worked reversed: from left to right, knit stitches are purled, purl stitches are knit etc.

When working in the round every round is worked from the right side and the diagram are worked from right to left on all rounds.

See DROPS lesson: How to read knitting diagrams

The diagram depicts all rows/rounds, and every stitch seen from the right side. It is worked from bottom to top, from right to left.

When working back and forth every other row is worked from the right side: from right to left and every other row is worked from the wrong side: from left to right.

When working in the round, every row in the diagram are worked from the right side, from right to left.

When working a circular diagram you start in the middle and work your way outwards, counter clockwise, row by row.

The rows usually start with a given number of chain stitches (equivalent to the height of the following stitch), this will either be depicted in the diagram or explained in the pattern.

See DROPS lesson: How to read crochet diagrams

Instructions for working several diagrams after each other on the same row/round, will often be written like so: “work A.1, A.2, A.3 a total of 0-0-2-3-4 times". This means you work A.1 once, then A.2 is worked once, and A.3 is repeated (in width) the number of times provided for your size – in this case like so: S = 0 times, M = 0 times, L=2 times, XL= 3 times and XXL = 4 times.

The diagrams are worked as usual: begin with the first row in A.1, then work the first row in A.2 etc.

See DROPS lesson: How to read knitting diagrams

See DROPS lesson: How to read crochet diagrams

The total width of the garment (from wrist-to-wrist) will be larger in the larger sizes, despite the actual sleeves being shorter. The larger sizes have longer sleeve caps and wider shoulders, so there will be a good fit in all sizes.

The measurement sketch/schematic drawing provides information regarding the full length of the garment. If it’s a jumper or a jacket the length is measured from the highest point on the shoulder closest to the neckline, and straight down to the bottom of the garment. It is NOT measured from the tip of shoulder. Similarly, the length of yoke is measured from the highest point on the shoulder and down to where yoke is split into body and sleeves.

On a jacket measures are never taken along bands, unless specifically stated. Always measure inside band stitches when measuring the length.

See DROPS lesson: How to read a schematic drawing

Diagrams are often repeated on the round or in height. 1 repeat is the diagram the way it appears in the pattern. If it says to work 5 repeats of A.1 in the round, then you work A.1 a total of 5 times after/next to each other in the round. If it says to work 2 repeats of A.1 vertically/in height you work the entire diagram once, then begin again at the start and work the entire diagram one more time.

Chain stitches are slightly narrower than other stitches and to avoid working the cast-on edge too tight, we simply chain more stitches to begin with. The stitch count will be adjusted on the following row to fit the pattern and measurement sketch.

The rib edge is more elastic and will contract slightly compared to, for example, stocking stitch. By increasing before the rib edge, you avoid a visible difference in width between the rib edge and the rest of the body.

It’s very easy to cast off too tightly, and by making yarn overs while casting off (and simultaneously casting these off) you avoid a too tight cast off edge.

See DROPS video: How to bind off with yarn overs (yo)

To achieve an even increase (or decrease) you can increase on, for example: every 3rd and 4th row alternately, like so: work 2 rows and increase on the 3rd row, work 3 rows and increase on the 4th. Repeat this until the increase is complete.

See DROPS lesson: Increase or decrease 1 st on every 3rd and 4th row alternately

Should you prefer to work in the round instead of back and forth, you may of course adjust the pattern. You’ll need to add steeks mid-front (usually 5 stitches), and follow the instructions. When you would normally turn and work from the wrong side, simply work across the steek and continue in the round. At the end you’ll cut the piece open, pick up stitches to work bands, and cover the cut edges.

See DROPS video: How to knit steeks and cut open

Should you prefer to work back and forth instead of in the round, you may of course adjust the pattern so you work the pieces separately and then assemble them at the end. Divide the stitches for the body in 2, add 1 edge stitch in each side (for sewing) and work the front and back pieces separately.

See DROPS lesson: Can I adapt a pattern for circular needles into straight needles?

Pattern repeats can vary slightly in the different sizes, in order to get the correct proportions. If you’re not working the exact same size as the garment in the photo, yours might deviate slightly. This has been carefully developed and adjusted so that the complete impression of the garment is the same in all sizes.

Make sure to follow instructions and diagrams for your size!

If you have found a pattern you like which is available in women’s size it’s not very difficult to convert it to men’s size. The biggest difference will be the length of sleeves and body. Start working on the women size that you think would fit across the chest. The additional length will be worked right before you cast off for the armhole/sleeve cap. If the pattern is worked top-down you can add the length right after the armhole or before the first decrease on sleeve.

Regarding additional yarn amount, this will depend on how much length you add, but it is better with a skein too many than too few.

All yarns will have excess fibres (from production) that might come off as lint or shedding. Brushed yarns (ie hairier yarns) have more of these loose, excess fibres, causing more shedding.

Shedding also depends on what is worn under or over the garment, and whether this pulls at the yarn fibres. It’s therefore not possible to guarantee that there will be no shedding

Below are some tips on how to get the best result when working with hairier yarns:

1. When the garment is finished (before you wash it) shake it vigorously so the looser hairs come off. NOTE: do NOT use a lint roller, brush or any method that pulls at the yarn.

2. Place the garment in a plastic bag and put it in your freezer - the temperature will cause the fibres to become less attached to each other, and excess fibres will come off easier.

3. Leave in the freezer for a few hours before taking it out and shaking it again.

4. Wash the garment according to the instructions on the yarn label.

Pilling is a natural process that happens to even the most exclusive of fibers. It's a natural sign of wear and tear that is hard to avoid, and that is most visible in high friction areas of your garment like a sweater's arms and cuffs.

You can make your garment look as new by removing the pilling, using a fabric comb or a pill/lint remover.

Still can't find the answer you need? Then scroll down and leave your question so one of our experts can try to help you. This will be done normally within 5 to 10 working days.
In the meantime, you can read the questions and answers that others have left to this pattern or join the DROPS Workshop on Facebook to get help from fellow knitters/crocheters!

You might also like...

Post a comment to pattern DROPS 164-6

We would love to hear what you have to say about this pattern!

If you want to leave a question, please make sure you select the correct category in the form below, to speed up the answering process. Required fields are marked *.

Comments / Questions (51)

country flag Inger Nicolas wrote:

Sweet Winter Poncho strl S. Problem med maskeantall. Etter første øking = 82 masker. deretter øking (7+2) ganger på hver side av 8 merker ; 9 x 8 x 2 = 144 + 82 = 226 og ikke 162 som det står i oppskriften. Hva har jeg gjort feil ? (Jeg strikker med Melody) Jeg bor i Frankrike, søker oppskriftene på norsk men kjøper garnet på franske nettbutikker. Jeg ville være takknemlig for et svar. Vennlig hilsen Inger

16.01.2023 - 16:26

DROPS Design answered:

Hei Inger, Du skal øke bare på den ene siden av merkene hver økeomgang (vekselsvis høyre og venstre siden). Så da øker du 8 masker hver gang og du øker 10 ganger (9 ganger til etter første økning). 10 x 8 =80. Da får du 162 masker. God fornøyelse!

26.01.2023 - 07:01

country flag Denise KOSSLER wrote:

Sur les explications je note un problème : à la fin des premières augmentations on a 264 mailles et non 176. 176 ce sont les augmentations : 9 augmentations de 16m puis 2 augmentations de 16m soit 176 mailles et comme j'avais déjà 88mailles, je rajoute 176 mailles et j'ai 264 mailles.. Pouvez vous m'expliquer

10.11.2022 - 15:44

DROPS Design answered:

Bonjour Mme Kossler, les augmentations ne se font que d'un seul côté de chaque marqueur, autrement dit, vous augmentez 8 mailles à chaque fois, et en taille L/XL vous aurez ainsi: 88 m + (9 fois tous les 2 tours +2 fois tous les 4 tours) 8 m =88 + (11*8)= 176m. Lorsque vous augmentez la 1ère fois, augmentez à droite (avant) chaque marqueur, la fois suivante, augmentez à gauche (après) chaque marqueur et ainsi de suite, toujours 8 mailles à chaque fois. Bon tricot!

10.11.2022 - 17:11

country flag Ingrid Breivik wrote:

Tusen takk for svar betr Sweet Winter Poncho. Hun önsker seg et skjört, ikkje kjole. Litt språkforvirring her trur jeg. Men tusen takk for tips. Tenker nå at det fineste kanskje er et grått skjört uten border, og i litt mer pratisk skjörtgarn. Ha de´!

31.01.2022 - 16:50

country flag Ingrid Breivik wrote:

Hej! Jag stickade Sweet Winter poncho och mössa till mitt barnbarn. Nu har jag fått önskemål om en matchande kjol. Finns det ? Hälsningar Ingrid

30.01.2022 - 10:49

DROPS Design answered:

Hei Ingrid. Vi har ikke oppskrift på matchande kjole, men ta en titt på oppskriftene til genserene i DROPS 164-19 og 164-45. Disse er strikket ovenfra og ned, så da kan du bare strikke de lengre så får du deilig kjole. Se gjerne på andre kjoleoppskrifter (i samme garngruppe) og se om du ønsker innsving i livet, vidden nederst og lengde på kjolen. mvh DROPS Design

31.01.2022 - 14:19

country flag Nadine wrote:

Sorry hat sich erledigt meine Nachfrage. Hatte Gedankenfehler. Trotzdem Danke schön.

01.10.2021 - 12:30

DROPS Design answered:

Keine Sorge :) Viel Spaß beim Stricken!

01.10.2021 - 16:03

country flag Nadine wrote:

Ich verstehe leider nicht ganz den richtigen Bedarf für das Garn Alpaca Silk, da es ja Doppelfädig gearbeitet wird. Also wenn ich jetzt richtig verstehe, dann bräuchte ich doch quasi die doppelte Menge oder? Also bei Größe L z.B. Farbe 03 = 300g, oder? Wäre nett wenn ihr helfen könntet. DANKE SCHÖN

01.10.2021 - 09:29

DROPS Design answered:

Liebe Nadine, hier stricken Sie entweder mit 2 Fäden Brushed Alpaca Silk oder 1 Faden DROPS Meldoy, die Garnmenge stimmt so - mit je 2 bzw 1 Faden; Viel Spaß beim stricken!

01.10.2021 - 16:02

country flag Ana Rivas wrote:

En donde puedo conseguir sus lanas si vivo en Mexico?

09.01.2021 - 18:38

country flag Ingrid Breivik wrote:

Hei! Jeg har löst og strikke denne til mitt barnebarn i strl S. DROPS Design: Modell nr as-041 Garngruppe C + C (eller D) Synes det er bergnet veldi lite garn, berre 100g grå, 75 g natur, 50 g lyng og 25 g lys grå, kan det stemme? Bi da tilstrekkelig? Hilsen Ingrid Breivik

30.10.2020 - 19:05

DROPS Design answered:

Hei Ingrid. Det var en feil i garnmengden da oppskriften kom ut, men dette er rettet og alt skal være OK nå. mvh DROPS design

02.11.2020 - 11:58

country flag Paula wrote:

Hola, me encanta este patrón pero no entiendo como son los aumentos. Tengo que tejer hasta un punto antes del marcapuntos y después aumentar una hebra?? Si lo hago así queda un agujero. No entiendo el tipo de aumento que pide el patrón con el tejido en redondo Y se aumentan 7 puntos cada dos vueltas alternos durante 14 vueltas?? Y otros 7 cada 4 durante 8 vueltas?? Me encanta el patrón pero no lo entiendo :(

13.02.2019 - 19:33

DROPS Design answered:

Hola Paula. Antes del patrón tienes un TIP PARA LOS AUMENTOS, donde te explican cómo trabajar los aumentos. Para que no te queden agujeros, las HEB se trabajan siempre retorcidas. La cantidad de veces que haya que repetir los aumentos dependerá de la talla que estés trabajando, Por ejemplo, repetimos los aumentos cada 2ª vuelta 7 veces en el caso de la talla S, etc.

16.02.2019 - 20:09

country flag Chantal DUJARDIN wrote:

Bonjour, comment dois-je faire et combien de pelotes en plus si je veux que le pancho soit plus long et arrive en bas des fesses? Merci pour votre réponse

21.12.2018 - 16:24

DROPS Design answered:

Bonjour Mme Dujardin, nous ne sommes malheureusement pas en mesure de pouvoir adapter chacun de nos modèles à chaque demande. Merci de bien vouloir contacter votre magasin DROPS pour toute assistance personnalisée - même par mail ou téléphone. Bon tricot!

02.01.2019 - 08:36