DROPS Air
DROPS Air
65% Alpaca, 28% Polyamide, 7% Wool
from 4.80 £ /50g
Get the yarn to make this pattern from 38.40£.

The yarn cost is calculated from the pattern’s smallest size and the yarn’s cheapest product type. Looking for an even better price? You might find it on the DROPS Deals!

DROPS SS24

Sigrid

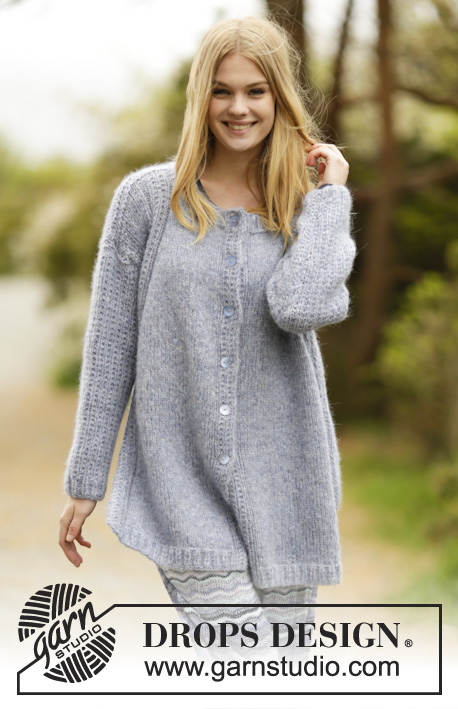
Knitted DROPS jumper with false raglan, vent and textured pattern on shoulders and sleeves in ”Air”. Size: S - XXXL.

DROPS 166-18
DROPS design: Pattern no ai-019
Yarn group C or A + A
----------------------------------------------------------
Size: S - M - L - XL - XXL - XXXL
Materials:
DROPS AIR from Garnstudio
400-400-450-450-500-550 g colour no 10, fog

DROPS CIRCULAR NEEDLE (60 cm) SIZE 5.5 mm - or size needed to get 16 sts x 20 rows in stocking st = 10 x 10 cm.
DROPS CIRCULAR NEEDLE (40 and 60 cm) SIZE 5 mm - for rib.

-------------------------------------------------------

Alternative Yarn – See how to change yarns here
Yarn Groups A to F – Use the same pattern and change the yarn here
Yarn usage using an alternative yarn – Use our yarn converter here

-------------------------------------------------------

DROPS Air
DROPS Air
65% Alpaca, 28% Polyamide, 7% Wool
from 4.80 £ /50g
Get the yarn to make this pattern from 38.40£.

The yarn cost is calculated from the pattern’s smallest size and the yarn’s cheapest product type. Looking for an even better price? You might find it on the DROPS Deals!

Pattern instructions

NOTE: This pattern is written in British English. All measurements in charts are in cm. For conversion from cm to inches - click here. There are different terms for crocheting in British and American English. If this pattern includes crochet, click for "crochet terms" here. For this pattern in American English, please click here.
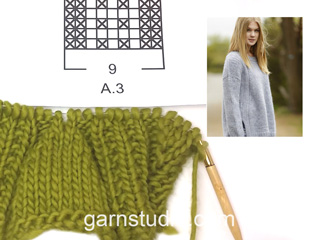
GARTER ST (back and forth):
K all rows. 1 ridge = 2 rows K.

PATTERN:
See diagrams A.1 to A.4. The diagrams show all rows in pattern seen from RS.

INCREASE TIP:
Inc 1 st by making 1 YO. On next row work YOs twisted, i.e. work in the back loop of st instead of front to avoid holes. NOTE: Work the inc sts gradually in diagram A.4.

DECREASE TIP:
Dec 1 sts as follows: All dec are done from RS!
Dec as follows after A.3: K 2 tog.
Dec as follows before A.3: Work until 2 sts before A.3, slip 1 st as if to K, K 1, psso.
----------------------------------------------------------

JUMPER:
Worked back and forth on circular needle and sewn tog when finished. Front piece is shorter than back piece.

BACK PIECE:
Cast on 95-98-101-107-113-116 sts on circular needle size 5 mm with Air. Work rib as follows: A.1 (= 8 sts), K 1, * P 2, K 1 *, repeat from *-* until 8 sts remain on row, A.2 (= 8 sts). Continue like this back and forth until piece measures 4 cm. On next row from RS switch to circular needle size 5.5 mm and work as follows: A.1, stocking st over the next 79-82-85-91-97-100 sts, AT THE SAME TIME dec 15-14-15-17-21-20 sts evenly, A.2 = 80-84-86-90-92-96 sts on needle in total. Continue in stocking st, work A.1 and A.2 in each side as before until piece measures 22 cm in all sizes. REMEMBER THE KNITTING TENSION At the end of the next 2 rows cast on 2 new sts (marks vent) = 84-88-90-94-96-100 sts. Now work A.3 (= 9 sts) over A.1 and A.2. i.e. inside 1 edge st in GARTER ST - see explanation above - in each side. When piece measures 26-24-24-23-23-23 cm, beg displacement of A.3 towards mid back. Work 1 edge st in garter st, inc 1 st - READ INCREASE TIP, A.3, dec 1 st - READ DECREASE TIP, stocking st until 2 sts remain before next A.3, dec 1 st, A.3, inc 1 st, 1 edge st in garter st. Repeat displacement of A.3 every 4th row 17-19-20-21-22-24 more times. NOTE: Inc is always inside 1 edge st in garter st in each side. AT THE SAME TIME when piece measures 60-61-62-63-64-65 cm, cast on 1 new st at the end of the next 2 rows for armholes = 86-90-92-96-98-102 sts. Continue pattern as before inside 1 edge st in garter st and 1 st in stocking st in each side. When piece measures 74-76-78-80-82-84 cm, cast off the middle 24-24-24-26-26-26 sts for neck and finish each shoulder separately. On next row from the neck, cast off 1 st = 30-32-33-34-35-37 sts remain on each shoulder. When piece measures 76-78-80-82-84-86 cm, work 1 ridge over all sts. Cast off. Work the other shoulder the same way.

FRONT PIECE:
Cast on and work as back piece. When piece measures 12 cm, work as follows: At the end of the next 2 rows cast on 2 new sts (marks vent) = 84-88-90-94-96-100 sts. Now work A.3 (= 9 sts) over A.1 and A.2. and work 1 edge st in garter st - see explanation above - in each side.
When piece measures 16-14-14-13-13-13 cm, beg displacement of A.3 towards mid front as on back piece. AT THE SAME TIME when piece measures 50-51-52-53-54-55 cm, cast on 1 new st at the end of the next 2 rows for armholes = 86-90-92-96-98-102 sts. Continue pattern inside 1 edge st in garter st and 1 st in stocking st in each side. When piece measures 54-56-58-59-61-63 cm, slip the middle 14-14-14-16-16-16 sts on a stitch holder and finish each shoulder separately. Then cast off sts on every row from neck as follows: 3 sts 1 time, 2 sts 1 time and 1 st 1 time = 30-32-33-34-35-37 sts remain for shoulder. Work edge st towards neck in garter st. When piece measures 66-68-70-72-74-76 cm, work 1 ridge over all sts. Cast off. Work the other shoulder the same way.

SLEEVE:
Worked back and forth on circular needle. Cast on 39-41-43-43-43-45 sts on circular needle size 5 mm with Air. Work rib as follows: 1 edge st in garter st, K 1, * P 1, K 1 *, repeat from *-* until 1 st remains, 1 edge st in garter st. When rib measures 4 cm, switch to circular needle size 5.5 mm and continue pattern as follows: 1 edge st in garter st, work last st in A.4, repeat A.4 until 1 st remains, 1 edge st in garter st. When piece measures 10 cm, inc 1 st inside 1 edge st in garter st in each side. Work the inc sts in the pattern A.4. Repeat inc every 5½-4½-4½-3½-3-3 cm 6-7-7-9-11-11 more times = 53-57-59-63-67-69 sts. When sleeve measures 46 cm in all sizes, work a sleeve cap with short rows as follows from RS: Work until 8-9-9-10-11-12 sts remain, turn and work until 8-9-9-10-11-12 sts remain, turn and work until 17-19-19-21-22-23 sts remain, turn and work until 17-19-19-21-22-23 sts remain. Turn and work all sts on needle, turn and work over all sts. Cast off with K from RS. Knit another sleeve.

ASSEMBLY:
Sew the shoulder seams tog. Sew sleeves to body inside 1 edge st in garter st. Sew underarm seams and side seams in one inside 1 edge st in garter st but leave 12 cm for vent at the bottom of body (i.e. 22 cm on back piece and 12 cm on front piece).

NECK EDGE:
Beg from mid back and pick up approx. 120-130 sts (incl sts on stitch holder) on circular needle size 5 mm. K 1 round while adjusting the no of sts to 75-75-75-84-84-84. Then work rib (= K 1/P 2) for 3 cm. Cast off with K over K and P over P.

Diagram

symbols = K from RS, P from WS
symbols = P from RS, K from WS
diagram
diagram

Each of our patterns has specific tutorial videos to help you.

Do you have a question? See a list of frequently asked questions (FAQ)

Knitting tension is what determines the final measurements of your work, and is usually measured per 10 x 10 cm. It is provided like so: number of stitches in width x number of rows in height - eg: 19 stitches x 26 rows = 10 x 10 cm.

The knitting tension is very individual; some people knit/crochet loosely while others work tightly. You adjust the knitting tension with the needle size, which is why the suggested needle size is only meant as a guide! You need to adjust this (up or down) to ensure that YOUR knitting tension matches the knitting tension provided in the pattern. If you work with a different knitting tension than provided you will have a different yarn consumption, and your work will have different measurements than what the pattern suggests.

The knitting tension also determines which yarns can replace each other. As long as you achieve the same knitting tension you can replace one yarn with another.

See DROPS lesson: How to measure your tension/gauge

See DROPS video: How to make a gauge tension swatch

The required amount of yarn is provided in grams, eg: 450 g. To calculate how many balls you’ll need you first need to know how many grams are in 1 ball (25g, 50g or 100g). This information is available if you click on the individual yarn quality on our pages. Divide the amount required with the amount of each ball. For example, if each ball is 50g (the most common amount), the calculation will be as follows: 450 / 50 = 9 balls.

The important thing when changing from one yarn to another is that the knitting/crochet tension remains the same. This is so that the measurements of the finished piece will be the same as on the sketch provided. It is easier to achieve the same knitting tension using yarns from the same yarn group. It is also possible to work with multiple strands of a thinner yarn to achieve the knitting tension of a thicker one. Please try our yarn converter. We recommend you to always work a test swatch.

Please NOTE: when changing yarn the garment might have a different look and feel to the garment in the photo, due to individual properties and qualities of each yarn.

See DROPS lesson: Can I use a different yarn than the one mentioned in the pattern?

All our yarns are categorised into yarn groups (from A to F) according to thickness and knitting tension – group A contains the thinnest yarns and group F the thickest. This makes it easier for you to find alternative yarns to our patterns, should you wish to switch yarn. All yarns within the same group have a similar knitting tension and can easily replace each other. However, different yarn qualities have different structures and properties which will give the finished work a unique look and feel.

Click here for an overview of the yarns in each yarn group

At the top of all our patterns you’ll find a link to our yarn calculator, which is a helpful tool should you wish to use a different yarn than suggested. By filling in the yarn quality you wish to replace, the amount (in your size) and number of strands, the calculator will present good alternative yarns with the same knitting tension. Additionally it will tell you how much you’ll require in the new qualities and whether you’ll need to work with multiple strands. Most skeins are 50g (some are 25g or 100g).

If the pattern is worked with multiple colours, every colour will have to be calculated separately. Similarly, if the pattern is worked with several strands of different yarns (for example 1 strand Alpaca and 1 strand Kid-Silk) you will have to find alternatives for each, individually.

Click here to see our yarn calculator

Since different yarns have different qualities and textures we have chosen to keep the original yarn in our patterns. However, you can easily find options among our available qualities by using our yarn calculator, or simply pick a yarn from the same yarn group.

It is possible that some retailers still have discontinued yarns in stock, or that someone has a few skeins at home that they would like to find patterns for.

The yarn calculator will provide both alternative yarn as well as required amount in the new quality.

If you think it's hard to decide what size to make, it can be a good idea to measure a garment you own already and like the size of. Then you can pick the size by comparing those measures with the ones available in the pattern's size chart.

You'll find the size chart at the bottom of the pattern.

See DROPS lesson: How to read size chart

The needle size provided in the pattern serves only as a guide, the important thing is to follow the knitting tension. And since knitting tension is very individual, you will have to adjust the needle size to ensure that YOUR tension is the same as in the pattern – maybe you’ll have to adjust 1, or even 2 needle sizes, up or down to achieve the correct tension. For this, we recommend that you work test swatches.

Should you work with a different knitting tension than the one provided, the measurements of the finished garment might deviate from the measurement sketch.

See DROPS lesson: How to measure your tension/gauge

See DROPS video: How to make a tension/gauge swatch

Working a garment top-down provides more flexibility and room for personal adjustment. For example it is easier to try the garment on while working, as well as making adjustments to length of yoke and shoulder caps.

The instructions are carefully explaining every step, in the correct order. Diagrams are adjusted to the knitting direction and are worked as usual.

The diagram depicts all rows/rounds, and every stitch seen from the right side. It is read from bottom to top, from right to left. 1 square = 1 stitch.

When working back and forth, every other row is worked from the right side and every other row is worked from the wrong side. When working from the wrong side, the diagram will have to be worked reversed: from left to right, knit stitches are purled, purl stitches are knit etc.

When working in the round every round is worked from the right side and the diagram are worked from right to left on all rounds.

See DROPS lesson: How to read knitting diagrams

The diagram depicts all rows/rounds, and every stitch seen from the right side. It is worked from bottom to top, from right to left.

When working back and forth every other row is worked from the right side: from right to left and every other row is worked from the wrong side: from left to right.

When working in the round, every row in the diagram are worked from the right side, from right to left.

When working a circular diagram you start in the middle and work your way outwards, counter clockwise, row by row.

The rows usually start with a given number of chain stitches (equivalent to the height of the following stitch), this will either be depicted in the diagram or explained in the pattern.

See DROPS lesson: How to read crochet diagrams

Instructions for working several diagrams after each other on the same row/round, will often be written like so: “work A.1, A.2, A.3 a total of 0-0-2-3-4 times". This means you work A.1 once, then A.2 is worked once, and A.3 is repeated (in width) the number of times provided for your size – in this case like so: S = 0 times, M = 0 times, L=2 times, XL= 3 times and XXL = 4 times.

The diagrams are worked as usual: begin with the first row in A.1, then work the first row in A.2 etc.

See DROPS lesson: How to read knitting diagrams

See DROPS lesson: How to read crochet diagrams

The total width of the garment (from wrist-to-wrist) will be larger in the larger sizes, despite the actual sleeves being shorter. The larger sizes have longer sleeve caps and wider shoulders, so there will be a good fit in all sizes.

The measurement sketch/schematic drawing provides information regarding the full length of the garment. If it’s a jumper or a jacket the length is measured from the highest point on the shoulder closest to the neckline, and straight down to the bottom of the garment. It is NOT measured from the tip of shoulder. Similarly, the length of yoke is measured from the highest point on the shoulder and down to where yoke is split into body and sleeves.

On a jacket measures are never taken along bands, unless specifically stated. Always measure inside band stitches when measuring the length.

See DROPS lesson: How to read a schematic drawing

Diagrams are often repeated on the round or in height. 1 repeat is the diagram the way it appears in the pattern. If it says to work 5 repeats of A.1 in the round, then you work A.1 a total of 5 times after/next to each other in the round. If it says to work 2 repeats of A.1 vertically/in height you work the entire diagram once, then begin again at the start and work the entire diagram one more time.

Chain stitches are slightly narrower than other stitches and to avoid working the cast-on edge too tight, we simply chain more stitches to begin with. The stitch count will be adjusted on the following row to fit the pattern and measurement sketch.

The rib edge is more elastic and will contract slightly compared to, for example, stocking stitch. By increasing before the rib edge, you avoid a visible difference in width between the rib edge and the rest of the body.

It’s very easy to cast off too tightly, and by making yarn overs while casting off (and simultaneously casting these off) you avoid a too tight cast off edge.

See DROPS video: How to bind off with yarn overs (yo)

To achieve an even increase (or decrease) you can increase on, for example: every 3rd and 4th row alternately, like so: work 2 rows and increase on the 3rd row, work 3 rows and increase on the 4th. Repeat this until the increase is complete.

See DROPS lesson: Increase or decrease 1 st on every 3rd and 4th row alternately

Should you prefer to work in the round instead of back and forth, you may of course adjust the pattern. You’ll need to add steeks mid-front (usually 5 stitches), and follow the instructions. When you would normally turn and work from the wrong side, simply work across the steek and continue in the round. At the end you’ll cut the piece open, pick up stitches to work bands, and cover the cut edges.

See DROPS video: How to knit steeks and cut open

Should you prefer to work back and forth instead of in the round, you may of course adjust the pattern so you work the pieces separately and then assemble them at the end. Divide the stitches for the body in 2, add 1 edge stitch in each side (for sewing) and work the front and back pieces separately.

See DROPS lesson: Can I adapt a pattern for circular needles into straight needles?

Pattern repeats can vary slightly in the different sizes, in order to get the correct proportions. If you’re not working the exact same size as the garment in the photo, yours might deviate slightly. This has been carefully developed and adjusted so that the complete impression of the garment is the same in all sizes.

Make sure to follow instructions and diagrams for your size!

If you have found a pattern you like which is available in women’s size it’s not very difficult to convert it to men’s size. The biggest difference will be the length of sleeves and body. Start working on the women size that you think would fit across the chest. The additional length will be worked right before you cast off for the armhole/sleeve cap. If the pattern is worked top-down you can add the length right after the armhole or before the first decrease on sleeve.

Regarding additional yarn amount, this will depend on how much length you add, but it is better with a skein too many than too few.

All yarns will have excess fibres (from production) that might come off as lint or shedding. Brushed yarns (ie hairier yarns) have more of these loose, excess fibres, causing more shedding.

Shedding also depends on what is worn under or over the garment, and whether this pulls at the yarn fibres. It’s therefore not possible to guarantee that there will be no shedding

Below are some tips on how to get the best result when working with hairier yarns:

1. When the garment is finished (before you wash it) shake it vigorously so the looser hairs come off. NOTE: do NOT use a lint roller, brush or any method that pulls at the yarn.

2. Place the garment in a plastic bag and put it in your freezer - the temperature will cause the fibres to become less attached to each other, and excess fibres will come off easier.

3. Leave in the freezer for a few hours before taking it out and shaking it again.

4. Wash the garment according to the instructions on the yarn label.

Pilling is a natural process that happens to even the most exclusive of fibers. It's a natural sign of wear and tear that is hard to avoid, and that is most visible in high friction areas of your garment like a sweater's arms and cuffs.

You can make your garment look as new by removing the pilling, using a fabric comb or a pill/lint remover.

Still can't find the answer you need? Then scroll down and leave your question so one of our experts can try to help you. This will be done normally within 5 to 10 working days.
In the meantime, you can read the questions and answers that others have left to this pattern or join the DROPS Workshop on Facebook to get help from fellow knitters/crocheters!

You might also like...

Post a comment to pattern DROPS 166-18

We would love to hear what you have to say about this pattern!

If you want to leave a question, please make sure you select the correct category in the form below, to speed up the answering process. Required fields are marked *.

Comments / Questions (125)

Sarin wrote:

Drops 166-18 Angegebene Maschenprobe =10x10cm 16 M.×20R. Warum bei Pulloverbreite von z.B. 54 cm ein Anschlag von 101 Maschen? Vielen Dank!

05.11.2017 - 15:22

DROPS Design answered:

Liebe Sarin, die Maschenprobe wird glatt rechts gestrickt, am Anfang vom Rückenteil stricken Sie Bündchen + A.1/A.2, deshalb braucht man mehr Maschen am Anfang. Viel Spaß beim stricken!

06.11.2017 - 09:48

country flag Andrea Lauxtermann wrote:

Liebe Drops Team! Ich bin etwas irritiert! Ich stricke gerade das Rückeneil.... Ist es richtig, daa die Ab- und Zunahmen weiter laufen und in der Mitte kaum noch rechte Maschen übrig sind? Es sieht auf dem Bild anders aus oder hab ich etas falsch gemachte?

18.10.2017 - 07:01

DROPS Design answered:

Liebe Frau Lauxermann, die Verschiebung von A.3 wird 18-25 x gemacht, dh das erste Mal wie beschrieben und noch weitere 17-19-20-21-22-24 Mal. Dann werden die Maschen ohne Ab- noch Zunahmen für Verschiebung gestrickt. Viel Spaß beim stricken!

18.10.2017 - 09:05

country flag Marjolein wrote:

Het is mij niet helemaal duidelijk hoe ik bij het verschuiven van A3 om moet gaan met A4. A4 bestaat uit twee steken terwijl er na de eerste 'schuifnaald' maar 1 extra steek is. Moet ik die dan de drie eerstvolgende naalden om en om recht en averecht breien? En dan bij de volgende 'schuifnaald' heb ik dan wel twee extra steken en kan ik A4 doen. Het gaat er dan volgens mij uiteindelijk uitzien zoals het middendeel van A3. Klopt dat?

04.10.2017 - 19:36

DROPS Design answered:

Hoi Marjolein, A.4 wordt allen gebreid bij de mouw en niet op de panden bij de verschuivingen. Bij het meerderen op de mouw brei je de gemeerderde steken gaandeweg in A.4 mee.

04.11.2017 - 15:23

country flag Marjolein wrote:

Moet je in de boordsteek de steken tussen A1 en A2 aan de goede en de verkeerde kant ook 'omkeren'? Ofwel aan de goede kant steeds 2av en 1r herhalen en aan de verkeerde kant 2r en 1 av herhalen?

07.06.2017 - 09:26

DROPS Design answered:

Hoi Marjolein, Ja dat klopt, voor de steken tussen A.1 en A.2 geldt: averecht op de goede kant is recht op de verkeerde kant en recht op de verkeerde kant is averecht op de goede kant. (In de telpatronen zijn alle naalden aagegeven op de goede kant.)

07.06.2017 - 10:54

country flag Gail Wasserman wrote:

I am now almost done with the back and am about to do shoulders. What does it mean where instructions say "work 1 ridge" over all stitches?j Thank you, Gail

21.04.2017 - 00:34

DROPS Design answered:

Dear Mrs Wasserman, before casting off, work 1 ridge (= K 2 rows) over all sts instead of working all sts in pattern as before. Happy knitting!

21.04.2017 - 08:58

country flag Gail Wasserman wrote:

Ok, now I understand the displacement--thank you. But am I making the same number of increases and decreases on the back every 4th row? Meaning each time I decrease on 4th row I am also making a YO after the garter stitches? In my size this would be 19 decreases on each side (so 38 increases) and 38 decreases. Thank you for your patience.

03.04.2017 - 17:49

DROPS Design answered:

Dear Mrs Wasserman, you will inc and dec every 4th row a total of 20 times (19 more times) in size M, number of sts will be the same since for every inc you will dec 1 st. Happy knitting!

04.04.2017 - 10:06

country flag Gail Wasserman wrote:

Thank you but I still don't understand the instruction to increase and decrease at the same time on the displacement part of the back. Can you please explain? thank you.

01.04.2017 - 17:57

DROPS Design answered:

Dear Mrs Wasserman, the video below shows how to make the displacement of the chart towards the middle. Happy knitting!

03.04.2017 - 10:12

country flag Gail Wasserman wrote:

I am up to the part of back where I have added garter stitches after A.1 and A.2 and am ready to do displacement of A.3 towards mid back. What do you mean by making 1 edge stitch in garter (where does this go -- at beginning and end of RS row?) and increasing as well as decreasing. Why am I both increasing and decreasing at the same time?

28.03.2017 - 20:01

DROPS Design answered:

Dear Mrs Wasserman, you were knitting A.1 (= 8 sts) and A.2 (= 8 sts), then you cast on 2 sts on each side and work now A.3 (= 9 sts) over A.1/A.2 + one of the new sts cast on and work now 1 edge st in garter st (= first/last st on row) on each side. Happy knitting!

29.03.2017 - 09:28

country flag Susanne wrote:

Ich finde in der Anleitung nicht, wie ich bei der Verschiebung die neu entstandenen Maschen zwischen Randmasche und A3 stricken soll. In dem Video sieht es so aus, als ob diese Maschen glatt rechts gestrickt werden, das Foto von dem Pullover zeigt aber ein Rippmuster (A4?)

05.03.2017 - 12:05

DROPS Design answered:

Liebe Suzanne, die neuen Maschen werden in A.4 eingearbeitet, siehe ZUNAHMETIP. Viel Spaß beim stricken!

06.03.2017 - 09:45

Evelyne wrote:

I'm working on the back of this sweater, but am stuck with the start of the A3 diagram. Do I just start with A3, knit the rest of the row and end with A3?

13.02.2017 - 10:09

DROPS Design answered:

Dear Evelyne, that's correct, see also below how to displace A.3. Happy knitting!

13.02.2017 - 12:10