The yarn cost is calculated from the pattern’s smallest size and the yarn’s cheapest product type. Looking for an even better price? You might find it on the DROPS Deals!
-------------------------------------------------------
Alternative Yarn – See how to change yarns here
Yarn Groups A to F – Use the same pattern and change the yarn here
Yarn usage using an alternative yarn – Use our yarn converter here
-------------------------------------------------------
The yarn cost is calculated from the pattern’s smallest size and the yarn’s cheapest product type. Looking for an even better price? You might find it on the DROPS Deals!
All measurements in charts are in cm.
= denim blue | |
= silver pink | |
= light old pink | |
= dark old rose | |
= petrol cerise | |
= dark mustard | |
= K 2 tog with base colour of pattern border or with colour in stripes |
Each of our patterns has specific tutorial videos to help you.
These step-by-step tutorials might also help you:
Why is the knitting/crochet tension so important?
Knitting tension is what determines the final measurements of your work, and is usually measured per 10 x 10 cm. It is provided like so: number of stitches in width x number of rows in height - eg: 19 stitches x 26 rows = 10 x 10 cm.
The knitting tension is very individual; some people knit/crochet loosely while others work tightly. You adjust the knitting tension with the needle size, which is why the suggested needle size only serve as a guide! You need to adjust this (up or down) to ensure that YOUR knitting tension matches the knitting tension provided in the pattern. If you work with a different knitting tension than provided you will have a different yarn consumption, and your work will have different measurements than what the pattern suggests.
The knitting tension also determines which yarns can replace each other. As long as you achieve the same knitting tension you can replace one yarn with another.
See DROPS lesson: How to measure your tension/gauge
See DROPS video: How to make a gauge tension swatch
How do I know how many balls of yarn I need?
The required amount of yarn is provided in grams, eg: 450 g. To calculate how many balls you’ll need you first need to know how many grams are in 1 ball (25g, 50g or 100g). This information is available if you click on the individual yarn quality on our pages. Divide the amount required with the amount of each ball. For example, if each ball is 50g (the most common amount), the calculation will be as follows: 450 / 50 = 9 balls.
Can I use a different yarn than what the pattern suggests?
The important thing when changing from one yarn to another is that the knitting/crochet tension remains the same. This is so that the measurements of the finished piece will be the same as on the sketch provided. It is easier to achieve the same knitting tension using yarns from the same yarn group. It is also possible to work with multiple strands of a thinner yarn to achieve the knitting tension of a thicker one. Please try our yarn converter. We recommend you to always work a test swatch.
Please NOTE: when changing yarn the garment might have a different look and feel to the garment in the photo, due to individual properties and qualities of each yarn.
See DROPS lesson: Can I use a different yarn than the one mentioned in the pattern?
What are the yarn groups?
All our yarns are categorised into yarn groups (from A to F) according to thickness and knitting tension – group A contains the thinnest yarns and group F the thickest. This makes it easier for you to find alternative yarns to our patterns, should you wish to switch yarn. All yarns within the same group have a similar knitting tension and can easily replace each other. However, different yarn qualities have different structures and properties which will give the finished work a unique look and feel.
How do I use the yarn converter?
At the top of all our patterns you’ll find a link to our yarn converter, which is a helpful tool should you wish to use a different yarn than suggested. By filling in the yarn quality you wish to replace, the amount (in your size) and number of strands, the converter will present good alternative yarns with the same knitting tension. Additionally it will tell you how much you’ll require in the new qualities and whether you’ll need to work with multiple strands. Most skeins are 50g (some are 25g or 100g).
If the pattern is worked with multiple colours, every colour will have to be converted separately. Similarly, if the pattern is worked with several strands of different yarns (for example 1 strand Alpaca and 1 strand Kid-Silk) you will have to find alternatives for each, individually.
Why do you show discontinued yarns in the patterns?
Since different yarns have different qualities and textures we have chosen to keep the original yarn in our patterns. However, you can easily find options among our available qualities by using our yarn converter, or simply pick a yarn from the same yarn group.
It is possible that some retailers still have discontinued yarns in stock, or that someone has a few skeins at home that they would like to find patterns for.
The yarn converter will provide both alternative yarn as well as required amount in the new quality.
What size should I knit?
If you think it's hard to decide what size to make, it can be a good idea to measure a garment you own already and like the size of. Then you can pick the size by comparing those measures with the ones available in the pattern's size chart.
You'll find the size chart at the bottom of the pattern.
See DROPS lesson: How to read size chart
Why do I get the wrong knitting tension with the suggested needle size?
The needle size provided in the pattern serves only as a guide, the important thing is to follow the knitting tension. And since knitting tension is very individual, you will have to adjust the needle size to ensure that YOUR tension is the same as in the pattern – maybe you’ll have to adjust 1, or even 2 needle sizes, up or down to achieve the correct tension. For this, we recommend that you work test swatches.
Should you work with a different knitting tension than the one provided, the measurements of the finished garment might deviate from the measurement sketch.
See DROPS lesson: How to measure your tension/gauge
See DROPS video: How to make a gauge tension swatch
Why is the pattern worked top-down?
Working a garment top-down provides more flexibility and room for personal adjustment. For example it is easier to try the garment on while working, as well as making adjustments to length of yoke and shoulder caps.
The instructions are carefully explaining every step, in the correct order. Diagrams are adjusted to the knitting direction and are worked as usual.
How do I work according to a knitting diagram?
The diagram depicts all rows/rounds, and every stitch seen from the right side. It is read from bottom to top, from right to left. 1 square = 1 stitch.
When working back and forth, every other row is worked from the right side and every other row is worked from the wrong side. When working from the wrong side, the diagram will have to be worked reversed: from left to right, knit stitches are purled, purl stitches are knit etc.
When working in the round every round is worked from the right side and the diagram are worked from right to left on all rounds.
See DROPS lesson: How to read knitting diagrams
How do I work according to a crochet diagram?
The diagram depicts all rows/rounds, and every stitch seen from the right side. It is worked from bottom to top, from right to left.
When working back and forth every other row is worked from the right side: from right to left and every other row is worked from the wrong side: from left to right.
When working in the round, every row in the diagram are worked from the right side, from right to left.
When working a circular diagram you start in the middle and work your way outwards, counter clockwise, row by row.
The rows usually start with a given number of chain stitches (equivalent to the height of the following stitch), this will either be depicted in the diagram or explained in the pattern.
See DROPS lesson: How to read crochet diagrams
How do I work several diagrams simultaneously on the same row/round?
Instructions for working several diagrams after each other on the same row/round, will often be written like so: “work A.1, A.2, A.3 a total of 0-0-2-3-4 times". This means you work A.1 once, then A.2 is worked once, and A.3 is repeated (in width) the number of times provided for your size – in this case like so: S = 0 times, M = 0 times, L=2 times, XL= 3 times and XXL = 4 times.
The diagrams are worked as usual: begin with the first row in A.1, then work the first row in A.2 etc.
See DROPS lesson: How to read knitting diagrams
See DROPS lesson: How to read crochet diagrams
Why are the sleeves shorter in larger sizes?
The total width of the garment (from wrist-to-wrist) will be larger in the larger sizes, despite the actual sleeves being shorter. The larger sizes have longer sleeve caps and wider shoulders, so there will be a good fit in all sizes.
Where on the garment is the length measured?
The measurement sketch/schematic drawing provides information regarding the full length of the garment. If it’s a jumper or a jacket the length is measured from the highest point on the shoulder (usually closest to the neckline), and straight down to the bottom of the garment. It is NOT measured from the tip of shoulder. Similarly, the length of yoke is measured from the highest point on the shoulder and down to where yoke is split into body and sleeves.
See DROPS lesson: How to read a schematic drawing
What is a repeat?
Diagrams are often repeated on the round or in height. 1 repeat is the diagram the way it appears in the pattern. If it says to work 5 repeats of A.1 in the round, then you work A.1 a total of 5 times after/next to each other in the round. If it says to work 2 repeats of A.1 vertically/in height you work the entire diagram once, then begin again at the start and work the entire diagram one more time.
Why does the piece start with more chain stitches than it’s worked with?
Chain stitches are slightly narrower than other stitches and to avoid working the cast-on edge too tight, we simply chain more stitches to begin with. The stitch count will be adjusted on the following row to fit the pattern and measurement sketch.
Why increase before the rib edge when the piece is worked top-down?
The rib edge is more elastic and will contract slightly compared to, for example, stocking stitch. By increasing before the rib edge, you avoid a visible difference in width between the rib edge and the rest of the body.
Why increase in the cast-off edge?
It’s very easy to cast off too tightly, and by making yarn overs while casting off (and simultaneously casting these off) you avoid a too tight cast off edge.
See DROPS video: How to bind off with yarn overs (yo)
How do I increase/decrease on every 3rd and 4th row/round alternately?
To achieve an even increase (or decrease) you can increase on, for example: every 3rd and 4th row alternately, like so: work 2 rows and increase on the 3rd row, work 3 rows and increase on the 4th. Repeat this until the increase is complete.
See DROPS lesson: Increase or decrease 1 st on every 3rd and 4th row alternately
How can I work a jacket in the round instead of back and forth?
Should you prefer to work in the round instead of back and forth, you may of course adjust the pattern. You’ll need to add steeks mid-front (usually 5 stitches), and follow the instructions. When you would normally turn and work from the wrong side, simply work across the steek and continue in the round. At the end you’ll cut the piece open, pick up stitches to work bands, and cover the cut edges.
See DROPS video: How to knit steeks and cut open
Can I work a jumper back and forth instead of in the round?
Should you prefer to work back and forth instead of in the round, you may of course adjust the pattern so you work the pieces separately and then assemble them at the end. Divide the stitches for the body in 2, add 1 edge stitch in each side (for sewing) and work the front and back pieces separately.
See DROPS lesson: Can I adapt a pattern for circular needles into straight needles?
Why is the pattern slightly different than what I see in the photo?
Pattern repeats can vary slightly in the different sizes, in order to get the correct proportions. If you’re not working the exact same size as the garment in the photo, yours might deviate slightly. This has been carefully developed and adjusted so that the complete impression of the garment is the same in all sizes.
Make sure to follow instructions and diagrams for your size!
How do I make a women’s size garment into a men’s size one?
If you have found a pattern you like which is available in women’s size it’s not very difficult to convert it to men’s size. The biggest difference will be the length of sleeves and body. Start working on the women size that you think would fit across the chest. The additional length will be worked right before you cast off for the armhole/sleeve cap. If the pattern is worked top-down you can add the length right after the armhole or before the first decrease on sleeve.
Regarding additional yarn amount, this will depend on how much length you add, but it is better with a skein too many than too few.
How do I prevent a hairy garment from shedding?
All yarns will have excess fibres (from production) that might come off as lint or shedding. Brushed yarns (ie hairier yarns) have more of these loose, excess fibres, causing more shedding.
Shedding also depends on what is worn under or over the garment, and whether this pulls at the yarn fibres. It’s therefore not possible to guarantee that there will be no shedding
Below are some tips on how to get the best result when working with hairier yarns:
1. When the garment is finished (before you wash it) shake it vigorously so the looser hairs come off. NOTE: do NOT use a lint roller, brush or any method that pulls at the yarn.
2. Place the garment in a plastic bag and put it in your freezer - the temperature will cause the fibres to become less attached to each other, and excess fibres will come off easier.
3. Leave in the freezer for a few hours before taking it out and shaking it again.
4. Wash the garment according to the instructions on the yarn label.
Why does my garment pill?
Pilling is a natural process that happens to even the most exclusive of fibers. It's a natural sign of wear and tear that is hard to avoid, and that is most visible in high friction areas of your garment like a sweater's arms and cuffs.
You can make your garment look as new by removing the pilling, using a fabric comb or a pill/lint remover.
Mariuska |
||||||||||||||||||||||
|
|
|||||||||||||||||||||
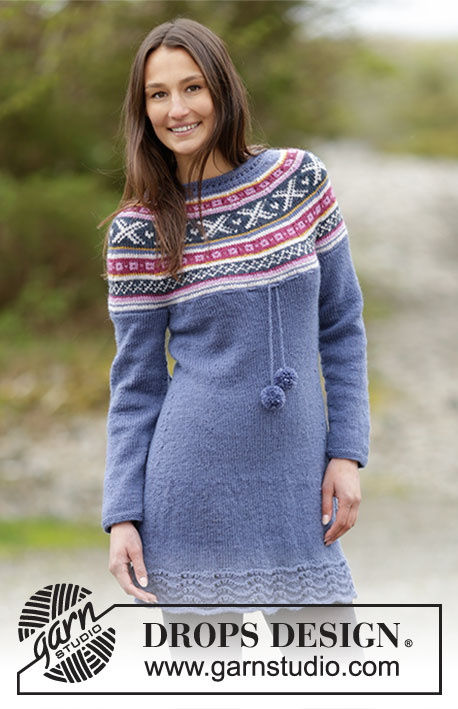
Set consists of: Knitted DROPS jumper with round yoke and Norwegian pattern and hat with Norwegian pattern and pompom in "Karisma" Size: S - XXXL.
DROPS 165-23 |
||||||||||||||||||||||
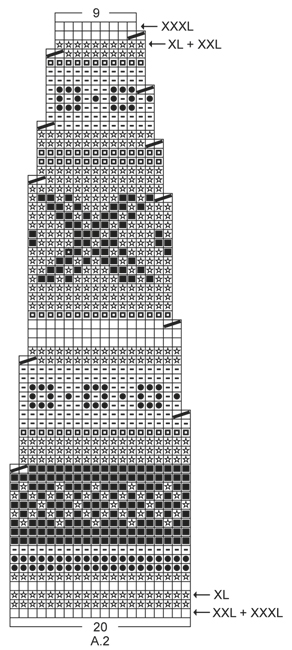
GARTER ST (worked in the round): * K 1 round and P 1 round *, repeat from *-*. 1 ridge = 2 rounds. PATTERN: See diagrams A.1 to A.3 – choose diagram for correct size. Work entire pattern in stockinette st. DECREASE TIP (applies to waist): Dec for waist front and back at the 4 markers. Dec as follows after 1st and 3rd marker: Slip 1 st as if to K, K 1, psso. Dec as follows when 2 sts remain before 2nd and 4th marker: K 2 tog. INCREASE TIP (applies to waist): Inc for waist front and back at the 4 markers. Inc as follows: Make 1 YO after 1st and 3rd marker and before 2nd and 4th marker. On next round K YOs twisted to avoid holes. ---------------------------------------------------------- JUMPER: BODY: Worked in the round on circular needle. Cast on 160-176-192-216-240-268 sts on circular needle size 3 mm / US 2.5 with denim blue. Work 2 ridges in GARTER ST - see explanation above. Switch to circular needle size 4 mm / US 6 and work 2 round in stockinette st. Then continue pattern in the round according to diagram A.1. When A.1 has been done, continue with denim blue and stockinette st. REMEMBER THE KNITTING GAUGE When piece measures 8 cm / 3 1/8'', insert 4 markers in the piece as follows: Insert 1st marker after the first 21-24-27-32-37-43 sts, 2nd marker after the next 38-40-42-44-46-48 sts, 3rd marker after the next 42-48-54-64-74-86 sts and 4th marker after the next 38-40-42-44-46-48 sts (= 21-24-27-32-37-43 sts remain on needle after last marker). On next round, dec after 1st and 3rd marker and before 2nd and 4th marker – Read DECREASE TIP (= 4 sts dec). Repeat dec when piece measures 16 cm / 6 1/4'' = 152-168-184-208-232-260 sts. When piece measures 22 cm / 8 3/4'', inc after 1st and 3rd marker and before 2nd and 4th marker – READ INCREASE TIP (= 4 sts inc). Repeat inc every 3-3-3-3½-3½-3½ cm / 1"-1"-1"-1 1/4"-1 1/4"-1 1/4" 4 times in total = 168-184-200-224-248-276 sts. Continue to work until piece measures 35-36-37-38-39-40 cm / 13¾''-14¼''-14½''-15''-15¼''-15¾''. Work next round as follows: bind off 3-3-4-4-5-5 sts for armhole, work 78-86-92-104-114-128 sts (= front piece), bind off 6-6-8-8-10-10 sts for armhole, work 78-86-92-104-114-128 sts (= back piece) and bind off the last 3-3-4-4-5-5 sts for armhole. Put piece aside and knit the sleeves. SLEEVE: Worked in the round on double pointed needles. Cast on 48-48-48-52-52-56 sts on double pointed needles size 3 mm / US 2.5 with denim blue. Work 2 ridges. Switch to double pointed needles size 4 mm / US 6 and K 2 round. Then continue pattern in the round according to diagram A.1. When A.1 has been done, continue with denim blue and stockinette st. When piece measures 10-10-8-8-10-10 cm / 4''-4"-3"-3"-4"-4", inc 2 sts mid under sleeve. Repeat inc every 3-2½-2½-2½-2-2 cm / 1 1/8"-7/8"-7/8"-7/8"-3/4"-3/4" 11-13-14-14-15-15 times in total = 70-74-76-80-82-86 sts. When piece measures 44-44-43-43-42-42 cm / 17 1/4"-17 1/4"-17"-17"-16½"-16½" (NOTE: Shorter measurements in the larger sizes because of wider shoulders), bind off the middle 6-6-8-8-10-10 sts under sleeve = 64-68-68-72-72-76 sts remain on needle. Put piece aside and make another sleeve. YOKE: Slip sleeves on to same circular needle as body where armholes were bound off (without working them first) = 284-308-320-352-372-408 sts. K 1 round with denim blue while dec 4-8-0-12-12-8 sts evenly = 280-300-320-340-360-400 sts. Then work pattern in the round according to diagram A.2 (choose diagram for correct size and beg and finish on round marked with arrow for correct size = 14-15-16-17-18-20 repetitions on round). Dec as shown in diagram. When diagram A.2 has been worked, there are 140-150-160-170-180-180 sts on needle and piece measures approx. 54-56-58-60-62-64 cm / 21¼''-22''-22¾''-23 5/8''-24 3/8''-25¼'' up to shoulder. ELEVATION IN BACK OF NECK: For better shape work an elevation in the back of neck as follows: Insert 1 marker mid back. Beg from RS with denim blue and K 16-17-18-19-20-21 sts past marker, turn, tighten yarn and P 32-34-36-38-40-42 sts. Turn, tighten yarn and K 48-51-54-57-60-63 sts, turn, tighten yarn and P 64-68-72-76-80-84 sts. Turn, tighten yarn and K 80-85-90-95-100-105 sts, turn, tighten yarn and P 96-102-108-114-120-126 sts. Turn piece, tighten yarn and K until mid back. Now K 1 round while dec 38-44-50-54-60-60 sts evenly (i.e. in size S + M K alternately every 2nd and 3rd st and every 3rd and 4th st tog and in size L + XL + XXL + XXXL K approx. every 2nd and 3rd st tog the entire round) = 102-106-110-116-120-120 sts. NECK EDGE: Switch to a short circular needle size 3 mm / US 2.5 and P 1 round, K 1 round and P 1 round, then loosely bind off with K. ASSEMBLY: Sew the openings under the sleeves. ---------------------------------------------------------- HAT: Worked in the round on circular needle, switch to double pointed needles when needed. Cast on 116-124 sts on circular needle size 3 mm / US 2.5 with Denim blue. Work rib = K 2/P 2 for 4 cm / 1½''. Switch to circular needle size 3.5 mm / US 4 and K 1 round while at the same time dec 8-4 sts evenly = 108-120 sts. Then work pattern according to diagram A.3 (= 9-10 repetitions on round). REMEMBER THE KNITTING GAUGE After A.3 continue in stockinette st with denim blue. When piece measures 18-20 cm / 7"-8", insert 9-10 markers in the piece, 12 sts apart. On next round, dec 1 st after every marker by K 2 tog. Repeat dec every other round a total of 4 times and then every round 7 times in total = 9-10 sts remain on needle. Cut the yarn and pull it through the remaining sts, tighten tog and fasten. The hat measures approx. 23-25 cm / 9"-9 3/4" vertically. POMPOM: Make a pompom with denim blue with an approx. of diameter 8 cm / 3 1/8'' and fasten it at the tip of the hat. |
||||||||||||||||||||||
Diagram explanations |
||||||||||||||||||||||
|
||||||||||||||||||||||
Have you made this or any other of our designs? Tag your pictures in social media with #dropsdesign so we can see them! Do you need help with this pattern?You'll find tutorial videos, a Comments/Questions area and more by visiting the pattern on garnstudio.com. © 1982-2024 DROPS Design A/S. We reserve all rights. This document, including all its sub-sections, has copyrights. Read more about what you can do with our patterns at the bottom of each pattern on our site. |
With over 40 years in knitting and crochet design, DROPS Design offers one of the most extensive collections of free patterns on the internet - translated to 17 languages. As of today we count 304 catalogs and 11422 patterns - 11417 of which are translated into English (US/in).
We work hard to bring you the best knitting and crochet have to offer, inspiration and advice as well as great quality yarns at incredible prices! Would you like to use our patterns for other than personal use? You can read what you are allowed to do in the Copyright text at the bottom of all our patterns. Happy crafting!
Comments / Questions (19)
Susan Mosman wrote:
RONDING OP HET ACHTERPAND VOOR DE HALS: Brei voor een betere pasvorm op het achterpand een rondong als volgt: Plaats 1 markeerder middenachter. Begin aan de goede kant met denimblauw en brei 16-17-18-19-20-21 r voorbij de markeerder, Mijn vraag is nu wat is de goede kant. Waar moet ik beginnen?
06.04.2022 - 20:07DROPS Design answered:
Dag Susan,
De goede kant is de kant waar je steeds recht breit (dus zoals het kledingstuk er aan de buitenkant uitziet als je het draagt), Je breit dus eerst een aantal steken recht aan de goede voorbij de markeerdraad, dan keer je het werk en brei je averecht terug, dit herhaal je steeds met het aantal aangegeven steken voorbij de markeerdraad zoals aangegeven.
09.04.2022 - 10:01Kathrin wrote:
Hallo! Das ist ein ganz toller Pullover mit schönem Muster. Ein kleiner Hinweis von mir: Der Rundenbeginn an der Passe ist laut Anleitung am linken Ärmel hinten, also am linken Schulterblatt. Um die Mitte des Musters auch in die vordere Mitte des Pullovers zu bekommen, könnte man im Muster A2 einen Pfeil an die Masche setzen, bei der man die Passe beginnt für die jeweilige Größe. Also bei Gr. L beginnt man die Passe mit der 16. Masche des Musters. LG Kathrin
04.01.2021 - 22:43Elena wrote:
Buongiorno, per realizzare il berretto viene indicato di usare i ferri circolari 40 cm. Io uso ferri circolari intercambiabili: devo usare le punte corte oppure punte standard? Grazie.
22.09.2018 - 15:36DROPS Design answered:
Buonasera Elena, dipende dal suo set di ferri: se con il cavo da 40 cm il suo set prevede l'uso delle punte accorciate usi pure quelle. Ad un certo punto, quando diminuirà il numero di maglie, dovrà per forza utilizzare il gioco di ferri. Buon lavoro!!
22.09.2018 - 22:36François wrote:
Bonjour, Je ne comprends pas la différence de longueur du corps entre les instructions et le dessin : dans les instructions, on raccorde l'empiècement après 40cm pour la plus grande taille, mais sur dessin il est indiqué 64cm ... 24cm de différence me paraissent énormes ! Pouvez-vous svp m'expliquer comment cela est possible? Merci beaucoup François
16.03.2018 - 09:11DROPS Design answered:
Bonjour Mme François, le bas du pull mesure 40 cm + 24 cm de hauteur d'empiècement = 64 cm au total. Bon tricot!
16.03.2018 - 09:44Susanne Behrens wrote:
Guten Tag, ich würde gern diesen Pullover stricken, allerdings nicht tailliert, er soll locker sitzen. Wie komme ich mit der Strickschrift hin. Gern würde ich Merinowolle verwenden, welche empfehlen Sie und welche Farben müsste ich dann nehmen? MfG Susanne Behrens
04.02.2017 - 12:36DROPS Design answered:
Liebe Frau Behrens, Sie können einfach die Ab- und Zunhamen beim Rumpfteil nicht bearbeiten (es kann aber mehr Wolle brauchen). Als Merinoalternative können Sie Merino Extra Fine stricken (siehe hier, lesen Sie mehr über alternative hier. Ihr DROPS Laden wird Ihnen gerne mit den passenden Farben helfen. Viel Spaß beim stricken!
06.02.2017 - 09:18Marie Johanne Ødegård wrote:
Hei. Det må være en feil i oppskriften. Det står at det skal være 100 gr lys beige nr 71. Men på fargekartet er det en annen farge. Så hvem er riktig.
31.01.2017 - 10:53DROPS Design answered:
Hej Marie. Nej, det er nummer 71 du skal have. Den har bare skiftet navn til sølvrosa i mellemtiden - men det er samme farve, men det nye navn var mere passende.
31.01.2017 - 15:23Henrike wrote:
Kann man diesen Pullover auch mit kurzen Ärmeln stricken?
23.12.2016 - 19:15DROPS Design answered:
Lieber Henrike, gerne können Sie diesen Pullover mit kurzen Ärmel stricken, für weitere persönnliche Hilfe kontaktieren Sie bitte Ihren DROPS Laden". Viel Spaß beim stricken!
29.12.2016 - 13:24Carmen wrote:
Cuando pone hacer dos pliegues a que se refiere? soy novata y me cuesta.
01.10.2016 - 07:03DROPS Design answered:
Hola Carmen. 1 pliegue = 2 filas de derecho ( si trabajamos de ida y vta) o 1 vta de derecho, 1 vta de revés (si trabajamos en redondo). 2 pliegues = 4 filas/vtas.
07.10.2016 - 18:00Heckmann wrote:
Bonjour , ce modèle me plait beaucoup , mais j'aimerais le réaliser ...du bas vers le haut ! comment faire ? Merci pour vos informations cordialement
13.06.2016 - 16:25DROPS Design answered:
Bonjour Mme Heckmann, nous ne sommes malheureusement pas en mesure de pouvoir adapter chaque modèle à chaque demande, vous pouvez vous aider d'un modèle réalisé de haut en bas et ajuster les explications de ce modèle. Merci de bien vouloir contacter votre magasin DROPS pour toute assistance individuelle complémentaire. Bon tricot!
13.06.2016 - 17:46Weiss wrote:
Hallo, Sie mussen den Rand mit kleineren nadeln stricken... Cathie
23.01.2016 - 18:59