
Popular categories
Looking for a yarn?


|
||||||||||||||||||||||
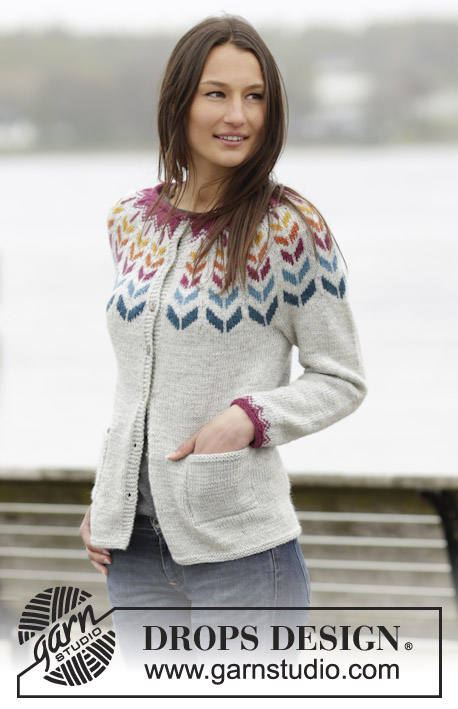
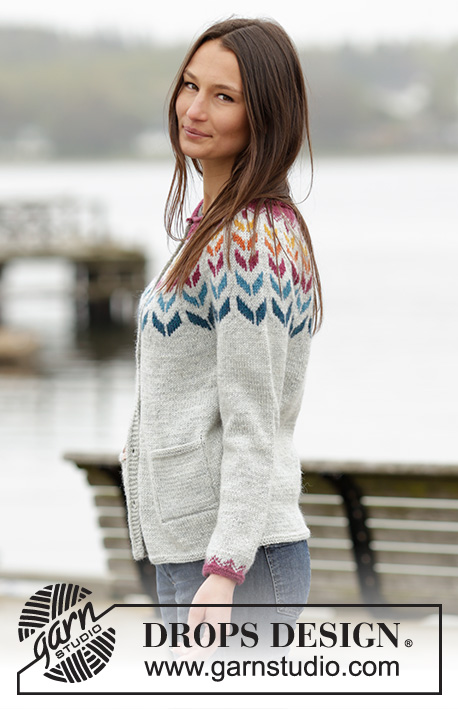
Joyride Cardigan |
||||||||||||||||||||||
 |
 |
|||||||||||||||||||||
Knitted DROPS jacket with round yoke and Nordic pattern in "Karisma". Size: S - XXXL.
DROPS 166-2 |
||||||||||||||||||||||
|
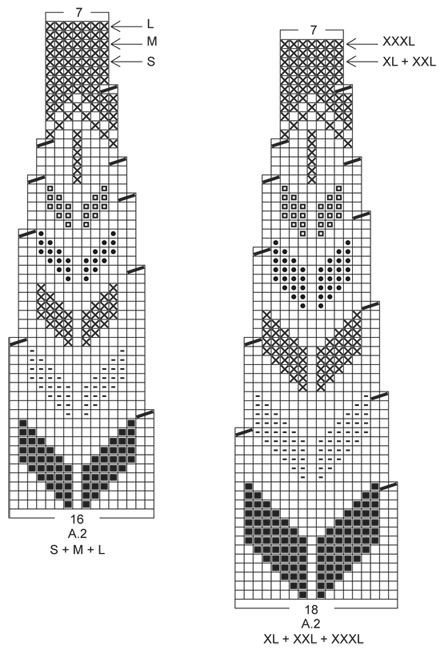
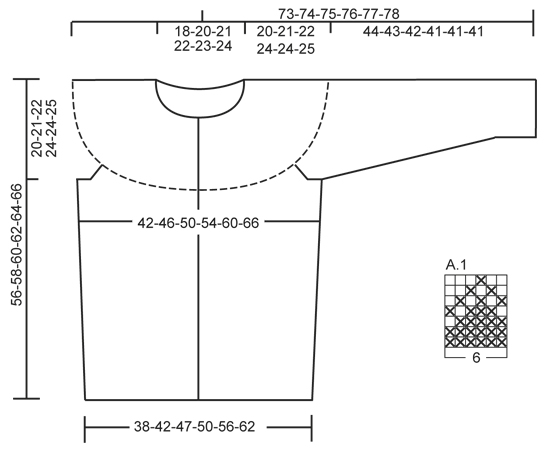
GARTER ST (back and forth): K all rows. 1 ridge = K2 rows. GARTER ST (worked in the round): * K 1 round and P 1 round *, repeat from *-*. 1 ridge = 2 rounds. INCREASE TIP: All inc are done from RS. Inc 1 st by picking up a st from previous row, K this st. BUTTONHOLES: Dec for buttonholes on right band. 1 buttonhole = K tog third and fourth st from edge and make 1 YO. Dec for buttonholes when piece measures: SIZE S: 7, 15, 23, 31, 39, 47 and 54 cm / 2¾",6",9",12¼",15¼",18½",21¼" SIZE M: 9, 17, 25, 33, 41, 49 and 56 cm / 3½",6¾",9¾",13",16⅛",19¼",22" SIZE L: 11, 19, 27, 35, 43, 51 and 58 cm / 4⅜",7½",10⅝",13¾",17",20",22¾" SIZE XL: 12, 19, 26, 33, 40, 47, 54 and 60 cm / 4¾",7½",10¼",13",15¾",18½",21¼",23⅝" SIZE XXL: 9, 17, 25, 33, 41, 49, 56 and 62 cm / 3½",6¾",9¾",13",16",19¼",22",24½" SIZE XXXL: 9, 17, 25, 33, 41, 49, 57 and 64 cm / 3½",6¾",9¾",13",16",19¼",22½",25¼" RAGLAN: Dec for raglan on each side of marker in every transition between sleeves and body. Beg 2 sts before marker, K 2 tog, slip 1 st as if to K, K 1, psso (= 2 sts dec). PATTERN: See diagrams A.1 and A.2 (choose diagram for correct size). The diagrams show all rows in pattern seen from RS. KNITTING TIP: To avoid the knitting gauge to tighten when working pattern on yoke, it is important not to tighten the strands on back side of piece. Switch to a higher needle no when working pattern if the pattern is somewhat tight. ---------------------------------------------------------- BODY: Worked back and forth on circular needle from mid front. Cast on 170-186-206-222-246-270 sts (includes 5 band sts in each side towards mid front) on circular needle size 3 mm / US 2.5 with light pearl gray. Work 3 ridges in GARTER ST - see explanation above. Switch to circular needle size 4 mm / US 6 and work in stockinette st with 5 band sts in garter st in each side towards mid front. REMEMBER THE KNITTING GAUGE and remember to dec for BUTTONHOLES on right band - see explanation above. When piece measures 8 cm / 3⅛", insert 1 marker 45-49-54-58-64-70 sts in from each side = 80-88-98-106-118-130 sts between markers on back piece. Now inc 1 st on each side of both markers – READ INCREASE TIP (= 4 sts inc). Repeat the inc in each side on every 8 cm / 3⅛" a total of 4 times = 186-202-222-238-262-286 sts. When piece measures 36-37-38-38-40-41 cm / 14¼"-14½"-15"-15"-15¾"-16", bind off 6-6-8-8-10-10 sts in each side for armholes (i.e. Bind off 3-3-4-4-5-5 sts on each side of both markers) = 82-90-98-106-116-128 sts remain on back piece and 46-50-54-58-63-69 sts on each front piece. Put piece aside and knit the sleeves. SLEEVE: Worked in the round on double pointed needles. Cast on 48-48-54-54-54-60 sts on double pointed needles size 3 mm / US 2.5 with dark old rose. Work 2 ridges. Switch to double pointed needles size 4 mm / US 6 and work pattern in the round according to diagram A.1 (= 8-8-9-9-9-10 repetitions on round). After A.1 continue in stockinette st with light pearl gray. When piece measures 7-9-9-9-10-11 cm / 2¾"-3½"-3½"-3½"-4"-4½", inc 2 sts mid under sleeve. Repeat inc every 3½-2½-3-2½-2-2 cm / 1¼"-⅞"-1⅛"-⅞"-¾"-¾" a total of 11-13-11-13-15-14 times = 70-74-76-80-84-88 sts. When piece measures 44-43-42-41-41-41 cm / 17¼"-17"-16½"-16"-16"-16" (NOTE: Shorter measurements in the larger sizes because of wider shoulders), bind off the middle 6-6-8-8-10-10 sts under sleeve = 64-68-68-72-74-78 sts remain on needle. Put piece aside and make another sleeve. YOKE: Slip sleeves on to same circular needle as body where armholes were bound off = 302-326-342-366-390-422 sts. Insert 1 marker in every transition between sleeves and body = 4 markers. Then work in stockinette st with light pearl gray (continue bands in garter st). AT THE SAME TIME on first row from RS beg dec for RAGLAN – see explanation above (= 8 sts dec). Repeat dec for raglan every other row (i.e. every row from RS) 2-2-3-3-3-3 times in total = 286-310-318-342-366-398 sts. After last row with dec, P 1 row from WS (continue bands in garter st) while dec 3-11-3-7-13-9 sts evenly (do not dec over bands) = 283-299-315-335-353-389 sts on needle. READ KNITTING TIP! Work next row as follows from RS: Work 5 band sts as before, work pattern according to diagram A.2 until 6 sts remain on row (choose diagram for correct size = 17-18-19-18-19-21 repetitions), finish with 1 st in stockinette st with light pearl gray and 5 band sts in garter st as before. Continue pattern like this and dec as shown in diagram. When A.2 has been worked (finish after a row marked with arrow in diagram for correct size), there are 130-137-144-137-144-158 sts on needle and piece measures approx. 56-58-60-62-64-66 cm / 22"-22¾"-23⅝"-24⅜"-25¼"-26" up to shoulder. ELEVATION IN BACK OF NECK: For better fit work an elevation at the back of neck. Insert 1 marker mid back. Beg from RS with dark old rose and K as before until 20-21-22-23-24-25 sts have been worked past marker, turn, tighten yarn and P 40-42-44-46-48-50 sts back. Turn, tighten yarn and K 50-52-54-56-58-60 sts, turn, tighten yarn and P 60-62-64-66-68-70 sts back. Turn, tighten yarn and K 70-72-74-76-78-80 sts, turn, tighten yarn and P 80-82-84-86-88-90 sts back. Turn and K the rest of the row. P 1 row from WS with dark old rose while dec 38-35-38-25-28-38 sts evenly (do not dec over bands) = 92-102-106-112-116-120 sts - NOTE: Remember that last buttonhole should be in the transition between body and neck edge). NECK EDGE: Switch to circular needle size 3 mm / US 2.5 and work 5 rows in stockinette st (= roll edge) with dark old rose, then bind off with P from WS. ASSEMBLY: Sew the openings under the sleeves. Sew on buttons. POCKETS: Worked back and forth on double pointed needles. Cast on 24-24-26-28-30-30 sts on 1 double pointed needle size 3 mm / US 2.5 with light pearl gray. Work 3 ridges. Switch to double pointed needles size 4 mm / US 6 and work in stockinette st with 1 edge st in garter st in each side. Bind off when pocket measures 12-12-13-14-15-15 cm / 4¾"-4¾"-5"-5½"-6"-6". Knit another pocket. Place one pocket on each front piece, approx. 8-9-10-11-12-13 cm / 3⅛"-3½"-4"-4⅜"-4¾"-5⅛" from mid front and approx. 6-7-7-8-8-8 cm / 2⅜"-2¾"-2¾"-3⅛"-3⅛"-3⅛" from bottom edge (try the jacket and pockets on for desired placement). Sew on pockets with grafting/kitchener stitches inside 1 edge st. |
||||||||||||||||||||||
Diagram explanations |
||||||||||||||||||||||
|
||||||||||||||||||||||
|
||||||||||||||||||||||
|
||||||||||||||||||||||
|
Have you made this or any other of our designs? Tag your pictures in social media with #dropsdesign so we can see them! Do you need help with this pattern?You'll find tutorial videos, a Comments/Questions area and more by visiting the pattern on garnstudio.com. © 1982-2024 DROPS Design A/S. We reserve all rights. This document, including all its sub-sections, has copyrights. Read more about what you can do with our patterns at the bottom of each pattern on our site. |
||||||||||||||||||||||


With over 40 years in knitting and crochet design, DROPS Design offers one of the most extensive collections of free patterns on the internet - translated to 17 languages. As of today we count 304 catalogs and 11422 patterns - 11417 of which are translated into English (US/in).
We work hard to bring you the best knitting and crochet have to offer, inspiration and advice as well as great quality yarns at incredible prices! Would you like to use our patterns for other than personal use? You can read what you are allowed to do in the Copyright text at the bottom of all our patterns. Happy crafting!
Comments / Questions (26)
Strikke str.xl, orginal garn, tjekket alt passer gennem arbejdet, kommer til bærestykket, tager ind som der står, efter disse indtagninger passer maskeantal så pludselig med Str.L? 318m ikke 342m som til Str.Xl Hvad sker der?
29.12.2022 - 10:52DROPS Design answered:
Hej Tine, i XL har du 366 masker, tager 8mx3=24 m ind= 342m-7=335m :)
04.01.2023 - 12:24It seems the finished measurements are incorrect on the English version. They are enormous. If I calculate the stitch count out by the gauge it is much more reasonable. Can you confirm the bust and sleeve length measurements for each size please?
10.10.2022 - 21:58DROPS Design answered:
Dear Mrs Clapp, the measurements in the chart are taken flat, from side to side, in cm - convert into inches here - read more about reading measurement chart here. Hope it can help. Happy knitting!
11.10.2022 - 07:58Hej. Det står inte hur lång ärmen ska vara innan avmaskning 6 maskor. Stl s.
15.01.2022 - 12:10DROPS Design answered:
Hei Petterson. Ja, her manglet det en linje i den svenske oppskriften. Det skal vi få ordnet, takk for at du gjorde oss oppmerksom på dette. I mellomtiden, så kan du se på den norske teksten: ... = 70-74-76-80-84-88 m. Når arb måler 44-43-42-41-41-41 cm (NB: Kortere... mvh DROPS Design
18.01.2022 - 09:34Hola Al seguir leyendo me parece que la chaqueta se teje de abajo a arriba, es así? Yo la estoy pensando de arriba a abajo 🤭
29.12.2021 - 03:21DROPS Design answered:
Hola Carina, a chaqueta se teje de abajo a arriba. Saludos!
29.12.2021 - 10:18Hola. Pero decís que se empieza por el gris pela, pero en la foto me parece que está empezado con el rosa, no sé si estoy equivocada 🙄
29.12.2021 - 00:24DROPS Design answered:
Hola Carina, la chaqueta se empieza de abajo, por el gris pela. Saludos!
29.12.2021 - 10:27Hei. Lurer på om det er mulig å strikke denne jakken rundt for så å klippe opp? Må jeg i såfall strikke en annen type stolpe eller kan det løses på noen måte?
22.03.2019 - 23:05DROPS Design answered:
Hei Wibeke. Om du vil strikke rundt og klippe opp, bør du legge til oppklippsmasker midt foran (feks 5 masker), og strikke stolpene og belegg etter at du har klippet opp. God fornøyelse
25.03.2019 - 15:20Hei. Jeg prøver å skrive ut diagram til oppskrift 166-2 men får bare ut deler av diagrammet. \r\nKan du ev. sende meg den siden, det er side 4 . \r\nKarin
05.02.2019 - 10:16DROPS Design answered:
Hei Karin. Vi har dessverre ikke mulighet til å sende oppskrifter individuelt, men vi har sjekket dette og det gikk helt fint an å skrive ut alle sidene. Har du kontrollert at du ikke har spesifisert sideantall på printerinstillingene dine? Eventuelt skalert bildet slik at ikke diagrammet blir kuttet? God fornøyelse.
08.02.2019 - 14:11Hej, jag undrar om det saknas någon bit i texten för ärmen. Efter OBS förklaringen så känns det som att det saknad en bit. "Upprepa ökningen med 3½-2½-3-2½-2-2 cm mellanrum totalt 11-13-11-13-15-14 ggr =OBS: Kortare mått i de större stl pga bredare axelvidd), maskas de mittersta 6-6-8-8-10-10 m under ärmen av = 64-68-68-72-74-78 m kvar på st."
12.10.2018 - 21:30DROPS Design answered:
Hej Emilie, ärmen fortsätter under oket. Lycka till :)
29.10.2018 - 15:18Hej Kan jeg udskifte garnet med Drops BabyAlpaca Silk? Mvh Heidi
07.06.2018 - 10:21DROPS Design answered:
Hej Heidi, egentlig ikke. Drops BabyAlpaca Silk tilhører garngruppe A og Karisma garngruppe B. Hvis du klikker på "Prøv vores omregner" - vælger DROPS Karisma - 750g - 1 tråd, så får du de alternativer op som passer bedst til DROPS Karisma som tilhører garngruppe B. God fornøjelse!
08.06.2018 - 11:22Hej Kan jeg udskrifte garnet med Drops BabyAlpaca Silk? Mvh Heidi
07.06.2018 - 10:19