
Popular categories
Looking for a yarn?


|
||||||||||||||||||||||||||||
Frost Flowers |
||||||||||||||||||||||||||||
 |
 |
|||||||||||||||||||||||||||
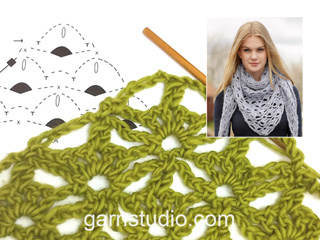
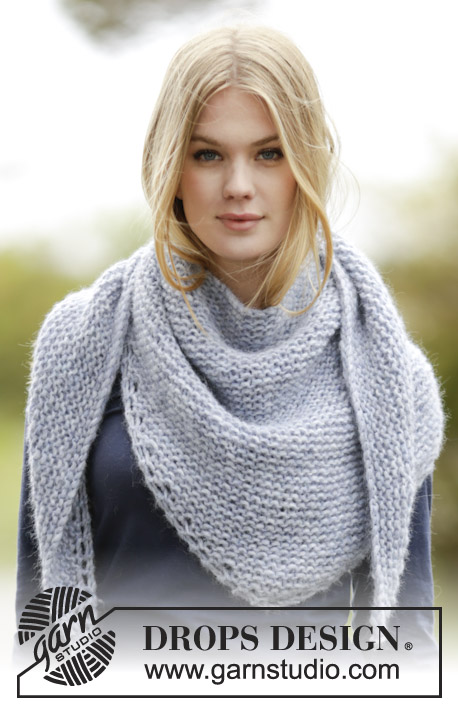
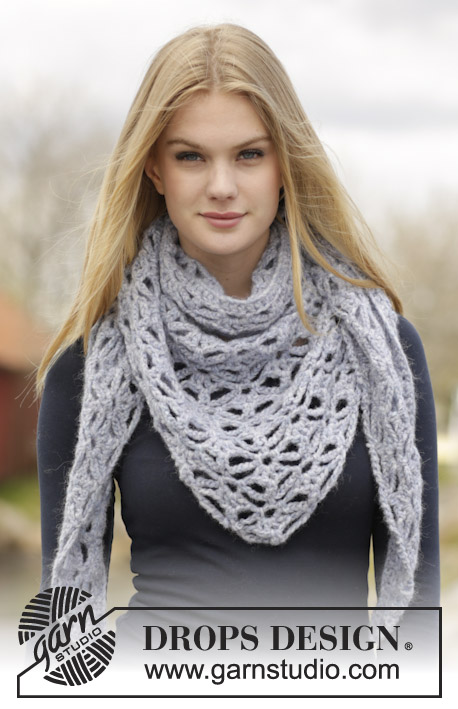
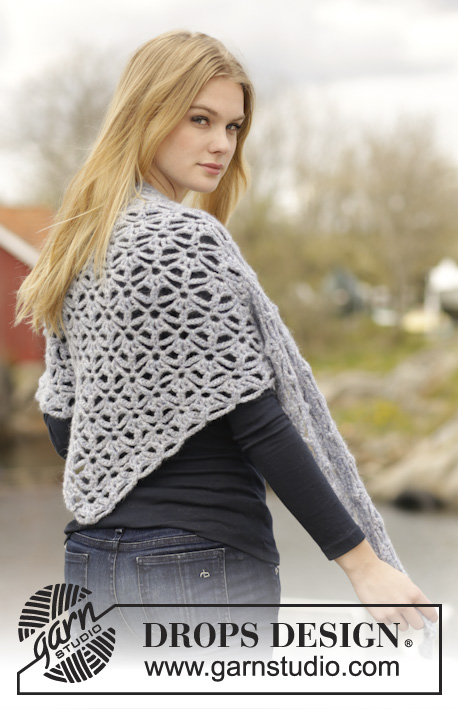
Crochet DROPS shawl with lace pattern in ”Air”.
DROPS 166-12 |
||||||||||||||||||||||||||||
|
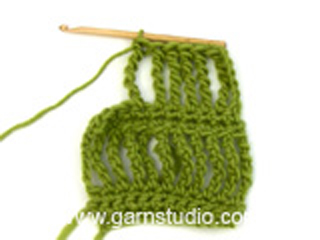
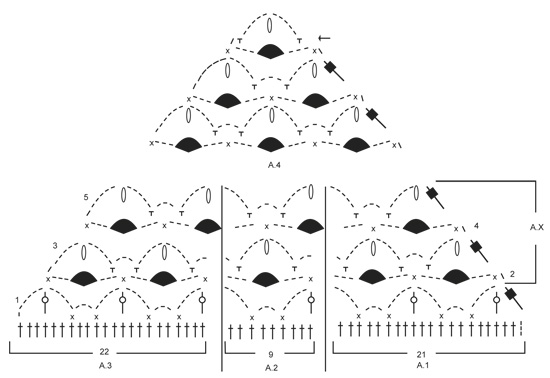
PATTERN: See diagrams A.1 to A.4. CROCHET 2 dc TOG (in dc): Work 1 dc in next dc but wait with last pull through, work 1 dc more in same dc, but on last pull through, pull through all sts on hook. WORK 2 dc TOG (AROUND CH): Work 1 dc around the middle ch in dc-group but wait with last pull through, work 1 dc more around same ch, but on last pull through, pull through all sts on hook. QUINTUPLE dc: Make 5 YOs on hook, insert hook in first dc/sc on previous row and pull yarn through, * 1 YO on hook, pull yarn through the first 2 sts on hook *, repeat from *-* 5 more times = 1 st on hook. DC-GROUP: * 1 dc around ch-space, 1 ch *, repeat from *-* 2 more times around same ch-space, 1 dc around same ch-space (= 4 dc around same ch-space). ---------------------------------------------------------- SHAWL: Worked back and forth. Work 216 ch (includes 3 ch to turn with) on hook size 6 mm / J/10 with Air. Turn and work 1 dc in 4th ch from hook (= 2 dc), then work 1 dc in each of the next ch 2, * skip ch 1, work 1 dc in each of the next 5 ch *, repeat from *-* 34 more times = 178 dc. Now work PATTERN - see explanation above, as follows: ROW 1: ch 6, skip 2 dc, in next dc work 2 dc TOG (in dc) - see explanation above, * work ch 5, skip 2 dc, 1 sc in next dc, skip 2 dc, ch 3, 1 sc in next dc, ch 5, skip 2 dc, work 2 dc TOG (in dc) *, repeat from *-* until 3 dc remain, skip 2 dc, work QUINTUPLE dc - see explanation above, in last dc on row. ROW 2: Turn and work as follows: ch 1, * 1 sc in dc worked tog, ch 3, skip 1 ch-space, work DC-GROUP around next ch-space, ch 3, skip 1 ch-space *, repeat from *-* until 2 ch-spaces remain, 1 sc in dc worked tog. ROW 3: ch 1, * work ch 5, skip to dc-group and work 2 dc TOG (around ch) - see explanation above, work ch 5, work 1 sc around next ch-space after dc-group, ch 3, 1 sc around next ch-space *, repeat from *-* until 1 dc-group remains, ch 5, work 2 dc TOG (around ch) in dc-group, skip next ch-space, work quintuple dc. ROW 4: Work ch 1, * 1 sc in dc worked tog, ch 3, skip 1 ch-space, 1 dc-group around next ch-space, skip 1 ch-space, 3 ch *, repeat from *-* until 2 ch-spaces remain, 1 sc in dc worked tog. ROW 5: ch 1, * ch 5, work 2 dc tog (around ch), ch 5, work 1 sc around next ch-space after dc-group, ch 3, 1 sc around next ch-space *, repeat from *-* until 1 dc-group remains, ch 5, work 2 dc tog (around ch), skip next ch-space, work quintuple dc. REMEMBER THE CROCHET GAUGE! Then repeat 2nd-5th row (i.e. A.X), and continue dec in each side as shown in A.1 and A.3. When working tip, work as shown in A.4. Piece measures approx. 48 cm / 19'' in the middle of shawl down towards tip. Fasten off. |
||||||||||||||||||||||||||||
Diagram explanations |
||||||||||||||||||||||||||||
|
||||||||||||||||||||||||||||
|
||||||||||||||||||||||||||||
|
Have you made this or any other of our designs? Tag your pictures in social media with #dropsdesign so we can see them! Do you need help with this pattern?You'll find tutorial videos, a Comments/Questions area and more by visiting the pattern on garnstudio.com. © 1982-2024 DROPS Design A/S. We reserve all rights. This document, including all its sub-sections, has copyrights. Read more about what you can do with our patterns at the bottom of each pattern on our site. |
||||||||||||||||||||||||||||


With over 40 years in knitting and crochet design, DROPS Design offers one of the most extensive collections of free patterns on the internet - translated to 17 languages. As of today we count 304 catalogs and 11422 patterns - 11417 of which are translated into English (US/in).
We work hard to bring you the best knitting and crochet have to offer, inspiration and advice as well as great quality yarns at incredible prices! Would you like to use our patterns for other than personal use? You can read what you are allowed to do in the Copyright text at the bottom of all our patterns. Happy crafting!
Comments / Questions (21)
Ik sluit me aan bij de eerdere vraag van Yvonne. Als ik het rekensommetje maak kom ik ook op 179 stokjes en niet op 178. Ik geloof best dat als je het patroon volgt, je 216 lossen verder bent, maar 5*35 stokjes + 4 stokjes aan het begin is toch echt 179... Enige opheldering zou fijn zijn!
03.06.2016 - 11:42DROPS Design answered:
Hoi Hanneke. Zie mijn antwoord aan Yvonne.
03.06.2016 - 12:28Pegah wrote:
Hi, I don't know if I am making it wrong. But it seems like I need more than 150 grams yarn to finish this project.do I? the spaces in your pattern seem very big, mine is very close.
02.05.2016 - 08:47DROPS Design answered:
Dear Pegah, remember to check your tension, you should have 12 tr x 7 rows = 10 x 10 cm or A.2 = 8 cm in width approx. Happy crocheting!
02.05.2016 - 10:28Prachtig patroon maar ook ik zit al vast in eerste tour. Je hebt 216 lossen. In de 4e maak je een stokje, en de 2 daarop volgende lossen ook (dus in de 213e losse, 212 en 211e). Tot zo ver snap ik het. Je hebt dan al 4 stokjes want de 3 keerlossen tel je mee. Daarna maak je telkens 5 stokjes. Dan zou je 178 stokjes uitkomen maar bij mij is 35 groepjes van 5 lossen en die 4 in het begin van de tour toch echt 179 en dan kom ik niet uit met de 2e tour. Zie ik iets over het hoofd?
18.02.2016 - 15:15DROPS Design answered:
Hoi Yvonne. Je haakt de eerste 4 stk (1 stk in de 4e l en 2 stk in 2 l). Je haakt dan: sla 1 l over, haak 1 stk in elke van de volgende 5 l (5 stk, 6 l gehaakt) en herhaalt deze werkwijz NOG 34 keer = 216 l gehaakt.
25.02.2016 - 16:06Na de 216 steken moet je steeds groepjes van 5 stokjes haken en na het vijfde stokje een losse overslaan zonder er een losse tussen te haken. Zo trekt het haakwerk toch scheef?
01.11.2015 - 21:48DROPS Design answered:
Hoi JoAn. Nee, wij doen dit om de opzetrand elastischer te maken, maar hij wordt niet scheef.
02.11.2015 - 14:32'Haak 215 losse (incl. 3 losse om mee te keren) met haaknld 6mm en Air. Keer en haak 1 stokje in 4e losse vanaf haak (= 2 stk) --> Wat bedoelt men met = 2 stk ??
22.10.2015 - 15:43DROPS Design answered:
Hoi Nicoline. Je haakt 1 stk in de 4e losse, dan heb je 2 stk (de eerste 3 l als eerste "stokje")
23.10.2015 - 10:55Haak 216 l (incl. 3 l om mee te keren) is (excl 3 l om mee te keren) Met vriendelijke groeten, Iris
05.10.2015 - 22:03DROPS Design answered:
Hoi Iris. Nee. Je hebt 216 l. Je haakt dan: 1 stk in 4e l (incl. 3 l om mee te keren), 1 stk in de volgende 2 l (je hebt nu 210 l over) en haak: * sla 1 l over, haak 1 stk in elke van de volgende 5 l * (= 6 l per herhaling) 210/6 = 35.
06.10.2015 - 12:55Gyönyörű ez a kendő, nagyon szeretném meghorgolni! Esetleg van vagy várható hozzá videó, vagy minta magyar jelölés magyarázattal (csak angolul találtam). Nagyon kezdő horgoló vagyok, ezért nagyon sokat jelentene valami plusz segítség! Előre is nagyon szépen köszönöm a választ!Szép napot kívánok!
10.08.2015 - 18:30DROPS Design answered:
Kedves Andrea! Apró technikai hiba miatt nem látszott a rajz, reméljük, most már látható az ön számára is. Köszönjük.
06.11.2016 - 14:53I cannot print, see or access the chart. My printer prints a blank page and the words refer to the chart for all decreases after 5th row referring to A.1 and A.3 which aren't available. Only an icon for a picture is visible, but it cannot be opened. What is wrong? Help please.
27.07.2015 - 13:11DROPS Design answered:
Dear Mrs Shadbolt, diagram will be soon available. Thank you in advance for your patience. Happy crocheting!
27.07.2015 - 18:03Un modèle qui me plaît vraiment beaucoup !
18.06.2015 - 20:05Deze wil ik dolgraag maken! Is een heel praktisch model.
15.06.2015 - 12:30