
Popular categories
Looking for a yarn?


|
|||||||||||||||||||
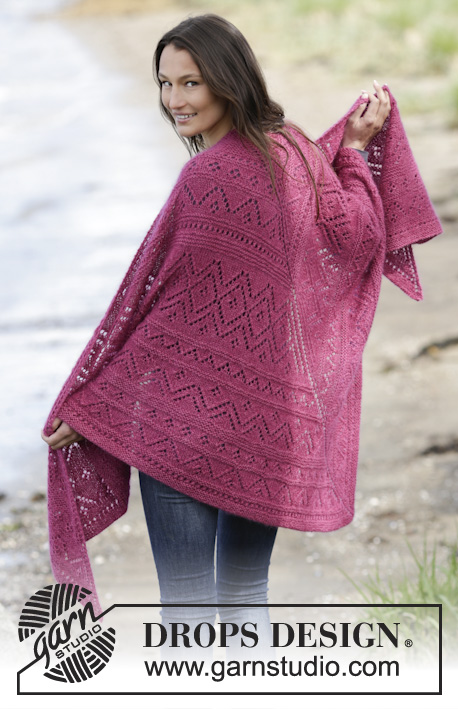
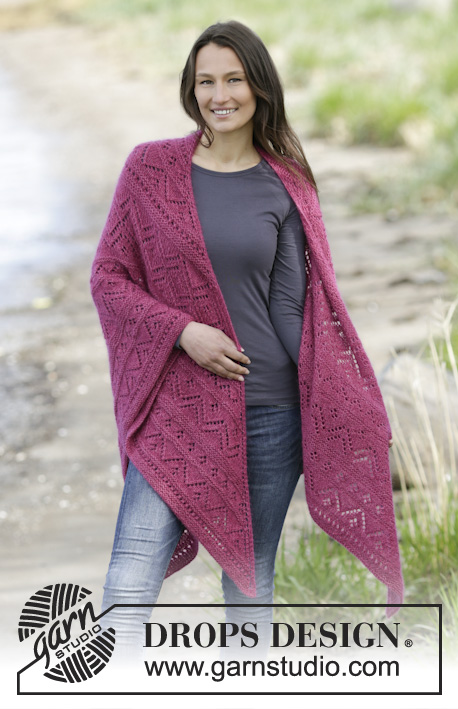
Raspberry Wrap |
|||||||||||||||||||
 |
 |
||||||||||||||||||
Knitted DROPS shawl in garter st with lace pattern in ”Alpaca” and ”Kid-Silk”.
DROPS 165-4 |
|||||||||||||||||||
|
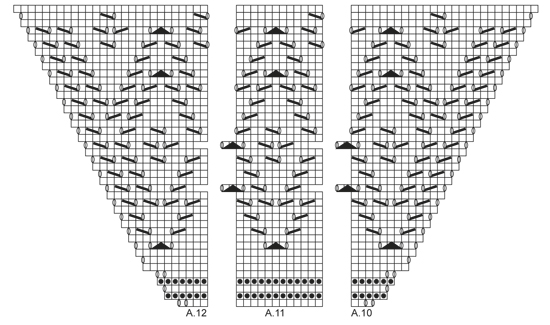
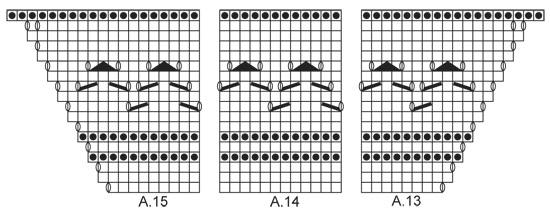
GARTER ST (back and forth): K all rows. 1 ridge = K2 rows. INCREASE TIP 1: Inc with YO, K YOs on next row to make holes. INCREASE TIP 2: Inc with YO, P YO twisted on next row to avoid holes. KNITTING TIP: Use two circular needles if there are too many sts on a circular needle. PATTERN: See diagrams A.1-A.18. The diagrams show all rows in pattern seen from RS. ---------------------------------------------------------- SHAWL: Worked back and forth on circular needle to make room for all the sts. The shawl is worked from mid back and down. Cast on 9 sts on circular needle size 5 mm / US 8 with 1 strand of each yarn (= 2 strands). Work 1 ridge in GARTER ST - see explanation above. Insert a marker in the middle st. Then work in garter st - AT THE SAME TIME inc 4 sts on every row from RS - READ INCREASE TIP 1 as follows: Inc 1 st inside 2 edge sts in each side of piece and 1 st on each side of mid st. Inc like this until there are 57 sts on needle (i.e. there are 28 sts on each side of mid st). REMEMBER THE KNITTING GAUGE Then work the 2 edge sts in each side in garter st and mid st in stockinette st. Work diagram A.1-A.3 as follows: 2 edge sts in garter st, A.1 over 1 st, repeat A.2 (= 2 sts) until 1 st remains before mid st, A.3 over 1 st, 1 st in stockinette st (= mid st), A.1 over 1 st, repeat A.2 until 3 sts remain, A.3 over 1 st and 2 edge sts in garter st. AT THE SAME TIME on last row from RS inc 12 sts evenly - READ INCREASE TIP 2. When A.1-A.3 have been worked 1 time vertically, there are 91 sts on needle. Work diagram A.4-A.6 as follows: 2 edge sts in garter st, A.4 over 3 sts, repeat A.5 (= 6 sts) until 4 sts remain before mid st, A.6 over 4 sts, 1 st in stockinette st (= mid st), A.4 over 3 sts, repeat A.5 until 6 sts remain, A.6 over 4 sts and 2 edge sts in garter st. AT THE SAME TIME on 11th row (= from RS) inc 12 sts evenly. When A.4-A.6 have been worked 1 time vertically, there are 135 sts on needle. Piece measures approx. 22 cm / 8 3/4'' measured along mid st. Work diagram A.7-A.9 as follows: 2 edge sts in garter st, A.7 over 2 sts, repeat A.8 (= 12 sts) until 3 sts remain before mid st, A.9 over 3 sts, 1 st in stockinette st (= mid st), A.7 over 2 sts, repeat A.8 until 5 sts remain, A.9 over 3 sts and 2 edge sts in garter st. When A.7-A.9 have been worked 1 time vertically, there are 165 sts on needle. Work diagram A.1-A.3 as follows: 2 edge sts in garter st, A.1 over 1 st, repeat A.2 until 1 st remains before mid st, A.3 over 1 st, 1 st in stockinette st (= mid st), A.1 over 1 st, repeat A.2 until 3 sts remain, A.3 over 1 st and 2 edge sts in garter st. When A.1-A.3 have been worked 1 time vertically, there are 187 sts on needle. Work diagram A.10-A.12 as follows: 2 edge sts in garter st, A.10 over 3 sts, repeat A.11 (= 12 sts) until 4 sts remains before mid st, A.12 over 4 sts, 1 st in stockinette st (= mid st), A.10 over 3 sts, repeat A.11 until 6 sts remain, A.12 over 4 sts and 2 edge sts in garter st. When A.10-A.12 have been worked 1 time vertically, there are 279 sts on needle. Piece measures approx. 57 cm / 22½'' measured along mid st. Work diagram A.13-A.15 as follows: 2 edge sts in garter st, A.13 over 8 sts, repeat A.14 until 9 sts remain before mid st, A.15 over 9 sts, 1 st in stockinette st (= mid st), A.13 over 8 sts, repeat A.14 until 11 sts remain, A.15 over 9 sts and 2 edge sts in garter st. When A.13-A.15 have been worked 1 time vertically, there are 319 sts on needle. Work diagram A.16-A.18 as follows: 2 edge sts in garter st, A.16 over 6 sts, repeat A.17 until 7 sts remain before mid st, A.18 over 7 sts, 1 st in stockinette st (= mid st), A.16 over 6 sts, repeat A.17 until 9 sts remain, A.18 over 7 sts and 2 edge sts in garter st. AT THE SAME TIME on last row from RS inc 12 sts evenly. When A.16-A.18 have been worked 1 time vertically, there are 403 sts on needle - READ KNITTING TIP. Piece measures approx. 81 cm / 32'' measured along mid st. Work diagram A.4-A.6 as follows: 2 edge sts in garter st, A.4 over 3 sts, repeat A.5 until 4 sts remain before mid st, A.6 over 4 sts, 1 st in stockinette st (= mid st), A.4 over 3 sts, repeat A.5 until 6 sts remain, A.6 over 4 sts and 2 edge sts in garter st. AT THE SAME TIME on 11th row (= from RS) inc 12 sts evenly. When A.4-A.6 have been worked 1 time vertically, there are 447 sts on needle. Work diagram A.7-A.9 as follows: 2 edge sts in garter st, A.7 over 2 sts, repeat A.8 until 3 sts remain before mid st, A.9 over 3 sts, 1 st in stockinette st (= mid st), A.7 over 2 sts, repeat A.8 until 5 sts remain, A.9 over 3 sts and 2 edge sts in garter st. When A.7-A.9 have been worked 1 time vertically, there are 477 sts on needle. Work diagram A.1-A.3 as follows: 2 edge sts in garter st, A.1 over 1 st, repeat A.2 until 1 st remains before mid st, A.3 over 1 st, 1 st in stockinette st (= mid st), A.1 over 1 st, repeat A.2 until 3 sts remain, A.3 over 1 st and 2 edge sts in garter st. When A.1-A.3 have been worked 1 time vertically, there are 499 sts on needle. Then work 2 ridges over all sts AT THE SAME TIME inc 2 sts inside 2 edge sts in each side of piece and 2 sts on each side of mid st on every row from RS (= 8 sts inc). Bind off. Piece measures approx. 100 cm / 40'' measured along mid st. |
|||||||||||||||||||
Diagram explanations |
|||||||||||||||||||
|
|||||||||||||||||||
|
|||||||||||||||||||

|
|||||||||||||||||||
|
|||||||||||||||||||

|
|||||||||||||||||||
|
Have you made this or any other of our designs? Tag your pictures in social media with #dropsdesign so we can see them! Do you need help with this pattern?You'll find tutorial videos, a Comments/Questions area and more by visiting the pattern on garnstudio.com. © 1982-2024 DROPS Design A/S. We reserve all rights. This document, including all its sub-sections, has copyrights. Read more about what you can do with our patterns at the bottom of each pattern on our site. |
|||||||||||||||||||


With over 40 years in knitting and crochet design, DROPS Design offers one of the most extensive collections of free patterns on the internet - translated to 17 languages. As of today we count 304 catalogs and 11422 patterns - 11417 of which are translated into English (US/in).
We work hard to bring you the best knitting and crochet have to offer, inspiration and advice as well as great quality yarns at incredible prices! Would you like to use our patterns for other than personal use? You can read what you are allowed to do in the Copyright text at the bottom of all our patterns. Happy crafting!
Comments / Questions (76)
Hallo, ich habe gerade dieses Tuch begonnen und wundere mich nun ab der fünften Reihe der Rapporte A1-3. Wenn das Diagramm stimmt erhalte ich durch die Wiederholung der Rapporte 1 und 2 einen doppelten Umschlag, muss das so sein ? Vielen Dank...
01.03.2016 - 00:06DROPS Design answered:
Liebe Rahel, könnten Sie das bitte noch genauer beschreiben? Es folgt immer: 1 Umschlag, 2 re zusammen.
01.03.2016 - 14:15Dokładny opis schematu A1-A3 do wzoru 1 65-4
13.02.2016 - 16:37DROPS Design answered:
Trudno będzie to opisać w kilku zdaniach. Musi Pani dokładnie trzymać się opisu i prześledzić schematy A.1-A.3, które znajdują się na dole strony. Powyżej będą wyjaśnienia symboli. Jak coś jest niezrozumiałe radze sięgnąć do zakładki VIDEO (pod tytułem wzoru, na górze strony). Proszę próbować, bo wtedy wiele się wyjaśnia. Jeśli będą kłopoty może uda się przygotować filmik instruktażowy jak przerabiać schematy A.1-A.3. Czekam na informację. POZDRAWIAM
14.02.2016 - 16:52Co oznacza w drops 165-4 schemat A1 ponad następnym oczkiem
12.02.2016 - 17:20DROPS Design answered:
Proszę napisać dokładnie o jaki fragment w opisie chodzi. POZDRAWIAM
12.02.2016 - 21:54Bij telpatroon A.4-A.6 en A.16-A.18 staat meerderen. Wordt hier bedoeld MEERDEREN 2 ? De volgende naald is recht, moeten de omslagen dan gedraaid recht gebreid worden? Mooi patroon. Dank voor uw antwoord.
11.02.2016 - 12:06DROPS Design answered:
Hoi Hansi. Bij het breien van de telpatronen maak je gewoon omslagen en deze worden niet gedraaid gebreid. Bedoel je de 12 st gelijkmatig meerderen in de 11e nld, dan brei je deze wel gedraaid (dus geen gaatjes) BEHALVE de 2 omslagen aan beide zijkanten in het telpatroon - deze worden NIET gedraaid gebreid
11.02.2016 - 14:44Sidder og er igang med dette sjal. Har talt for at få det til at passe. Jeg er kun kommet til de 3 første diagrammer og har lige haft udtagninger på sidste retpind. Men jeg mangler 3 masker til sidst. Har ellers flittigt talt maskerne. Kan ikke se hvor jeg mangler dem. Hvad skal jeg gøre?
21.11.2015 - 01:29DROPS Design answered:
Hej Karina, Det er svært at gætte hvor det går galt.... Kan du ikke bare tage de 3 m ud på sidste pind? God fornøjelse!
25.11.2015 - 15:20Amna Hassan wrote:
I am a little confused about this " - READ INCREASE TIP 1 as follows: Inc 1 st inside 2 edge sts in each side of piece and 1 st on each side of mid st. Inc like this until there are 57 sts on needle" Is the increase between the 2 edge sts or after the 2 edge sts? Thank you
18.11.2015 - 07:55DROPS Design answered:
Dear Mrs Hassan, you inc with 1 YO after the first 2 edge sts + 1YO on each side of mid st + 1 YO before the last 2 sts on row = 4 YO = 4 inc. Happy crocheting!
18.11.2015 - 09:45Vous indiquez 150g de kid Silk, soit 3 pelotes. Avec déjà plus de 400 mailles sur mon aiguille circulaire j'ai déjà épuisé presque 5 pelotes de cette qualité et ma dernière pelote n'ira pas au bout de l'ouvrage... Vous devriez peut être revoir votre estimation de nb de pelotes à la hausse...
03.11.2015 - 20:05DROPS Design answered:
Bonjour Nathalie, DROPS Kid-Silk se présente en pelotes de 25 g, ainsi 150 g Kid-Silk = 6 pelotes. Bon tricot!
04.11.2015 - 09:23Amna Hassan wrote:
I could not understand INCREASE TIP 2: Inc with YO, P YO twisted on next row to avoid holes. Instead of this, can we use the regular method to increase? Will it make any difference? By regular method i mean knit and purl the same stitch. Thank you.
26.10.2015 - 04:56DROPS Design answered:
Dear Mrs Hassan, see in the video below how to inc with a YO - do not hesitate to make a swatch to test both methods and use the one you rather like. Happy knitting!
26.10.2015 - 11:43I have never used a diagram for knitting and have tried to find video help related to pattern 165-4 raspberry shawl. On the pattern it says there are 16 related videos but I am not sure which ones will help. I have the correct number of stitches (57) ready to start the diagram A1-A3, but I am not sure on which row to increase 12 stitches evenly. Is it the very last row before going on to A4? I don't understand how I will end up with 91 stitches on needle before proceeding to A4.
22.10.2015 - 15:26DROPS Design answered:
Dear Debra, please click here to read more about diagrams - the 12 sts have to been increased on last row from RS in diagrams, ie on next to last row and have to be done extra to the YOs in A.1/A.3 - see how to inc evenly here. 57 sts + (2 x 5 sts inc in A.1) + (2 x 6 sts inc in A.3) + 12 sts inc evenly = 91 sts. Happy knitting!
23.10.2015 - 09:20Bonjour! Superbe châle! J'aimerais le faire, j'ai des pelotes de "DROPS ALPACA SILK brushed", est ce possible de les utiliser pour l’exécution de cet ouvrage! J'ai vu sur les explications que l'on pouvait utiliser des fils de groupe A+A ou C, or , le fil que j'ai cité plus haut et qui est en ma possession, est de groupe C ! J'ai déjà réalisé quelques uns de vos modèles que je trouve formidables! Merci de votre réponse! Cordialement à vous! CLARABELLE
25.09.2015 - 18:18DROPS Design answered:
Bonjour Clarabelle, effectivement 2 fils A = 1 Fil C, vous pouvez donc utiliser Brushed Alpaca Silk au lieu d'1 fil Alpaca + 1 fil Kid-Silk. Cliquez ici pour savoir comment calculer la quantité nécessaire. Bon tricot!
28.09.2015 - 09:10