
Popular categories
Looking for a yarn?


|
|||||||||||||||||||
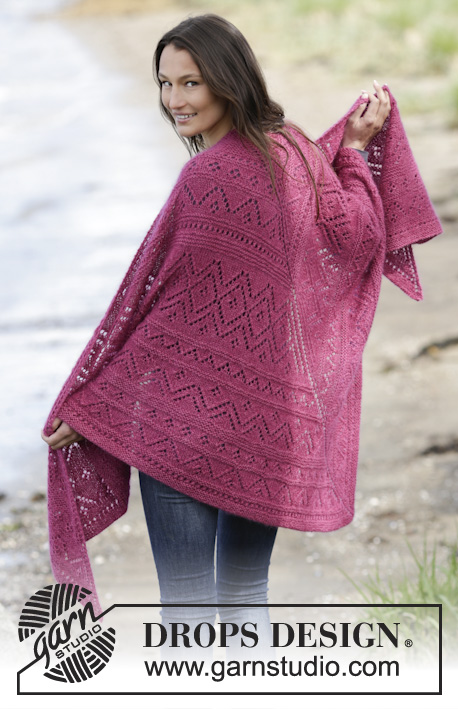
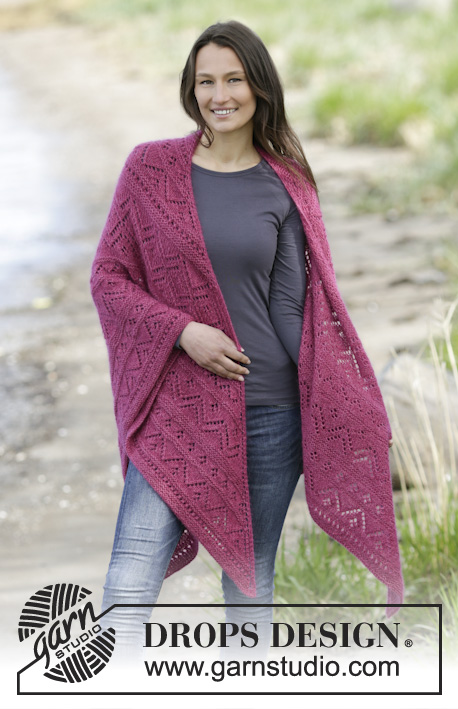
Raspberry Wrap |
|||||||||||||||||||
 |
 |
||||||||||||||||||
Knitted DROPS shawl in garter st with lace pattern in ”Alpaca” and ”Kid-Silk”.
DROPS 165-4 |
|||||||||||||||||||
|
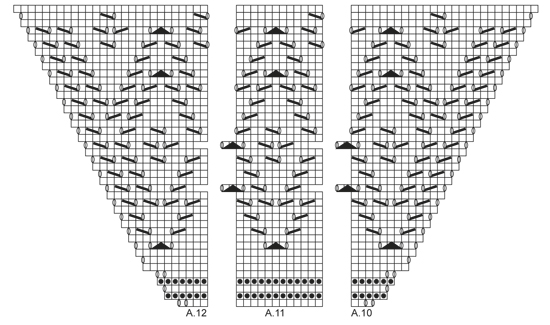
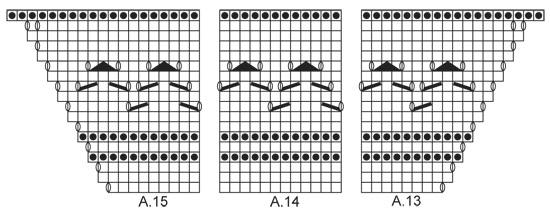
GARTER ST (back and forth): K all rows. 1 ridge = 2 rows K. INCREASE TIP 1: Inc with YO, K YOs on next row to make holes. INCREASE TIP 2: Inc with YO, P YO twisted on next row to avoid holes. KNITTING TIP: Use two circular needles if there are too many sts on a circular needle. PATTERN: See diagrams A.1-A.18. The diagrams show all rows in pattern seen from RS. ---------------------------------------------------------- SHAWL: Worked back and forth on circular needle to make room for all the sts. The shawl is worked from mid back and down. Cast on 9 sts on circular needle size 5 mm with 1 strand of each yarn (= 2 strands). Work 1 ridge in GARTER ST - see explanation above. Insert a marker in the middle st. Then work in garter st - AT THE SAME TIME inc 4 sts on every row from RS - READ INCREASE TIP 1 as follows: Inc 1 st inside 2 edge sts in each side of piece and 1 st on each side of mid st. Inc like this until there are 57 sts on needle (i.e. there are 28 sts on each side of mid st). REMEMBER THE KNITTING TENSION Then work the 2 edge sts in each side in garter st and mid st in stocking st. Work diagram A.1-A.3 as follows: 2 edge sts in garter st, A.1 over 1 st, repeat A.2 (= 2 sts) until 1 st remains before mid st, A.3 over 1 st, 1 st in stocking st (= mid st), A.1 over 1 st, repeat A.2 until 3 sts remain, A.3 over 1 st and 2 edge sts in garter st. AT THE SAME TIME on last row from RS inc 12 sts evenly - READ INCREASE TIP 2. When A.1-A.3 have been worked 1 time vertically, there are 91 sts on needle. Work diagram A.4-A.6 as follows: 2 edge sts in garter st, A.4 over 3 sts, repeat A.5 (= 6 sts) until 4 sts remain before mid st, A.6 over 4 sts, 1 st in stocking st (= mid st), A.4 over 3 sts, repeat A.5 until 6 sts remain, A.6 over 4 sts and 2 edge sts in garter st. AT THE SAME TIME on 11th row (= from RS) inc 12 sts evenly. When A.4-A.6 have been worked 1 time vertically, there are 135 sts on needle. Piece measures approx. 22 cm measured along mid st. Work diagram A.7-A.9 as follows: 2 edge sts in garter st, A.7 over 2 sts, repeat A.8 (= 12 sts) until 3 sts remain before mid st, A.9 over 3 sts, 1 st in stocking st (= mid st), A.7 over 2 sts, repeat A.8 until 5 sts remain, A.9 over 3 sts and 2 edge sts in garter st. When A.7-A.9 have been worked 1 time vertically, there are 165 sts on needle. Work diagram A.1-A.3 as follows: 2 edge sts in garter st, A.1 over 1 st, repeat A.2 until 1 st remains before mid st, A.3 over 1 st, 1 st in stocking st (= mid st), A.1 over 1 st, repeat A.2 until 3 sts remain, A.3 over 1 st and 2 edge sts in garter st. When A.1-A.3 have been worked 1 time vertically, there are 187 sts on needle. Work diagram A.10-A.12 as follows: 2 edge sts in garter st, A.10 over 3 sts, repeat A.11 (= 12 sts) until 4 sts remains before mid st, A.12 over 4 sts, 1 st in stocking st (= mid st), A.10 over 3 sts, repeat A.11 until 6 sts remain, A.12 over 4 sts and 2 edge sts in garter st. When A.10-A.12 have been worked 1 time vertically, there are 279 sts on needle. Piece measures approx. 57 cm measured along mid st. Work diagram A.13-A.15 as follows: 2 edge sts in garter st, A.13 over 8 sts, repeat A.14 until 9 sts remain before mid st, A.15 over 9 sts, 1 st in stocking st (= mid st), A.13 over 8 sts, repeat A.14 until 11 sts remain, A.15 over 9 sts and 2 edge sts in garter st. When A.13-A.15 have been worked 1 time vertically, there are 319 sts on needle. Work diagram A.16-A.18 as follows: 2 edge sts in garter st, A.16 over 6 sts, repeat A.17 until 7 sts remain before mid st, A.18 over 7 sts, 1 st in stocking st (= mid st), A.16 over 6 sts, repeat A.17 until 9 sts remain, A.18 over 7 sts and 2 edge sts in garter st. AT THE SAME TIME on last row from RS inc 12 sts evenly. When A.16-A.18 have been worked 1 time vertically, there are 403 sts on needle - READ KNITTING TIP. Piece measures approx. 81 cm measured along mid st. Work diagram A.4-A.6 as follows: 2 edge sts in garter st, A.4 over 3 sts, repeat A.5 until 4 sts remain before mid st, A.6 over 4 sts, 1 st in stocking st (= mid st), A.4 over 3 sts, repeat A.5 until 6 sts remain, A.6 over 4 sts and 2 edge sts in garter st. AT THE SAME TIME on 11th row (= from RS) inc 12 sts evenly. When A.4-A.6 have been worked 1 time vertically, there are 447 sts on needle. Work diagram A.7-A.9 as follows: 2 edge sts in garter st, A.7 over 2 sts, repeat A.8 until 3 sts remain before mid st, A.9 over 3 sts, 1 st in stocking st (= mid st), A.7 over 2 sts, repeat A.8 until 5 sts remain, A.9 over 3 sts and 2 edge sts in garter st. When A.7-A.9 have been worked 1 time vertically, there are 477 sts on needle. Work diagram A.1-A.3 as follows: 2 edge sts in garter st, A.1 over 1 st, repeat A.2 until 1 st remains before mid st, A.3 over 1 st, 1 st in stocking st (= mid st), A.1 over 1 st, repeat A.2 until 3 sts remain, A.3 over 1 st and 2 edge sts in garter st. When A.1-A.3 have been worked 1 time vertically, there are 499 sts on needle. Then work 2 ridges over all sts AT THE SAME TIME inc 2 sts inside 2 edge sts in each side of piece and 2 sts on each side of mid st on every row from RS (= 8 sts inc). Cast off. Piece measures approx. 100 cm measured along mid st. |
|||||||||||||||||||
Diagram explanations |
|||||||||||||||||||
|
|||||||||||||||||||
|
|||||||||||||||||||

|
|||||||||||||||||||
|
|||||||||||||||||||

|
|||||||||||||||||||
|
Have you made this or any other of our designs? Tag your pictures in social media with #dropsdesign so we can see them! Do you need help with this pattern?You'll find tutorial videos, a Comments/Questions area and more by visiting the pattern on garnstudio.com. © 1982-2024 DROPS Design A/S. We reserve all rights. This document, including all its sub-sections, has copyrights. Read more about what you can do with our patterns at the bottom of each pattern on our site. |
|||||||||||||||||||


With over 40 years in knitting and crochet design, DROPS Design offers one of the most extensive collections of free patterns on the internet - translated to 17 languages. As of today we count 304 catalogues and 11422 patterns - 11422 of which are translated into English (UK/cm).
We work hard to bring you the best knitting and crochet have to offer, inspiration and advice as well as great quality yarns at incredible prices! Would you like to use our patterns for other than personal use? You can read what you are allowed to do in the Copyright text at the bottom of all our patterns. Happy crafting!
Comments / Questions (76)
Hej. Försöker sticka er underbara sjal men får inte till det med ökningar. Har 57 m innan jag börjar med A1-A3 men får för många maskor, har 94 redan efter tre varv in på mönstret. Vad gör jag för fel?
02.07.2017 - 19:49DROPS Design answered:
Hei Kristina. Du øker på hver 2. pinne (= fra retten). Når du har lagt opp og strikket 1 rille (1 rille = 1 pinne rett og 1 pinne rang), starter du med økningene. Du har 9 masker, så øker du med 4 masker på første omgang fra retten slik: strikk 2 masker, øk, strikk 2 masker, øk, strikk 1 maske(midt masken med merke), øk, strikk 2 masker, øke og strikk de 2 siste kantmaskene = 13 masker på pinnen, les også ØKETIPS i oppskriften. Strikk 1 pinne fra vrangen uten å øke, neste pinne fra retten øker du med 4 masker = 17 masker på pinnen. Når du har 57 masker på pinnen har du strikket 13 pinner fra retten. God Fornøyelse!
03.07.2017 - 15:36Lurer veldig på hvorfor mønsteret ikke er symmetrisk? Tenker først og fremst på A3 omgang 5 og 9 .Skjønner rekkefølgen, men det kan umulig bli likt på begge sider ettersom det er 2 kast på slutten av A3 og ikke ett som starten på A1
28.02.2017 - 19:55DROPS Design answered:
Hej Ellen. Jeg tror (uden at udpensle mönstret helt) at det bliver rettet op andre steder i löbet af opskriften. Det er konsekvent at det sker (ogsaa ved A.7 og A.9 og A.10 og A.12), saa det er meningen med opskriften og hvad designeren har taenkt.
01.03.2017 - 16:17Ist da in A3- 5 und 9 Reihe und A6- 3 Reihe ein Fehler drin?
14.02.2017 - 18:40Ist bei A3 , 5 und 9 Reihe und bei A6 3, Reihe ein Fehler drin ? Oder ist die Mittelmasche mit eingezeichnet ? Gruß Annette.
14.02.2017 - 17:49DROPS Design answered:
Liebe Frau Kirchner, die Mittlemasche sowie die 2 M krausrippe sind im Diagram nicht einbegriffen, so sollen Sie stricken: 2 M kraus re, A.1, A.2 wdh, A.3, 1 M glatt re (= Mittelmasche), A.1, 1.2, A.3, 2 M kraus re. Viel Spaß beim stricken!
15.02.2017 - 08:57Guten Tag, die Anleitung verstehe ich nicht. Ist das Muster nicht symmetrisch rechts und links der Mittelmasche ? Ich bin bei A4 bis A6. Bitte Hilfe. Danke.
14.02.2017 - 12:29DROPS Design answered:
Liebe Frau Kirchner, bei A.4-A.6 stricken Sie auf beiden Seiten der mittleren Maschen genauso das gleiche: A.4, dann A.5 wiederholen, und A.6. Viel Spaß beim stricken!
14.02.2017 - 12:38Bonjour, je commence ce modèle de châle mais j'ai un peu de mal à comprendrele 2ème paragraphe. Dois-je faire 2point mousse, 1 jeté, puis des mailles endroits jusqu'à 1 maille avant le milieu ou bien dois-je recommencer dea1,a2,a3 ? Merci pour votre réponse
26.01.2017 - 11:44DROPS Design answered:
Bonjour Marie, sur les 9 m, augmentez 4 m (= 1 m après la m lis, 1 m de chaque côté de la m centrale puis 1 m avant la m lis) jusqu'à ce que vous ayez 57 m. Tricotez ensuite A.1-A.3: 2 m point mousse, A.1 (= 1 jeté, 1 m end), A.2 jusqu'à 1 avant la m centrale, A.3 (= 1 m end, 1 jeté), la m centrale etc... Bon tricot!
26.01.2017 - 12:02Bonjour, Que signifie "A1 au dessus de la maille suivante" ? Merci d'avance
19.06.2016 - 19:49DROPS Design answered:
Bonjour Danica, au 1er rang de A.1, on n'a qu'une seule maille, tricotez ce rang au-dessus de la m suivante (= on va ainsi avoir: A.1 = 1 jeté, 1 m end). Bon tricot!
20.06.2016 - 09:03Falsch gedacht: Keine ungleichen Maschenzahlen aber muss der Umschlag zwei mal hintereinander (vgl. A3 Reihe 9) nicht je am Anfang und am Ende der Reihe sein, weil sonst ist es doch unsymmetrisch?
13.05.2016 - 01:48DROPS Design answered:
liebe Helena, siehe Antwort zu Ihrer ersten Frage.
16.05.2016 - 12:05Ist es richtig, dass z.B. bei A3 in der 9. Reihe am Ende 2 Umschläge sind? Weil dann habe ich auf einer Seite der Mittelmasche doch eine Masche mehr als auf der anderen? (genauso bei: A9, 13. Reihe etc.) Liebe Grüße :)
13.05.2016 - 00:03DROPS Design answered:
Liebe Helena, auf dem dritten Foto (Detailfoto) sehen Sie, wie die Symmetrie an der Mittellinie verläuft.
16.05.2016 - 12:05J'aimerais réaliser ce châle dans des tons gris clair. Que me conseillez-vous comme combinaison Alpaga/ Kid silk? Merci de votre réponse
11.04.2016 - 19:01DROPS Design answered:
Bonjour Mme fiilon, votre magasin DROPS saura vous conseiller dans le choix de la couleur, en fonction de ce que vous souhaitez. Vous pouvez le contacter même par mail ou téléphone. Bon tricot!
12.04.2016 - 09:01