DROPS Merino Extra Fine
100% Wool
from 4.55 $ /50g
Get the yarn to make this pattern from 27.30$.

The yarn cost is calculated from the pattern’s smallest size and the yarn’s cheapest product type. Looking for an even better price? You might find it on the DROPS Deals!

DROPS SS24

Lucky Jack

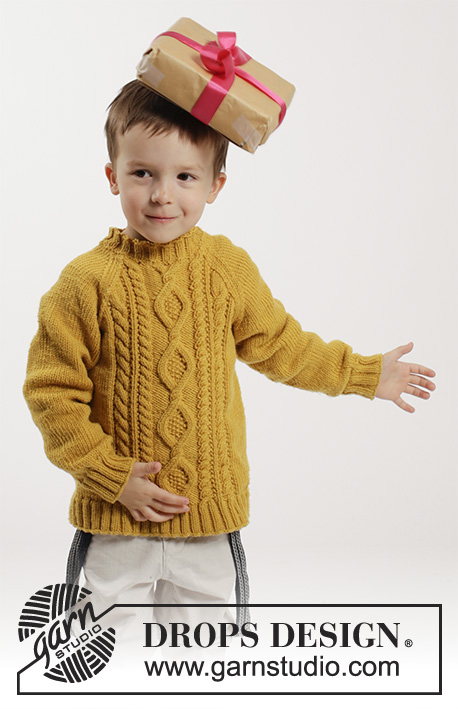
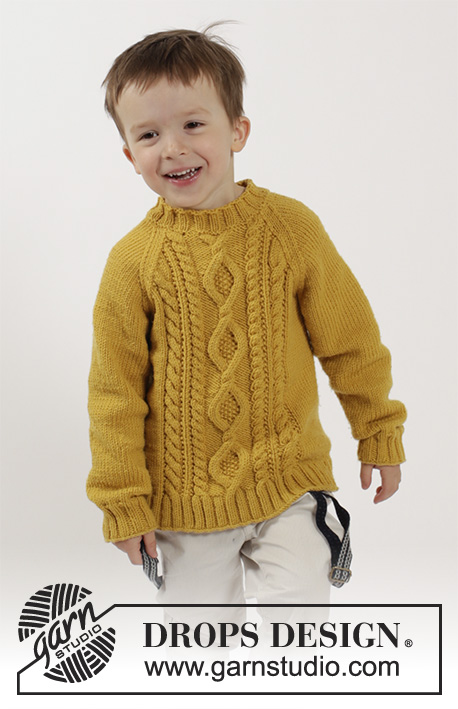
Knitted sweater with raglan and cables in DROPS Merino Extra Fine. Size children 2 - 10 years

DROPS Children 26-3
DROPS design: Pattern no me-021-bn
Yarn group B
----------------------------------------------------------
Size: 2 - 3/4 - 5/6 - 7/8 - 9/10 years
All measurements in chart in cm. Conversion to inch - see page 4.

Materials:
DROPS MERINO EXTRA FINE from Garnstudio
300-300-350-400-500 color no 30, mustard

DROPS DOUBLE POINTED NEEDLES and CIRCULAR NEEDLE (60 cm / 24'') SIZE 4 mm/US 6 - or size needed to get 21 sts x 28 rows in stockinette st = 4'' x 4'' (10 x 10 cm).
A.3 (= 52 sts) measures 17 cm / 6 3/4'' in width.
DROPS DOUBLE POINTED NEEDLES and CIRCULAR NEEDLE (40 and 60 cm / 16'' and 24'') SIZE 3.5 mm/US 4 - for rib.

-------------------------------------------------------

Alternative Yarn – See how to change yarns here
Yarn Groups A to F – Use the same pattern and change the yarn here
Yarn usage using an alternative yarn – Use our yarn converter here

-------------------------------------------------------

DROPS Merino Extra Fine
100% Wool
from 4.55 $ /50g
Get the yarn to make this pattern from 27.30$.

The yarn cost is calculated from the pattern’s smallest size and the yarn’s cheapest product type. Looking for an even better price? You might find it on the DROPS Deals!

Pattern instructions

NOTE: This pattern is written in American English. All measurements in charts are in cm. For conversion from inches to cm - click here. There are different terms for crocheting in American and British English. If this pattern includes crochet, click for "crochet terms" here. For this pattern in British English, please click here.
PATTERN: See diagrams A.1 to A.3. The diagrams show all rows in pattern seen from RS.

RAGLAN:
Dec for raglan on each side of marker in every transition between sleeves and body.
DEC AS FOLLOWS FROM RS:
Beg 3 sts before marker and K 2 tog, K 2 (marker is between these 2 sts), slip 1 st as if to K, K 1, psso (= 2 sts dec).
DEC AS FOLLOWS FROM WS:
Beg 3 sts before marker and P 2 twisted tog, P 2 (marker is between these 2 sts) and P 2 tog (= 2 sts dec).
----------------------------------------------------------

BODY:
Worked in the round on circular needle.
Cast on 184-200-208-216-224 sts on circular needle size 3.5 mm / US 4 with Merino Extra Fine. K 1 round. Work next round as follows:
SIZE 2 + 3/4 + 7/8 YEARS: K 1, * P 2, K 2 *, repeat from *-* 4-5-6 times in total, work rib according to diagram A.1 over the next 58 sts (= mid front), * K 2, P 2 *, repeat from *-* 8-10-12 times in total, K 2, work rib according to diagram A.1 over the next 58 sts (= mid back), * K 2, P 2 *, repeat from *-* 4-5-6 times in total and finish with K 1.
SIZE 5/6 + 9/10 YEARS: P 1, * K 2, P 2 *, repeat from *-* 5-6 times in total, K 2, work rib according to diagram A.1 over the next 58 sts (= mid front), * K 2, P 2 *, repeat from *-* 11-13 times in total, K 2, work rib according to diagram A.1 over the next 58 sts (= mid back), * K 2, P 2 *, repeat from *-* 5-6 times in total and finish with K 2 and P 1.
Continue rib like this until piece measures 5 cm / 2''.
Switch to circular needles size US 6/4mm and work next round as follows FOR ALL SIZES: K the first 17-21-23-25-27 sts and dec at the same time 3-5-5-5-5 sts evenly over these sts, work and dec according to A.2 over the next 58 sts, K over the next 34-42-46-50-54 sts and dec at the same time 6-10-10-10-10 sts evenly over these sts, work and dec according to A.2 over the next 58 sts, K the last 17-21-23-25-27 sts and dec at the same time 3-5-5-5-5 sts evenly over these sts. After A.2, there are 160-168-176-184-192 sts on needle.
Work next round as follows: 14-16-18-20-22 sts in stockinette st, work pattern according to diagram A.3 (= 52 sts), 28-32-36-40-44 sts in stockinette st, work pattern according to diagram A.3 (= 52 sts) and finish with 14-16-18-20-22 sts in stockinette st. Continue pattern like this. REMEMBER THE KNITTING GAUGE
When piece measures 22-25-28-31-34 cm / 8 3/4"-9 3/4"-11"-12 1/4"-13½", work next round as follows: bind off 3 sts for armhole, work the next 74-78-82-86-90 sts as before (= front piece), bind off 6 sts for armhole, work the next 74-78-82-86-90 sts as before (= back piece) and bind off the last 3 sts for armhole. Put piece aside and knit the sleeves.

SLEEVE:
Worked in the round on double pointed needles.
Cast on 32-36-40-44-44 sts on double pointed needles size 3.5 mm / US 4 with Merino Extra Fine. K 1 round. Then work rib = K 2/P 2 until piece measures 5 cm / 2''. Switch to double pointed needles size 4 mm / US 6 and work in stockinette st. When piece measures 6-8-8-8-7 cm / 2½"-3"-3"-3"-2 3/4", inc 2 sts mid under sleeve. Repeat inc every 2-2-2½-2½-2½ cm / 3/4"-3/4"-7/8"-7/8"-7/8" a total of 10-10-10-11-13 times = 52-56-60-66-70 sts. When piece measures 26-29-32-36-39 cm / 10 1/4"-11½"-12½"-14 1/4"-15 1/4", bind off the middle 6 sts mid under sleeve = 46-50-54-60-64 sts remain on needle. Put piece aside and make another sleeve.

YOKE:
Slip sleeves on to same circular needle as body where armholes were bound off (without working them first) = 240-256-272-292-308 sts on needle. Insert 1 marker in all transitions between sleeves and body piece = 4 markers. Continue in the round with stockinette st and pattern as before.
AT THE SAME TIME on first round dec for RAGLAN in every transition between body and sleeves – see explanation above (= 8 sts dec). Repeat dec for raglan every other round a total of 14-16-16-17-17 times and then every round a total of 3-3-5-7-9 times.
AT THE SAME TIME when piece measures 32-35-39-42-46 cm / 12½"-13 3/4"-15 1/4"-16½"-18", slip the middle 28-26-26-20-20 sts mid front on 1 stitch holder for neck (work sts before slipping them on the stitch holder). Then finish piece back and forth on circular needle from mid front and bind off for neck at beg of every row in each side as follows: bind off 2 sts 1-1-1-2-2 times and 1 st 1-2-2-2-2 times.
After all dec for raglan and bind offs for neck, 70-70-70-68-68 sts remain on needle.

NECK EDGE:
Pick up from RS on circular needle size 3.5 mm / US 4 approx. 104-104-104-100-100 sts around the neck (includes sts on stitch holder at the front). P 1 round. Then K 1 round while dec evenly to 60-68-76-80-88 sts. Then work rib = K 2/P 2 for 3 cm / 1'', then bind off with K over K and P over P.

ASSEMBLY:
Sew the openings under the sleeves.

This pattern has been corrected.

Updated online: 28.08.2015
Correction: New diagram A.3.

Diagram

All measurements in charts are in cm.

symbols = K from RS, P for WS
symbols = P from RS, K from WS
symbols = K 2 tog
symbols = slip 1 st as if to K, K 1, psso
symbols = slip 2 sts on cable needle behind piece, K 2, K 2 from cable needle
symbols = slip 2 sts on cable needle in front of piece, K 2, K 2 from cable needle
symbols = slip 3 sts on cable needle behind piece, K 3, K 3 from cable needle
symbols = slip 3 sts on cable needle in front of piece, K 3, K 3 from cable needle
symbols = slip 1 st on cable needle behind piece, k 3, K 1 from cable needle
symbols = slip 3 st on cable needle in front of piece, K 1, K 3 from cable needle
diagram
diagram
diagram

Each of our patterns has specific tutorial videos to help you.

Do you have a question? See a list of frequently asked questions (FAQ)

Knitting tension is what determines the final measurements of your work, and is usually measured per 10 x 10 cm. It is provided like so: number of stitches in width x number of rows in height - eg: 19 stitches x 26 rows = 10 x 10 cm.

The knitting tension is very individual; some people knit/crochet loosely while others work tightly. You adjust the knitting tension with the needle size, which is why the suggested needle size only serve as a guide! You need to adjust this (up or down) to ensure that YOUR knitting tension matches the knitting tension provided in the pattern. If you work with a different knitting tension than provided you will have a different yarn consumption, and your work will have different measurements than what the pattern suggests.

The knitting tension also determines which yarns can replace each other. As long as you achieve the same knitting tension you can replace one yarn with another.

See DROPS lesson: How to measure your tension/gauge

See DROPS video: How to make a gauge tension swatch

The required amount of yarn is provided in grams, eg: 450 g. To calculate how many balls you’ll need you first need to know how many grams are in 1 ball (25g, 50g or 100g). This information is available if you click on the individual yarn quality on our pages. Divide the amount required with the amount of each ball. For example, if each ball is 50g (the most common amount), the calculation will be as follows: 450 / 50 = 9 balls.

The important thing when changing from one yarn to another is that the knitting/crochet tension remains the same. This is so that the measurements of the finished piece will be the same as on the sketch provided. It is easier to achieve the same knitting tension using yarns from the same yarn group. It is also possible to work with multiple strands of a thinner yarn to achieve the knitting tension of a thicker one. Please try our yarn converter. We recommend you to always work a test swatch.

Please NOTE: when changing yarn the garment might have a different look and feel to the garment in the photo, due to individual properties and qualities of each yarn.

See DROPS lesson: Can I use a different yarn than the one mentioned in the pattern?

All our yarns are categorised into yarn groups (from A to F) according to thickness and knitting tension – group A contains the thinnest yarns and group F the thickest. This makes it easier for you to find alternative yarns to our patterns, should you wish to switch yarn. All yarns within the same group have a similar knitting tension and can easily replace each other. However, different yarn qualities have different structures and properties which will give the finished work a unique look and feel.

Click here for an overview of the yarns in each yarn group

At the top of all our patterns you’ll find a link to our yarn converter, which is a helpful tool should you wish to use a different yarn than suggested. By filling in the yarn quality you wish to replace, the amount (in your size) and number of strands, the converter will present good alternative yarns with the same knitting tension. Additionally it will tell you how much you’ll require in the new qualities and whether you’ll need to work with multiple strands. Most skeins are 50g (some are 25g or 100g).

If the pattern is worked with multiple colours, every colour will have to be converted separately. Similarly, if the pattern is worked with several strands of different yarns (for example 1 strand Alpaca and 1 strand Kid-Silk) you will have to find alternatives for each, individually.

Click here to see our yarn converter

Since different yarns have different qualities and textures we have chosen to keep the original yarn in our patterns. However, you can easily find options among our available qualities by using our yarn converter, or simply pick a yarn from the same yarn group.

It is possible that some retailers still have discontinued yarns in stock, or that someone has a few skeins at home that they would like to find patterns for.

The yarn converter will provide both alternative yarn as well as required amount in the new quality.

If you think it's hard to decide what size to make, it can be a good idea to measure a garment you own already and like the size of. Then you can pick the size by comparing those measures with the ones available in the pattern's size chart.

You'll find the size chart at the bottom of the pattern.

See DROPS lesson: How to read size chart

The needle size provided in the pattern serves only as a guide, the important thing is to follow the knitting tension. And since knitting tension is very individual, you will have to adjust the needle size to ensure that YOUR tension is the same as in the pattern – maybe you’ll have to adjust 1, or even 2 needle sizes, up or down to achieve the correct tension. For this, we recommend that you work test swatches.

Should you work with a different knitting tension than the one provided, the measurements of the finished garment might deviate from the measurement sketch.

See DROPS lesson: How to measure your tension/gauge

See DROPS video: How to make a gauge tension swatch

Working a garment top-down provides more flexibility and room for personal adjustment. For example it is easier to try the garment on while working, as well as making adjustments to length of yoke and shoulder caps.

The instructions are carefully explaining every step, in the correct order. Diagrams are adjusted to the knitting direction and are worked as usual.

The diagram depicts all rows/rounds, and every stitch seen from the right side. It is read from bottom to top, from right to left. 1 square = 1 stitch.

When working back and forth, every other row is worked from the right side and every other row is worked from the wrong side. When working from the wrong side, the diagram will have to be worked reversed: from left to right, knit stitches are purled, purl stitches are knit etc.

When working in the round every round is worked from the right side and the diagram are worked from right to left on all rounds.

See DROPS lesson: How to read knitting diagrams

The diagram depicts all rows/rounds, and every stitch seen from the right side. It is worked from bottom to top, from right to left.

When working back and forth every other row is worked from the right side: from right to left and every other row is worked from the wrong side: from left to right.

When working in the round, every row in the diagram are worked from the right side, from right to left.

When working a circular diagram you start in the middle and work your way outwards, counter clockwise, row by row.

The rows usually start with a given number of chain stitches (equivalent to the height of the following stitch), this will either be depicted in the diagram or explained in the pattern.

See DROPS lesson: How to read crochet diagrams

Instructions for working several diagrams after each other on the same row/round, will often be written like so: “work A.1, A.2, A.3 a total of 0-0-2-3-4 times". This means you work A.1 once, then A.2 is worked once, and A.3 is repeated (in width) the number of times provided for your size – in this case like so: S = 0 times, M = 0 times, L=2 times, XL= 3 times and XXL = 4 times.

The diagrams are worked as usual: begin with the first row in A.1, then work the first row in A.2 etc.

See DROPS lesson: How to read knitting diagrams

See DROPS lesson: How to read crochet diagrams

The total width of the garment (from wrist-to-wrist) will be larger in the larger sizes, despite the actual sleeves being shorter. The larger sizes have longer sleeve caps and wider shoulders, so there will be a good fit in all sizes.

The measurement sketch/schematic drawing provides information regarding the full length of the garment. If it’s a jumper or a jacket the length is measured from the highest point on the shoulder (usually closest to the neckline), and straight down to the bottom of the garment. It is NOT measured from the tip of shoulder. Similarly, the length of yoke is measured from the highest point on the shoulder and down to where yoke is split into body and sleeves.

See DROPS lesson: How to read a schematic drawing

Diagrams are often repeated on the round or in height. 1 repeat is the diagram the way it appears in the pattern. If it says to work 5 repeats of A.1 in the round, then you work A.1 a total of 5 times after/next to each other in the round. If it says to work 2 repeats of A.1 vertically/in height you work the entire diagram once, then begin again at the start and work the entire diagram one more time.

Chain stitches are slightly narrower than other stitches and to avoid working the cast-on edge too tight, we simply chain more stitches to begin with. The stitch count will be adjusted on the following row to fit the pattern and measurement sketch.

The rib edge is more elastic and will contract slightly compared to, for example, stocking stitch. By increasing before the rib edge, you avoid a visible difference in width between the rib edge and the rest of the body.

It’s very easy to cast off too tightly, and by making yarn overs while casting off (and simultaneously casting these off) you avoid a too tight cast off edge.

See DROPS video: How to bind off with yarn overs (yo)

To achieve an even increase (or decrease) you can increase on, for example: every 3rd and 4th row alternately, like so: work 2 rows and increase on the 3rd row, work 3 rows and increase on the 4th. Repeat this until the increase is complete.

See DROPS lesson: Increase or decrease 1 st on every 3rd and 4th row alternately

Should you prefer to work in the round instead of back and forth, you may of course adjust the pattern. You’ll need to add steeks mid-front (usually 5 stitches), and follow the instructions. When you would normally turn and work from the wrong side, simply work across the steek and continue in the round. At the end you’ll cut the piece open, pick up stitches to work bands, and cover the cut edges.

See DROPS video: How to knit steeks and cut open

Should you prefer to work back and forth instead of in the round, you may of course adjust the pattern so you work the pieces separately and then assemble them at the end. Divide the stitches for the body in 2, add 1 edge stitch in each side (for sewing) and work the front and back pieces separately.

See DROPS lesson: Can I adapt a pattern for circular needles into straight needles?

Pattern repeats can vary slightly in the different sizes, in order to get the correct proportions. If you’re not working the exact same size as the garment in the photo, yours might deviate slightly. This has been carefully developed and adjusted so that the complete impression of the garment is the same in all sizes.

Make sure to follow instructions and diagrams for your size!

If you have found a pattern you like which is available in women’s size it’s not very difficult to convert it to men’s size. The biggest difference will be the length of sleeves and body. Start working on the women size that you think would fit across the chest. The additional length will be worked right before you cast off for the armhole/sleeve cap. If the pattern is worked top-down you can add the length right after the armhole or before the first decrease on sleeve.

Regarding additional yarn amount, this will depend on how much length you add, but it is better with a skein too many than too few.

All yarns will have excess fibres (from production) that might come off as lint or shedding. Brushed yarns (ie hairier yarns) have more of these loose, excess fibres, causing more shedding.

Shedding also depends on what is worn under or over the garment, and whether this pulls at the yarn fibres. It’s therefore not possible to guarantee that there will be no shedding

Below are some tips on how to get the best result when working with hairier yarns:

1. When the garment is finished (before you wash it) shake it vigorously so the looser hairs come off. NOTE: do NOT use a lint roller, brush or any method that pulls at the yarn.

2. Place the garment in a plastic bag and put it in your freezer - the temperature will cause the fibres to become less attached to each other, and excess fibres will come off easier.

3. Leave in the freezer for a few hours before taking it out and shaking it again.

4. Wash the garment according to the instructions on the yarn label.

Pilling is a natural process that happens to even the most exclusive of fibers. It's a natural sign of wear and tear that is hard to avoid, and that is most visible in high friction areas of your garment like a sweater's arms and cuffs.

You can make your garment look as new by removing the pilling, using a fabric comb or a pill/lint remover.

Still can't find the answer you need? Then scroll down and leave your question so one of our experts can try to help you. This will be done normally within 5 to 10 working days.
In the meantime, you can read the questions and answers that others have left to this pattern or join the DROPS Workshop on Facebook to get help from fellow knitters/crocheters!

You might also like...

Lucky Jack

Elske, Netherlands

Lucky Santi

BirTual, Norway

Post a comment to pattern DROPS Children 26-3

We would love to hear what you have to say about this pattern!

If you want to leave a question, please make sure you select the correct category in the form below, to speed up the answering process. Required fields are marked *.

Comments / Questions (85)

country flag Tara Schanssema wrote:

Volgens mij klopt dit patroon niet..ik heb nu een pand gebreid en ziet er anders uit.. ook goed..maar niet hetzlefde

25.08.2019 - 20:20

country flag Seemal wrote:

Can someone post a video on how to start tbe first line of tbe cable design.Its a little confusing.

12.02.2019 - 14:59

DROPS Design answered:

Hi Seemal, I can write the first line for you (row 3 in A.3 which is from the right side and read from right to left): K1, P1, place 3 stitches on cable needle behind piece, K3 and K3 from cable needle, P1, K3, P1, place 2 stitches on cable needle behind piece, K2 and K2 from cable needle, P6, place 3 stitches on cable needle behind piece, K3 and K3 from cable needle, P6, place 2 stitches on cable needle behind piece, K2 and K2 from cable needle, P1, K3, P1, place 3 stitches on cable needle behind piece, K3 and K3 from cable needle, P1, K1. Hope this helps and happy knitting!

13.02.2019 - 08:02

country flag Rushd Nakade wrote:

Am wondering after joining sleeves with body , how to do back n forth with pattern as after raglan decrease started it will close all opening n it has to be worked on round right? please correct if am doing something wrong

21.01.2019 - 13:24

DROPS Design answered:

Dear Mrs Rushd, after you have slipped the sts from neck on front piece on a thread, jusst continue back and forth (make sure that the cable rows will still be worked from RS) starting rows now from neck and decreasing as before for raglan cast off for neck as explain for the size at the beg of every row both from RS and from WS (= each side of the middle sts for neck). Happy knitting!

21.01.2019 - 16:22

country flag Rushd wrote:

Am working on yoke. But one side where sleeves are join is close.i.e. where 6 sts had been bindoff in body for armhole. While other sleeves is join on other side where the body is open. Can i close the side of body n armhole gap after finishing the sweater?

20.01.2019 - 11:41

DROPS Design answered:

Dear Mrs Rushd, body has been worked in the round and you have cast off 6 sts on each side of the jumper for the armholes. Each sleeve will then be joined over these 6 sts - see the video below showing how to place sleeves on same circular needle as body. Happy knitting!

21.01.2019 - 10:55

country flag Rushd wrote:

Nice pattern

18.01.2019 - 19:00

country flag Rushd wrote:

While working on body when piece measure 22cm it is ask to dec sts.am confuse as to how to dec totally. ,i.e . Start n end we have to dec 3 sts each side. And the 6sts again for armhole which comes in the middle 28sts. Mean explain how to dec.

18.01.2019 - 13:31

DROPS Design answered:

Dear Rushd, rounds are starting in the side, so that you cast off the first 3 sts on round (half the armhole on the side), work until 3 sts remain before the marker on the other side, cast off the next 6 sts (= 3 sts on each side of the marker), work until 3 sts remain before last marker, cast off the last 3 sts. Happy knitting!

18.01.2019 - 14:38

country flag Kirsten Werner Landsnes wrote:

Jeg har strikket i over 50 år, og trenger hjelp, for første gang. Legg opp: OK Strikk i henhold til størrelse, osv etter A1, og nå føler jeg meg virkelig dum. Er ikke dette en vanlig vrangbord i 2r og 2vr? Og hvor strikkes A2?

11.01.2019 - 02:00

DROPS Design answered:

Hei Kirsten. Jo, A.1 er en vanlig vrangbord 2 rett, 1 vrang. Det er laget diagram slik at det blir lettere å skjønne hvordan A.2 strikkes over vrangborden. Du strikker A.2 etter at du har strikket vrangborden over 5 cm. Det står slik: Bytt til rundp 4 og strikk slik I ALLE STR: Strikk rett over de første 17-21-23-25-27 m og fell samtidig 3-5-5-5-5 m jevnt fordelt over disse m, strikk og fell etter A.2 over de neste 58 m,... osv. A.2 strikkes altså over A.1. God fornøyelse

11.01.2019 - 09:25

Rushd Nakade wrote:

I am working on sleeves. What you mean by Inc 2 sts mid under sleeves? Also at the 26cm for size 1 cast off 6 sts mid under sleeves. Can you please explain Thanks

11.12.2018 - 18:59

DROPS Design answered:

Hi Rushd. You increase mid under sleeve to make the increase as invisible as possible. The beginning/end of the round is normally mid under sleeve as there will always be a slight irregularity here. Increase 1 stitch at the beginning, and 1 stitch at the end of the round= 2 stitches increased mid under sleeve. When the sleeve measures 26 cm, you cast off 6 stitches. This is where the sleeve will meet the body and will later be sewn to the 6 stitches you cast off for sleeves on the body. Happy knitting.

12.12.2018 - 08:36

Rushd Nakade wrote:

Pattern ask for dec when you change from 3.5mm to 4mm, am working on size 2 i.e 2yrs. A total of 14 stitches are asked to dec. But when u read the pattern. Its 3 stitches in first 17, 3 stitches in last 17 and 6 stitches in middle 34 stitches. So its total of 12 stitches where to dec those 2 stitches so make it 160. Plz explain.

25.11.2018 - 23:27

DROPS Design answered:

Dear Mrs Rushd, you have to decrease evenly over the rib and at the same time you will work A.2 where you will decrease 6 sts each time you'll work A.2. So that you will dec: 3 + 6 + 3 sts + 6 sts in each of the 2 A.2 = 24 sts dec, there were 184 sts - 24= 160 sts remain. Happy knitting!

26.11.2018 - 10:35

Sossa wrote:

I need diagram A.1 please

27.09.2018 - 10:44

DROPS Design answered:

Dear Sossa, You'll find diagram A.1 just above measurement chart = 4 rows framed on the right side of diagram. Happy knitting!

27.09.2018 - 13:43