
Popular categories
Looking for a yarn?


|
||||||||||||||||||||||
Spring Bliss |
||||||||||||||||||||||
 |
 |
|||||||||||||||||||||
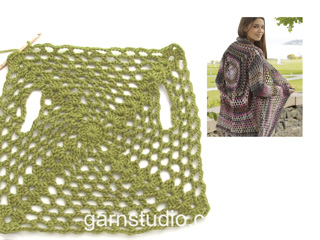
Crochet DROPS jacket with lace pattern in ”Paris”. Size: S - XXXL.
DROPS 162-5 |
||||||||||||||||||||||
|
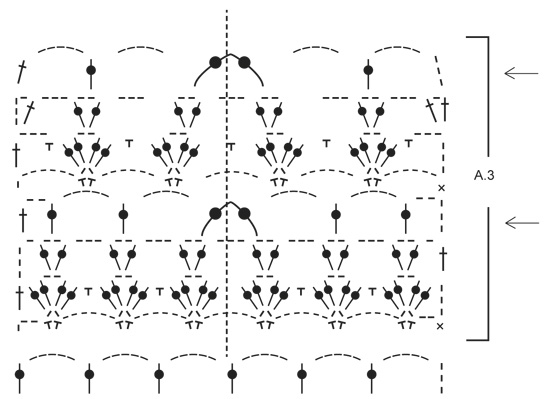
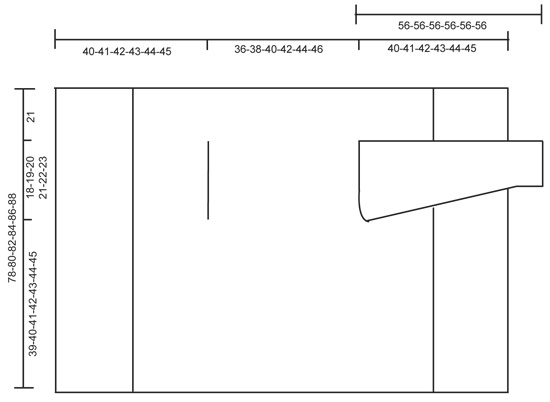
PATTERN: See diagrams A.1 and A.2. DECREASE TIP: Dec 1 dc by working 2 dc tog as follows: Work 1 dc in first ch-space but wait with last pull through, skip ch 3, work 1 dc in next ch-space but on last pull through, pull yarn through all 3 loops on hook. ---------------------------------------------------------- BODY: Worked in the round from mid back on the back. Work 6 ch with Paris on hook size 5 mm / H/8 and form a ring with 1 sl st in first ch. Work according to diagram A.1, i.e. work as follows: ROUND 1: 5 ch (= 1 dc + 2 ch), * 1 dc in ring, 2 ch *, repeat from *-* a total of 7 times, finish with 1 sl st in 3rd ch from beg of round = 8 dc with 2 ch between each. ROUND 2: 1 sl st in first ch-space, 3 ch (= 1 dc), 2 dc in same ch-space, * ch 1, 3 dc in next ch-space *, repeat from *-* 7 times in total, and finish with 1 ch and 1 sl st in 3rd ch from beg of round = 8 dc-groups with 1 ch between each. ROUND 3: ch 1, 1 sc in the middle dc in dc-group, * ch 3, 1 sc in ch before next dc-group, ch 3, 1 sc in the middle dc in next dc-group *, repeat from *-* 7 times in total, ch 3, 1 sc in last ch, 3 ch and 1 sl st in first sc at beg of round = 16 ch-spaces. ROUND 4: Now work the circle into a square, i.e. work as follows: 1 sl st in first ch-space, 4 ch (= 1 tr), 1 tr + 3 ch + 2 tr in same ch-space (= corner), * (2 ch, 1 dc in next ch-space) repeat from (-) 3 times in total, ch 2, 2 tr + 3 ch + 2 tr in next ch-space (= corner) *, repeat from *-* 3 times in total, repeat from (-) 3 times in total and finish with 2 ch and 1 sl st in 4th ch from beg of round. ROUND 5: Work sl sts until ch-space in the corner, 3 ch (= 1 dc), 2 dc + 3 ch + 3 dc in same ch-space (= corner), * ch 5, skip 1 ch-space, 1 sc in next ch-space, ch 5, 1 sc in next ch-space, ch 5, skip 1 ch-space, in next ch-space (= corner) work 3 dc + 3 ch + 3 dc *, repeat from *-* 3 times in total, ch 5, skip 1 ch-space, 1 sc in next ch-space, ch 5, 1 sc in next ch-space, ch 5, skip last ch-space and finish with 1 sl st in 3rd ch at beg of round. ROUND 6: Work sl sts until ch-space in the corner, 3 ch (= 1 dc), 2 dc + 3 ch + 3 dc in same ch-space (= corner), * (6 ch, 1 sc + 2 ch + sc in next ch-space), repeat from (-) until corner, ch 6, work 3 dc + 3 ch + 3 dc in ch-space in the corner *, repeat from *-* 3 times in total, repeat from (-) until the corner and finish with 6 ch and 1 sl st in 3rd ch at beg of round. ROUND 7: Work sl sts until ch-space in the corner, 3 ch (= 1 dc), 2 dc + 3 ch + 3 dc in same ch-space (= corner), * ch 1, (1 sc in 6-ch-space, 2 dc + 2 ch + 2 dc in 2-ch-space), repeat from (-) until one 6-ch-space remains before the corner, 1 sc in 6-ch-space, ch 1, 3 dc + 3 ch + 3 dc in ch-space in the corner *, repeat from *-* 3 times in total, ch 1, repeat from (-) until one 6-ch-space remains before the corner and finish with 1 ch and 1 sl st in 3rd ch at beg of round. ROUND 8: Work sl sts until ch-space in the corner, 3 ch (= 1 dc), 2 dc + 3 ch + 3 dc in same ch-space (= corner), * ch 2, 1 dc in first ch, (3 ch, 1 dc + 2 ch + 1 dc in ch-space in dc-group), repeat from (-) until corner, ch 3, 1 dc in ch before corner, ch 2, 3 dc + 3 ch + 3 dc in ch-space in the corner *, repeat from *-* 3 times in total, ch 2, 1 dc in first ch, repeat from (-) until corner, ch 3, 1 dc in last ch, 2 ch and 1 sl st in 3rd ch at beg of round. ROUND 9: Work sl sts until ch-space in the corner, 3 ch (= 1 dc), 2 dc + 3 ch + 3 dc in same ch-space (= corner), * ch 5, 1 dc in first ch-space, (5 ch, 1 dc in ch-space in dc-group), repeat from (-) until 1 ch-space remains before dc-group in the corner, ch 5, 1 dc in last ch-space before the corner, 5 ch and 3 dc + 3 ch + 3 dc in ch-space in the corner *, repeat from *-* 3 times in total, ch 5, 1 dc in first ch-space, repeat from (-) until 1 ch-space remains before the corner, ch 5, 1 dc in last ch-space, 5 ch and 1 sl st in 3rd ch at beg of round. REMEMBER THE CROCHET GAUGE! Repeat 6th to 9th round (4 rounds) outwards as shown in diagram. Continue like this until square measures approx. 36-38-40-42-44-46 cm x 36-38-40-42-44-46 cm / 14¼''-15''-15¾''-16½''-17¼''-18'' x 14¼''-15''-15¾''-16½''-17¼''-18''. Now work armholes as follows: Work as before until first corner, work 3 dc + 3 ch + 3 dc in ch-space in the corner. Now work ch until the middle of next side (i.e. in the middle between 1st and 2nd corner) as follows: Work 1 ch for every ch/dc skipped. Then work pattern as before until the middle between 3rd and 4th corner. Now work ch until beg of round as follows: Work 1 ch for every ch/dc skipped. On next round work pattern and inc as before over all sts, also in ch for armholes. Continue like this until square measures approx. 78-80-82-84-86-88 cm x 78-80-82-84-86-88 cm/ 30¾''-31½''-32¼''-33''-33 7/8''-34 5/8'' x 30¾''-31½''-32¼''-33''-33 7/8''-34 5/8'' (i.e. approx. 21 cm / 8 1/4'' in all sizes from armhole) - adjust to finish after 9th round (round with ch-spaces and dc's). Cut the yarn. FRONT PIECE: Beg from WS and work back and forth between first and second corner. NOTE: Work front piece without inc. Work according to diagram A.2 from first corner, i.e. work as follows: ROW 1: 3 ch (= 1 sc + 2 ch), 1 sc + 2 ch + 1 sc in first ch-space, * ch 6, 1 sc + 2 ch + 1 sc in next ch-space*, repeat from *-* the entire row and finish with 2 ch and 1 sc in first ch-space in the corner, turn piece. ROW 2 (= RS): 3 ch (= 1 dc), * 2 dc + 2 ch + 2 dc in ch-space between 2 sc, 1 sc in 6-ch-space *, repeat from *-* the entire row and finish with 1 dc in 1st ch from beg of previous row, turn piece. ROW 3: 4 ch (= 1 dc + 1 ch), * 1 dc + 2 ch + 1 dc in ch-space in the middle of dc-group, 3 ch *, repeat from *-* until 1 dc-group remains before the corner, 1 dc + 2 ch + 1 dc in ch-space in last dc-group, finish with 1 ch and 1 dc in 3rd ch from beg of previous row, turn piece. ROW 4 (= RS): 5 ch (= 1 dc + 2 ch), * 1 dc in ch-space in dc-group, 5 ch *, repeat from *-* until 1 dc-group remains, 1 dc in ch-space in last dc-group, 2 ch and 1 dc in 3rd ch from beg of previous row, turn piece. ROW 5: 7 ch (= 1 sc + 6 ch), * 1 sc + 2 ch + 1 sc in 5-ch-space, 6 ch *, repeat from *-* the entire row and finish with 1 sc in 3rd ch from beg of previous row, turn piece. ROW 6 (= RS): 6 ch (= 1 dc + 3 ch), * 1 sc in 6-ch-space, 2 dc + 2 ch + 2 dc in 2-ch-space *, repeat from *-* the entire row and finish with 1 sc in last 6-ch-space, 3 ch and 1 dc in first ch from beg of previous row, turn piece. ROW 7: 4 ch (= 1 dc + 1 ch), 1 dc in same st, * ch 3, 1 dc + 2 ch + 1 dc in ch-space in the middle of next dc-group *, repeat from *-* the entire row and finish with 3 ch and 1 dc + 1 ch + 1 dc in 3rd ch from beg of previous row, turn piece. ROW 8 (= RS): 8 ch (= 1 dc + 5 ch), * 1 dc in ch-space in the middle of dc-group, 5 ch *, repeat from *-* the entire row and finish with 5 ch and 1 dc in 3rd ch from beg of previous row, turn piece. Repeat rows 1 to 8 outwards. Continue like this until approx. 19-20-21-22-23-24 cm / 7½''-8''-8¼''-8¾''-9''-9½'' have been worked back and forth, fasten off (adjust after 1st or 5th row in pattern). Repeat on the other side, now work back and forth from third to fourth corner. EDGE: Finally work a round around the entire piece with 2nd or 6th row in pattern but in ch-space in each corner work 6 dc. Fasten off. SLEEVE: Work back and forward and sew togheter at the end. Sleeve is worked straight out of armhole of the body, top down. Beg mid under armhole, from RS. 1 sc in first st, then work ch-space as on 4th or 8th row in A.2. Work so that there are 12-13-14-15-15-16 ch-spaces around armhole. Then continue with pattern according to diagram A.2. Work pattern like this until sleeve measures 26 cm / 10 1/4''. Now work according to A.3. On every row with arrow work 2 dc tog into 1 dc mid front of sleeve (i.e. dec 1 ch-space on every round with arrow) - READ DECREASE TIP. The dotted line shows mid front of sleeve. Otherwise continue the pattern as before. Dec on every 4th row a total of 4 times. Then work according to diagram A.2 until sleeve measures 56 cm / 22'' in all sizes. Fasten off. Repeat in the other side. |
||||||||||||||||||||||
Diagram explanations |
||||||||||||||||||||||
|
||||||||||||||||||||||

|
||||||||||||||||||||||

|
||||||||||||||||||||||
|
||||||||||||||||||||||
|
||||||||||||||||||||||
|
Have you made this or any other of our designs? Tag your pictures in social media with #dropsdesign so we can see them! Do you need help with this pattern?You'll find tutorial videos, a Comments/Questions area and more by visiting the pattern on garnstudio.com. © 1982-2024 DROPS Design A/S. We reserve all rights. This document, including all its sub-sections, has copyrights. Read more about what you can do with our patterns at the bottom of each pattern on our site. |
||||||||||||||||||||||


With over 40 years in knitting and crochet design, DROPS Design offers one of the most extensive collections of free patterns on the internet - translated to 17 languages. As of today we count 304 catalogs and 11422 patterns - 11417 of which are translated into English (US/in).
We work hard to bring you the best knitting and crochet have to offer, inspiration and advice as well as great quality yarns at incredible prices! Would you like to use our patterns for other than personal use? You can read what you are allowed to do in the Copyright text at the bottom of all our patterns. Happy crafting!
Comments / Questions (149)
E possibile avere uno schema ho fatto il dietro ma non ho capito con gli scalfi maniche grazie mille
20.04.2020 - 18:49DROPS Design answered:
Buongiorno Flora. Purtroppo non abbiamo materiale aggiuntivo a quanto pubblicato. Per gli scalfi, non lavora la prima metà del lato tra il 1° e il 2° angolo, ma avvia 1 catenella per ogni maglia (catenella o m.alta) non lavorata; procede come prima fino alla metà del lato tra il 3° e il 4° angolo e qui avvia lo stesso numero di catenelle. Buon lavoro!
21.04.2020 - 09:26When starting with the front piece, do you still work the corner (3dc, 3ch, 3dc) before starting the first ch 3 in Row 1 and then end with a corner again before starting with row 2?
13.01.2020 - 09:17DROPS Design answered:
Dear Hannelie, when working the front piece, you don't increase anymore, work A.3 as explained under written pattern. Happy crocheting!
13.01.2020 - 10:58Las mangas se tejen en redondo o van cosidas?
26.09.2019 - 22:26DROPS Design answered:
Hola Mirta. Las mangas se trabajan de ida y vuelta, comenzando en la sisa de la chaqueta y se hace una costura en el centro bajo la manga para finalizar
28.09.2019 - 23:39Ben bezig met dit patroon. Gaat prima ! Ik ben nieuwsgierig voor het resultaat....
07.07.2019 - 08:22Hallo, ich bin etwas verwirrt, das Garn Drops Paris betreffend. Auf der Seite "Pflegehinweise" ist folgende Empfehlung zu finden:Maschinenwäsche 60°C / liegend trocknen. Gleichzeitig ist jedoch sowohl dort wie auch auf dem Etikett ein Tumbler-Symbol mit 2 Punkten angegeben, welches besagt, dass das Garn im Trockner sogar ohne Schontrocknung getrocknet werden kann. Man kann Drops Paris ergo bedenkenlos in den Trockner geben? Für eine kurze Info besten Dank!
27.06.2019 - 11:05DROPS Design answered:
Liebe Frau Cajun, wenn Sie keinen Trockner haben, dann soll die Jacke flach liegen, aber sonnst können Sie im Trockner trocknen - siehe Symbol, Paris ist 100% Baumwolle. Viel Spaß beim häkeln!
28.06.2019 - 09:30Please tell me there is a video tutorial! I’m so stuck!
19.06.2019 - 18:25DROPS Design answered:
Dear Mrs Jones, there are not specified video to this pattern, but these informations might help you reading diagrams. Happy crocheting!
20.06.2019 - 08:28Non riesco a capire come fare gli scalfì è possibile avere un diagramma?
06.05.2019 - 21:28DROPS Design answered:
Buongiorno Maria. Purtroppo uun diagramma non è disponibile. Una volta lavorato fino al primo angolo compreso, non deve lavorare la prima metà del lato tra il 1° e il 2° angolo, ma avvia 1 catenella per ogni maglia (catenella o m.alta) che non lavora. Riprende a lavorare a metà del lato (tra il 1° e il 2° angolo) e procede come prima fino alla metà del lato tra il 3° e il 4° angolo. Qui avvia di nuovo lo stesso numero di catenelle e chiude il giro. Buon lavoro!
07.05.2019 - 09:03Podrian explicar como se forma el hombro? Se cose? No me queda claro. Gracias
04.03.2019 - 19:29DROPS Design answered:
Hola Marta . El hombro se forma a la vez que trabajas el cuerpo y los delanteros.
17.10.2019 - 19:00Ik heb het lijf volledig af maar ik begrijp ff niet hoe het zit met de armsgaten. Daar zit ik wat vast.
26.06.2018 - 11:18DROPS Design answered:
Dag Lieve, Je haakt tot het midden van de volgende zijkant en dan haak je lossen (een aantal lossen dat overeenkomt met de steken van de vorige toer) om vervolgens op de hoek het patroon weer op te pakken. Op deze manier heb je een armsgat gecreëerd, waar later de mouw aan gehaakt kan worden.
26.06.2018 - 14:52Heyy, I've just chained for the arms on both sides of the squares and I'm not sure what to do next
21.06.2018 - 12:42DROPS Design answered:
Dear Mrs Potato, after the round with chains and skipping sts for armholes, work next round in diagram, but now crochet in both chains as there weren't any chain before (= you should crochet the same row as over all other sts on round so that you have the same number of sts after and before the armholes). Happy crocheting!
21.06.2018 - 15:27