
Popular categories
Looking for a yarn?


|
|||||||||||||||||||
Peach Macaroon |
|||||||||||||||||||
 |
 |
||||||||||||||||||
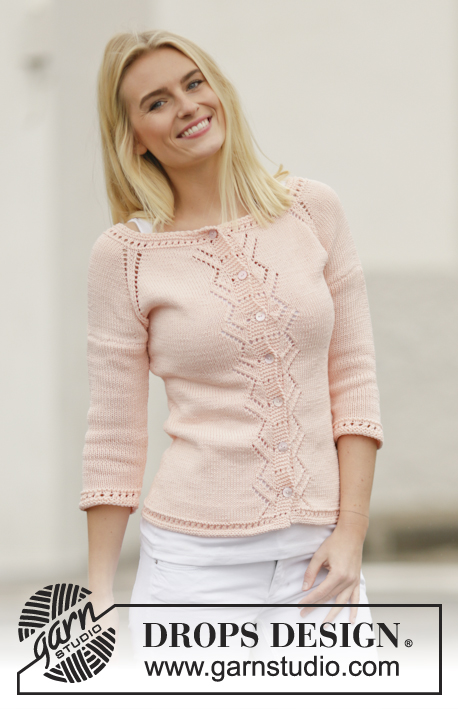
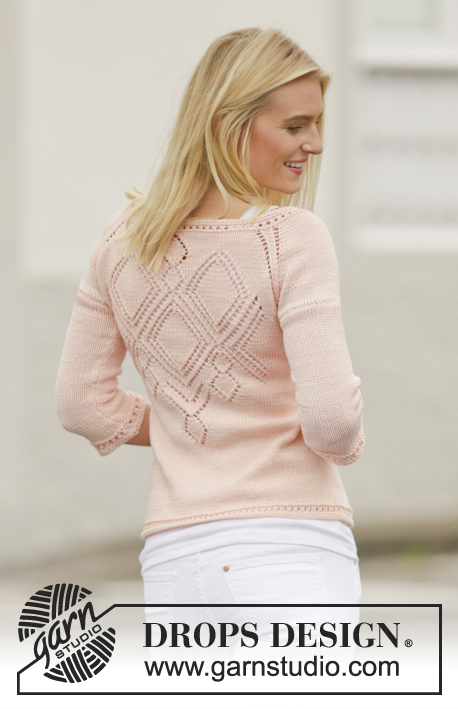
Knitted DROPS jacket with lace pattern and raglan in ”Muskat”. Worked top down. Size: S - XXXL.
DROPS 160-23 |
|||||||||||||||||||
|
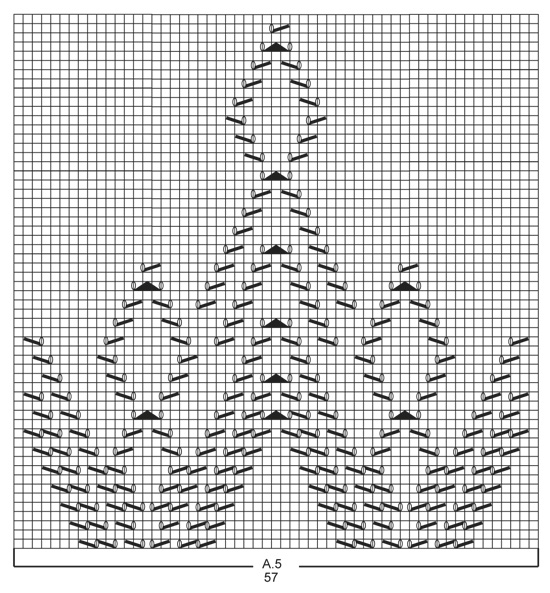
PATTERN: See diagrams A.1 to A.6. The diagrams show all rows in pattern seen from RS. DECREASE TIP: Dec 1 st before marker as follows: Work until 2 sts remain before marker, slip 1 st as if to K, K 1, psso. Dec 1 st after marker as follows: K 2 tog. BAND STS: Work band (= 6 sts) as follows: ROW 1 (= RS): K 6. ROW 2: K 6. Repeat 1st-2nd row 5 times in total (= 5 ridges). ROW 11 (= RS): * K 2 tog, 1 YO *, repeat from *-* 3 times in total, work reversed in the other side of piece, i.e.: 1 YO, K 2 twisted tog (= eyelet row). ROW 12: K all sts, do not work YOs twisted; they should make holes. RAGLAN: Inc differently for raglan in the different sizes: SIZE S-M: Inc on every row from RS (= every other row) as follows: Inc 1 sts each side of each marker (= 8 sts inc) as follows: 1 YO, K1 twisted, K 1( = st with marker), K 1 twisted, 1 YO. Do not work YOs twisted on next row, they should make holes, repeat inc every other row 17-19 more times. SIZE L-XL-XXL-XXXL: Inc on every row from RS (= every other row) as follows: Inc 2 sts each side of each marker (= 16 sts inc in total) as follows: 1 YO, K 1, 1 YO, K 1 twisted, K 1(= st with maker), K 1 twisted, 1 YO, K 1, 1 YO (the first and last YO work P twisted on next row, it should not make a hole, P the 2 middle YO, they should make holes). Repeat inc on every row from RS 1-1-1-3 more times. Then inc on every row from RS (= every other row) as follows: Inc 1 st on each side of each marker (= 8 sts inc in total) as follows: YO, K 1 twisted, K 1 (= st with maker), K 1 twisted, YO. Do not P YOs twisted on next row, they should make holes, repeat inc every other row 19-20-22-21 times in total. INCREASE TIP: Inc 1 st by making a YO. On next row P YO twisted (i.e. work in the back loop of st instead of front) to avoid holes. KNITTING TIP: Picture deviate from pattern, there is no seam on sleeve in pattern. ---------------------------------------------------------- YOKE: Worked back and forth on circular needle, top down. Cast on 147-147-153-157-157-161 sts (includes 6 band sts in each side of piece) on circular needle size 3.5 mm / US 4 with Muskat. Work 6 BAND STS - see explanation above, A.1 (= 2 sts) until 7 sts remain, K 1, finish with 6 band sts. When A.1 has been worked 1 time vertically, switch to circular needle size 4 mm / US 6. Work the 6 band sts like this until finished measurements. On next row from RS, 6 band sts, A.2 (= 7 sts), K until 13 sts remain - AT THE SAME TIME inc 14-18-12-20-40-44 sts evenly, A.3 (= 7 sts), ending with 6 band sts = 161-165-165-177-197-205 sts. On next row (= from WS) insert 4 markers in the piece as follows: 6 band sts, A.3, P 15-16-17-20-25-28 sts (= front piece), P 1 and insert 1st marker in this st, P 28-28-26-26-26-24 (= sleeve), P 1 st and insert 2nd marker in this st, P 45-47-49-55-65-71 sts (= back piece), P 1 st and insert 3rd marker in this st, P 28-28-26-26-26-24 sts(= sleeve), P 1 and insert 4th marker in this st, P 15-16-17-20-25-28 sts (= front piece), A.2 and finish with 6 band sts. REMEMBER THE GAUGE! A.2-A.3 is worked like this until finished measurements. Then work as follows (from RS) - AT THE SAME TIME inc for RAGLAN - see explanation above. Work 6 band sts, A.2, K until 1-1-2-2-2-2 st remains before 1st marker, work RAGLAN - see explanation above, K until 1-1-2-2-2-2 sts remain before 2nd marker, work raglan, K 0-1-1-4-9-12, A.4 (= 43 sts), K until 1-1-2-2-2-2 st remains before 3rd marker, work raglan, K until 1-1-2-2-2-2 sts remain before 4th marker, work raglan,in stockinette st until 13 sts remain, A.3 (= 7 sts), finish with 6 band sts. Work the inc sts in stockinette st until they can be worked in pattern as shown in A.4. When A.4 has been worked 1 time vertically, work A.5 (= 57 sts) over A.4. After all inc are done there are 305-325-349-369-405-437 sts on needle. Piece measures approx. 14-15-16-17-18-19 cm / 5½"-6"-6¼"-6¾"-7"-7½". Continue with pattern and stockinette st as before AT THE SAME TIME work as follows on next row from RS: Work 6 band sts, A.2 as before, 33-36-40-44-51-57 sts in stockinette st (= front piece), insert the next 66-70-74-76-80-84 sts on a stitch holder for sleeve, cast on 6-6-6-8-8-8 sts under sleeve (insert marker in the middle of the new sts), work the next 81-87-95-103-117-129 sts (= back piece) as before, slip the next 66-70-74-76-80-84 sts on a stitch holder for sleeve, cast on 6-6-6-8-8-8 sts under sleeve (insert a marker in the middle of the new sts), 33-36-40-44-51-57 sts in stockinette st (= front piece), A.3 as before, finish with 6 band sts = 185-197-213-233-261-285 sts remain on needle. Insert 1 marker in piece, NOW MEASURE PIECE FROM HERE. Continue with pattern and stockinette st over the remaining sts. When piece measures 3 cm / 1", dec 1 st on each side of each markers in the side (= 4 sts dec) - READ DECREASE TIP! Repeat dec every 2½-4-4-4-4-4 cm / ⅞"-1½"-1½"-1½"-1½"-1½" 5-3-3-3-3-3 more times = 161-181-197-217-245-269 sts. Work as before until piece measures 18-19-20-21-22-23 cm / 7"-7½"-8"-8¼"-8 ¾"-9". When A.5 has been worked 1 time vertically, work in stockinette st over all sts. Then inc 1 st on each side of each markers in the sides (= 4 sts inc) - READ INCREASE TIP! Repeat inc every 2 cm / ¾" 8-7-7-7-7-7 more times = 197-213-229-249-277-301 sts. When piece measures 40-41-42-43-44-45 cm / 15¾"-16⅛"-16½"-17"-17¼"-17¾" (adjust so that next row is from RS), switch to circular needle size 3.5 mm / US 4. Then work as follows: 6 band sts, work A.6 (= 2 sts) until 7 sts remain, 1 st in stockinette st and 6 band sts. When A.6 has been worked 1 time vertically, bind off. SLEEVE: Worked in the round on double pointed needles. Insert 1 marker in piece, NOW MEASURE PIECE FROM HERE. Slip sts from stitch holder back on double pointed needles size 4 mm / US 6 and cast on 6-6-6-8-8-8 new sts under sleeve (insert a marker in the middle of the new sts) = 72-76-80-84-88-92 sts - see KNITTING TIP. Work in stockinette st. When piece measures 3 cm / 1", dec 1 st on each side of marker mid under sleeve (= 2 sts dec), repeat dec every 2-1½-1½-1½-1-1 cm / ¾"-½"-½"-½"-⅜"-⅜" 12-13-14-15-17-18 more times = 46-48-50-52-52-54 sts. When piece measures 32-32-32-31-31-31 cm / 12½"-12½"-12½"-12¼"-12¼"-12¼" (shorter measurements in the larger sizes because of wider shoulders), switch to double pointed needle size 3.5 mm / US 4. Work A.6. Bind off when A.6 has been worked 1 time vertically. Work the other sleeve the same way. ASSEMBLY: Sew the opening under the sleeves. Sew on buttons, button in eyelet row for band sts. Fasten the top button in neck on left band in first eyelet row, skip 2 eyelet rows, fasten the next button, then fasten the other button in every other eyelet row. |
|||||||||||||||||||
Diagram explanations |
|||||||||||||||||||
|
|||||||||||||||||||

|
|||||||||||||||||||

|
|||||||||||||||||||
|
|||||||||||||||||||

|
|||||||||||||||||||
|
Have you made this or any other of our designs? Tag your pictures in social media with #dropsdesign so we can see them! Do you need help with this pattern?You'll find tutorial videos, a Comments/Questions area and more by visiting the pattern on garnstudio.com. © 1982-2024 DROPS Design A/S. We reserve all rights. This document, including all its sub-sections, has copyrights. Read more about what you can do with our patterns at the bottom of each pattern on our site. |
|||||||||||||||||||


With over 40 years in knitting and crochet design, DROPS Design offers one of the most extensive collections of free patterns on the internet - translated to 17 languages. As of today we count 304 catalogs and 11422 patterns - 11417 of which are translated into English (US/in).
We work hard to bring you the best knitting and crochet have to offer, inspiration and advice as well as great quality yarns at incredible prices! Would you like to use our patterns for other than personal use? You can read what you are allowed to do in the Copyright text at the bottom of all our patterns. Happy crafting!
Comments / Questions (74)
Je ne comprends comment faire au sujet du raglan. Est-ce qu'il faut le faire à chaque marqueur comme indiqué dans l'explication ? Alors que pour commencer c'est 3 m avant le 2ème et 4ème marqueur (pour la taille M). Donc je ne sais pas. Merci pour votre aide
28.05.2015 - 09:51DROPS Design answered:
Bonjour Mme Domoleron, les augmentations du raglan sont les 2 jetés indiqués avant et après "1 m torse à l'end, 1 m end, 1 m torse à l'end" - alignez toujours ces 3 m les unes au-dessus des autres et faites le jeté avant et après ces 3 m = 1 m augmentée pour la partie concernée - on augmente ainsi de 2 m pour chaque manche et pour le dos et d'1 m pour les devants. Bon tricot!
28.05.2015 - 15:15Ich stricke Größe M. Bei der Passe heißt es "glatt re bis noch 3-3-4-4-4-4 M vor dem 2. Markierer übrig sind, die Raglanzunahme str, 2-3-3-6-11-14 M glatt re, A.4 (= 43 M), " Insgesamt 47 M mittig. Im Muster A.4 sind links vom Muster 20, rechts 21M. Wenn ich jetzt nach der Raglanzunahme 3M glatt re stricke, habe ich links 22 und rechts 24M. Warum? Oder ist es so gedacht, dass das Muster "perfekt" mittig auf dem Rücken ist, dann würden auch bei Größe M 2 M glatt re ausreichen... LG Sarah
25.05.2015 - 14:19DROPS Design answered:
Optisch müssen Sie die beiden zusgestr. M der 1. R auch als 1 M re betrachten, Sie haben also rechts + links vom Umschl. je 21 M in A.4, damit wirkt es mittig. Bleiben noch je 2 M rechts + links davon bis zum jeweiligen Markierer. Wenn Sie die Zunahmen nun wie beschrieben arb., passt das: Zun., 2 M re, A.4 (= 43 M), 2 M re (es bleiben ja 2 M bis zum Markierer übrig), Zun. Die 3 M zwischen den Zun. (re verschr, re, re verschr) bilden die Raglanlinie und sind zunächst weder zum Rumpfteil noch zu den Ärmel zu rechnen, die Zun. rechts und links davon müssen Sie jeweils zum Rumpf bzw. zu den Ärmel rechnen. Sie haben also nach der 1. Muster-R von A.4 je 3 M re rechts + links des Musters.
26.05.2015 - 09:37Tricoté durant ce long week-end en coton/mérinos, magnifique, que du bonheur. Merci pour ce superbe modèle, tricoté de haut en bas, sans couture. Génial nos grand-mères connaissaient déjà cette méthode rapide.
19.05.2015 - 01:31Over de raglan: in het patroon staat niet dat je eerst de omslag moet doen en dan de markeerder moet verplaatsen. Als je eerst de markeerder overneemt en dan de raglan gaat doen, gaat het inderdaad scheef lopen. Ik kwam dat probleem ook tegen, maar heb besloten de markeerder te negeren en gewoon de raglan recht boven elkaar te breien. Elke keer als je het 'gaatje' van de vorige rij tegenkomt, moet je nog 1 steek recht breien en dan aan de raglan beginnen, dan komt het ook goed.
06.05.2015 - 10:05DROPS Design answered:
Hoi Loes. Je breit bijv. in maat M tot 0 st voor de markeerder, dan maak je de omslag, dan komt de markeerder enzovoort = automatisch komt de omslag (= nieuwe steek) voor de markeerder. Volg je het patroon, en houd je de markeerder op dezelfde plaats, dan komt de raglan schuin boven elkaar zoals op de foto (ik heb nav de opmerkingen een proefje gedaan). Het is volgens mij een kwestie van hoe je het patroon leest, maar heb je een eigen manier om het te doen en wordt het resultaat zoals gewenst, dan is dat natuurlijk altijd goed:-) Veel breiplezier verder!
06.05.2015 - 11:27Hallo, IK ben de raglan aan het breien in maat m en hij gaat dus de mouw in en niet naar de voorpanden en het rugpand. Ik vind het erg jammer dat het niet klopt en hoop op een spoedige reactie met een kloppende raglan zodat ik de vest daadwerkelijk kan maken. Uit de reacties zie ik dat er meer mensen zijn die deze fout hebben ontdekt
04.05.2015 - 11:27DROPS Design answered:
Hoi Jenny. Ik kan niet je probleem zien. Je meerdert voor de raglan voor EN na de markeerder, de markeerder is de overgang tussen panden en mouwen (bijvoorbeeld markeerder 1: brei tot 0 st voor de markeerder en maak hier de omslag, dan markeerder, 1 gedraaid r, 1 r, 1 gedraaid r, 1 omsl). De eerste omslag (meerdering), is dan en nieuwe steek op het voorpand en tweede omslag op de mouw. Je moet ervoor zorgen dat de markeerder op dezelfde plek blijft. Is dit niet je probleem, graag dan even duidelijker omschrijven wat en wanneer het fout gaat. :-)
05.05.2015 - 11:32Bonjour, j'ai l'impression qu'il y a une erreur lorsque l'on doit commencer le motif A4. Selon le modèle en taille S, le dos fait 45 mailles et le motif 43, on nous dit de tricoter 2 mailles end puis A4, mais le motif est donc décalé. Je pense qu'il y a une erreur dans le nombre de mailles a tricoter avant le motif A4, cela ne devrait-il pas être 1/2/3/6/11/14?!?! Pouvez-vous m'eclairer sur ce point? Merci!
03.05.2015 - 10:28DROPS Design answered:
Bonjour Nadine, votre question a été transférée à nos stylistes. Merci d'avance pour votre patience.
18.05.2015 - 10:41Natalie wrote:
Could you please give me some help with your raglan, I am knitting L, your Raglan instructions I get extremely confused - I am supposed to start 1 stitch before the first marker and then......*Inc 4 sts at each marker as follows: 1 YO, K 1, 1 YO, K 1 twisted, K 1, K 1 twisted, 1 YO, K 1, 1 YO* Where are all these stitches supposed to come from? Am I supposed to do a YO and knit one stitch before the marker? Where do I pass marker?
27.04.2015 - 10:59DROPS Design answered:
Dear Natalie, when inc 4 sts at each marker, the 2nd and 3rd YOs are the inc for raglan (the holes each side of K1 twisted, K1, K1 twisted), these 3 sts (K1 twisted, K1, K1 twisted) are the raglan sts and should be worked above each other on every row. Happy knitting!
27.04.2015 - 13:36Jeg sliter med at A4 forskyver seg, siden jeg øker til raglan..noen som kan forklare meg hva jeg gjør feil?
17.04.2015 - 23:12DROPS Design answered:
Hei Anette. Jeg tror du "bare" flytter mönstret i og med du faar flere masker paa pinden, du skal sörge for at strikke mönstret over de samme masker som i forrige pind - du kan eventuelt markere hvor mönstret begynder efter förste pind (1 kast, ta 1 m løst av p, 1 r, løft den løse m over), saa ved du hele tiden hvor du skal begynde med naeste mönsterraekke.
22.04.2015 - 15:10Jag har också problem med raglanökningarna för storlek m, det är svårt att förstå hur jag ska få det rätt, det hamnar snett (jag har stickat många raglan tidigare). Stämmer mönstret? Förtydligande?
21.03.2015 - 08:58DROPS Design answered:
Hej Jessica, jo selve raglanudtagningerne stemmer, de skal være indenfor mærketrådenen mod ærmet i hver side i de to mindste størrelser, yderste ved selve mærketråden. MEN A.4 er forskudt en maske og det skal vi få rettet, sørg for at have lige mange masker i hver side mellem A.4 og mærketråden. Der vil blive lagt en rettelse ud!
25.05.2015 - 13:24Hej jag tror att det är fel i mönstret för strl s-m också. Jag får inte raglanökningarna rätt utan de går åt fel håll och ökningen blir då bara på ärmen. Kan jag få en förklaring på hur jag ska göra? Hade tyvärr kommit en bit innan jag upptäckte felet så det är bara att repa upp... Tack på förhand. Mvh Tove
14.03.2015 - 23:09DROPS Design answered:
Hej Tove, jo selve raglanudtagningerne stemmer, de skal være indenfor mærketrådenen mod ærmet i hver side i de to mindste størrelser, yderste ved selve mærketråden. MEN A.4 er forskudt en maske og det skal vi få rettet, sørg for at have lige mange masker i hver side mellem A.4 og mærketråden. Der vil blive lagt en rettelse ud!
25.05.2015 - 12:28