DROPS Cotton Light
DROPS Cotton Light
50% Cotton, 50% Polyester
from 1.40 € /50g
Get the yarn to make this pattern from 15.40€.

The yarn cost is calculated from the pattern’s smallest size and the yarn’s cheapest product type. Looking for an even better price? You might find it on the DROPS Deals!

DROPS SS24

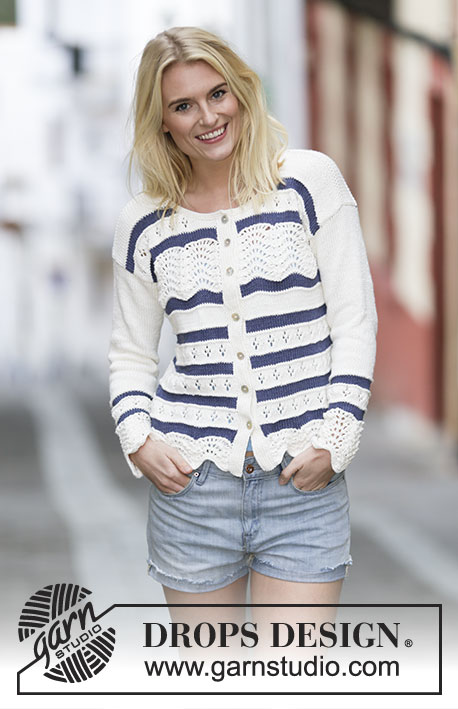
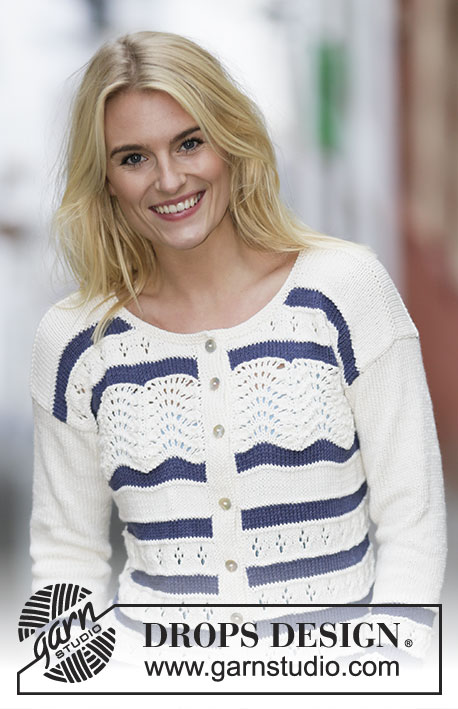
Nautical Waves Cardigan

Knitted DROPS jacket with lace pattern and stripes in ”Cotton Light”. Size: S - XXXL.

DROPS 161-30
DROPS design: Pattern no cl-044
Yarn group B
----------------------------------------------------------
Size: S - M - L - XL - XXL - XXXL
Materials:
DROPS COTTON LIGHT from Garnstudio
450-500-550-600-650-700 g colour no 01, off white
100-100-150-150-150-150 g colour no 26, denim blue

DROPS DOUBLE POINTED NEEDLES and CIRCULAR NEEDLE (80 cm) SIZE 4.5 mm - or size needed to get 21 sts x 28 rows in stocking st = 10 x 10 cm.
DROPS DOUBLE POINTED NEEDLES and CIRCULAR NEEDLE (80 cm) SIZE 4 mm - for edge in garter st.
DROPS BUTTON: ARCHED (white), NO 521: 7 pieces in all sizes

-------------------------------------------------------

Alternative Yarn – See how to change yarns here
Yarn Groups A to F – Use the same pattern and change the yarn here
Yarn usage using an alternative yarn – Use our yarn converter here

-------------------------------------------------------

DROPS Cotton Light
DROPS Cotton Light
50% Cotton, 50% Polyester
from 1.40 € /50g
Get the yarn to make this pattern from 15.40€.

The yarn cost is calculated from the pattern’s smallest size and the yarn’s cheapest product type. Looking for an even better price? You might find it on the DROPS Deals!

Pattern instructions

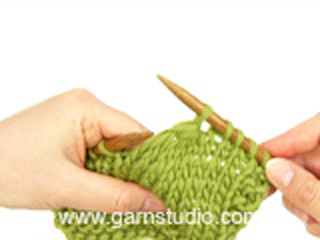
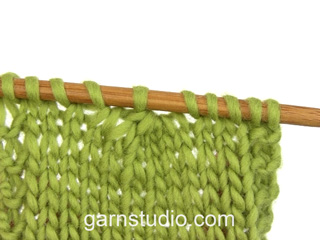
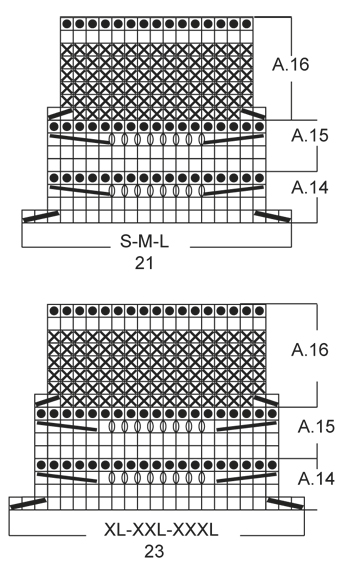
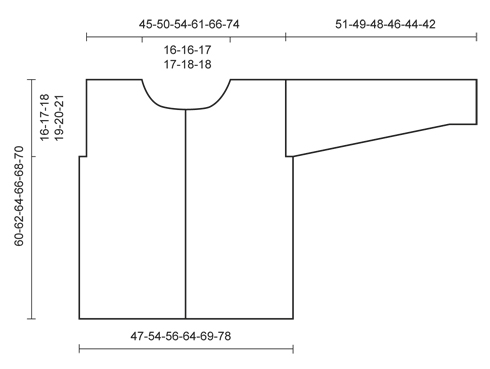
GARTER ST (back and forth):
K all rows. 1 ridge = 2 rows K.

GARTER ST (worked in the round):
* K 1 round and P 1 round *, repeat from *-*. 1 ridge = 2 rounds.

PATTERN:
See diagrams A.1-A.16. The diagrams show all rows in pattern seen from RS.

KNITTING TIP:
K 5 twisted tog as follows: K 5, pass next to last st worked over the last so that this st is around the last st, repeat until all 4 sts have been passed over (= 4 sts dec).
K 5 tog as follows: K 5, pass them back on left needle, pass the next to last st over the last so that this st is around the last st, repeat until all 4 sts have been passed over (= 4 sts dec), pass the last st worked back on right needle.

INCREASE TIP:
Work until 1 st remains before marker, 1 YO, K 2 (marker is in the middle of these), 1 YO = 2 sts inc. On next round K YO twisted to avoid holes.
----------------------------------------------------------

BODY:
Worked back and forth on circular needle.
Cast on 275-317-338-380-401-464 sts (incl 1 edge st in each side) on circular needle size 4 mm with off white. Work 1 ridge in GARTER ST - see explanation above. Switch to circular needle size 4.5 mm. Work 1 edge st in garter st, A.1 (= 21 sts) until 1 st remains (= 13-15-16-18-19-22 times in total), finish with 1 edge st in garter st. Work edge sts in garter st until finished measurements. After A.1, there are 223-257-274-308-325-376 sts on needle. Then work A.2 (= 17 sts) over A.1. Repeat A.2 2-2-2-3-3-3 times in total vertically. Work A.3 over A.2. After first row of A.3, there are 197-227-242-272-287-332 sts on needle. On last row from RS in A.3 (see star in diagram) dec or inc differently in the different sizes:
Size S and XXL:
Inc 4 sts evenly = 201-291 sts.
Size M-L-XL-XXXL:
Dec 2-5-5-5 sts evenly = 225-237-267-327 sts.
REMEMBER THE KNITTING TENSION Then work as follows from RS: 1 edge st in garter st, A.4 (= 6 sts) until 2 sts remain on needle (= 33-37-39-44-48-54 times in total), finish with 1 st in stocking st and 1 edge st in garter st. Repeat A.4 3-3-3-3-4-4 times in total vertically. Then work A.5 1 time vertically. On last row from RS in A.5 (see star in diagram), dec 3-3-2-1-4-5 sts evenly = 198-222-235-266-287-322 sts. After last row in A.5 continue as follows from RS: 1 edge st in garter st, A.6 (= 15 sts) 3-3-3-4-4-5 times in width, A.8 (= 7 sts) 0-0-1-0-1-0 times, 8-20-12-12-8-10 sts in stocking st, A.6 6-6-7-8-9-10 times in width, 8-20-12-12-8-10 sts in stocking st, A.7 (= 7 sts) 0-0-1-0-1-0 times, A.6 3-3-3-4-4-5 times in width, finish with 1 edge st in garter st. NOTE: K the sts in stocking st in the sides from WS when working K from WS in A.6-A.8. After A.6/A.7/A.8, there are 222-246-263-298-323-362 sts on needle. Work A.2 over A.6, A.9 over A.7 and A.10 over A.8, K the sts in stocking st from WS when working K from WS in A.2. Repeat A.2/A.9/A.10 5-5-6-5-5-6 times in total vertically. AT THE SAME TIME when piece measures 44-45-46-47-48-49 cm, cast off for armhole from RS as follows: 1 edge st in garter st, A.2 as before over the first 51-51-51-68-68-85 sts, A.9 0-0-1-0-1-0 times as before, 1-6-4-3-1-2 sts in stocking st, 1 st in garter st, cast off the next 4-6-2-4-4-4 sts, 1 st in garter st, 1-6-4-3-1-2 sts in stocking st, A.2 over the next 102-102-119-136-153-170 sts as before, 1-6-4-3-1-2 sts in stocking st, 1 st in garter st, cast off the next 4-6-2-4-4-4 sts, 1 st in garter st, 1-6-4-3-1-2 sts in stocking st, A.10 0-0-1-0-1-0 times as before, A.2 over the last 51-51-51-68-68-85 sts as before, finish with 1 edge st in garter st = 54-59-65-73-79-89 sts on each front piece and 106-116-129-144-157-176 sts on back piece. Now finish each part separately.

LEFT FRONT PIECE:
= 54-59-65-73-79-89 sts. When A.2/A.10 has been worked 5-5-6-5-5-6 times vertically, work A.3 over A.2 and A.11 over A.10. When A.3/A.11 have been worked 1 time vertically, there are 48-53-58-65-70-79 sts on needle. Then work as follows from RS: 1 st in garter st, 1-0-4-0-1-2 sts in stocking st, A.4 6-7-7-9-9-11 times in total, 9-9-10-9-13-9 sts in stocking st, 1 st in garter st. When the first 3 rows of A.4 have been worked, cast off for neck on every row from WS as follows: Cast off the first 7 sts, then cast off 3 sts 1 time, 2 sts 2 times, 1 st 4-4-5-5-6-6 times = 30-35-39-46-50-59 sts remain for shoulder. When A.4 has been worked 1 time vertically, work piece in off white until finished measurements. Work 1 ridge over all sts when piece measures 59-61-63-65-67-69 cm. Cast off.

RIGHT FRONT PIECE:
Work as left front piece but reversed. Work A.13 instead of A.4. Cast off for neck at beg of row from RS.

BACK PIECE:
= 106-116-129-144-157-176 sts. When A.2 has been worked 5-5-6-5-5-6 times vertically, work A.3 over A.2. When A.3 has been worked 1 time vertically, there are 94-104-115-128-139-156 sts on needle. Then work as follows from RS: 1 st in garter st, 1-0-4-0-1-2 sts in stocking st, A.4 6-7-7-9-9-11 times in total, 18-18-21-18-27-18 sts in stocking st, A.13 6-7-7-9-9-11 times in total, 1-0-4-0-1-2 sts in stocking st, 1 st in garter st.
When the first 4 rows of A.4/A.13 have been worked, slip the middle 12-12-13-14-15-16 sts on a stitch holder for neck and finish each shoulder separately (= 41-46-51-57-62-70 sts). Continue to cast off for neck on every row from neck as follows: Cast off 3 sts 1 time, 2 sts 2 times, 1 st 4-4-5-4-5-4 times = 30-35-39-46-50-59 sts remain for shoulder.
When A.4/A.13 have been worked 1 time vertically, work piece in stocking st and off white until finished measurements. Work 1 ridge over all sts when piece measures 59-61-63-65-67-69 cm. Cast off. Work the other shoulder the same way.

SLEEVE:
Worked in the round on double pointed needles. Cast on 63-63-63-69-69-69 sts on double pointed needle size 4 mm with off white. Work 1 ridge in GARTER ST - see explanation above. Insert 1 marker at the beg of the round. Switch to double pointed needles size 4.5 mm. Work A.14 (= 3 times in width) – see diagram for correct size. Work A.15 over A.14 5 times in total. Then work A.16 over A.15. When A.16 has been worked 1 time vertically, there are 45-45-45-51-51-51 sts on needle. Then work as follows: K 2, A.13 7-7-7-8-8-8 times in total in width, finish with K 1. AT THE SAME TIME when piece measures 12-10-10-10-10-10 cm, inc 1 st on each side of marker – see INCREASE TIP. Repeat inc every 3½-3-2½-2½-2-1½ cm 10-12-14-13-16-18 more times = 67-71-75-79-85-89 sts. When A.13 has been worked 1 time vertically, work piece in off white and stocking st until finished measurements. Cast off when piece measures 51-49-48-46-44-42 cm (shorter measurements in the larger sizes because of longer sleeve cap and wider shoulders). Knit another sleeve the same way.

ASSEMBLY:
Sew the shoulder seam. Sew in the sleeves inside 1 edge st, sew underarm seams.

LEFT BAND:
Work band back and forth on circular needle size 4 mm. Pick up 105-125 sts, inside 1 edge st on left front piece with off white. Work 5 ridges. Cast off.

RIGHT BAND:
Work as left, but dec for 7 buttonholes evenly after 1 cm. 1 BUTTONHOLE = K 2 tog and make 1 YO – top buttonhole (towards the neck) should be approx. ½ cm from the top and bottom approx. 5-6 cm from bottom edge.

NECK EDGE:
Beg at the edge on right band at the top. Use circular needle size 4 mm and off white, pick up 100-120 sts around the entire edge and over left band incl sts from stitch holder. Work 2 ridges. Cast off.

ASSEMBLY:
Sew on buttons.

This pattern has been corrected.

Updated online: 04.06.2015
Correction: Small correction in Knitting tip.

Diagram

symbols = K from RS, P from WS with off white
symbols = K from RS, P from WS with denim blue
symbols = K from WS, P from RS with off white
symbols = K 5 tog - READ KNITTING TIP in pattern
symbols = K 5 twisted tog - READ KNITTING TIP in pattern
symbols = K 2 tog
symbols = slip 1 st as if to K, K 1, psso
symbols = 1 YO between 2 sts, do not K YO twisted on next row, it should make hole
symbols = 1 YO between 2 sts, K YO twisted on next row, it should not make hole
symbols = K 3 tog
symbols = K 3 twisted tog
symbols = inc/dec row - see pattern
diagram
diagram
diagram

Each of our patterns has specific tutorial videos to help you.

Do you have a question? See a list of frequently asked questions (FAQ)

Knitting tension is what determines the final measurements of your work, and is usually measured per 10 x 10 cm. It is provided like so: number of stitches in width x number of rows in height - eg: 19 stitches x 26 rows = 10 x 10 cm.

The knitting tension is very individual; some people knit/crochet loosely while others work tightly. You adjust the knitting tension with the needle size, which is why the suggested needle size is only meant as a guide! You need to adjust this (up or down) to ensure that YOUR knitting tension matches the knitting tension provided in the pattern. If you work with a different knitting tension than provided you will have a different yarn consumption, and your work will have different measurements than what the pattern suggests.

The knitting tension also determines which yarns can replace each other. As long as you achieve the same knitting tension you can replace one yarn with another.

See DROPS lesson: How to measure your tension/gauge

See DROPS video: How to make a gauge tension swatch

The required amount of yarn is provided in grams, eg: 450 g. To calculate how many balls you’ll need you first need to know how many grams are in 1 ball (25g, 50g or 100g). This information is available if you click on the individual yarn quality on our pages. Divide the amount required with the amount of each ball. For example, if each ball is 50g (the most common amount), the calculation will be as follows: 450 / 50 = 9 balls.

The important thing when changing from one yarn to another is that the knitting/crochet tension remains the same. This is so that the measurements of the finished piece will be the same as on the sketch provided. It is easier to achieve the same knitting tension using yarns from the same yarn group. It is also possible to work with multiple strands of a thinner yarn to achieve the knitting tension of a thicker one. Please try our yarn converter. We recommend you to always work a test swatch.

Please NOTE: when changing yarn the garment might have a different look and feel to the garment in the photo, due to individual properties and qualities of each yarn.

See DROPS lesson: Can I use a different yarn than the one mentioned in the pattern?

All our yarns are categorised into yarn groups (from A to F) according to thickness and knitting tension – group A contains the thinnest yarns and group F the thickest. This makes it easier for you to find alternative yarns to our patterns, should you wish to switch yarn. All yarns within the same group have a similar knitting tension and can easily replace each other. However, different yarn qualities have different structures and properties which will give the finished work a unique look and feel.

Click here for an overview of the yarns in each yarn group

At the top of all our patterns you’ll find a link to our yarn calculator, which is a helpful tool should you wish to use a different yarn than suggested. By filling in the yarn quality you wish to replace, the amount (in your size) and number of strands, the calculator will present good alternative yarns with the same knitting tension. Additionally it will tell you how much you’ll require in the new qualities and whether you’ll need to work with multiple strands. Most skeins are 50g (some are 25g or 100g).

If the pattern is worked with multiple colours, every colour will have to be calculated separately. Similarly, if the pattern is worked with several strands of different yarns (for example 1 strand Alpaca and 1 strand Kid-Silk) you will have to find alternatives for each, individually.

Click here to see our yarn calculator

Since different yarns have different qualities and textures we have chosen to keep the original yarn in our patterns. However, you can easily find options among our available qualities by using our yarn calculator, or simply pick a yarn from the same yarn group.

It is possible that some retailers still have discontinued yarns in stock, or that someone has a few skeins at home that they would like to find patterns for.

The yarn calculator will provide both alternative yarn as well as required amount in the new quality.

If you think it's hard to decide what size to make, it can be a good idea to measure a garment you own already and like the size of. Then you can pick the size by comparing those measures with the ones available in the pattern's size chart.

You'll find the size chart at the bottom of the pattern.

See DROPS lesson: How to read size chart

The needle size provided in the pattern serves only as a guide, the important thing is to follow the knitting tension. And since knitting tension is very individual, you will have to adjust the needle size to ensure that YOUR tension is the same as in the pattern – maybe you’ll have to adjust 1, or even 2 needle sizes, up or down to achieve the correct tension. For this, we recommend that you work test swatches.

Should you work with a different knitting tension than the one provided, the measurements of the finished garment might deviate from the measurement sketch.

See DROPS lesson: How to measure your tension/gauge

See DROPS video: How to make a tension/gauge swatch

Working a garment top-down provides more flexibility and room for personal adjustment. For example it is easier to try the garment on while working, as well as making adjustments to length of yoke and shoulder caps.

The instructions are carefully explaining every step, in the correct order. Diagrams are adjusted to the knitting direction and are worked as usual.

The diagram depicts all rows/rounds, and every stitch seen from the right side. It is read from bottom to top, from right to left. 1 square = 1 stitch.

When working back and forth, every other row is worked from the right side and every other row is worked from the wrong side. When working from the wrong side, the diagram will have to be worked reversed: from left to right, knit stitches are purled, purl stitches are knit etc.

When working in the round every round is worked from the right side and the diagram are worked from right to left on all rounds.

See DROPS lesson: How to read knitting diagrams

The diagram depicts all rows/rounds, and every stitch seen from the right side. It is worked from bottom to top, from right to left.

When working back and forth every other row is worked from the right side: from right to left and every other row is worked from the wrong side: from left to right.

When working in the round, every row in the diagram are worked from the right side, from right to left.

When working a circular diagram you start in the middle and work your way outwards, counter clockwise, row by row.

The rows usually start with a given number of chain stitches (equivalent to the height of the following stitch), this will either be depicted in the diagram or explained in the pattern.

See DROPS lesson: How to read crochet diagrams

Instructions for working several diagrams after each other on the same row/round, will often be written like so: “work A.1, A.2, A.3 a total of 0-0-2-3-4 times". This means you work A.1 once, then A.2 is worked once, and A.3 is repeated (in width) the number of times provided for your size – in this case like so: S = 0 times, M = 0 times, L=2 times, XL= 3 times and XXL = 4 times.

The diagrams are worked as usual: begin with the first row in A.1, then work the first row in A.2 etc.

See DROPS lesson: How to read knitting diagrams

See DROPS lesson: How to read crochet diagrams

The total width of the garment (from wrist-to-wrist) will be larger in the larger sizes, despite the actual sleeves being shorter. The larger sizes have longer sleeve caps and wider shoulders, so there will be a good fit in all sizes.

The measurement sketch/schematic drawing provides information regarding the full length of the garment. If it’s a jumper or a jacket the length is measured from the highest point on the shoulder closest to the neckline, and straight down to the bottom of the garment. It is NOT measured from the tip of shoulder. Similarly, the length of yoke is measured from the highest point on the shoulder and down to where yoke is split into body and sleeves.

On a jacket measures are never taken along bands, unless specifically stated. Always measure inside band stitches when measuring the length.

See DROPS lesson: How to read a schematic drawing

Diagrams are often repeated on the round or in height. 1 repeat is the diagram the way it appears in the pattern. If it says to work 5 repeats of A.1 in the round, then you work A.1 a total of 5 times after/next to each other in the round. If it says to work 2 repeats of A.1 vertically/in height you work the entire diagram once, then begin again at the start and work the entire diagram one more time.

Chain stitches are slightly narrower than other stitches and to avoid working the cast-on edge too tight, we simply chain more stitches to begin with. The stitch count will be adjusted on the following row to fit the pattern and measurement sketch.

The rib edge is more elastic and will contract slightly compared to, for example, stocking stitch. By increasing before the rib edge, you avoid a visible difference in width between the rib edge and the rest of the body.

It’s very easy to cast off too tightly, and by making yarn overs while casting off (and simultaneously casting these off) you avoid a too tight cast off edge.

See DROPS video: How to bind off with yarn overs (yo)

To achieve an even increase (or decrease) you can increase on, for example: every 3rd and 4th row alternately, like so: work 2 rows and increase on the 3rd row, work 3 rows and increase on the 4th. Repeat this until the increase is complete.

See DROPS lesson: Increase or decrease 1 st on every 3rd and 4th row alternately

Should you prefer to work in the round instead of back and forth, you may of course adjust the pattern. You’ll need to add steeks mid-front (usually 5 stitches), and follow the instructions. When you would normally turn and work from the wrong side, simply work across the steek and continue in the round. At the end you’ll cut the piece open, pick up stitches to work bands, and cover the cut edges.

See DROPS video: How to knit steeks and cut open

Should you prefer to work back and forth instead of in the round, you may of course adjust the pattern so you work the pieces separately and then assemble them at the end. Divide the stitches for the body in 2, add 1 edge stitch in each side (for sewing) and work the front and back pieces separately.

See DROPS lesson: Can I adapt a pattern for circular needles into straight needles?

Pattern repeats can vary slightly in the different sizes, in order to get the correct proportions. If you’re not working the exact same size as the garment in the photo, yours might deviate slightly. This has been carefully developed and adjusted so that the complete impression of the garment is the same in all sizes.

Make sure to follow instructions and diagrams for your size!

If you have found a pattern you like which is available in women’s size it’s not very difficult to convert it to men’s size. The biggest difference will be the length of sleeves and body. Start working on the women size that you think would fit across the chest. The additional length will be worked right before you cast off for the armhole/sleeve cap. If the pattern is worked top-down you can add the length right after the armhole or before the first decrease on sleeve.

Regarding additional yarn amount, this will depend on how much length you add, but it is better with a skein too many than too few.

All yarns will have excess fibres (from production) that might come off as lint or shedding. Brushed yarns (ie hairier yarns) have more of these loose, excess fibres, causing more shedding.

Shedding also depends on what is worn under or over the garment, and whether this pulls at the yarn fibres. It’s therefore not possible to guarantee that there will be no shedding

Below are some tips on how to get the best result when working with hairier yarns:

1. When the garment is finished (before you wash it) shake it vigorously so the looser hairs come off. NOTE: do NOT use a lint roller, brush or any method that pulls at the yarn.

2. Place the garment in a plastic bag and put it in your freezer - the temperature will cause the fibres to become less attached to each other, and excess fibres will come off easier.

3. Leave in the freezer for a few hours before taking it out and shaking it again.

4. Wash the garment according to the instructions on the yarn label.

Pilling is a natural process that happens to even the most exclusive of fibers. It's a natural sign of wear and tear that is hard to avoid, and that is most visible in high friction areas of your garment like a sweater's arms and cuffs.

You can make your garment look as new by removing the pilling, using a fabric comb or a pill/lint remover.

Still can't find the answer you need? Then scroll down and leave your question so one of our experts can try to help you. This will be done normally within 5 to 10 working days.
In the meantime, you can read the questions and answers that others have left to this pattern or join the DROPS Workshop on Facebook to get help from fellow knitters/crocheters!

You might also like...

Post a comment to pattern DROPS 161-30

We would love to hear what you have to say about this pattern!

If you want to leave a question, please make sure you select the correct category in the form below, to speed up the answering process. Required fields are marked *.

Comments / Questions (23)

country flag Terena Currey wrote:

I just wanted to say that as a new knitter and being unfamiliar with a lot of knitting stitches, your patterns are so lovely to follow. The videos make things so easy to understand. Thank you for all your hard work and the pretty patterns!

02.02.2023 - 20:28

country flag Pat Lapiere wrote:

Ik begrijp helemaal niet wat ik hier moet doen. kunnen jullie dit even verduidelijken aub? LET OP: brei de st in tricotst aan de zijkant aan de verkeerde kant recht als u aan de verkeerde kant st in A.6 recht breit.

13.05.2022 - 00:46

DROPS Design answered:

Dag Pat Lapiere,

Wanneer de steken in A.6 t/m A.8 recht gebreid worden aan de verkeerde kant, dan brei je de steken aan de zijkant (die normaal in tricotsteek worden gebreid) ook recht.

14.05.2022 - 09:57

country flag Maria André wrote:

Jag stickar koftan 161-30. Efter uppläggningsvarvet börjar jag ju sticka från avigsidan (först 2 räta varv och sedan mönsterstickning). Varje mönsterstickningsdel börjar då från avigsidan, vilket verkar bli fel. Hur är det tänkt att jag ska göra?

03.02.2022 - 22:20

DROPS Design answered:

Hej Maria. Första varvet efter att du lagt upp maskor är rätsidan så det första varvet med mönsterstickning kommer vara på rätsidan. Mvh DROPS Design

04.02.2022 - 13:51

country flag Franca Rossetti wrote:

Mi spiegate, per favore, perché le spiegazioni sono le stesse per il modello 161-31? Questo non si potrebbe eseguire con le parti separate? Cioè dietro, i due davanti, poi cucire? Se, sì, mi inviereste la spiegazione? Grazie.

04.02.2021 - 07:11

DROPS Design answered:

Buongiorno Franca, le spiegazioni sono simili perché sono due modelli con la stessa costruzione. Se preferisce può lavorarlo in parti separate, ma purtroppo non possiamo aiutarla a riadattare il modello. Buon lavoro!

04.02.2021 - 13:23

country flag Helga Nixon wrote:

I am ending up with 10 stitches unknit, what am I doing wrong? i.e. 2 in stst, A4 6 times (36 stitches) 18 centre A13 6 times (36 stitches 2 stst. + 84 stitches not 94? there are 94-104-115-128-139-156 sts on needle. Then work as follows from RS: 2-1-5-1-2-3 sts in stocking st, A.4 6-7-7-9-9-11 times in total, 18-18-21-18-27-18 sts in stocking st, A.13 6-7-7-9-9-11 times in total, 2-1-5-1-2-3 sts in stocking st.

31.07.2017 - 20:50

DROPS Design answered:

Dear Mrs Nixon, you are working over 106 sts with 6 repeats of 17 sts (A.2). When working A.3 over A.2 you will dec 2 sts a total of 6 times (2 dec in first row in A.3 in each repeat): 106 - 12 = 94 sts, then work: 1 st in garter st, 1 st in st st, A.3 over the next st (= 17 sts in first row (15 sts after dec) x 6 times = 90 sts), 1 st in st st, 1 st in garter st = 94 sts. Happy knitting!

01.08.2017 - 08:59

country flag Susanne Damgaard wrote:

Hej og tak for svaret. Jeg har fulgt opskriften til punkt og prikke, og hele tiden kontrolleret maskeantallet. Nu er jeg igang med andet forsøg - i en meget mindre størrelse.

18.03.2016 - 07:23

country flag Susanne Damgaard wrote:

Hej. Hvad mon der er galt med denne ellers flotte opskrift? Jeg er lige blevet færdig med kroppen og må begynde forfra fordi den er alt alt for stor. Efter målskemaet skal jeg have str XL, garnet er det originale og strikkefastheden passer, men trøjen er 2 x 12 cm for bred (ryg + forstykke). Jeg har fulgt opskrift og indtagningen til punkt og prikke. Nu prøver jeg str. M i stedet, og prøver om jeg kan få længde mv. til at passe alligevel. Synd hvis andre skal gøre samme erfaringer.

06.03.2016 - 19:02

DROPS Design answered:

Hej, Har du taget ind ifølge A.1 og igen ifølge A.3 som der står i opskriften? Hvis du overholder strikkefastheden med 21 m på 10 cm, så skal du få målene som står i måleskitsen. God fornøjelse!

07.03.2016 - 15:06

country flag Mona Rasmussen wrote:

Hej, er lige blevet færdig med denne cardigan og må sande at den er mega stor. jeg prøvede at vaske den på 60 grader for at se om den trak sig noget sammen, men nej den var stadig meget stor. plejer at strikke xxl efter jeres opskrifter og de passer men åbenbart ikke denne...har trævlet den op og vil starte forfra i str L

10.08.2015 - 14:12

country flag Gabrielle wrote:

Bonjour, J'ai beaucoup de difficultes avec les tailles. J'ai tricote un gilet pour enfant en 3/4 ans, et le produit fini est plus proche du 5/6 ans. Je tricote en ce moment le modele 161-30, le patron indique 108 cm pour une taille M, mon tricot mesure 132 cm. Pourriez-vous me dire ce que vous en pensez? merci

14.06.2015 - 09:46

DROPS Design answered:

Bonjour Gabrielle, pensez à toujours faire l'échantillon pour vérifier vos mesures, vous devez avoir ici 21 m x 28 rangs jersey = 10 x 10 cm, adaptez la taille de vos aiguilles si nécessaire jusqu'à ce que vous ayez cet échantillon, et quand vous tricotez le gilet, veillez bien à conserver la même tension pour avoir les bonnes mesures. Bon tricot!

15.06.2015 - 10:29

country flag Josefin wrote:

Vad är de färdiga måtten på de olika storlekarna? Tack!

13.06.2015 - 04:48

DROPS Design answered:

Hej. Längst ner på alla våra mönster finns en mått-skiss, med de olika måtten i alla storlekar. Mvh DROPS Design

15.06.2015 - 08:25