DROPS Cotton Viscose
54% Cotton, 46% Viscose
Discontinued
find alternatives
DROPS SS24

Lady Ascot Cardigan

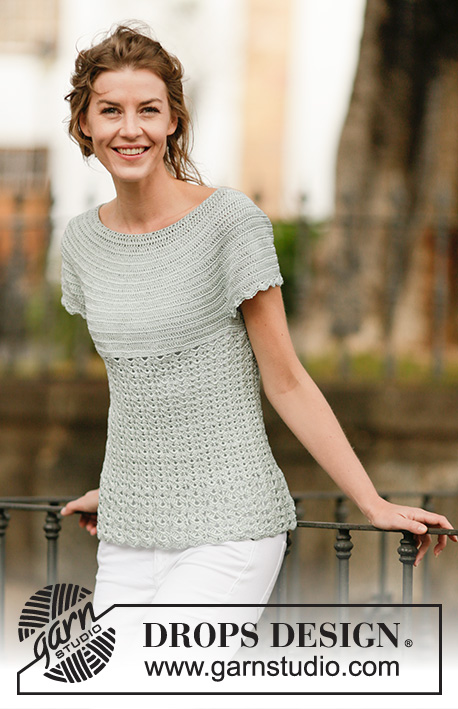
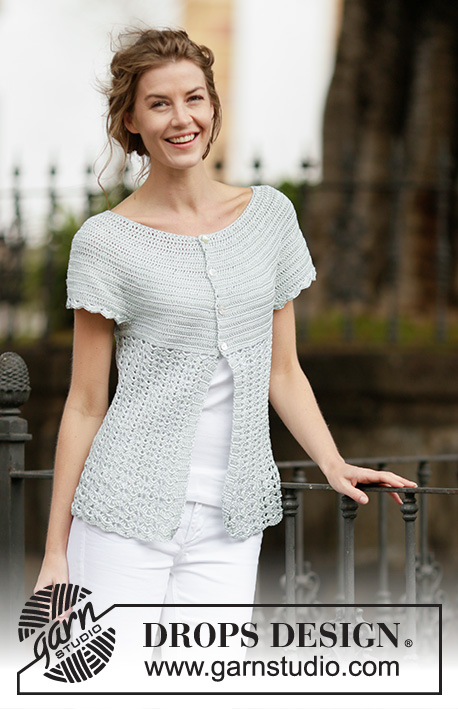
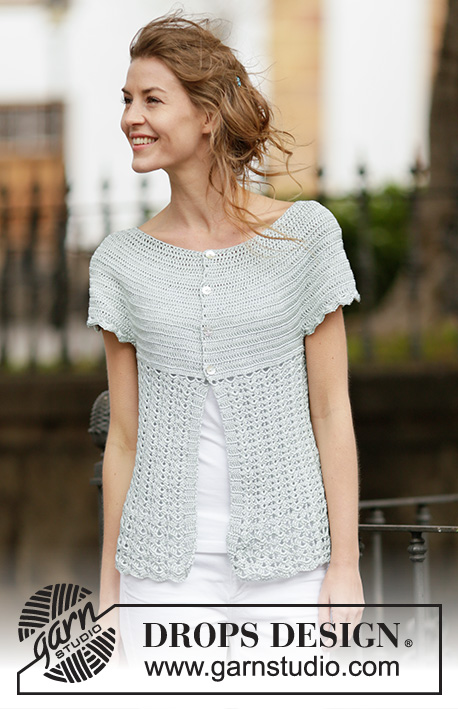
Crochet DROPS jacket with fan pattern and round yoke, worked top down in ”Cotton Viscose”. Size: S - XXXL.

DROPS 162-25
DROPS design: Pattern no n-172
Yarn group A
----------------------------------------------------------
Size: S - M - L - XL - XXL - XXXL
Materials:
DROPS COTTON VISCOSE from Garnstudio
400-450-500-550-600-650 g colour no 29, light grey green

DROPS HOOK SIZE 3.5 mm - or size needed to get 22 tr x 12 rows = 10 x 10 cm, and 3 repetition of 3rd and 4th row in A.1B = width 9 cm.
DROPS MOTHER-OF-PEARL BUTTON: Arched (white), NO 521: 4 pieces in all sizes

-------------------------------------------------------

Alternative Yarn – See how to change yarns here
Yarn Groups A to F – Use the same pattern and change the yarn here
Yarn usage using an alternative yarn – Use our yarn converter here

-------------------------------------------------------

DROPS Cotton Viscose
54% Cotton, 46% Viscose
Discontinued
find alternatives

Pattern instructions

NOTE: This pattern is written in British English. All measurements in charts are in cm. For conversion from cm to inches - click here. There are different terms for crocheting in British and American English. If this pattern includes crochet, click for "crochet terms" here. For this pattern in American English, please click here.
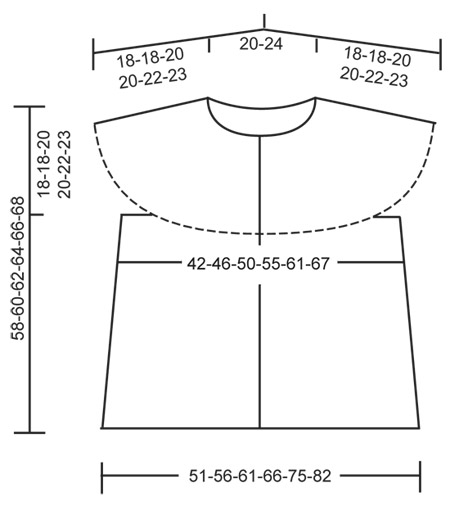
PATTERN:
See diagrams A.1-A.2.

CROCHET INFO:
Replace first tr on every tr row with 3 ch and finish every tr row with 1 tr in 3rd ch from beg of previous row.

INCREASE TIP:
Inc 1 tr by working 2 tr in 1 tr.
----------------------------------------------------------

JACKET:
The piece is worked top down. Worked back and forth from mid front. Work 136-140-145-150-155-160 ch (incl 3 ch to turn with) on hook size 3.5 mm with Cotton Viscose. Work 1 tr in 4th ch from hook (= 2 tr), * skip 1 ch, 1 tr in each of the next 5 ch *, repeat from *-* until 0-4-3-2-1-0 ch remain, 1 tr in each of the last 0-4-3-2-1-0 ch = 112-116-120-124-128-132 tr - READ CROCHET INFO. Work 1 row with 1 tr in every tr AT THE SAME TIME inc 28 tr evenly (i.e. inc 1 tr after approx. every 4th tr) – READ INCREASE TIP = 140-144-148-152-156-160 tr. Insert 12 markers in the piece as follows: Work 17-18-19-20-21-22 tr AT THE SAME TIME inc 1-0-0-2-2-1 tr evenly, insert first marker, * work 4 tr, insert next marker *, repeat from *-* 1 more time, work 20 tr, insert next marker, * work 4 tr, insert next marker *, repeat from *-* 1 more time, work 34-36-38-40-42-44 tr AT THE SAME TIME inc 2-0-0-4-4-2 tr evenly, insert next marker, * work 4 tr, insert next marker *, repeat from *-* 1 more time, work 20 tr, insert next marker, * work 4 tr, insert next marker *, repeat from *-* 1 more time, work 17-18-19-20-21-22 tr AT THE SAME TIME inc 1-0-0-2-2-1 tr evenly = 144-144-148-160-164-164 tr. REMEMBER THE CROCHET TENSION! On next row from RS, inc as follows: Inc 1 tr on each side of every marker (= 24 tr inc), repeat inc on every row from RS 1-4-5-7-8-10 times in total, then inc before every marker (= 12 tr inc), repeat inc on every row from RS 9-6-6-4-4-3 times in total = 276-312-340-376-404-440 tr. Piece measures approx. 18-18-20-20-22-23 cm. Work next row as follows: 36-43-48-54-59-66 tr (= front piece), work 12 ch (insert a marker in the middle of these new sts = under sleeve), skip 66-70-74-80-84-88 tr from previous row (= sleeve), work 72-86-96-108-118-132 tr (= back piece), work 12 ch (insert a marker in the middle of these new sts = under sleeve), skip 66-70-74-80-84-88 tr from previous row and work 36-43-48-54-59-66 tr (= front piece) = 168-196-216-240-260-288 tr/ch (= 84-98-108-120-130-144 tr/ch on back piece and 42-49-54-60-65-72 tr/ch on each front piece). Insert 1 marker in piece. NOW MEASURE PIECE FROM HERE!

Work 1 row with 1 tr in every tr and 1 tr in every ch under sleeve while AT THE SAME TIME inc 18-8-6-0-10-6 tr evenly = 186-204-222-240-270-294 tr. Work 1 row with 1 tr in every tr. Then work fan pattern.

FAN PATTERN:
Work 1st-4th row in diagram A.1 as follows: A.1A, A.1B 29-32-35-38-43-47 times in total, finish with A.1C. Then repeat 3rd and 4th row until piece measures 29-31-31-33-31-31 cm, adjust so that last row is 4th row. Work 5th-6th row in diagram A.1. Repeat 5th and 6th row until piece measures approx. 40-42-43-45-45-45 cm. Fasten off.

SLEEVE EDGE:
Beg by working mid under sleeve as follows: Work 1 dc in 6th ch of the 12 ch worked in armhole on body. Work 3 ch (= 1 tr). Then work 1 tr in each of the next 6 ch, work 1 tr in tr-row where ch for sleeve were worked, 1 tr in the next 66-70-74-80-84-88 tr (= over sleeve) AT THE SAME TIME inc 0-4-0-2-6-2 tr evenly, work 1 tr in tr-row where ch for sleeve were worked, work 1 tr in each of the remaining 5 ch under sleeve = 80-88-88-96-104-104 tr. Then work A.2 10-11-11-12-13-13 times in total. Fasten off when A.2 has been worked 1 time vertically. Work the other sleeve edge the same way.

ASSEMBLY:
Fasten the buttons on left front piece, the top button approx. 1 cm from neck edge, fasten the remaining button approx. 6 cm apart. Button between 2 tr on right front piece.

Diagram

symbols = ch
symbols = dc
symbols = tr in st
symbols = dtr in st
symbols = beg here
symbols = 3 tr around ch-space
symbols = 3 dtr around ch-space
symbols = 4 tr around ch-space
symbols = tr around ch-space
diagram
diagram
Do you have a question? See a list of frequently asked questions (FAQ)

Knitting tension is what determines the final measurements of your work, and is usually measured per 10 x 10 cm. It is provided like so: number of stitches in width x number of rows in height - eg: 19 stitches x 26 rows = 10 x 10 cm.

The knitting tension is very individual; some people knit/crochet loosely while others work tightly. You adjust the knitting tension with the needle size, which is why the suggested needle size is only meant as a guide! You need to adjust this (up or down) to ensure that YOUR knitting tension matches the knitting tension provided in the pattern. If you work with a different knitting tension than provided you will have a different yarn consumption, and your work will have different measurements than what the pattern suggests.

The knitting tension also determines which yarns can replace each other. As long as you achieve the same knitting tension you can replace one yarn with another.

See DROPS lesson: How to measure your tension/gauge

See DROPS video: How to make a gauge tension swatch

The required amount of yarn is provided in grams, eg: 450 g. To calculate how many balls you’ll need you first need to know how many grams are in 1 ball (25g, 50g or 100g). This information is available if you click on the individual yarn quality on our pages. Divide the amount required with the amount of each ball. For example, if each ball is 50g (the most common amount), the calculation will be as follows: 450 / 50 = 9 balls.

The important thing when changing from one yarn to another is that the knitting/crochet tension remains the same. This is so that the measurements of the finished piece will be the same as on the sketch provided. It is easier to achieve the same knitting tension using yarns from the same yarn group. It is also possible to work with multiple strands of a thinner yarn to achieve the knitting tension of a thicker one. Please try our yarn converter. We recommend you to always work a test swatch.

Please NOTE: when changing yarn the garment might have a different look and feel to the garment in the photo, due to individual properties and qualities of each yarn.

See DROPS lesson: Can I use a different yarn than the one mentioned in the pattern?

All our yarns are categorised into yarn groups (from A to F) according to thickness and knitting tension – group A contains the thinnest yarns and group F the thickest. This makes it easier for you to find alternative yarns to our patterns, should you wish to switch yarn. All yarns within the same group have a similar knitting tension and can easily replace each other. However, different yarn qualities have different structures and properties which will give the finished work a unique look and feel.

Click here for an overview of the yarns in each yarn group

At the top of all our patterns you’ll find a link to our yarn calculator, which is a helpful tool should you wish to use a different yarn than suggested. By filling in the yarn quality you wish to replace, the amount (in your size) and number of strands, the calculator will present good alternative yarns with the same knitting tension. Additionally it will tell you how much you’ll require in the new qualities and whether you’ll need to work with multiple strands. Most skeins are 50g (some are 25g or 100g).

If the pattern is worked with multiple colours, every colour will have to be calculated separately. Similarly, if the pattern is worked with several strands of different yarns (for example 1 strand Alpaca and 1 strand Kid-Silk) you will have to find alternatives for each, individually.

Click here to see our yarn calculator

Since different yarns have different qualities and textures we have chosen to keep the original yarn in our patterns. However, you can easily find options among our available qualities by using our yarn calculator, or simply pick a yarn from the same yarn group.

It is possible that some retailers still have discontinued yarns in stock, or that someone has a few skeins at home that they would like to find patterns for.

The yarn calculator will provide both alternative yarn as well as required amount in the new quality.

If you think it's hard to decide what size to make, it can be a good idea to measure a garment you own already and like the size of. Then you can pick the size by comparing those measures with the ones available in the pattern's size chart.

You'll find the size chart at the bottom of the pattern.

See DROPS lesson: How to read size chart

The needle size provided in the pattern serves only as a guide, the important thing is to follow the knitting tension. And since knitting tension is very individual, you will have to adjust the needle size to ensure that YOUR tension is the same as in the pattern – maybe you’ll have to adjust 1, or even 2 needle sizes, up or down to achieve the correct tension. For this, we recommend that you work test swatches.

Should you work with a different knitting tension than the one provided, the measurements of the finished garment might deviate from the measurement sketch.

See DROPS lesson: How to measure your tension/gauge

See DROPS video: How to make a tension/gauge swatch

Working a garment top-down provides more flexibility and room for personal adjustment. For example it is easier to try the garment on while working, as well as making adjustments to length of yoke and shoulder caps.

The instructions are carefully explaining every step, in the correct order. Diagrams are adjusted to the knitting direction and are worked as usual.

The diagram depicts all rows/rounds, and every stitch seen from the right side. It is read from bottom to top, from right to left. 1 square = 1 stitch.

When working back and forth, every other row is worked from the right side and every other row is worked from the wrong side. When working from the wrong side, the diagram will have to be worked reversed: from left to right, knit stitches are purled, purl stitches are knit etc.

When working in the round every round is worked from the right side and the diagram are worked from right to left on all rounds.

See DROPS lesson: How to read knitting diagrams

The diagram depicts all rows/rounds, and every stitch seen from the right side. It is worked from bottom to top, from right to left.

When working back and forth every other row is worked from the right side: from right to left and every other row is worked from the wrong side: from left to right.

When working in the round, every row in the diagram are worked from the right side, from right to left.

When working a circular diagram you start in the middle and work your way outwards, counter clockwise, row by row.

The rows usually start with a given number of chain stitches (equivalent to the height of the following stitch), this will either be depicted in the diagram or explained in the pattern.

See DROPS lesson: How to read crochet diagrams

Instructions for working several diagrams after each other on the same row/round, will often be written like so: “work A.1, A.2, A.3 a total of 0-0-2-3-4 times". This means you work A.1 once, then A.2 is worked once, and A.3 is repeated (in width) the number of times provided for your size – in this case like so: S = 0 times, M = 0 times, L=2 times, XL= 3 times and XXL = 4 times.

The diagrams are worked as usual: begin with the first row in A.1, then work the first row in A.2 etc.

See DROPS lesson: How to read knitting diagrams

See DROPS lesson: How to read crochet diagrams

The total width of the garment (from wrist-to-wrist) will be larger in the larger sizes, despite the actual sleeves being shorter. The larger sizes have longer sleeve caps and wider shoulders, so there will be a good fit in all sizes.

The measurement sketch/schematic drawing provides information regarding the full length of the garment. If it’s a jumper or a jacket the length is measured from the highest point on the shoulder closest to the neckline, and straight down to the bottom of the garment. It is NOT measured from the tip of shoulder. Similarly, the length of yoke is measured from the highest point on the shoulder and down to where yoke is split into body and sleeves.

On a jacket measures are never taken along bands, unless specifically stated. Always measure inside band stitches when measuring the length.

See DROPS lesson: How to read a schematic drawing

Diagrams are often repeated on the round or in height. 1 repeat is the diagram the way it appears in the pattern. If it says to work 5 repeats of A.1 in the round, then you work A.1 a total of 5 times after/next to each other in the round. If it says to work 2 repeats of A.1 vertically/in height you work the entire diagram once, then begin again at the start and work the entire diagram one more time.

Chain stitches are slightly narrower than other stitches and to avoid working the cast-on edge too tight, we simply chain more stitches to begin with. The stitch count will be adjusted on the following row to fit the pattern and measurement sketch.

The rib edge is more elastic and will contract slightly compared to, for example, stocking stitch. By increasing before the rib edge, you avoid a visible difference in width between the rib edge and the rest of the body.

It’s very easy to cast off too tightly, and by making yarn overs while casting off (and simultaneously casting these off) you avoid a too tight cast off edge.

See DROPS video: How to bind off with yarn overs (yo)

To achieve an even increase (or decrease) you can increase on, for example: every 3rd and 4th row alternately, like so: work 2 rows and increase on the 3rd row, work 3 rows and increase on the 4th. Repeat this until the increase is complete.

See DROPS lesson: Increase or decrease 1 st on every 3rd and 4th row alternately

Should you prefer to work in the round instead of back and forth, you may of course adjust the pattern. You’ll need to add steeks mid-front (usually 5 stitches), and follow the instructions. When you would normally turn and work from the wrong side, simply work across the steek and continue in the round. At the end you’ll cut the piece open, pick up stitches to work bands, and cover the cut edges.

See DROPS video: How to knit steeks and cut open

Should you prefer to work back and forth instead of in the round, you may of course adjust the pattern so you work the pieces separately and then assemble them at the end. Divide the stitches for the body in 2, add 1 edge stitch in each side (for sewing) and work the front and back pieces separately.

See DROPS lesson: Can I adapt a pattern for circular needles into straight needles?

Pattern repeats can vary slightly in the different sizes, in order to get the correct proportions. If you’re not working the exact same size as the garment in the photo, yours might deviate slightly. This has been carefully developed and adjusted so that the complete impression of the garment is the same in all sizes.

Make sure to follow instructions and diagrams for your size!

If you have found a pattern you like which is available in women’s size it’s not very difficult to convert it to men’s size. The biggest difference will be the length of sleeves and body. Start working on the women size that you think would fit across the chest. The additional length will be worked right before you cast off for the armhole/sleeve cap. If the pattern is worked top-down you can add the length right after the armhole or before the first decrease on sleeve.

Regarding additional yarn amount, this will depend on how much length you add, but it is better with a skein too many than too few.

All yarns will have excess fibres (from production) that might come off as lint or shedding. Brushed yarns (ie hairier yarns) have more of these loose, excess fibres, causing more shedding.

Shedding also depends on what is worn under or over the garment, and whether this pulls at the yarn fibres. It’s therefore not possible to guarantee that there will be no shedding

Below are some tips on how to get the best result when working with hairier yarns:

1. When the garment is finished (before you wash it) shake it vigorously so the looser hairs come off. NOTE: do NOT use a lint roller, brush or any method that pulls at the yarn.

2. Place the garment in a plastic bag and put it in your freezer - the temperature will cause the fibres to become less attached to each other, and excess fibres will come off easier.

3. Leave in the freezer for a few hours before taking it out and shaking it again.

4. Wash the garment according to the instructions on the yarn label.

Pilling is a natural process that happens to even the most exclusive of fibers. It's a natural sign of wear and tear that is hard to avoid, and that is most visible in high friction areas of your garment like a sweater's arms and cuffs.

You can make your garment look as new by removing the pilling, using a fabric comb or a pill/lint remover.

Still can't find the answer you need? Then scroll down and leave your question so one of our experts can try to help you. This will be done normally within 5 to 10 working days.
In the meantime, you can read the questions and answers that others have left to this pattern or join the DROPS Workshop on Facebook to get help from fellow knitters/crocheters!

You might also like...

Post a comment to pattern DROPS 162-25

We would love to hear what you have to say about this pattern!

If you want to leave a question, please make sure you select the correct category in the form below, to speed up the answering process. Required fields are marked *.

Comments / Questions (32)

country flag Roelandts wrote:

Hallo, kan u me helpen met het waaierpatroon van bovenstaande cardigan. Ik snap het niet! Het patroon begint met A1 dat zijn de lussen, maar dan spreekt men van A, terwijl dat stokjes zijn .ik snap gewoon niet waarom A B en C dienen tussen de haakjes. Kan je me het eens eenvoudig uitleggen aub. Dank u

14.03.2024 - 21:32

DROPS Design answered:

Dag Roelandts,

Aan het begin van de toer haak je A.1, dan herhaal je steeds A.1B (kies het juiste aantal herhalingen voor je maat), op het einde van de toer haak je A.1C. Je haakt op deze manier eerst toer 1 tot en met toer 4, daarna herhaal je de 3e en 4e toer steeds tot de juiste lengte. Tot slot haak je de 5e en de 6e toer steeds tot de gewenste lengte.

14.03.2024 - 22:02

country flag Isabelle Saeys wrote:

Hallo, wat doe ik met de markeerders nadat ik de eerste rij meerderen haakte (12x24)? Laat ik ze zitten waar ze zijn of moet ik ze op één of andere manier verplaatsen? En ook, na elke rij meerderen (goede kant) haak ik op elke slechte kant gewoon 1 rij steken, met name alle aanwezige steken? alvast bedankt,

05.06.2023 - 20:20

DROPS Design answered:

Dag Isabelle,

Je laat de markeerders zitten op die plek en je neemt ze mee in de hoogte tijdens het haken, zodat je weet waar je de volgende keer moet meerderen.

07.06.2023 - 11:16

country flag Isabelle Saeys wrote:

Dear Drops Design, when the pattern says 'insert marker' that means you attach the marker to the last stitch made, right?

05.06.2023 - 10:48

DROPS Design answered:

Dear Mrs Sayes, depending on the pattern the marker can be inserted between stitches or in a stitch, but here you will insert the marker between stitches. Happy crocheting!

05.06.2023 - 13:14

country flag Susanne wrote:

Hallo liebes drops team. Ich hab den cardigan gehäkelt.ich hab für Ärmel Seiten Teile rücken schon alles zusammen gehäkelt.nur hab später festgestellt.das es ein bisschen zu klein ist .könnte ich einfach paar Stäbchen zu nähmen ? Oder ging es nicht mehr.? Liebe grüße Susanne

28.01.2021 - 13:39

DROPS Design answered:

Liebe Susanne, messen Sie eine ähnliche Jacke, die Sie gerne haben und vergleichen Sie mit den Maßen in der Skizze - prüfen Sie mal Ihre Maschenprobe, und sollte sie stimmen, dann sind Sie sicher, die genauen Maßen wie in der Skizze zu bekommen. Sollten Sie Hilfe brauchen, die Anleitung anzupassen, können Sie sich gerne an Ihrem DROPS Laden wenden, dort hilft man gerne weiter, auch telefonisch oder per E-Mail. Viel Spaß beim häkeln!

28.01.2021 - 13:55

country flag Susanne wrote:

Hallo Ich hab eine Frage zu der anleitung. Was heißt * bis ** Welche Maschen folge ist das. Bei den makirer setzen. Gruß Susanne

26.12.2020 - 19:42

DROPS Design answered:

Liebe Susanne, Sie sollen wiederholen, den ganze Teil zwischen den Sternchen, d.h. von dem 1. * bis letzten * wiederholen. Viel Spaß beim häkeln!

04.01.2021 - 08:54

country flag Anne wrote:

What / where is the gauge? I don't see it shown for this pattern!

10.04.2020 - 03:09

DROPS Design answered:

Dear Anne. For this pattern, we use DROPS Hook size 3.5 mm/E/4 - or size needed to get 22 dc x 12 rows = 4'' x 4'' (10 x 10 cm), and 3 repetitions of 3rd and 4th row in A.1B = width 9 cm / 3½''. Happy crocheting!

12.04.2020 - 18:04

country flag Ingrid De Buck wrote:

Ik wil dit vest maken. Haak proeflapje maar krijg de stekenverhouding niet goed. Haak nu met haaknld 2,5 en kom op 20 stokjes en 11 toeren. Kan het dat ik naar haaknld 2 moet dan is dat toch heel veel kleiner dan de 3,5 van in het patroon

13.11.2019 - 15:42

DROPS Design answered:

Dag Ingrid,

Dan zou je inderdaad haaknaald 2 kunnen proberen, want het werkt het prettigst als de stekenverhouding overeenkomt, zodat je het patroon kunt volgen.

15.11.2019 - 12:26

country flag Sabine wrote:

Thank you for the pattern! It came out fantastic. How to work A2 with only 11 repeats? But I improvised and the jacket looks great. Thanks again to the team who wrote up the instruction. Happy crocheting everyone!

09.03.2019 - 11:28

Menawatie Hardath wrote:

Is it possible to separate the rows by actually stating "Row 1, 2,"etc? Also typing each new row on a new line?

08.10.2018 - 23:12

DROPS Design answered:

Dear Mrs Hardath, there is only diagrams to this pattern, when working diagrams, work each row in each diagram as follows: row 1 in A.1A, A.1B and A.1C (= read from the right towards the left), then row 2 in A.1C, A.1B, A.1A (= read from the left towards the right) and continue reading/working diagrams like this. Happy crocheting!

09.10.2018 - 09:43

country flag Paula wrote:

I am.having trouble figuring out the first part of the instructions for the fan pattern: A. 1A A.1B does that mean 5dc (A) and then 4ch 1sc(1A) 4dc (A) 4ch 1sc 4ch 1sc (1B)? I also tried just doing the chain SC row but it doesn\'t look right if I have to do that for rows 1-4. I\'m obviously fairly new to crocheting and I don\'t know anyone else who crochets.

16.06.2018 - 03:38

DROPS Design answered:

Dear Paula, when working diagrams start at the bottom corner on the right side from RS and read towards the left: work A.1A over the first 5 sts (= row 1 = 1 turning ch, 4 ch, skip 3 sts, 1 sc in next st), then repeat A.1B over the next sts until 7 sts remain and work A.1C over these last sts. From WS read from the left towards the right: work A.1C, repeat A.1B and finish with A.1A. Happy crocheting!

18.06.2018 - 09:44