
Popular categories
Looking for a yarn?


|
||||||||||||||||||||||||||||
Elly May |
||||||||||||||||||||||||||||
 |
 |
|||||||||||||||||||||||||||
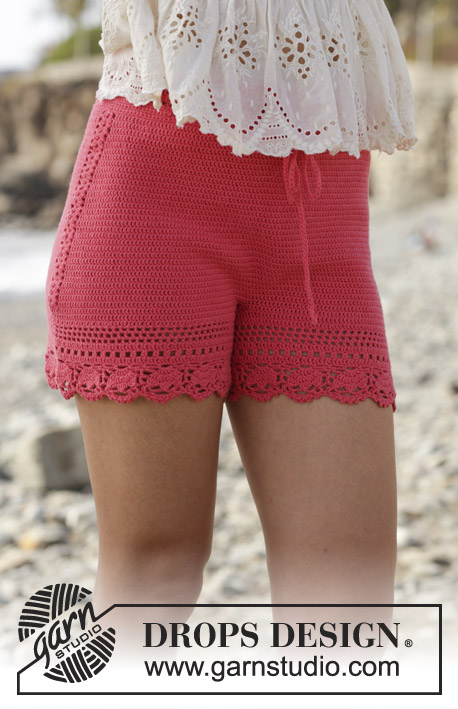
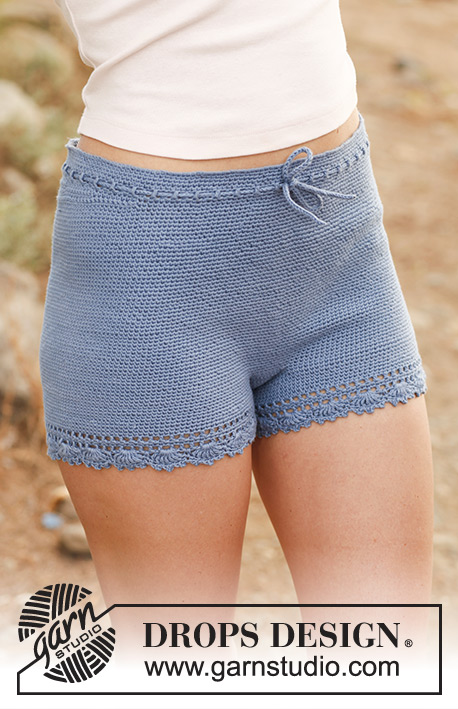
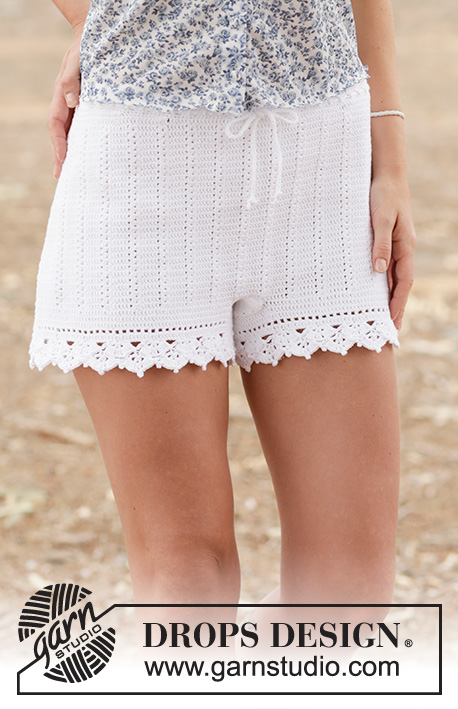
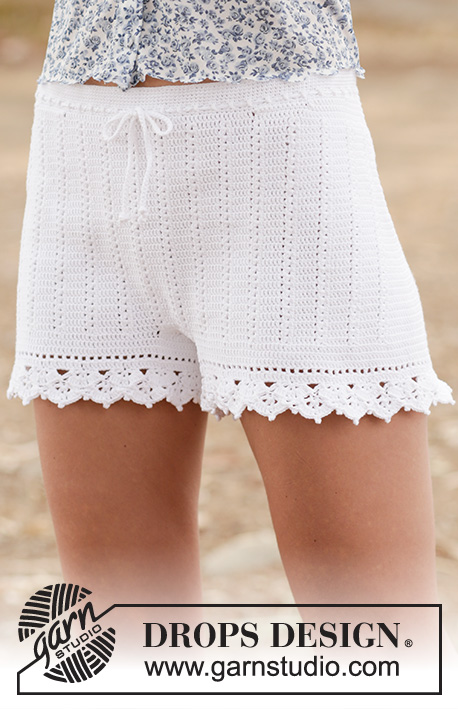
Crochet DROPS shorts with trebles and lace pattern in ”Safran”. Size: S - XXL.
DROPS 162-19 |
||||||||||||||||||||||||||||
|
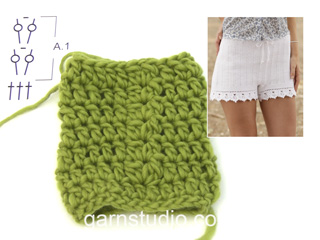
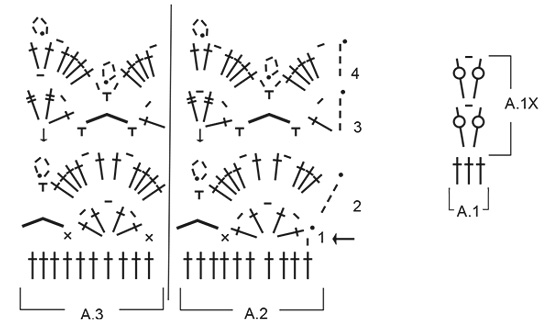
CROCHET INFO: Replace first dc at beg of every dc round with 1 ch. Finish round with 1 sl st in 1st ch at beg of round. Replace first tr at beg of every tr round with 3 ch. Finish round with 1 sl st in 3rd ch at beg of round. PATTERN: See diagrams A.1 to A.3. INCREASE TIP 1: Inc 2 tr mid back as follows: Work until 2 tr remain before marker mid back, work 2 tr in first tr, 1 tr in each of the next 2 tr (marker is between these) and 2 tr in next tr (= 2 tr inc). Inc 4 tr mid back as follows: Work until 4 tr remain before marker mid back, work 2 tr in first tr, 1 tr in next tr, 2 tr in next tr, 1 tr each of the next 2 tr (marker is between these) and 2 tr in next tr, 1 tr in next tr, 2 tr in next tr (= 4 tr inc). INCREASE TIP 2: Work until 1 tr remains before marker in the side, work 2 tr in first tr, 1 tr in next tr (marker is in this tr) and 2 tr in next tr (= 2 tr inc). Repeat the same inc in the other side = 4 sts inc on round. ---------------------------------------------------------- SHORTS: The piece is worked top down. Work 224-274-326 ch on hook size 2,5 mm with Safran and form a ring with 1 sl st in first ch. Insert 1 marker at beg of round = mid back. Work first round as follows: 1 ch, * skip 1 ch, 1 dc in each of the next 7 ch *, repeat from *-* until 0-2-6 ch remain, work 1 dc in each of these ch = 196-240-286 dc. READ CROCHET TIP! Continue working 1 dc in every dc until piece measures 2 cm. REMEMBER THE CROCHET TENSION! Now work an eyelet row as follows: 4 ch, skip 1 dc, * 1 tr in next dc, 1 ch, skip 1 dc *, repeat from *-* the entire round, finish with 1 sl st in 3rd ch from beg of round. On next round work 1 dc in every tr and every ch. Then work the shorts higher in the back as follows: Work 11-12-13 dc past the marker mid back, turn and work 1 sl st in first st, then 1 dc in each of the next 21-23-25 dc, turn and work 1 sl st in first st, then 1 dc in each of the next 32-35-38 sts (sl sts are also worked). Continue like this by working 11-12-13 sts more on every turn until a total of 154-192-208 sts have been worked. Turn again and work until marker mid back. Continue to work 1 round with dc while AT THE SAME TIME inc 28-16-2 dc evenly = 224-256-288 dc. Then work pattern (and insert markers) as follows from mid back: 3 tr, A.1 (= 3 tr), * 5 tr, A.1*, repeat from *-* until 2 tr remain, 2 tr, AT THE SAME TIME insert a marker in each side as follows: Insert a marker in the 3rd tr after 7th-8th-9th repetition A.1, and insert a marker in 3rd tr after 21th-24th-27th repetition with A.1 (i.e. 1 marker in each side). When A.1 has been worked 1 time vertically, continue pattern A.1X - AT THE SAME TIME inc mid back and in the sides as follows: SIDES: Inc on each side of tr with marker, in each side as follows - READ INCREASE TIP 2. Repeat inc every 4th round 7-7-8 times in total = 28-28-32 tr inc. MID BACK: AT THE SAME TIME when piece measures 15-17-19 cm (measured mid front), inc mid back as follows – Read INCREASE TIP-1. Repeat inc with 2 tr mid back every round 10 times in total, and repeat inc with 4 tr every round 2-2-3 times = 28-28-32 tr inc. There are now 280-312-352 tr on round. Now piece measures approx. 22-24-27 cm mid front and 27-29-32 cm mid back. Now divide for legs as follows: Work 1 sl st in each of the first 5-6-6 tr on round, turn and work 1 tr in each of the first 10-12-12 tr (i.e. 5-6-6 sts on each side of marker mid back). These 10-12-12 tr = gusset. Work tr back and forth over these tr. When piece measures 4-5-6 cm, dec 1 tr in each side, repeat dec when piece measures 8-9-10 cm = 6-8-8 tr. Continue with 1 tr in every tr until gusset measures 11-12-13 cm, cut the yarn. Fasten gusset edge to edge to the middle 6-8-8 sts towards mid front. Then work the legs. LEG: Work 1 tr in each of the 132-146-166 tr around one leg (i.e. work 1 tr in every tr in A.1X and 1 tr in ch-space = 3 tr), in addition work 28-31-34 tr along the gusset = 160-177-200 tr. Work 2 rounds with tr AT THE SAME TIME on last round inc 0-3-0 tr evenly by working 2 tr in 1 tr = 160-180-200 tr. Continue to work as follows: ROUND 1: 3 ch (= 1 tr), * 1 ch, skip 1 tr, 1 tr in next tr * , repeat from *-* until 1 tr remains, 1 ch, skip 1 tr, 1 sl st in 3rd ch at beg of round. ROUND 2: 3 ch (= 1 tr), * 1 tr in ch-space, 1 tr in next tr *, repeat from *-* the entire round until 1 ch-space remains, 1 tr in ch-space, finish with 1 sl st in 3rd ch on round. ROUND 3: Now work pattern as follows: Work pattern according to diagram A.2 over the first 10 tr, continue with A.3 the entire round. Finish every round with 1 sl st at beg of round. REMEMBER CROCHET INFO! Continue like this until pattern A.2-A.3 have been worked vertically. Fasten off. Work the other leg the same way. TIES: Work 130-140-150 cm with LOOSE ch, turn and work 1 sl st in every ch. Thread the tie in the row with eyelet holes at the top of shorts – start mid front |
||||||||||||||||||||||||||||
Diagram explanations |
||||||||||||||||||||||||||||
|
||||||||||||||||||||||||||||
|
||||||||||||||||||||||||||||

|
||||||||||||||||||||||||||||
|
Have you made this or any other of our designs? Tag your pictures in social media with #dropsdesign so we can see them! Do you need help with this pattern?You'll find tutorial videos, a Comments/Questions area and more by visiting the pattern on garnstudio.com. © 1982-2024 DROPS Design A/S. We reserve all rights. This document, including all its sub-sections, has copyrights. Read more about what you can do with our patterns at the bottom of each pattern on our site. |
||||||||||||||||||||||||||||


With over 40 years in knitting and crochet design, DROPS Design offers one of the most extensive collections of free patterns on the internet - translated to 17 languages. As of today we count 304 catalogues and 11422 patterns - 11415 of which are translated into English (UK/cm).
We work hard to bring you the best knitting and crochet have to offer, inspiration and advice as well as great quality yarns at incredible prices! Would you like to use our patterns for other than personal use? You can read what you are allowed to do in the Copyright text at the bottom of all our patterns. Happy crafting!
Comments / Questions (157)
Hello again, I just wanna make sure about the increase on sides, what does it mean with “increase every 4th round 7 =28 (I’m working the S/M size)? Do the increases have to be in very around (for 7 rounds)? Thanks again for the help!
22.06.2020 - 14:46DROPS Design answered:
Dear Sharon, you have to increase on the sides (= 2 sts on each side = 4 sts increased on every increase round) a total of 7 times on every 4th round = *work 1 round with inc, 3 rounds without increase*, repeat from *-* a total of 6 times, and work 1 more increase round. Happy crocheting!
22.06.2020 - 16:08Do I have to buy the yarn in order to get the pattern
14.06.2020 - 00:24DROPS Design answered:
Dear Sandrene, the patterns are available for free in the website. You can print it by clicking in the button print, located under the materials. Happy crocheting!
14.06.2020 - 22:54How do I work the mid back increase and join the end of the row? I keep using stitches from the beginning of the next row. Help!
30.05.2020 - 16:41DROPS Design answered:
Dear Linda, when joining, put a stitch marker between the two middle stitch. For increasing, crochet two stitch in the stitch that is one stitch before and after the stitch ight next to the marker on both sides. Happy Crafting!
31.05.2020 - 01:55Now I get it! Thank you very much for your answers and patience! Appreciate it!
26.05.2020 - 10:01Hi, it’s me again, sorry for many questions. I wanna ask also for work 11-12-13 from mid back, this means I have to work only for 11 sts long back and forth from top to down and it is only lets say the left side from mid back marker until total 154 sts? Then how can I continue with the rest of the pattern? Do I need to work this 11-12-13 one by one and join them together instead working in round? I’m really confused, thanks again for your kind help,
26.05.2020 - 04:53DROPS Design answered:
Dear Sharon, you are here working an elevation on back piece to make the back piece somewhat higher, so that you will have to work short rows over the sts on midback: work 11-12-13 sts past marker mid back, turn (leave all remaining sts on round unworked), work now from WS 1 sl st, 1 st in each of the next 21-23-25 sts, (leaving the remaining sts on round unworked), continue like this alternately from RS and from WS until short rows are done, then work back to the mid back to work 1 round increasing evenly. Happy crocheting!
26.05.2020 - 08:59Hi, thank you for your kindness to share all the free patterns, if I may ask, what does it mean with “continue to work 1 round and the same time increase 28-16-2 evenly?” (Under shorts) I’m a bit lost here, thank you for your help in advance!
26.05.2020 - 03:17DROPS Design answered:
Dear Sharon, work next round over all stitches as before but at the same time you will increase 28 sts in first size, 16 sts in 2nd size and 2 sts in 3rd size evenly distributed - as explained here 26.05.2020 - 08:56
I'm using the UK English pattern for these shorts but notice the terminology in the diagram hasn't changed (e.g. double, treble, single crochet), yet the terminology changes in the written instructions. What stitches am I supposed to use when following the diagram, US or UK terminology?
10.05.2020 - 12:44DROPS Design answered:
Dear Lani M, check the English language, if you work the UK-English pattern, you should read treble crochet (US-double crochet), double crochet (US-single crochet) etc.. Happy crocheting!
11.05.2020 - 09:50Hallo, ich verstehe nicht, warum bei den Zunahmen in der hinteren Mitte der Markierungsfaden zwischen den Mädchen liegen soll (d.h. Muster, 2 M, Markierung, 3 M, Muster). Wenn da auf beiden Seiten des Markierers zugenommen wird, wird das ganze etwas asymmetrisch, nicht? Oder ist es kein Problem?
11.04.2020 - 12:00DROPS Design answered:
Liebe Bernadett, die Markierer sind in das 3. von den 5 Stäbchen (= in das mittlere Stäbchen) eingesetzt, so haben Sie auf beiden Seiten: ... 5 Stb, A.1, 2 Stb, 1 Stb mit Markierer, 2 Stb, A.1, 5 Stb, A.1 ... Viel Spaß beim Häkeln!
14.04.2020 - 11:02Proszę o pomoc, bo utknęłam. Przerobiony mam motyw A1, zacznę okr. z A1X, ale nie zgadza mi się ilość sł, które mam dodać. (W TYM SAMYM CZASIE dodawać o. na środku tyłu i z boków), to w okrążeniu wyjdzie 6 dodatkowych słupków: 2 sł od śr. tyłu, i po 2 sł. po bokach (=4 sł). Czy teraz dodawać tylko po bokach, a z tyłu dopiero po tych 15 cm?
29.03.2020 - 11:31DROPS Design answered:
Witaj Agnieszko! Najpierw zaczynasz dodawać oczka na bokach (po 2 sł na każdym boku, w sumie dodane 4 sł w okrążeniu). Zaczynasz dodawanie oczek środku tyłu (najpierw po 2 sł, a następnie po 4 sł), dopiero gdy długość robótki (mierząc po środku przodu) wynosi 15 cm. Serdecznie pozdrawiamy!
31.03.2020 - 12:58Merci pour votre réponse. Oui les explications ont été vues et lues mais j'obtiens ce que j'ai mis sur ma question précédente d'où mon interrogation. Pouvez-vous m'en dire davantage ? Cdt.
23.03.2020 - 20:12DROPS Design answered:
Bonjour Ghislaine, vos marqueurs doivent être dans une bride, au milieu des 5 brides entre chaque A.1, il vous suffit ensuite de suivre simplement l'astuce "augmentation": pour celles des côtés, vous aurez: 1 bride dans la 1ère des 5 brides, 2 brides dans la bride suivante, 1 bride dans la bride suivante (= celle avec le marqueur), 2 brides dans la bride suivante et 1 bride dans la 5ème des 5 brides. Bon crochet!
24.03.2020 - 09:57