DROPS Safran
DROPS Safran
100% Cotton
from 2.05 $ /50g
Get the yarn to make this pattern from 10.25$.

The yarn cost is calculated from the pattern’s smallest size and the yarn’s cheapest product type. Looking for an even better price? You might find it on the DROPS Deals!

DROPS SS24

Shy Violet

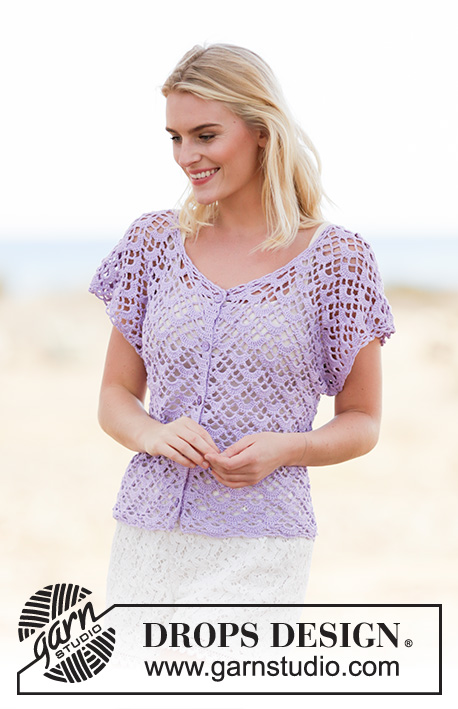
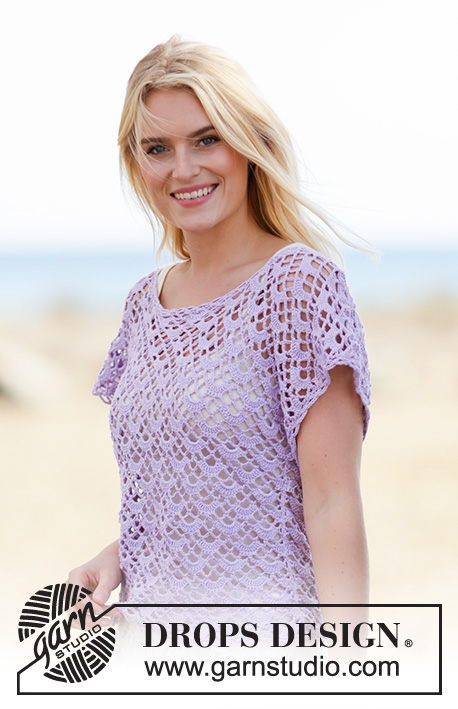
Crochet DROPS top with fan pattern, worked top down in ”Safran”. Size S- XXXL

DROPS 162-15
DROPS design: Pattern no e-229
Yarn group A
----------------------------------------------------------
Size: S/M – L/XL – XXL - XXXL
Finished measurements:
Bust: 84-106-128-148 cm / 33"-41 3/4"-50½"-58"
Full length: 48-52-56-58 cm / 19"-20½"-22"-22 3/4"

Materials:
DROPS SAFRAN from Garnstudio
250-350-350-400 g color no 53, light purple

DROPS CROCHET HOOK size 3.5 mm/E/4 – or size needed to get 2 repetitions of A.3 = approx. width 10.5 cm / 4 1/4''.

-------------------------------------------------------

Alternative Yarn – See how to change yarns here
Yarn Groups A to F – Use the same pattern and change the yarn here
Yarn usage using an alternative yarn – Use our yarn converter here

-------------------------------------------------------

DROPS Safran
DROPS Safran
100% Cotton
from 2.05 $ /50g
Get the yarn to make this pattern from 10.25$.

The yarn cost is calculated from the pattern’s smallest size and the yarn’s cheapest product type. Looking for an even better price? You might find it on the DROPS Deals!

Pattern instructions

NOTE: This pattern is written in American English. All measurements in charts are in cm. For conversion from inches to cm - click here. There are different terms for crocheting in American and British English. If this pattern includes crochet, click for "crochet terms" here. For this pattern in British English, please click here.
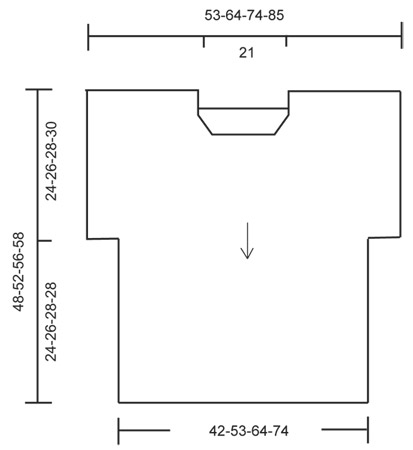
PATTERN:
See diagrams A.1 to A.7. The diagrams show all rows in pattern seen from RS.
----------------------------------------------------------

FRONT PIECE:
The piece is worked top down.

Right shoulder:
Work 69-92-114-137 ch (includes 3 ch to turn with) on hook size 3.5 mm/E/4 with Safran.
ROW 1 (= WS): Work 1 dc in 4th ch from hook (= 2 dc), 1 dc in each of the next 5-3-5-3 ch, * skip ch 1, work 1 dc in each of the next 4 ch *, repeat from *-* the entire row = 55-73-91-109 dc. NOW MEASURE PIECE FROM HERE!
Now work according to diagram, i.e. work as follows:
ROW 1-6: (1st row = RS): Work A.1, A.2, A.3 2-3-4-5 times in total, A.4, A.5. REMEMBER THE CROCHET GAUGE!
ROW 7 (= RS): Work last row in A.1-A.4 as before but finish with A.6 over A.5.
Continue until A.6 has been worked 1 time vertically, in A.1-A.4 repeat rows in A.x. Cut the yarn.

Work left shoulder as right shoulder, work A.7 over A.1. On last row in A.7 (= from WS) work 35 ch for neck at the end of row, fasten with 1 sl st in 3rd ch at beg of last row on right shoulder. Cut the yarn.
Now work over all sts, beg from RS as follows: A.1, A.2, A.3 9-10-11-12 times in total, A.4, finish with A.5. Continue like this. When piece measures approx. 24-26-28-30 cm / 9½"-10 1/4"-11"-11 3/4" – adjust after 7th row, sleeves are done.
Then work as follows, beg from WS: Skip 3 ch-space, beg by working in next sc as follows: A.5, A.4, A.3 7-8-9-10 times in total, A.2, finish with A.1 (do not work the last 3 ch-spaces). Continue like this until piece measures approx. 48-52-56-58 cm / 19"-20½"-22"-22 3/4", adjust after 5th row in diagram. Fasten off.

BACK PIECE:
Work left shoulder in ch-row from cast on edge (work in same ch as dc's, i.e. in the 55-73-91-109 dc) from left front piece as follows:
ROW 1-6: (1st row = RS): Work A.1, A.2, A.3 2-3-4-5 times in total, A.4, A.5. Cut the yarn.
Work right shoulder as left shoulder but in right front piece - NOTE! Instead of cutting the yarn work 71 ch for neck and fasten with 1 sl st in first ch at beg of last row on left shoulder. Cut the yarn.
Now work over all sts the same way as on front piece.

ASSEMBLY:
Sew side and underarm seams in one.

EDGES:
Work an edge around the neck, beg from one shoulder as follows:
ROUND 1: Work * 1 sc, 5 ch *, repeat from *-* along the neck with approx. 2 cm / 3/4'' between every sc, finish with 1 sl st in first sc.
ROUND 2: ch 3, 1 sc in next ch-space, * ch 5, 1 sc in next ch-space *, repeat from *-* the entire round and finish with 3 ch and 1 sl st in first sc from beg of 1st round. Fasten off.
Work an edge at the bottom along front and back piece the same way, beg from the side. Work an edge around the sleeve the same way, beg from mid under sleeve.

This pattern has been corrected.

Updated online: 26.05.2015
New chart A.7 (was missing 1 dc around st and 1 sc in st).
Updated online: 14.11.2016
New chart A.7

Diagram

All measurements in charts are in cm.

symbols = 1 ch
symbols = 1 sc around st
symbols = 1 sc in st
symbols = 1 dc in st
symbols = 1 dc around st
symbols = row is explained in pattern (1 ch
counts as 1 dc when it applies to
shoulders, ch-row applies to
neck)
symbols = beg on diagram here
symbols = shows first row of A.1-A.5
diagram
diagram
diagram
Do you have a question? See a list of frequently asked questions (FAQ)

Knitting tension is what determines the final measurements of your work, and is usually measured per 10 x 10 cm. It is provided like so: number of stitches in width x number of rows in height - eg: 19 stitches x 26 rows = 10 x 10 cm.

The knitting tension is very individual; some people knit/crochet loosely while others work tightly. You adjust the knitting tension with the needle size, which is why the suggested needle size only serve as a guide! You need to adjust this (up or down) to ensure that YOUR knitting tension matches the knitting tension provided in the pattern. If you work with a different knitting tension than provided you will have a different yarn consumption, and your work will have different measurements than what the pattern suggests.

The knitting tension also determines which yarns can replace each other. As long as you achieve the same knitting tension you can replace one yarn with another.

See DROPS lesson: How to measure your tension/gauge

See DROPS video: How to make a gauge tension swatch

The required amount of yarn is provided in grams, eg: 450 g. To calculate how many balls you’ll need you first need to know how many grams are in 1 ball (25g, 50g or 100g). This information is available if you click on the individual yarn quality on our pages. Divide the amount required with the amount of each ball. For example, if each ball is 50g (the most common amount), the calculation will be as follows: 450 / 50 = 9 balls.

The important thing when changing from one yarn to another is that the knitting/crochet tension remains the same. This is so that the measurements of the finished piece will be the same as on the sketch provided. It is easier to achieve the same knitting tension using yarns from the same yarn group. It is also possible to work with multiple strands of a thinner yarn to achieve the knitting tension of a thicker one. Please try our yarn converter. We recommend you to always work a test swatch.

Please NOTE: when changing yarn the garment might have a different look and feel to the garment in the photo, due to individual properties and qualities of each yarn.

See DROPS lesson: Can I use a different yarn than the one mentioned in the pattern?

All our yarns are categorised into yarn groups (from A to F) according to thickness and knitting tension – group A contains the thinnest yarns and group F the thickest. This makes it easier for you to find alternative yarns to our patterns, should you wish to switch yarn. All yarns within the same group have a similar knitting tension and can easily replace each other. However, different yarn qualities have different structures and properties which will give the finished work a unique look and feel.

Click here for an overview of the yarns in each yarn group

At the top of all our patterns you’ll find a link to our yarn converter, which is a helpful tool should you wish to use a different yarn than suggested. By filling in the yarn quality you wish to replace, the amount (in your size) and number of strands, the converter will present good alternative yarns with the same knitting tension. Additionally it will tell you how much you’ll require in the new qualities and whether you’ll need to work with multiple strands. Most skeins are 50g (some are 25g or 100g).

If the pattern is worked with multiple colours, every colour will have to be converted separately. Similarly, if the pattern is worked with several strands of different yarns (for example 1 strand Alpaca and 1 strand Kid-Silk) you will have to find alternatives for each, individually.

Click here to see our yarn converter

Since different yarns have different qualities and textures we have chosen to keep the original yarn in our patterns. However, you can easily find options among our available qualities by using our yarn converter, or simply pick a yarn from the same yarn group.

It is possible that some retailers still have discontinued yarns in stock, or that someone has a few skeins at home that they would like to find patterns for.

The yarn converter will provide both alternative yarn as well as required amount in the new quality.

If you think it's hard to decide what size to make, it can be a good idea to measure a garment you own already and like the size of. Then you can pick the size by comparing those measures with the ones available in the pattern's size chart.

You'll find the size chart at the bottom of the pattern.

See DROPS lesson: How to read size chart

The needle size provided in the pattern serves only as a guide, the important thing is to follow the knitting tension. And since knitting tension is very individual, you will have to adjust the needle size to ensure that YOUR tension is the same as in the pattern – maybe you’ll have to adjust 1, or even 2 needle sizes, up or down to achieve the correct tension. For this, we recommend that you work test swatches.

Should you work with a different knitting tension than the one provided, the measurements of the finished garment might deviate from the measurement sketch.

See DROPS lesson: How to measure your tension/gauge

See DROPS video: How to make a gauge tension swatch

Working a garment top-down provides more flexibility and room for personal adjustment. For example it is easier to try the garment on while working, as well as making adjustments to length of yoke and shoulder caps.

The instructions are carefully explaining every step, in the correct order. Diagrams are adjusted to the knitting direction and are worked as usual.

The diagram depicts all rows/rounds, and every stitch seen from the right side. It is read from bottom to top, from right to left. 1 square = 1 stitch.

When working back and forth, every other row is worked from the right side and every other row is worked from the wrong side. When working from the wrong side, the diagram will have to be worked reversed: from left to right, knit stitches are purled, purl stitches are knit etc.

When working in the round every round is worked from the right side and the diagram are worked from right to left on all rounds.

See DROPS lesson: How to read knitting diagrams

The diagram depicts all rows/rounds, and every stitch seen from the right side. It is worked from bottom to top, from right to left.

When working back and forth every other row is worked from the right side: from right to left and every other row is worked from the wrong side: from left to right.

When working in the round, every row in the diagram are worked from the right side, from right to left.

When working a circular diagram you start in the middle and work your way outwards, counter clockwise, row by row.

The rows usually start with a given number of chain stitches (equivalent to the height of the following stitch), this will either be depicted in the diagram or explained in the pattern.

See DROPS lesson: How to read crochet diagrams

Instructions for working several diagrams after each other on the same row/round, will often be written like so: “work A.1, A.2, A.3 a total of 0-0-2-3-4 times". This means you work A.1 once, then A.2 is worked once, and A.3 is repeated (in width) the number of times provided for your size – in this case like so: S = 0 times, M = 0 times, L=2 times, XL= 3 times and XXL = 4 times.

The diagrams are worked as usual: begin with the first row in A.1, then work the first row in A.2 etc.

See DROPS lesson: How to read knitting diagrams

See DROPS lesson: How to read crochet diagrams

The total width of the garment (from wrist-to-wrist) will be larger in the larger sizes, despite the actual sleeves being shorter. The larger sizes have longer sleeve caps and wider shoulders, so there will be a good fit in all sizes.

The measurement sketch/schematic drawing provides information regarding the full length of the garment. If it’s a jumper or a jacket the length is measured from the highest point on the shoulder (usually closest to the neckline), and straight down to the bottom of the garment. It is NOT measured from the tip of shoulder. Similarly, the length of yoke is measured from the highest point on the shoulder and down to where yoke is split into body and sleeves.

See DROPS lesson: How to read a schematic drawing

Diagrams are often repeated on the round or in height. 1 repeat is the diagram the way it appears in the pattern. If it says to work 5 repeats of A.1 in the round, then you work A.1 a total of 5 times after/next to each other in the round. If it says to work 2 repeats of A.1 vertically/in height you work the entire diagram once, then begin again at the start and work the entire diagram one more time.

Chain stitches are slightly narrower than other stitches and to avoid working the cast-on edge too tight, we simply chain more stitches to begin with. The stitch count will be adjusted on the following row to fit the pattern and measurement sketch.

The rib edge is more elastic and will contract slightly compared to, for example, stocking stitch. By increasing before the rib edge, you avoid a visible difference in width between the rib edge and the rest of the body.

It’s very easy to cast off too tightly, and by making yarn overs while casting off (and simultaneously casting these off) you avoid a too tight cast off edge.

See DROPS video: How to bind off with yarn overs (yo)

To achieve an even increase (or decrease) you can increase on, for example: every 3rd and 4th row alternately, like so: work 2 rows and increase on the 3rd row, work 3 rows and increase on the 4th. Repeat this until the increase is complete.

See DROPS lesson: Increase or decrease 1 st on every 3rd and 4th row alternately

Should you prefer to work in the round instead of back and forth, you may of course adjust the pattern. You’ll need to add steeks mid-front (usually 5 stitches), and follow the instructions. When you would normally turn and work from the wrong side, simply work across the steek and continue in the round. At the end you’ll cut the piece open, pick up stitches to work bands, and cover the cut edges.

See DROPS video: How to knit steeks and cut open

Should you prefer to work back and forth instead of in the round, you may of course adjust the pattern so you work the pieces separately and then assemble them at the end. Divide the stitches for the body in 2, add 1 edge stitch in each side (for sewing) and work the front and back pieces separately.

See DROPS lesson: Can I adapt a pattern for circular needles into straight needles?

Pattern repeats can vary slightly in the different sizes, in order to get the correct proportions. If you’re not working the exact same size as the garment in the photo, yours might deviate slightly. This has been carefully developed and adjusted so that the complete impression of the garment is the same in all sizes.

Make sure to follow instructions and diagrams for your size!

If you have found a pattern you like which is available in women’s size it’s not very difficult to convert it to men’s size. The biggest difference will be the length of sleeves and body. Start working on the women size that you think would fit across the chest. The additional length will be worked right before you cast off for the armhole/sleeve cap. If the pattern is worked top-down you can add the length right after the armhole or before the first decrease on sleeve.

Regarding additional yarn amount, this will depend on how much length you add, but it is better with a skein too many than too few.

All yarns will have excess fibres (from production) that might come off as lint or shedding. Brushed yarns (ie hairier yarns) have more of these loose, excess fibres, causing more shedding.

Shedding also depends on what is worn under or over the garment, and whether this pulls at the yarn fibres. It’s therefore not possible to guarantee that there will be no shedding

Below are some tips on how to get the best result when working with hairier yarns:

1. When the garment is finished (before you wash it) shake it vigorously so the looser hairs come off. NOTE: do NOT use a lint roller, brush or any method that pulls at the yarn.

2. Place the garment in a plastic bag and put it in your freezer - the temperature will cause the fibres to become less attached to each other, and excess fibres will come off easier.

3. Leave in the freezer for a few hours before taking it out and shaking it again.

4. Wash the garment according to the instructions on the yarn label.

Pilling is a natural process that happens to even the most exclusive of fibers. It's a natural sign of wear and tear that is hard to avoid, and that is most visible in high friction areas of your garment like a sweater's arms and cuffs.

You can make your garment look as new by removing the pilling, using a fabric comb or a pill/lint remover.

Still can't find the answer you need? Then scroll down and leave your question so one of our experts can try to help you. This will be done normally within 5 to 10 working days.
In the meantime, you can read the questions and answers that others have left to this pattern or join the DROPS Workshop on Facebook to get help from fellow knitters/crocheters!

You might also like...

Post a comment to pattern DROPS 162-15

We would love to hear what you have to say about this pattern!

If you want to leave a question, please make sure you select the correct category in the form below, to speed up the answering process. Required fields are marked *.

Comments / Questions (77)

Celia Gutierrez wrote:

Hola gotas me gustan muchos sus patrones gracias por compartir. Ya comence con este top pero no entiendo como se disminuye de las mangas para abajo los videos q pusieron en los comentarios me ayudaron mucho pero ahora como sigo??? gracias por su atencion espero su respuesta. Celia soy de Chihuahua, Chih. Mexico y encontre su pag por medio de Pinterest

18.03.2016 - 19:07

DROPS Design answered:

Hola Celia. Cuando alcanzamos un ancho de mangas de aprox. 24-26-28-30 cm, para dism saltamos los 3 primeros arcos de la fila anterior y no trabajamos los últimos 3 arcos al final de la fila - ahora comenzamos a trabajar la parte inferior del cuerpo.

21.03.2016 - 10:30

country flag Jean Heesbeen wrote:

Hallo zou iemand mij uit kunnen leggen hoe je moet meerderen bij de hals voor Drops 162-15 Alvast bedankt Jean

06.03.2016 - 14:32

DROPS Design answered:

Hoi Jean. Volg je het telpatroon A.6 voor rechts (of A.7 voor links) dan meerder je automatisch langs de hals op het voorpand. Als je klaar met A.7 bent zet je 35 l op (halslijn) en haakt verder over A.6. Zie ook video hier:

08.03.2016 - 12:31

country flag Nicola Hitt wrote:

The latest chart A7 appears to have a chain missing on rows 2 and 4. All other chains are 5 in number but this pattern currently indicates that only 4 should be created on these rows. Chart A6 does not have this discrepancy.

07.09.2015 - 10:37

country flag Martine Van Dijk wrote:

Deze verhouding heb ik opgezocht bij het patroon Summer escape (rok 162-18): DROPS HAAKNLD 3,5 mm - of de maat haaknaald die u nodig hebt voor een stekenverhouding van 22 stk x 12 toeren = 10 x 10 cm. Voor dit patroon anders de eerste toeren met naald 3 haken?

01.09.2015 - 17:54

DROPS Design answered:

Hoi Martine. De stekenverhouding voor een ander patroon heeft niets te doen met de stekenverhouding van dit patroon. Maar individuele aanpassingen mag natuurlijk altijd ;-)

02.09.2015 - 16:16

country flag Margrietje wrote:

Ik heb een vraag over de schouders. Volgens het schema van het truitje zou de schouder 16 cm breed zijn. Je begint voor de schouder met 69 l, wordt 55 stk. Dan kom je op ong. 25 cm (dus 9 cm meer). Ga je het patroon haken, dan gaat de "opzetrand" met stokjes enorm bubbelen of wordt de schouder veel te breed en komt het patroon niet mooi uit. Is dat de bedoeling?

30.08.2015 - 14:45

DROPS Design answered:

Hoi Margrietje. Ik denk dat je de eerste toeren heel losjes haakt. Met de juiste stekenverhouding zou 2 herhalingen van A.3 ongeveer 10,5 cm breed zijn. Met A.1/A.2/A.4 en A.5 erbij (wat kleine herhalingen zijn) schat ik in dat ongeveer 16 cm klopt. Het eerste toer moet losser zijn, maar niet bijna 10 cm. Controleer of de stekenverhouding klopt

01.09.2015 - 17:02

Candace wrote:

USA - ok, i am down to the end of the sleeves. do I only skip 3 chains on each end once? from the diagram it looks like each side should be about 5.5 cm?

27.08.2015 - 19:35

DROPS Design answered:

Dear Candace, diagram is standard. When you have worked the sleeve (to row 7 included), cut the yarn and work next rom from WS in th sc after the first 3 ch-loops. Happy crocheting!

28.08.2015 - 09:57

country flag Candace wrote:

Thanks for the help, i think i have it figured out!

20.08.2015 - 18:57

country flag Candace wrote:

This is my first time doing a drops pattern and also a diagram. HELP! haha I am doing a large. in the diagram is A1-A5 horizontal or vertical? i have been working it as A1 is a row, A2 is a row and so on. if that is correct then i am totally at a loss as to how to work in the neck section A6/A7 please explain in dummy terms. thanks

19.08.2015 - 00:51

DROPS Design answered:

Dear Candace, you work following all diagrams at the same time, ie work 1st st in A.1 (= first st seen from RS), then work A.2 over the next 9 sts (beg of the pattern), repeat A.3 (= 18 sts) until 9 ch remain, finish row then with A.4 (= 8 sts) and A.5 (end of row). From WS, work A.5, A.4, repeat A.3 and finish with A.2 and A.1. After you have worked the first 6 rows like this, work next row working A.6 over A.5 and A7 over A.1 for the other shoulder. See also video below. Happy crocheting!

19.08.2015 - 09:34

country flag Els wrote:

Omdat het patroon niet uitkwam op het middenstuk bij de nieuw opgezette lossen, ben ik eens gaan rekenen. Ik kwam tot ontdekking dat het wel klopt wanneer je in de eerste toer insteekt in de 5e losse ipv in de 6e zoals het patroon aangeeft. Lijkt me een belangrijke aanvulling.

24.07.2015 - 13:24

country flag Lynne Underkofler wrote:

I've been able to download and view the videos so no need to respond further. Thanks again so much for your quick responses and awesome patterns!!

22.06.2015 - 13:16