DROPS Safran uni colour 100% Cotton |
2.05 $ /50g |
Order |
Clicking the ORDER button will redirect you to Wool Warehouse Direct Ltd website
The yarn cost is calculated from the pattern’s smallest size and the yarn’s cheapest product type. Looking for an even better price? You might find it on the DROPS Deals!
-------------------------------------------------------
Alternative Yarn – See how to change yarns here
Yarn Groups A to F – Use the same pattern and change the yarn here
Yarn usage using an alternative yarn – Use our yarn converter here
-------------------------------------------------------
DROPS Safran uni colour 100% Cotton 2.05 $ /50g Order |
Clicking the ORDER button will redirect you to Wool Warehouse Direct Ltd website
The yarn cost is calculated from the pattern’s smallest size and the yarn’s cheapest product type. Looking for an even better price? You might find it on the DROPS Deals!
This pattern has been corrected. Click here to see the correction/s.
All measurements in charts are in cm.
= 1 ch | |
= 1 sc around st | |
= 1 sc in st | |
= 1 dc in st | |
= 1 dc around st | |
= row is explained in pattern (1 ch counts as 1 dc when it applies to shoulders, ch-row applies to neck) |
|
= beg on diagram here | |
= shows first row of A.1-A.5 |
Each of our patterns has specific tutorial videos to help you.
These step-by-step tutorials might also help you:
Why is the knitting/crochet tension so important?
Knitting tension is what determines the final measurements of your work, and is usually measured per 10 x 10 cm. It is provided like so: number of stitches in width x number of rows in height - eg: 19 stitches x 26 rows = 10 x 10 cm.
The knitting tension is very individual; some people knit/crochet loosely while others work tightly. You adjust the knitting tension with the needle size, which is why the suggested needle size only serve as a guide! You need to adjust this (up or down) to ensure that YOUR knitting tension matches the knitting tension provided in the pattern. If you work with a different knitting tension than provided you will have a different yarn consumption, and your work will have different measurements than what the pattern suggests.
The knitting tension also determines which yarns can replace each other. As long as you achieve the same knitting tension you can replace one yarn with another.
See DROPS lesson: How to measure your tension/gauge
See DROPS video: How to make a gauge tension swatch
How do I know how many balls of yarn I need?
The required amount of yarn is provided in grams, eg: 450 g. To calculate how many balls you’ll need you first need to know how many grams are in 1 ball (25g, 50g or 100g). This information is available if you click on the individual yarn quality on our pages. Divide the amount required with the amount of each ball. For example, if each ball is 50g (the most common amount), the calculation will be as follows: 450 / 50 = 9 balls.
Can I use a different yarn than what the pattern suggests?
The important thing when changing from one yarn to another is that the knitting/crochet tension remains the same. This is so that the measurements of the finished piece will be the same as on the sketch provided. It is easier to achieve the same knitting tension using yarns from the same yarn group. It is also possible to work with multiple strands of a thinner yarn to achieve the knitting tension of a thicker one. Please try our yarn converter. We recommend you to always work a test swatch.
Please NOTE: when changing yarn the garment might have a different look and feel to the garment in the photo, due to individual properties and qualities of each yarn.
See DROPS lesson: Can I use a different yarn than the one mentioned in the pattern?
What are the yarn groups?
All our yarns are categorised into yarn groups (from A to F) according to thickness and knitting tension – group A contains the thinnest yarns and group F the thickest. This makes it easier for you to find alternative yarns to our patterns, should you wish to switch yarn. All yarns within the same group have a similar knitting tension and can easily replace each other. However, different yarn qualities have different structures and properties which will give the finished work a unique look and feel.
How do I use the yarn converter?
At the top of all our patterns you’ll find a link to our yarn converter, which is a helpful tool should you wish to use a different yarn than suggested. By filling in the yarn quality you wish to replace, the amount (in your size) and number of strands, the converter will present good alternative yarns with the same knitting tension. Additionally it will tell you how much you’ll require in the new qualities and whether you’ll need to work with multiple strands. Most skeins are 50g (some are 25g or 100g).
If the pattern is worked with multiple colours, every colour will have to be converted separately. Similarly, if the pattern is worked with several strands of different yarns (for example 1 strand Alpaca and 1 strand Kid-Silk) you will have to find alternatives for each, individually.
Why do you show discontinued yarns in the patterns?
Since different yarns have different qualities and textures we have chosen to keep the original yarn in our patterns. However, you can easily find options among our available qualities by using our yarn converter, or simply pick a yarn from the same yarn group.
It is possible that some retailers still have discontinued yarns in stock, or that someone has a few skeins at home that they would like to find patterns for.
The yarn converter will provide both alternative yarn as well as required amount in the new quality.
What size should I knit?
If you think it's hard to decide what size to make, it can be a good idea to measure a garment you own already and like the size of. Then you can pick the size by comparing those measures with the ones available in the pattern's size chart.
You'll find the size chart at the bottom of the pattern.
See DROPS lesson: How to read size chart
Why do I get the wrong knitting tension with the suggested needle size?
The needle size provided in the pattern serves only as a guide, the important thing is to follow the knitting tension. And since knitting tension is very individual, you will have to adjust the needle size to ensure that YOUR tension is the same as in the pattern – maybe you’ll have to adjust 1, or even 2 needle sizes, up or down to achieve the correct tension. For this, we recommend that you work test swatches.
Should you work with a different knitting tension than the one provided, the measurements of the finished garment might deviate from the measurement sketch.
See DROPS lesson: How to measure your tension/gauge
See DROPS video: How to make a gauge tension swatch
Why is the pattern worked top-down?
Working a garment top-down provides more flexibility and room for personal adjustment. For example it is easier to try the garment on while working, as well as making adjustments to length of yoke and shoulder caps.
The instructions are carefully explaining every step, in the correct order. Diagrams are adjusted to the knitting direction and are worked as usual.
How do I work according to a knitting diagram?
The diagram depicts all rows/rounds, and every stitch seen from the right side. It is read from bottom to top, from right to left. 1 square = 1 stitch.
When working back and forth, every other row is worked from the right side and every other row is worked from the wrong side. When working from the wrong side, the diagram will have to be worked reversed: from left to right, knit stitches are purled, purl stitches are knit etc.
When working in the round every round is worked from the right side and the diagram are worked from right to left on all rounds.
See DROPS lesson: How to read knitting diagrams
How do I work according to a crochet diagram?
The diagram depicts all rows/rounds, and every stitch seen from the right side. It is worked from bottom to top, from right to left.
When working back and forth every other row is worked from the right side: from right to left and every other row is worked from the wrong side: from left to right.
When working in the round, every row in the diagram are worked from the right side, from right to left.
When working a circular diagram you start in the middle and work your way outwards, counter clockwise, row by row.
The rows usually start with a given number of chain stitches (equivalent to the height of the following stitch), this will either be depicted in the diagram or explained in the pattern.
See DROPS lesson: How to read crochet diagrams
How do I work several diagrams simultaneously on the same row/round?
Instructions for working several diagrams after each other on the same row/round, will often be written like so: “work A.1, A.2, A.3 a total of 0-0-2-3-4 times". This means you work A.1 once, then A.2 is worked once, and A.3 is repeated (in width) the number of times provided for your size – in this case like so: S = 0 times, M = 0 times, L=2 times, XL= 3 times and XXL = 4 times.
The diagrams are worked as usual: begin with the first row in A.1, then work the first row in A.2 etc.
See DROPS lesson: How to read knitting diagrams
See DROPS lesson: How to read crochet diagrams
Why are the sleeves shorter in larger sizes?
The total width of the garment (from wrist-to-wrist) will be larger in the larger sizes, despite the actual sleeves being shorter. The larger sizes have longer sleeve caps and wider shoulders, so there will be a good fit in all sizes.
Where on the garment is the length measured?
The measurement sketch/schematic drawing provides information regarding the full length of the garment. If it’s a jumper or a jacket the length is measured from the highest point on the shoulder (usually closest to the neckline), and straight down to the bottom of the garment. It is NOT measured from the tip of shoulder. Similarly, the length of yoke is measured from the highest point on the shoulder and down to where yoke is split into body and sleeves.
See DROPS lesson: How to read a schematic drawing
What is a repeat?
Diagrams are often repeated on the round or in height. 1 repeat is the diagram the way it appears in the pattern. If it says to work 5 repeats of A.1 in the round, then you work A.1 a total of 5 times after/next to each other in the round. If it says to work 2 repeats of A.1 vertically/in height you work the entire diagram once, then begin again at the start and work the entire diagram one more time.
Why does the piece start with more chain stitches than it’s worked with?
Chain stitches are slightly narrower than other stitches and to avoid working the cast-on edge too tight, we simply chain more stitches to begin with. The stitch count will be adjusted on the following row to fit the pattern and measurement sketch.
Why increase before the rib edge when the piece is worked top-down?
The rib edge is more elastic and will contract slightly compared to, for example, stocking stitch. By increasing before the rib edge, you avoid a visible difference in width between the rib edge and the rest of the body.
Why increase in the cast-off edge?
It’s very easy to cast off too tightly, and by making yarn overs while casting off (and simultaneously casting these off) you avoid a too tight cast off edge.
See DROPS video: How to bind off with yarn overs (yo)
How do I increase/decrease on every 3rd and 4th row/round alternately?
To achieve an even increase (or decrease) you can increase on, for example: every 3rd and 4th row alternately, like so: work 2 rows and increase on the 3rd row, work 3 rows and increase on the 4th. Repeat this until the increase is complete.
See DROPS lesson: Increase or decrease 1 st on every 3rd and 4th row alternately
How can I work a jacket in the round instead of back and forth?
Should you prefer to work in the round instead of back and forth, you may of course adjust the pattern. You’ll need to add steeks mid-front (usually 5 stitches), and follow the instructions. When you would normally turn and work from the wrong side, simply work across the steek and continue in the round. At the end you’ll cut the piece open, pick up stitches to work bands, and cover the cut edges.
See DROPS video: How to knit steeks and cut open
Can I work a jumper back and forth instead of in the round?
Should you prefer to work back and forth instead of in the round, you may of course adjust the pattern so you work the pieces separately and then assemble them at the end. Divide the stitches for the body in 2, add 1 edge stitch in each side (for sewing) and work the front and back pieces separately.
See DROPS lesson: Can I adapt a pattern for circular needles into straight needles?
Why is the pattern slightly different than what I see in the photo?
Pattern repeats can vary slightly in the different sizes, in order to get the correct proportions. If you’re not working the exact same size as the garment in the photo, yours might deviate slightly. This has been carefully developed and adjusted so that the complete impression of the garment is the same in all sizes.
Make sure to follow instructions and diagrams for your size!
How do I make a women’s size garment into a men’s size one?
If you have found a pattern you like which is available in women’s size it’s not very difficult to convert it to men’s size. The biggest difference will be the length of sleeves and body. Start working on the women size that you think would fit across the chest. The additional length will be worked right before you cast off for the armhole/sleeve cap. If the pattern is worked top-down you can add the length right after the armhole or before the first decrease on sleeve.
Regarding additional yarn amount, this will depend on how much length you add, but it is better with a skein too many than too few.
How do I prevent a hairy garment from shedding?
All yarns will have excess fibres (from production) that might come off as lint or shedding. Brushed yarns (ie hairier yarns) have more of these loose, excess fibres, causing more shedding.
Shedding also depends on what is worn under or over the garment, and whether this pulls at the yarn fibres. It’s therefore not possible to guarantee that there will be no shedding
Below are some tips on how to get the best result when working with hairier yarns:
1. When the garment is finished (before you wash it) shake it vigorously so the looser hairs come off. NOTE: do NOT use a lint roller, brush or any method that pulls at the yarn.
2. Place the garment in a plastic bag and put it in your freezer - the temperature will cause the fibres to become less attached to each other, and excess fibres will come off easier.
3. Leave in the freezer for a few hours before taking it out and shaking it again.
4. Wash the garment according to the instructions on the yarn label.
Why does my garment pill?
Pilling is a natural process that happens to even the most exclusive of fibers. It's a natural sign of wear and tear that is hard to avoid, and that is most visible in high friction areas of your garment like a sweater's arms and cuffs.
You can make your garment look as new by removing the pilling, using a fabric comb or a pill/lint remover.
Shy Violet |
|||||||||||||||||||||||||
|
|
||||||||||||||||||||||||
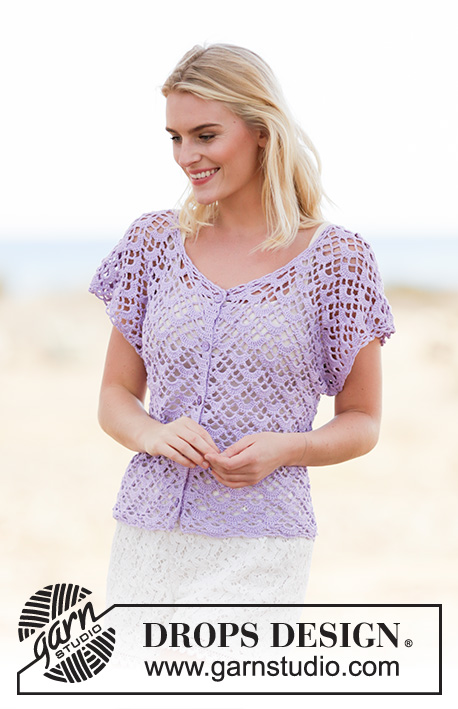
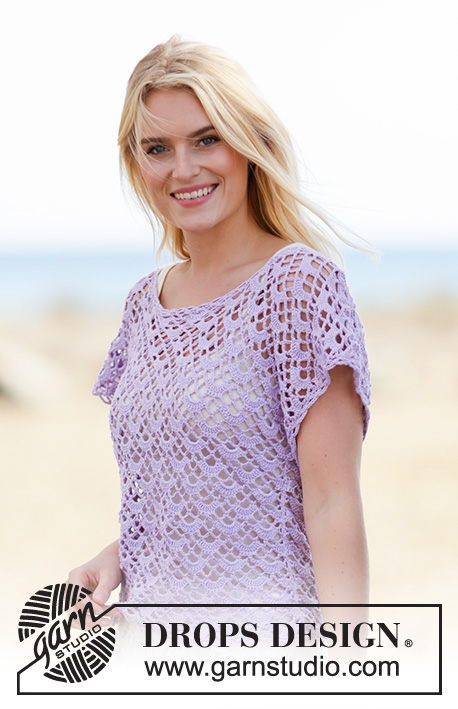
Crochet DROPS top with fan pattern, worked top down in ”Safran”. Size S- XXXL
DROPS 162-15 |
|||||||||||||||||||||||||
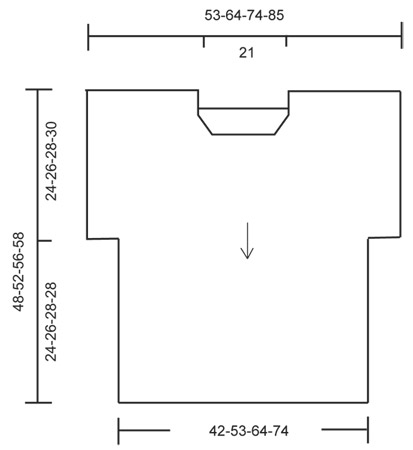
PATTERN: See diagrams A.1 to A.7. The diagrams show all rows in pattern seen from RS. ---------------------------------------------------------- FRONT PIECE: The piece is worked top down. Right shoulder: Work 69-92-114-137 ch (includes 3 ch to turn with) on hook size 3.5 mm/E/4 with Safran. ROW 1 (= WS): Work 1 dc in 4th ch from hook (= 2 dc), 1 dc in each of the next 5-3-5-3 ch, * skip ch 1, work 1 dc in each of the next 4 ch *, repeat from *-* the entire row = 55-73-91-109 dc. NOW MEASURE PIECE FROM HERE! Now work according to diagram, i.e. work as follows: ROW 1-6: (1st row = RS): Work A.1, A.2, A.3 2-3-4-5 times in total, A.4, A.5. REMEMBER THE CROCHET GAUGE! ROW 7 (= RS): Work last row in A.1-A.4 as before but finish with A.6 over A.5. Continue until A.6 has been worked 1 time vertically, in A.1-A.4 repeat rows in A.x. Cut the yarn. Work left shoulder as right shoulder, work A.7 over A.1. On last row in A.7 (= from WS) work 35 ch for neck at the end of row, fasten with 1 sl st in 3rd ch at beg of last row on right shoulder. Cut the yarn. Now work over all sts, beg from RS as follows: A.1, A.2, A.3 9-10-11-12 times in total, A.4, finish with A.5. Continue like this. When piece measures approx. 24-26-28-30 cm / 9½"-10 1/4"-11"-11 3/4" – adjust after 7th row, sleeves are done. Then work as follows, beg from WS: Skip 3 ch-space, beg by working in next sc as follows: A.5, A.4, A.3 7-8-9-10 times in total, A.2, finish with A.1 (do not work the last 3 ch-spaces). Continue like this until piece measures approx. 48-52-56-58 cm / 19"-20½"-22"-22 3/4", adjust after 5th row in diagram. Fasten off. BACK PIECE: Work left shoulder in ch-row from cast on edge (work in same ch as dc's, i.e. in the 55-73-91-109 dc) from left front piece as follows: ROW 1-6: (1st row = RS): Work A.1, A.2, A.3 2-3-4-5 times in total, A.4, A.5. Cut the yarn. Work right shoulder as left shoulder but in right front piece - NOTE! Instead of cutting the yarn work 71 ch for neck and fasten with 1 sl st in first ch at beg of last row on left shoulder. Cut the yarn. Now work over all sts the same way as on front piece. ASSEMBLY: Sew side and underarm seams in one. EDGES: Work an edge around the neck, beg from one shoulder as follows: ROUND 1: Work * 1 sc, 5 ch *, repeat from *-* along the neck with approx. 2 cm / 3/4'' between every sc, finish with 1 sl st in first sc. ROUND 2: ch 3, 1 sc in next ch-space, * ch 5, 1 sc in next ch-space *, repeat from *-* the entire round and finish with 3 ch and 1 sl st in first sc from beg of 1st round. Fasten off. Work an edge at the bottom along front and back piece the same way, beg from the side. Work an edge around the sleeve the same way, beg from mid under sleeve. |
|||||||||||||||||||||||||
Diagram explanations |
|||||||||||||||||||||||||
|
|||||||||||||||||||||||||
Have you made this or any other of our designs? Tag your pictures in social media with #dropsdesign so we can see them! Do you need help with this pattern?You'll find tutorial videos, a Comments/Questions area and more by visiting the pattern on garnstudio.com. © 1982-2024 DROPS Design A/S. We reserve all rights. This document, including all its sub-sections, has copyrights. Read more about what you can do with our patterns at the bottom of each pattern on our site. |
With over 40 years in knitting and crochet design, DROPS Design offers one of the most extensive collections of free patterns on the internet - translated to 17 languages. As of today we count 304 catalogs and 11422 patterns - 11417 of which are translated into English (US/in).
We work hard to bring you the best knitting and crochet have to offer, inspiration and advice as well as great quality yarns at incredible prices! Would you like to use our patterns for other than personal use? You can read what you are allowed to do in the Copyright text at the bottom of all our patterns. Happy crafting!
Comments / Questions (77)
Sharon wrote:
“When piece measures approx. 24-26-28-30 cm / 9½"-10 1/4"-11"-11 3/4" – adjust after 7th row, sleeves are done. “. I’m new to crochet, my question is how/what do you adjust if the measurements aren’t correct? The same applies later when it says “adjust after 5th row in diagram”. Thanks
28.06.2020 - 15:12DROPS Design answered:
Dear Sharon, if your tension in height is not exactly the right one, the most important is to finish after a row 7 in diagram (or later a row 5) so that the next row can be worked as explained - you might have then to work some cm fewer or less depending on your tension in height. Happy crocheting!
29.06.2020 - 08:28Lavenac Nathalie wrote:
Bonjour. Juste un petit commentaire pour vous remercier pour votre aide et vos conseils. J’ai terminé le devant et viens de commencer le dos. Cordialement.
08.06.2020 - 18:40Jeanette wrote:
När man virkat ihop höger och vänster Axel står det att det ska vara 48 cm innan man börjar virka i uppläggningskanten. På filmen är det inte det. Det ser ut att vara 24 cm om man räknar varven. Har jag missuppfattat något?
02.06.2020 - 17:44DROPS Design answered:
Hej Jeanette, vi virkar alla delar av tröjan. Men vi virkar inte hela tröjan, det som upprepas måske du följa enligt mönstret. Lycka till :)
05.06.2020 - 14:57Hupsis wrote:
Mielestäni takakappaleen kaula-aukon lisäyssilmukkamäärä 71 on väärin. Siinä tulee 1 viuhkakuvio liikaa kokonaismäärään ja vrt etukappaleeseen + viuhkakuviot eivät täsmää edellisten kanssa. Itse vähensin siitä 1 viuhkakuvion (3 ktjs lenkkiä) ja tein siihen väliin 57 ktjs ja sain sillä kuviot täsmäämään. Muuten hyvä ja selkeä ohje.
25.05.2020 - 09:00Belen Espejo wrote:
Buenos dias, tengo un par de preguntas. Los 24 cm que tiene que medir el delantero para finalizar la manga son desde el hombro o desde el escote? La segunda es como saltar tres arcos al inicio de una fila una vez acabadas las mangas. Hay que cortar el hilo? Muchas gracias. Belen.
21.09.2019 - 21:10DROPS Design answered:
Hola Belen. La medida para la manga es desde el borde de montaje ( es decir desde el hombro). Para saltar tres arcos es mejor que cortes el hilo y continues la labor en el siguiente punto bajo según el patrón.
17.10.2019 - 19:57Belen Espejo wrote:
Los grupos de puntos altos me quedan una vuelta del derecho y otra del revés, que estoy haciendo mal? Muchas gracias. Belen.
12.09.2019 - 18:28DROPS Design answered:
Hola Belen. Sin ver la labor no se puede saber donde está el fallo. Puedes contactar con la tienda Drops más cercana para obtener ayuda más personalizada.
17.11.2019 - 19:53Anneke wrote:
Ik kom er nog niet goed uit moet ik de schouder delen haken over A_1,2,3,4,5 en voor de rechterschouder A6 er gelijk aan vast??? Want ik heb het eerste gedeelte gehaat over 137 st. Tot toer 7 maar hoe krijg ik patroon 6 er dan aan vast ,ik weet dat ik iets verkeerd doe maar wat zit er al de hele dag mee te vechten.
31.03.2019 - 18:27DROPS Design answered:
Dag Anneke,
Pas vanaf toer 7 haak je A.6 boven A.5. A.6 begint boven de vaste van A.5 (zie pijl onderaan bij A.6) en elke toer wordt A.6 wijder zodat de hals gevormd wordt.
09.04.2019 - 21:25Anneke wrote:
Dank u wel voor het snelle antwoord ik kan verder een fijne dag
31.03.2019 - 11:40Anneke wrote:
Hoe is het mogelijk bij 162-15 shy violet dat je bij het opzetten137 steken moet hebben en na 1 toer er 109 overhoud je volgens het patroon verder moet gaan en het schema A1- A2-A3 5 x moet herhalen dat kan toch niet en dan moet A 4 en A 5 nog gedaan worden volgens mijn berekening heb je veel tekort steken zou daar graag antwoord op hebben dank u
30.03.2019 - 20:18DROPS Design answered:
Dag Anneke,
Je haakt eerst A.1 en A.2 en dan haak je A.3 5 keer en daarna A.4 en A.5 (dus alleen A.3 haak je 5 keer; de anderen 1 keer).
31.03.2019 - 11:26Anneke Van Weert wrote:
Volgens het patroon op papier moet je ongeveer 100 st.opzetten en volgens patroon haken maar de video laat zien dat je 2 apparte delen haak en dan aan elkaar haak ik snap het niet erg heb het hele patroon doorgelezen ku t u mij helpen ?????
30.03.2019 - 18:31DROPS Design answered:
Dag Anneke,
Je haakt inderdaad eerst de rechter en dan de linker schouder, van boven naar beneden en daarna breng je beide delen samen om het voorpand in zijn geheel te haken. In de video kun je zien hoe beide delen samengebracht worden.
31.03.2019 - 11:30