
Popular categories
Looking for a yarn?


|
|||||||||||||||||||
Too Much Fun |
|||||||||||||||||||
 |
 |
||||||||||||||||||
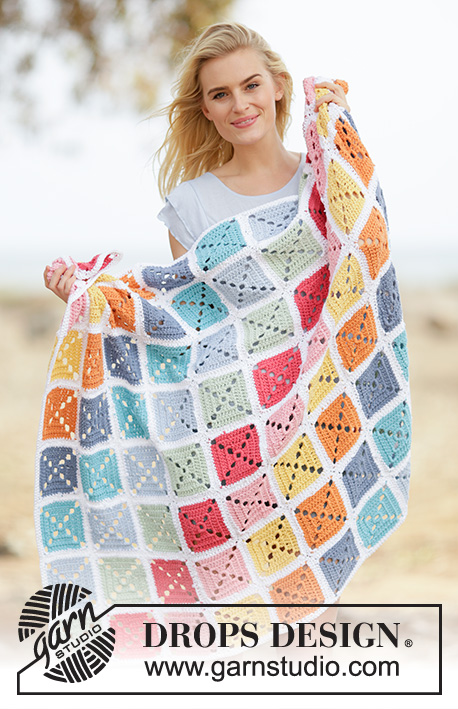
Crochet DROPS rainbow blanket with squares in ”Paris”.
DROPS 162-4 |
|||||||||||||||||||
|
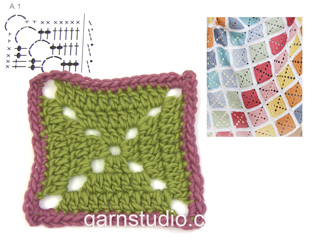
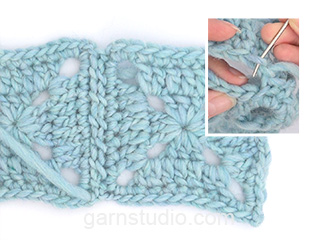
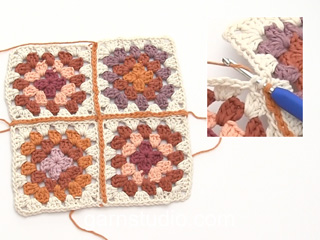
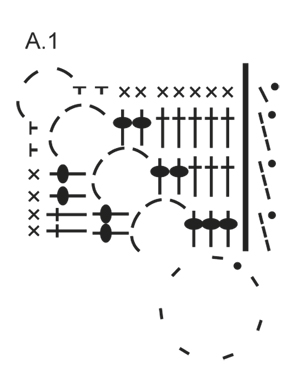
SQUARES: SQUARE 1 = light mint green, color no 21. SQUARE 2 = vanilla, color no 35. SQUARE 3 = light pink, color no 20. SQUARE 4 = gray blue, color no 30. SQUARE 5 = light wash, color no 100. SQUARE 6 = light turquoise, color no 02. SQUARE 7 = raspberry, color no 38. SQUARE 8 = dusty orange, color no 45. Work 11 squares with every color = 88 squares in total. CROCHET INFO: Beg every round with dc with 3 ch (replace first dc) and finish with 1 sl st in 3rd ch on round. Beg every round with sc with 1 ch (replace first sc) and finish with a sl st in first ch on round. COLOR CHANGE: To get a nice transition between the color changes, work last sl st on round with the new color as follows: Insert hook in 3rd ch from beg of round, get the new yarn, make a YO with the new color and pull it through st on hook. PATTERN: See diagrams A.1-A.2. Diagram A.1 is repeated 4 times in total on round. ---------------------------------------------------------- BLANKET: Blanket consists of 8 colors - READ SQUARES - and white. SQUARE: Work 7 ch on hook size 5 mm / H/8 with Paris and form a ring with 1 sl st in first ch. ROUND 1: See diagram A.1. Work 3 ch - READ CROCHET INFO, * 3 dc in ch-ring, 4 ch *, repeat from *-* a total of 4 times = 12 dc. REMEMBER THE CROCHET GAUGE! ROUND 2: Work * 1 dc in each of the first 3 dc, 2 dc in ch-space, ch 4, 2 dc in same ch-space *, repeat from *-* 4 times in total = 28 dc. ROUND 3: Work * 1 dc in each of the first 5 dc, 2 dc in ch-space, ch 4, 2 dc in same ch-space, 1 dc in each of the next 2 dc *, repeat from *-* 4 times in total = 44 dc. ROUND 4: Switch to white - READ COLOR CHANGE! Work * 1 sc in each of the first 7 dc, 2 sc in ch-space, ch 3, 2 sc in same ch-space, 1 sc in each of the next 4 dc *, repeat from *-* 4 times in total = 60 sc. Fasten all strands. ASSEMBLY: Sew blanket tog with 8 squares in height and 11 squares in length. Sew one and one strip tog with white in outer loops of edge sts alongside, then sew tog all strips in width. CROCHET EDGE: Work an edge around the blanket on hook size 5 mm / H/8 with white as follows: 1 sc in every sc, 3 sc in every ch-space, in each corner work 2 sc in ch-space, ch 3, 2 sc in same ch-space, finish with 1 sl st in first ch. Fasten off. |
|||||||||||||||||||
Diagram explanations |
|||||||||||||||||||
|
|||||||||||||||||||
|
|||||||||||||||||||

|
|||||||||||||||||||
|
Have you made this or any other of our designs? Tag your pictures in social media with #dropsdesign so we can see them! Do you need help with this pattern?You'll find tutorial videos, a Comments/Questions area and more by visiting the pattern on garnstudio.com. © 1982-2024 DROPS Design A/S. We reserve all rights. This document, including all its sub-sections, has copyrights. Read more about what you can do with our patterns at the bottom of each pattern on our site. |
|||||||||||||||||||


With over 40 years in knitting and crochet design, DROPS Design offers one of the most extensive collections of free patterns on the internet - translated to 17 languages. As of today we count 304 catalogs and 11422 patterns - 11417 of which are translated into English (US/in).
We work hard to bring you the best knitting and crochet have to offer, inspiration and advice as well as great quality yarns at incredible prices! Would you like to use our patterns for other than personal use? You can read what you are allowed to do in the Copyright text at the bottom of all our patterns. Happy crafting!
Comments / Questions (28)
Pour une finition plus jolie et à mon goût, j'ai fait un rang de mailles serrées en plus autour du plaid et j'ai fini par un rang de coquilles simples .
08.06.2018 - 16:41Hejsa. Jeg er gået i gang med at hækle tæppet, men jeg mangler den farve der hedder: nr.45, lys orange. Jeg kan heller ikke finde den herinde på jeres website :-) Håber i kan hjælpe
15.04.2018 - 14:29Bonjour, j'ai fait tout les carrés mais je n'arrive pas à faire un assemblage qui soit joli. Pouvez vous m'expliquer comment faire? Sinon c'est un très joli modèle Merci
01.11.2015 - 17:18DROPS Design answered:
Bonjour Françoise, la vidéo ci-dessous montre comment assembler les carrés entre eux - faites la couture en blanc et assemblez d'abord les motifs en longueur (= hauteur), puis assemblez les bandes obtenues entre elles (suivez bien le schéma des couleurs). Bon assemblage!
02.11.2015 - 09:20Ik bedoelde 3 bollen van een kleur in plaats van 4 per kleur, omdat ik twee dekens ga maken. Vaak houd je wat over, en ik kon niet inschatten hoeveel dat was. Dit omdat ik sommige van de kleuren twee keer ga gebruiken, voor beide dekens zeg maar.
06.08.2015 - 17:03Hej! Vill bara tala om att färg 45 ljus orange har utgått från sortimentet det borde ni veta själva och ger annat förslag på orange färg i ert egen mönster. Jag tog vanlig orange och hoppas det blir bra... gillar era bomullsfiltar annars. Hoppas på fler nya bomullsfiltar! Mvh Malin
29.07.2015 - 22:03Graag zou ik twee dekens maken voor mijn zussen. Er is een grote overlap in de kleuren. Kan ik dan ook drie bollen Paris bestellen? Of kom ik dan garen tekort? Heel erg bedankt voor de reactie, Nancy van Geer
16.07.2015 - 21:32DROPS Design answered:
Hoi Nancy. Voor het deken heb je in totaal 23 bollen nodig, dus wat bedoel je met 3 bollen bestellen?
29.07.2015 - 14:48Når jeg skal sy ruderne sammen så kan jeg ikke helt finde ud af om jeg skal sy dem sammen på ret siden eller vrang siden - jeg er forholdsvis nybegynder så I jeres sy sammen video synes jeg ikke at jeg kan se hvilken side der er valgt - er det ikke mærkeligt at sy sammen på "forsiden" som jeg umiddelbart tror man skal?
16.07.2015 - 21:25DROPS Design answered:
Hej Ditte, Sy den sammen fra retsiden, det bliver super fint! God fornøjelse!
29.07.2015 - 15:44Ok, jeg gir meg. Og repeterer et godt gammelt råd: les HELE oppskriften før du begynner😀
30.05.2015 - 13:15Takk for svar, men jeg tror ikke det kan stemme. Som sagt går det 1nøste hvitt pr 8 ruters rekke, dvs minimum 8 nøster der. Har heklet to rekker nå. Hvor mye skal jeg beregne til kanten rundt? Jeg må nemlig etterbestille uansett og vil gjerne gjøre det i en bestilling for å slippe enda mer frakt.....
26.05.2015 - 20:45DROPS Design answered:
Hej Helle, Hvor mange hvide nøgler har du tilbage når du har hæklet alle ruderne? Der kan ikke gå et helt nøgle til at sy en række sammen med... syr du sammen på samme måde som vi viser i videoen?
27.05.2015 - 12:27Hei! Er det beregnet for lite mengde av hvit i oppskriften? Jeg hekler med Drops for you 5 og det gikk med ett hvitt nøste til en remse ( 8 ruter) og oppskriften sier 11 remser
24.05.2015 - 12:08DROPS Design answered:
Hej Helle, Du bør klare dig med 7 nøgler hvid ifølge opskriften. Sig gerne til hvor mange du har brugt når du er klar. God fornøjelse!
25.05.2015 - 09:52