
Popular categories
Looking for a yarn?


|
||||||||||||||||||||||||||||||||||||||||
Amanecer |
||||||||||||||||||||||||||||||||||||||||
 |
 |
|||||||||||||||||||||||||||||||||||||||
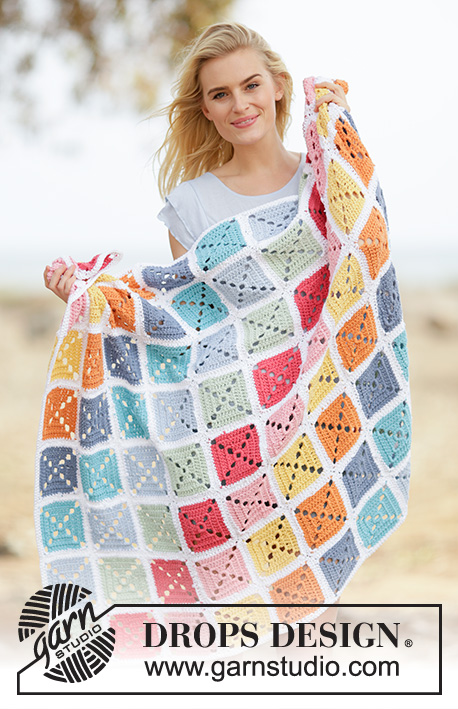
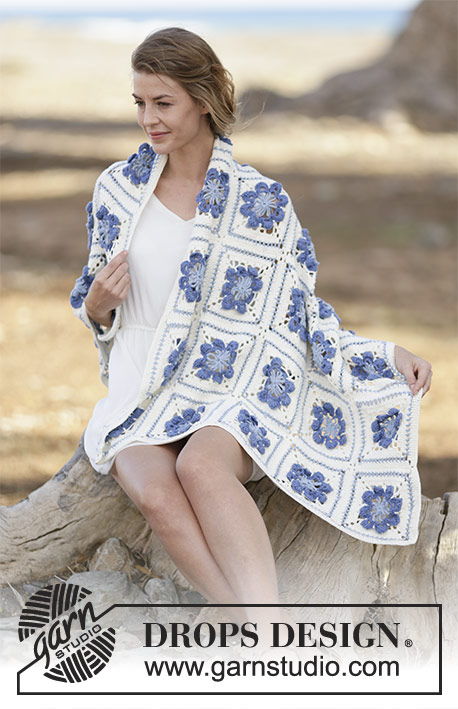
Crochet DROPS blanket with flower squares in ”Cotton Merino”.
DROPS 162-40 |
||||||||||||||||||||||||||||||||||||||||
|
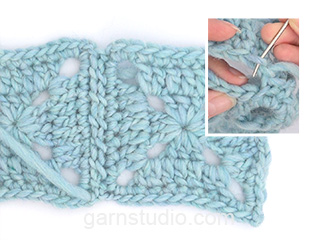
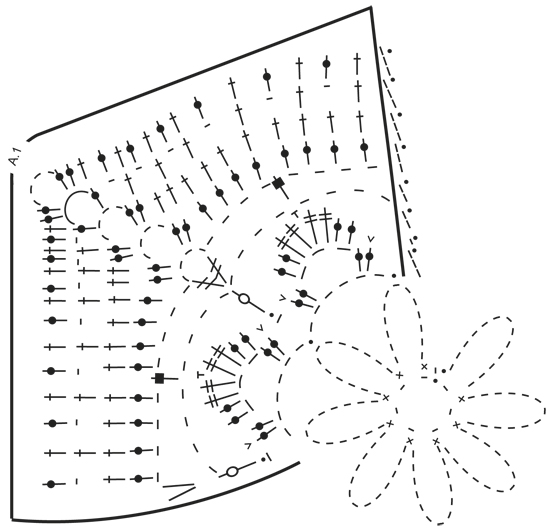
PICOT: Work 2 ch, 1 dc in the 2nd ch from hook. COLOUR CHANGE: To get a nice transition between the colour changes, work last sl st on round with the new colour as follows: Insert hook in last ch from beg of round, get the new yarn, make a YO with the new colour and pull it through st on hook. PATTERN: See diagram A.1. After 1st round, repeat A.1 4 times in total in width. ---------------------------------------------------------- BLANKET: Worked in squares that are worked tog at the end. SQUARE: Work 7 ch on hook size 3 mm with ice blue and form a ring with 1 sl st in first ch - see diagram A.1. ROUND 1: Work 1 ch, * 1 dc in ch-ring, 13 ch *, repeat from *-* a total of 8 times, finish with 1 sl st in first ch = 8 ch-spaces. Fasten off. Switch colour to denim blue. ROUND 2: Work 1 sl st in first ch-space, 6 ch, * 1 sl st in next ch-space, 6 ch *, repeat from *-* a total of 7 times, finish with 1 sl st in first sl st = 8 ch-spaces. REMEMBER THE CROCHET TENSION! ROUND 3: Work 3 ch, * work 2 tr in next ch-space, 3 ch, 2 tr in same ch-space, 1 ch *, repeat from *-* 8 times in total, finish with 1 sl st in 3rd ch = 32 tr. ROUND 4: Work 1 ch, * 1 dc in first/next tr, skip 1 tr, in next ch-space work as follows: 2 tr, 2 dtr, 1 PICOT – see explanation above, 2 dtr, 2 tr, skip 1 tr, 1 dc in next tr, 1 sl st in next ch st *, repeat from *-* 8 times in total, finish with 1 sl st in first ch = 8 leaves. Switch to off white - READ COLOUR CHANGE! ROUND 5: Work 2 ch, * 8 ch, 1 htr in ch on 3rd round *, repeat from *-* 8 times in total, finish with 1 sl st in 2nd ch = 8 ch-space. Spaces are folded behind the leaves on 4th round. ROUND 6: Work 2 ch, * 4 ch, 1 htr in ch-space, 4 ch, 1 dtr in next htr, 4 ch, 1 dtr in same htr, 4 ch, 1 htr in next ch-space, 4 ch, 2 htr in next htr *, repeat from *-* 4 times in total, finish with 1 sl st in 2nd ch. ROUND 7: Work 3 ch, * 4 tr in ch-space, skip 1 htr, work 4 tr in next ch-space, skip 1 dtr, 2 tr in next ch-space, 4 ch, 2 tr in same ch-space, skip 1 dtr, 4 tr in next ch-space, skip 1 htr, 4 tr in next ch-space, skip 2 htr *, repeat from *-* 4 times in total, finish with 1 sl st in 3rd ch = 80 tr. ROUND 8: Work 3 ch, * 1 tr in each of the next 10 tr, 2 tr in ch-space, 4 ch, 2 tr in same ch-space, 1 tr in each of the next 10 tr *, repeat from *-* 4 times in total, finish with 1 sl st in 3rd ch = 96 tr. ROUND 9: Switch colour to ice blue. Work 3 ch, ** * 1 tr in first/next tr, 1 ch, skip 1 tr *, repeat from *-* 6 times in total, 1 tr in ch-space, 6 ch, 1 tr in same ch-space, 1 ch, * 1 tr in next tr, 1 ch, skip 1 tr *, repeat from *-* 6 times in total **, repeat from **-** 4 times in total, finish with 1 sl st in 3rd ch = 56 tr. ROUND 10: Switch colour to off white. Work 3 ch, ** *1 tr in first/next tr, 1 tr in next ch *, repeat from *-* 6 times in total, 1 tr in next tr, 2 tr in next ch-space (= corner), 4 ch, 2 tr in same ch-space,* 1 tr in next tr, 1 tr in next ch *, repeat from *-* 7 times in total **, repeat from **-** 4 times in total = 124 tr and 4 ch-space (= corners). Work 40 squares in total. Fasten all threads. ASSEMBLY: Sew one and one strip tog with off white in outer loops of edge sts alongside with 8 squares in total in length (= 5 strips in total with squares), then strips tog in width. CROCHET EDGE: Work an edge around the blanket on hook size 3 mm with off white as follows: 3 ch (replace first tr), 1 tr in every tr, 3 tr in every ch-space, in each corner work 2 tr in ch-space, 4 ch, 2 tr in same ch-space, finish with 1 sl st in 3rd ch. Fasten off. |
||||||||||||||||||||||||||||||||||||||||
Diagram explanations |
||||||||||||||||||||||||||||||||||||||||
|
||||||||||||||||||||||||||||||||||||||||
|
||||||||||||||||||||||||||||||||||||||||
|
Have you made this or any other of our designs? Tag your pictures in social media with #dropsdesign so we can see them! Do you need help with this pattern?You'll find tutorial videos, a Comments/Questions area and more by visiting the pattern on garnstudio.com. © 1982-2024 DROPS Design A/S. We reserve all rights. This document, including all its sub-sections, has copyrights. Read more about what you can do with our patterns at the bottom of each pattern on our site. |
||||||||||||||||||||||||||||||||||||||||


With over 40 years in knitting and crochet design, DROPS Design offers one of the most extensive collections of free patterns on the internet - translated to 17 languages. As of today we count 304 catalogues and 11422 patterns - 11422 of which are translated into English (UK/cm).
We work hard to bring you the best knitting and crochet have to offer, inspiration and advice as well as great quality yarns at incredible prices! Would you like to use our patterns for other than personal use? You can read what you are allowed to do in the Copyright text at the bottom of all our patterns. Happy crafting!
Comments / Questions (6)
Hallo, Ich habe auch noch eine kleine Frage zur 9. Runde: wie oft arbeite ich die 6 Lm? Nur an den Ecken und ansonsten die Stäbchen oder auch in der Mitte nach den 6 Stäbchen?
27.05.2016 - 21:45DROPS Design answered:
Liebe Susanne, Antwort siehe unten.
30.05.2016 - 09:25Hallo, Ich habe auch noch eine kleine Frage zur 9. Runde: wie oft arbeite ich die 6 Lm? Nur an den Ecken und ansonsten die Stäbchen oder auch in der Mitte nach den 6 Stäbchen?
25.05.2016 - 17:51DROPS Design answered:
Liebe Susanne, die 6 Stb sind nur an den Ecken.
30.05.2016 - 09:20Hallo, Ich habe mal eine Frage zum Zusammennähen zum Schluss. Das leuchtet irgendwie nicht richtig ein. 8 Quadrate zusammennähen, aber dazwischen ist doch ein zwischenraum oder werden die Quadrate tatsächlich direkt zusammengenäht?
25.05.2016 - 17:20DROPS Design answered:
Liebe Susanne, die Quadrate werden ohne Zwischenraum direkt zusammengenäht.
30.05.2016 - 09:18Ik vind het mooier om in de lichtblauwe rand 4 lossen te haken op de hoeken. De lossen die je haakt aan het begin van elke toer moeten meestal worden gezien als het 1e stokje. Anders kom je niet uit c.q. je meerdert in elke ronde 1 steek. Verder vind ik dat de hoeveelheid garen erg krap is aangegeven. Ecru en donkerblauw heb ik moeten bijbestellen, terwijl ik al meer had gekocht dan volgens de beschrijving nodig was... Maar het wordt een schitterende deken!
07.04.2015 - 12:53Klopt het dat er in toer 9 op de hoeken 6 lossen worden gehaakt? Het lijkt mij dat het 4 lossen moeten zijn, net als in de andere toeren zijn. Met 6 lossen wordt het gaatje op de hoeken van toer 9 ineens groter...
24.02.2015 - 16:10DROPS Design answered:
Hoi Monique. Ja, het moet 6 l zijn. Je mag het natuurlijk altijd aanpassen als je dat zelf mooier vindt.
09.03.2015 - 14:42é lindo e quero fazer!
28.01.2015 - 15:59