
Popular categories
Looking for a yarn?


|
|||||||||||||||||||||||||
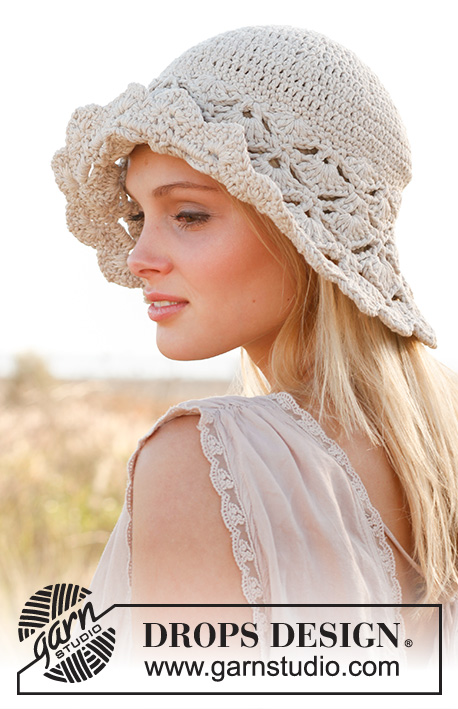
Summer Dream |
|||||||||||||||||||||||||
 |
 |
||||||||||||||||||||||||
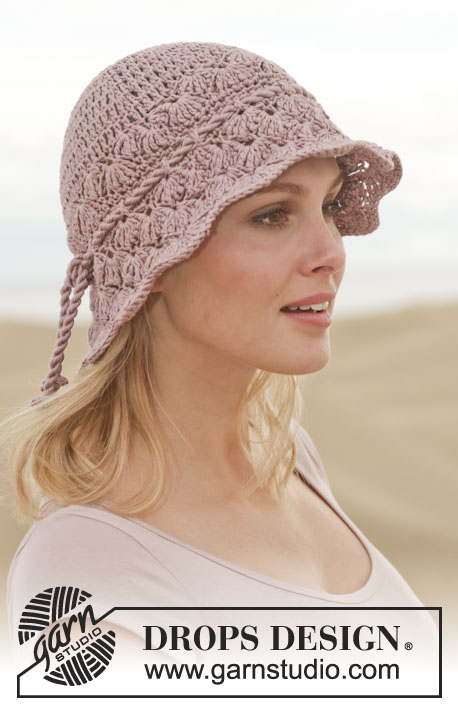
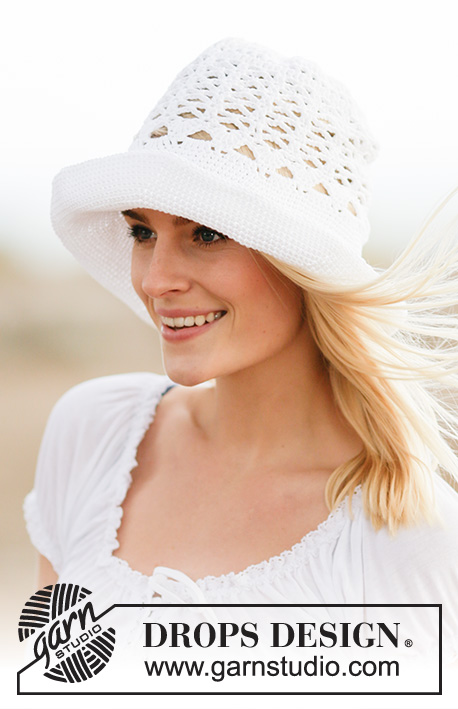
Crochet DROPS hat with lace pattern in ”Muskat”.
DROPS 162-30 |
|||||||||||||||||||||||||
|
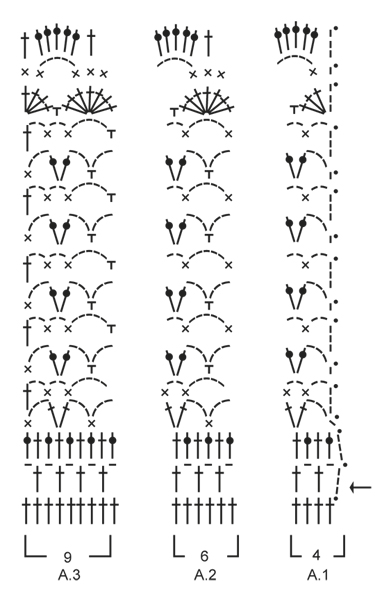
PATTERN: See diagrams A.1 to A.3. ---------------------------------------------------------- HAT: Worked in the round. Work 6-6 ch with Muskat on hook size 3.5 mm and form a ring with 1 sl st. ROUND 1: Work 3 ch (= 1 dc), * ch 2, 1 dc in ch-space *, repeat *-* 6 more times, ch 2, finish with 1 sl st in 3rd ch on round = 8-8 ch-spaces. ROUND 2: Work 1 sl st in 1st ch, 3 ch (= 1 dc), 2 dc in ch-space, * ch 1, 3 dc in next ch-space *, repeat from *-* 6 more times, ch 1, 1 sl st in 3rd ch on round. ROUND 3: Work ch 1, 1 sc in next dc, * ch 3, 1 sc in next ch-space, ch 3, skip 1 dc, 1 sc in next dc *, repeat from *-* 6 more times, ch 3, 1 sc in next ch-space, ch 3, 1 sl st in first sc on round = 16-16 ch-spaces. ROUND 4: 1 sl st in first ch, 3 ch (= 1 dc), 2 dc in ch-space, * ch 1, 3 dc in next ch-space *, repeat from *-* 15 more times, ch 1, 1 sl st in 3rd ch on round. REMEMBER THE CROCHET GAUGE! ROUND 5: Work ch 1, 1 sc in next dc, * ch 3, 1 sc in next ch-space, ch 3, skip 1 dc, 1 sc in next dc *, repeat from *-* 14 more times, ch 3, 1 sc in next ch-space, ch 3, 1 sl st in first sc on round = 32-32 ch-spaces. ROUND 6: 1 sl st in first ch, 3 ch (= 1 dc), 2 dc in ch-space, * ch 1, 3 dc in next ch-space *, repeat from *-* 31 more times, ch 1, 1 sl st in 3rd ch on round. There are now 96-96 dc on round. ROUND 7: Work 1 dc in every dc AT THE SAME TIME inc 1-7 dc evenly = 97-103 dc. Size S/M is now done, continue with M/L as follows: ROUND 8: Work 1 dc in every dc. Then work PATTERN as follows: Work A.1 over the first 4 dc, A.2 (= 6 dc) until 9 dc remain on round, A.3 over the last 9 dc, finish round with 1 sl st as shown in diagram. Continue like this until A.1-A.3 have been worked vertically. Piece measures approx. 17-18 cm / 6 3/4"-7''. BRIM: Now work a brim in sc as follows: NOTE: On every third round, i.e. every round without inc, beg round with 1 ch. Finish round with 1 sl st in 1st ch on round. ROUND 1: 1 ch and 1 sc in first dc, * 2 sc in next dc, 1 sc in each of the next 15-16 dc *, repeat from *-* the rest of round, 1 sl st in first ch on round = 103-109 sc. ROUND 2: 1 ch and 1 sc in first sc, * 2 sc in next sc, 1 sc in each of the next 16-17 sc *, repeat from *-* the rest of round, 1 sl st in first ch on round = 109-115 sc. ROUND 3: 1 sc in every sc = 109-115 sc. ROUND 4: 1 ch and 1 sc in first sc, * 2 sc in next sc, 1 sc in each of the next 17-18 sc *, repeat from *-* the rest of round, 1 sl st in first ch on round = 115-121 sc. ROUND 5: 1 ch and 1 sc in first sc, * 2 sc in next sc, 1 sc in each of the next 18-19 sc *, repeat from *-* the rest of round, 1 sl st in first ch on round = 121-127 sc. ROUND 6: 1 sc in every sc = 121-127 sc. ROUND 7: 1 ch and 1 sc in first sc, * 2 sc in next sc, 1 sc in each of the next 19-20 sc *, repeat from *-* the rest of round, 1 sl st in first ch on round = 127-133 sc. ROUND 8: 1 ch and 1 sc in first sc, * 2 sc in next sc, 1 sc in each of the next 20-21 sc *, repeat from *-* the rest of round, 1 sl st in first ch on round = 133-139 sc. ROUND 9: 1 sc in every sc = 133-139 sc. ROUND 10: 1 ch and 1 sc in first sc, * 2 sc in next sc, 1 sc in each of the next 21-22 sc *, repeat from *-* the rest of round, 1 sl st in first ch on round = 139-145 sc. ROUND 11: 1 ch and 1 sc in first sc, * 2 sc in next sc, 1 sc in each of the next 22-23 sc *, repeat from *-* the rest of round, 1 sl st in first ch on round = 145-151 sc. ROUND 12: 1 sc in every sc = 145-151 sc. ROUND 13: 1 ch and 1 sc in first sc, * 2 sc in next sc, 1 sc in each of the next 23-24 sc *, repeat from *-* the rest of round, 1 sl st in first ch on round = 151-157 sc. ROUND 14: 1 ch and 1 sc in first sc, * 2 sc in next sc, 1 sc in each of the next 24-25 sc *, repeat from *-* the rest of round, 1 sl st in first ch on round = 157-163 sc. ROUND 15: 1 sc in every sc = 157-163 sc. ROUND 16: 1 ch and 1 sc in first sc, * 2 sc in next sc, 1 sc in each of the next 25-26 sc *, repeat from *-* the rest of round, 1 sl st in first ch on round = 163-169 sc. ROUND 17: 1 ch and 1 sc in first sc, * 2 sc in next sc, 1 sc in each of the next 26-27 sc *, repeat from *-* the rest of round, 1 sl st in first ch on round = 169-175 sc. ROUND 18: 1 sc in every sc = 169-175 sc. ROUND 19: 1 ch and 1 sc in first sc, * 2 sc in next sc, 1 sc in each of the next 27-28 sc *, repeat from *-* the rest of round, 1 sl st in first ch on round = 175-181 sc. ROUND 20: 1 ch and 1 sc in first sc, * 2 sc in next sc, 1 sc in each of the next 28-29 sc *, repeat from *-* the rest of round, 1 sl st in first ch on round = 181-187 sc. ROUND 21: 1 sc in every sc = 181-187 sc. ROUND 22: 1 ch and 1 sc in first sc, * 2 sc in next sc, 1 sc in each of the next 29-30 sc *, repeat from *-* the rest of round, 1 sl st in first ch on round = 187-193 sc. ROUND 23: 1 ch and 1 sc in first sc, * 2 sc in next sc, 1 sc in each of the next 30-31 sc *, repeat from *-* the rest of round, 1 sl st in first ch on round = 193-199 sc. ROUND 24: ch 1, * 1 sc, 1 ch in every sc *, repeat from *-* the entire round and finish with 1 sl st in first ch on round = 193-199 sc. Fasten off. |
|||||||||||||||||||||||||
Diagram explanations |
|||||||||||||||||||||||||
|
|||||||||||||||||||||||||
|
|||||||||||||||||||||||||
|
Have you made this or any other of our designs? Tag your pictures in social media with #dropsdesign so we can see them! Do you need help with this pattern?You'll find tutorial videos, a Comments/Questions area and more by visiting the pattern on garnstudio.com. © 1982-2024 DROPS Design A/S. We reserve all rights. This document, including all its sub-sections, has copyrights. Read more about what you can do with our patterns at the bottom of each pattern on our site. |
|||||||||||||||||||||||||


With over 40 years in knitting and crochet design, DROPS Design offers one of the most extensive collections of free patterns on the internet - translated to 17 languages. As of today we count 304 catalogs and 11422 patterns - 11417 of which are translated into English (US/in).
We work hard to bring you the best knitting and crochet have to offer, inspiration and advice as well as great quality yarns at incredible prices! Would you like to use our patterns for other than personal use? You can read what you are allowed to do in the Copyright text at the bottom of all our patterns. Happy crafting!
Comments / Questions (23)
After Round 7, pattern states that “Size S/M is now done”. What is the next instruction for size S/M?
02.09.2021 - 21:28DROPS Design answered:
Dear Mrs Fitz, you just skip the row 8 and continue with Then work PATTERN as follows (with A.1, A.3, A.3). Happy crocheting!
03.09.2021 - 07:20Thank you for that clarification. I have not seen the instruction set out like that before. I interpreted 6-6 6 chain to be 6 times 6 chain. Thank you.
02.09.2021 - 14:30I must have something wrong on the foundation round before round 1.I have 6 loops of 6ch joined in a circle with a slip stitch at the base of the first loop. Is this correct?
01.09.2021 - 23:15DROPS Design answered:
Dear Mrs Fitz, you begin the hat with a ring of chain, ie crochet 6 chains and join with a slip stitch in the first chain crocheted = you have the ring of chains you will then work around on round 1. Can this help?
02.09.2021 - 08:37I need help with start of 162-30.Does 1st instruction create 6by6ch loops joined in circle by sl st into base of 1st loop? Please explain Round1.I ended up with 7 chain spaces & Round 1 was tighter than the previous round. I must have misinterpreted the instructions. Please clarify. Many thanks.
31.08.2021 - 21:15DROPS Design answered:
Dear Mrs Fitz, you should have a total of 8 chain-spaces at the end of the round, you work first 3 ch to replace 1st treble, then (2 chains, 1 treble) a total of 7 times, then end the round with 2 chains and 1 sl st in the 3rd ch from beg of round = 8 ch-space. Can this help?
01.09.2021 - 07:09Buongiorno, avrei bisogno di un aiuto con lo schema. Nel primo giro n°6, mi ritrovo con 127 m.a. anzichè 96. Non capisco perchè. Lo schema dice: 1cat+3ma (=4 mg) per ogni arco di catenelle (31x4mg=124+3 mg inizali=127mg). Potete aiutarmi a capire dove sbaglio? Grazie
13.08.2019 - 20:17DROPS Design answered:
Buongiorno Adria. Il conteggio delle maglie fa riferimento alle sole maglie alte. Faremo correggere un piccolo errore: le istruzioni tra * vanno lavorate in tutto 31 volte e non altre 31 volte. In questo ci sono 31 x 3 + le 2 maglie alte e le 3 cat iniziali (1 maglia alta) = 96 maglie alte. Buon lavoro!
14.08.2019 - 07:53Bonjour, j'ai fait mon échantillon. Mon fil et un crochet 3.5 me permet d'arriver exactement aux bonnes dimensions. Mais problème: après le rang 6, mon ouvrage gondole ! J'ai le bon nombre de points (96 brides à la fin du 6ème rang). Comment est-ce possible? Merci !
30.06.2019 - 00:37DROPS Design answered:
Bonjour Cathy, veillez bien à ce que les mailles en l'air entre les brides ne soient pas trop lâches, elles doivent toujours avoir la même largeur qu'une bride. Il est délicat de trouver ainsi pourquoi votre ouvrage gondole, il sera bien plus simple de montrer votre ouvrage (même par mail) au magasin où vous avez acheté votre fil, on pourra ainsi mieux vous renseigner. Bon crochet!
01.07.2019 - 07:09Buongiorno, ho acquistato il vostro filato per realizzare questo cappello. Ho aumentato di 7 maglie alte al settimo giro e il lavoro proseguiva in modo perfetto ma era troppo grande, allora sono tornata indietro e ho aumentato di 1 maglia e nulla non mi ritrovo a fine lavoro, posso evitare di aumentare e continuare con le 96 maglie del sesto giro? Grazie.
11.03.2019 - 11:10DROPS Design answered:
Buongiorno Giovanna. Il numero delle maglie dovrebbe restare quello indicato per consentire la corretta lavorazione dei diagrammi. Buon lavoro!
11.03.2019 - 14:15Hi it says to crochet the gauge but I can’t see where the gauge is. Please tell me where the gauge is. Thanks and best Regards Hannelise
08.02.2019 - 00:29DROPS Design answered:
Dear Mrs Le Lagadec, you will find the gauge under the header, together with sizes and required yarn and crochet hook size, ie 20 tr (Uk-terminology)/dc (US-terminology) x 10 rows = 10 x 10 cm. Happy crocheting!
08.02.2019 - 09:12I love this hat. Could it be crochet in crocheting thread maybe size 3 or a cotton yarn.
15.07.2018 - 08:57Vraagje , blijft de rand van de hoed goed zitten, zodat deze goed als zonnehoed gebruikt kan worden ? Of is die daar te dik voor?
29.05.2017 - 15:27DROPS Design answered:
Hoi Corrie, Je zou wat stijfsel kunnen gebruiken om de rand in vorm te houden.
29.05.2017 - 15:36