DROPS Belle
DROPS Belle
53% Cotton, 33% Viscose, 14% Linen
from 3.05 $ /50g
Get the yarn to make this pattern from 39.65$.

The yarn cost is calculated from the pattern’s smallest size and the yarn’s cheapest product type. Looking for an even better price? You might find it on the DROPS Deals!

DROPS SS24

Beverly

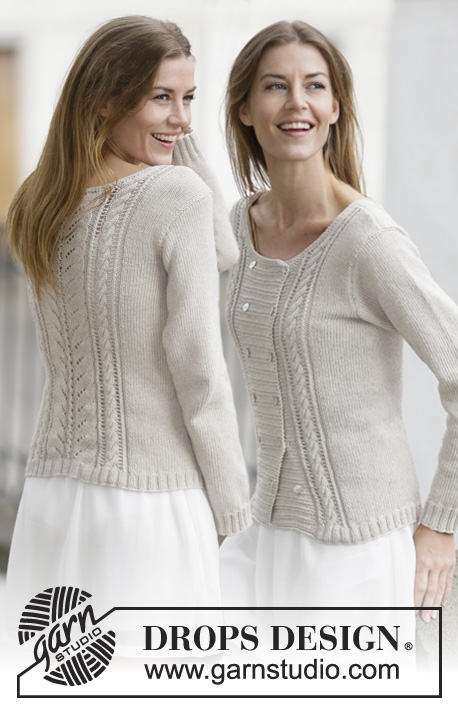
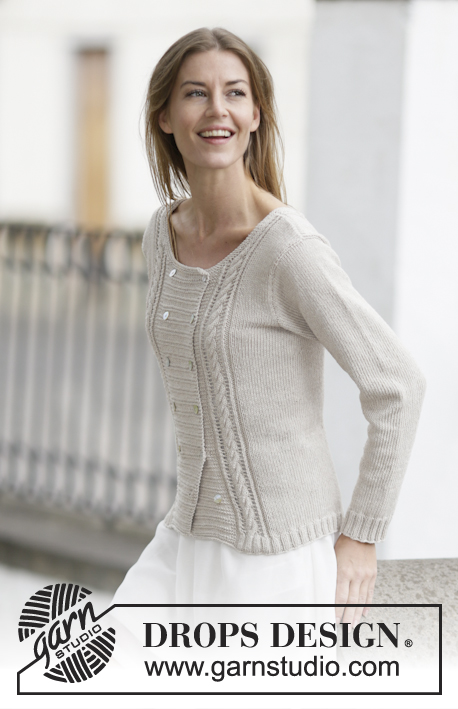
Knitted DROPS double-breasted jacket with lace pattern and cables in "Cotton Light" or "Belle". Size: S - XXXL.

DROPS 160-9
DROPS design: Pattern no vs-002
Yarn group B
----------------------------------------------------------
Size: S - M - L - XL - XXL - XXXL
Finished measurements:
Bust: 80-88-98-108-122-134 cm / 31½"-34½"-38½"-42½"-48"-52 3/4"
Full length: 58-60-62-64-66-68 cm / 22¾''-23 5/8''-24 3/8''-25¼''-26''-26¾''

Materials:
DROPS COTTON LIGHT from Garnstudio
650-700-750-850-900-1000 g color no 21, light beige
Or use:
DROPS BELLE from Garnstudio
650-700-750-850-900-1000 g color no 03, light beige

DROPS DOUBLE POINTED NEEDLES AND CIRCULAR NEEDLE (80 cm / 32'') SIZE 3.5 mm/US 4 - or size needed to get 22 sts x 30 rows in stockinette st = 4'' x 4'' (10 x 10 cm), and 28 sts x 30 rows in pattern = 4'' x 4'' (10 x 10 cm).
DROPS DOUBLE POINTED NEEDLES and CIRCULAR NEEDLE (80 cm / 32'') SIZE 3 mm/US 2.5 - for rib.
DROPS MOTHER-OF-PEARL BUTTON ARCHED (white), NO 521: 12-12-12-14-14-14 pieces

-------------------------------------------------------

Alternative Yarn – See how to change yarns here
Yarn Groups A to F – Use the same pattern and change the yarn here
Yarn usage using an alternative yarn – Use our yarn converter here

-------------------------------------------------------

DROPS Belle
DROPS Belle
53% Cotton, 33% Viscose, 14% Linen
from 3.05 $ /50g
Get the yarn to make this pattern from 39.65$.

The yarn cost is calculated from the pattern’s smallest size and the yarn’s cheapest product type. Looking for an even better price? You might find it on the DROPS Deals!

Pattern instructions

NOTE: This pattern is written in American English. All measurements in charts are in cm. For conversion from inches to cm - click here. There are different terms for crocheting in American and British English. If this pattern includes crochet, click for "crochet terms" here. For this pattern in British English, please click here.
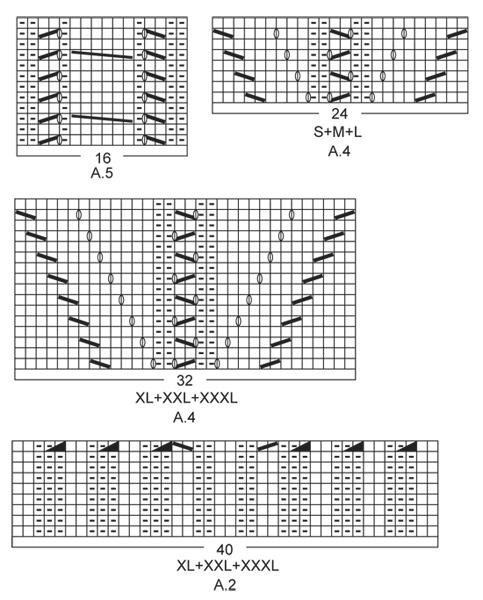
GARTER ST (back and forth):
K all rows. 1 ridge = K2 rows.

BAND:
Work band alternately in garter st and stockinette st as follows:
* Work 2 ridges over band sts (= 4 rows), work 2 rows in stockinette st with 2 sts in garter st at the edge towards mid front *, repeat from *-* up along the entire band.

PATTERN:
See diagrams A.1 to A.5. The diagrams show all rows in pattern seen from RS. Choose diagram for correct size.

BUTTONHOLES:
bind off for buttonholes on right band. The jacket is double-breasted and bind off 2 buttonholes in width as follows: 1st buttonhole = bind off third and fourth st from edge. 2nd buttonhole = work until 5 sts remain on band, bind off the next 2 sts and work the last sts on band. On next row cast on 2 new sts over the bind off sts on band.
bind off for 2 buttonholes on band when piece measures:
SIZE S: 9, 17, 25, 33, 41 and 49 cm /
3½", 6 3/4", 9 3/4", 13", 16", 19 1/4".
SIZE M: 11, 19, 27, 35, 43 and 51 cm /
4½", 7½", 10½", 13 3/4", 17", 20".
SIZE L: 12, 20, 28, 36, 44 and 52 cm /
4 3/4", 8", 11", 14 1/4", 17 1/4", 20½".
SIZE XL: 12, 19, 26, 33, 40, 47 and 54 cm /
4 3/4", 7½2, 10 1/4", 13", 15 3/4", 18½", 21 1/4"
SIZE XXL: 13, 20, 27, 34, 41, 48 and 55 cm /
5", 8", 10½", 13½", 16", 19", 21½"
SIZE XXXL: 15, 22, 29, 36, 43, 50 and 57 cm /
6", 8 3/4", 11½", 14 1/4", 17", 19 3/4", 22½''

DECREASE TIP:
All dec are done from RS!
Dec as follows after 1st and 3rd marker: Slip 1 st as if to K, K 1, psso.
Dec as follows before 2nd and 4th marker: Beg 2 sts before marker and K 2 tog.

INCREASE TIP:
All inc are done from RS.
Inc 1 st by making 1 YO after 1st and 3rd marker and before 2nd and 4th marker. On next row P YO twisted to avoid holes.
----------------------------------------------------------

BODY:
Worked back and forth on circular needle from mid front.
Cast on 274-290-322-348-380-404 sts (includes 24-24-24-28-28-28 band sts in each side towards mid front) on circular needle size 3 mm / US 2.5 with Cotton Light or Belle. P 1 row from WS. Work next row as follows from RS: Work 24-24-24-28-28-28 sts BAND – see explanation above, work A.1 (= 18 sts), work K 2/P 2 over the next 62-70-86-90-106-118 sts (beg and end with 2 K), work A.1 (= 18 sts), A.2 (= 30-30-30-40-40-40 sts), A.1 (= 18 sts), work K 2/P 2 over the next 62-70-86-90-106-118 sts (beg and end with 2 K), work A.1 (= 18 sts) and finish with 24-24-24-28-28-28 sts BAND. Continue rib like this until last row in A.1/A.2 remains. Work last row as follows from RS: 24-24-24-28-28-28 band sts as before, work last row in A.1, K 62-70-86-90-106-118 sts - AT THE SAME TIME dec evenly 14-14-18-18-22-22 sts, work last row in A.1, A.2 and A.1, K 62-70-86-90-106-118 sts - AT THE SAME TIME dec evenly 14-14-18-18-22-22 sts, work last row in A.1 and finish with 24-24-24-28-28-28 band sts as before = 232-248-272-296-320-344 sts remain on needle. Switch to circular needle size 3.5 mm / US 4 and P 1 row from WS (continue band as before).
Then work as follows (1st row = RS): Work band as before, work A.5 (= 16 sts), 48-56-68-72-84-96 sts in stockinette st, A.3 (= 16 sts), A.4 (= 24-24-24-32-32-32 sts), A.5 (= 16 sts), 48-56-68-72-84-96 sts in stockinette st, A.3 (= 16 sts) and finish with band as before. Continue pattern like this. REMEMBER THE KNITTING GAUGE and remember BUTTONHOLES on band - see explanation above.
When piece measures 8 cm / 3 1/8'', insert 4 markers in the piece as follows: Insert 1st marker after A.5 on right front band, 2nd marker before A.3 on back piece, 3rd marker after A.5 on back piece and 4th marker before A.3 on left front piece. Now dec 1 st on the outside of the 4 markers - READ DECREASE TIP (= 4 sts dec). Repeat dec every 2½-2½-2½-2½-4-4 cm / 7/8"-7/8"-7/8"-7/8"-1½"-1½" 6-6-6-6-4-4 times in total = 208-224-248-272-304-328 sts. When piece measures 24 cm / 9½'', inc 1 st on the outside the 4 markers - READ INCREASE TIP (= 4 sts inc). Repeat inc every 4-4-4-5-5-5 cm / 1½''-1½''-1½''-2''-2''-2'' a total of 4 times = 224-240-264-288-320-344 sts.

When piece measures 39-40-41-42-43-44 cm / 15¼''-15¾''-16 1/8''-16½''-17''-17¼'', work next row (from RS) as follows: Work 59-63-68-74-81-87 sts as before (= right front piece), bind off 6-6-8-8-10-10 sts for armhole, work 94-102-112-124-138-150 sts as before (= back piece), bind off 6-6-8-8-10-10 sts for armhole, work the last 59-63-68-74-81-87 sts as before (= left front piece). Finish each part separately.

BACK PIECE:
= 94-102-112-124-138-150 sts. Continue to bind off for armholes in each side as follows: bind off 3 sts 0-0-0-1-1-2 times, 2 sts 0-1-2-2-4-4 times, 1 st 1-3-4-3-6-7 times = 92-92-96-104-104-108 sts. Continue to work until piece measures 56-58-60-62-64-66 cm / 22''-22¾''-23 5/8''-24 3/8''-25¼''-26''. Now bind off the middle 44-44-44-52-52-52 sts for neck and finish each shoulder separately. Continue to dec 1 st on next row from neck = 23-23-25-25-25-27 sts remain on the shoulder. Continue until piece measures 58-60-62-64-66-68 cm / 22¾''-23 5/8''-24 3/8''-25¼''-26''-26¾'' and bind off. Repeat on the other shoulder.

RIGHT FRONT PIECE:
= 59-63-68-74-81-87 sts. Now bind off for armhole at beg of every row from the side as on back piece. AT THE SAME TIME when piece measures 50-52-53-55-56-58 cm / 19 3/4"-20½"-21"-21½"-22"-22 3/4" – adjust so that 1-2 rows have been worked after last buttonhole on band, slip the outermost 23-23-23-27-27-27 sts from mid front on 1 stitch holder for neck. Then dec at beg of every row from neck: 2 sts 6 times in total. After all bind off for armhole and dec for neck, 23-23-25-25-25-27 sts remain on shoulder. Continue to work until piece measures 58-60-62-64-66-68 cm / 22¾''-23 5/8''-24 3/8''-25¼''-26''-26¾'', bind off.

LEFT FRONT PIECE:
Work as right but reversed.

SLEEVE:
Worked in the round on double pointed needles.
Cast on 56-60-60-64-68-68 sts on double pointed needles size 3 mm / US 2.5 with Cotton Light or Belle. K 1 round. Then work rib = K 2/P 2. When rib measures 4 cm / 1½'', dec 8-10-8-10-12-10 sts evenly = 48-50-52-54-56-58 sts. Insert 1 marker at beg of round (= mid under sleeve). Switch to double pointed needles size 3.5 mm / US 4 and work in stockinette st. When piece measures 8-10-8-10-6-8 cm / 3"-4"-3"-4"-2½"-3", inc 2 sts mid under sleeve. Repeat inc every 3½-2½-2½-2-2-1½ cm / 1 1/4"-7/8"-7/8"-3/4"-3/4"-½" 12-15-16-18-19-22 times in total = 72-80-84-90-94-102 sts. When piece measures 49-49-48-47-45-44 cm / 19 1/4"-19 1/4"-19"-18½"-17 3/4"-17 1/4" (shorter measurements in the larger sizes because of longer sleeve cap and wider shoulders), bind off 6-6-8-8-10-10 sts mid under sleeve and work back and forth until finished measurements. Bind off for sleeve cap at beg of every row in each side as follows: 2 sts 3-3-3-4-4-5 times and 1 st 2-4-5-5-7-8 times. Then bind off 2 sts in each side until piece measures 55-56-56-56-57-57 cm / 21 5/8''-22''-22''-22''-22½''-22½''. Bind off 3 sts at beg of the next 2 rows before loosely binding off all sts. Make another sleeve.

ASSEMBLY:
Sew the shoulder seams. Sew in sleeves. Sew on buttons.

NECK EDGE:
Pick up approx. 110 to 130 sts around the neck (includes sts on stitch holders at the front) on circular needle size 3 mm / US 2.5 with Cotton Light or Belle. K 4 rows and then loosely bind off with K.

Diagram

All measurements in charts are in cm.

symbols = K from RS, P from WS
symbols = P from RS, K from WS
symbols = 1 YO between 2 sts
symbols = K 2 tog
symbols = slip 1 st as if to K, K 1, psso
symbols = P 2 tog
symbols = slip 3 sts on cable needle behind piece, K 3, K 3 from cable needle
symbols = slip 3 sts on cable needle in front of piece, K 3, K 3 from cable needle
diagram
diagram
diagram

Each of our patterns has specific tutorial videos to help you.

Do you have a question? See a list of frequently asked questions (FAQ)

Knitting tension is what determines the final measurements of your work, and is usually measured per 10 x 10 cm. It is provided like so: number of stitches in width x number of rows in height - eg: 19 stitches x 26 rows = 10 x 10 cm.

The knitting tension is very individual; some people knit/crochet loosely while others work tightly. You adjust the knitting tension with the needle size, which is why the suggested needle size only serve as a guide! You need to adjust this (up or down) to ensure that YOUR knitting tension matches the knitting tension provided in the pattern. If you work with a different knitting tension than provided you will have a different yarn consumption, and your work will have different measurements than what the pattern suggests.

The knitting tension also determines which yarns can replace each other. As long as you achieve the same knitting tension you can replace one yarn with another.

See DROPS lesson: How to measure your tension/gauge

See DROPS video: How to make a gauge tension swatch

The required amount of yarn is provided in grams, eg: 450 g. To calculate how many balls you’ll need you first need to know how many grams are in 1 ball (25g, 50g or 100g). This information is available if you click on the individual yarn quality on our pages. Divide the amount required with the amount of each ball. For example, if each ball is 50g (the most common amount), the calculation will be as follows: 450 / 50 = 9 balls.

The important thing when changing from one yarn to another is that the knitting/crochet tension remains the same. This is so that the measurements of the finished piece will be the same as on the sketch provided. It is easier to achieve the same knitting tension using yarns from the same yarn group. It is also possible to work with multiple strands of a thinner yarn to achieve the knitting tension of a thicker one. Please try our yarn converter. We recommend you to always work a test swatch.

Please NOTE: when changing yarn the garment might have a different look and feel to the garment in the photo, due to individual properties and qualities of each yarn.

See DROPS lesson: Can I use a different yarn than the one mentioned in the pattern?

All our yarns are categorised into yarn groups (from A to F) according to thickness and knitting tension – group A contains the thinnest yarns and group F the thickest. This makes it easier for you to find alternative yarns to our patterns, should you wish to switch yarn. All yarns within the same group have a similar knitting tension and can easily replace each other. However, different yarn qualities have different structures and properties which will give the finished work a unique look and feel.

Click here for an overview of the yarns in each yarn group

At the top of all our patterns you’ll find a link to our yarn converter, which is a helpful tool should you wish to use a different yarn than suggested. By filling in the yarn quality you wish to replace, the amount (in your size) and number of strands, the converter will present good alternative yarns with the same knitting tension. Additionally it will tell you how much you’ll require in the new qualities and whether you’ll need to work with multiple strands. Most skeins are 50g (some are 25g or 100g).

If the pattern is worked with multiple colours, every colour will have to be converted separately. Similarly, if the pattern is worked with several strands of different yarns (for example 1 strand Alpaca and 1 strand Kid-Silk) you will have to find alternatives for each, individually.

Click here to see our yarn converter

Since different yarns have different qualities and textures we have chosen to keep the original yarn in our patterns. However, you can easily find options among our available qualities by using our yarn converter, or simply pick a yarn from the same yarn group.

It is possible that some retailers still have discontinued yarns in stock, or that someone has a few skeins at home that they would like to find patterns for.

The yarn converter will provide both alternative yarn as well as required amount in the new quality.

If you think it's hard to decide what size to make, it can be a good idea to measure a garment you own already and like the size of. Then you can pick the size by comparing those measures with the ones available in the pattern's size chart.

You'll find the size chart at the bottom of the pattern.

See DROPS lesson: How to read size chart

The needle size provided in the pattern serves only as a guide, the important thing is to follow the knitting tension. And since knitting tension is very individual, you will have to adjust the needle size to ensure that YOUR tension is the same as in the pattern – maybe you’ll have to adjust 1, or even 2 needle sizes, up or down to achieve the correct tension. For this, we recommend that you work test swatches.

Should you work with a different knitting tension than the one provided, the measurements of the finished garment might deviate from the measurement sketch.

See DROPS lesson: How to measure your tension/gauge

See DROPS video: How to make a gauge tension swatch

Working a garment top-down provides more flexibility and room for personal adjustment. For example it is easier to try the garment on while working, as well as making adjustments to length of yoke and shoulder caps.

The instructions are carefully explaining every step, in the correct order. Diagrams are adjusted to the knitting direction and are worked as usual.

The diagram depicts all rows/rounds, and every stitch seen from the right side. It is read from bottom to top, from right to left. 1 square = 1 stitch.

When working back and forth, every other row is worked from the right side and every other row is worked from the wrong side. When working from the wrong side, the diagram will have to be worked reversed: from left to right, knit stitches are purled, purl stitches are knit etc.

When working in the round every round is worked from the right side and the diagram are worked from right to left on all rounds.

See DROPS lesson: How to read knitting diagrams

The diagram depicts all rows/rounds, and every stitch seen from the right side. It is worked from bottom to top, from right to left.

When working back and forth every other row is worked from the right side: from right to left and every other row is worked from the wrong side: from left to right.

When working in the round, every row in the diagram are worked from the right side, from right to left.

When working a circular diagram you start in the middle and work your way outwards, counter clockwise, row by row.

The rows usually start with a given number of chain stitches (equivalent to the height of the following stitch), this will either be depicted in the diagram or explained in the pattern.

See DROPS lesson: How to read crochet diagrams

Instructions for working several diagrams after each other on the same row/round, will often be written like so: “work A.1, A.2, A.3 a total of 0-0-2-3-4 times". This means you work A.1 once, then A.2 is worked once, and A.3 is repeated (in width) the number of times provided for your size – in this case like so: S = 0 times, M = 0 times, L=2 times, XL= 3 times and XXL = 4 times.

The diagrams are worked as usual: begin with the first row in A.1, then work the first row in A.2 etc.

See DROPS lesson: How to read knitting diagrams

See DROPS lesson: How to read crochet diagrams

The total width of the garment (from wrist-to-wrist) will be larger in the larger sizes, despite the actual sleeves being shorter. The larger sizes have longer sleeve caps and wider shoulders, so there will be a good fit in all sizes.

The measurement sketch/schematic drawing provides information regarding the full length of the garment. If it’s a jumper or a jacket the length is measured from the highest point on the shoulder (usually closest to the neckline), and straight down to the bottom of the garment. It is NOT measured from the tip of shoulder. Similarly, the length of yoke is measured from the highest point on the shoulder and down to where yoke is split into body and sleeves.

See DROPS lesson: How to read a schematic drawing

Diagrams are often repeated on the round or in height. 1 repeat is the diagram the way it appears in the pattern. If it says to work 5 repeats of A.1 in the round, then you work A.1 a total of 5 times after/next to each other in the round. If it says to work 2 repeats of A.1 vertically/in height you work the entire diagram once, then begin again at the start and work the entire diagram one more time.

Chain stitches are slightly narrower than other stitches and to avoid working the cast-on edge too tight, we simply chain more stitches to begin with. The stitch count will be adjusted on the following row to fit the pattern and measurement sketch.

The rib edge is more elastic and will contract slightly compared to, for example, stocking stitch. By increasing before the rib edge, you avoid a visible difference in width between the rib edge and the rest of the body.

It’s very easy to cast off too tightly, and by making yarn overs while casting off (and simultaneously casting these off) you avoid a too tight cast off edge.

See DROPS video: How to bind off with yarn overs (yo)

To achieve an even increase (or decrease) you can increase on, for example: every 3rd and 4th row alternately, like so: work 2 rows and increase on the 3rd row, work 3 rows and increase on the 4th. Repeat this until the increase is complete.

See DROPS lesson: Increase or decrease 1 st on every 3rd and 4th row alternately

Should you prefer to work in the round instead of back and forth, you may of course adjust the pattern. You’ll need to add steeks mid-front (usually 5 stitches), and follow the instructions. When you would normally turn and work from the wrong side, simply work across the steek and continue in the round. At the end you’ll cut the piece open, pick up stitches to work bands, and cover the cut edges.

See DROPS video: How to knit steeks and cut open

Should you prefer to work back and forth instead of in the round, you may of course adjust the pattern so you work the pieces separately and then assemble them at the end. Divide the stitches for the body in 2, add 1 edge stitch in each side (for sewing) and work the front and back pieces separately.

See DROPS lesson: Can I adapt a pattern for circular needles into straight needles?

Pattern repeats can vary slightly in the different sizes, in order to get the correct proportions. If you’re not working the exact same size as the garment in the photo, yours might deviate slightly. This has been carefully developed and adjusted so that the complete impression of the garment is the same in all sizes.

Make sure to follow instructions and diagrams for your size!

If you have found a pattern you like which is available in women’s size it’s not very difficult to convert it to men’s size. The biggest difference will be the length of sleeves and body. Start working on the women size that you think would fit across the chest. The additional length will be worked right before you cast off for the armhole/sleeve cap. If the pattern is worked top-down you can add the length right after the armhole or before the first decrease on sleeve.

Regarding additional yarn amount, this will depend on how much length you add, but it is better with a skein too many than too few.

All yarns will have excess fibres (from production) that might come off as lint or shedding. Brushed yarns (ie hairier yarns) have more of these loose, excess fibres, causing more shedding.

Shedding also depends on what is worn under or over the garment, and whether this pulls at the yarn fibres. It’s therefore not possible to guarantee that there will be no shedding

Below are some tips on how to get the best result when working with hairier yarns:

1. When the garment is finished (before you wash it) shake it vigorously so the looser hairs come off. NOTE: do NOT use a lint roller, brush or any method that pulls at the yarn.

2. Place the garment in a plastic bag and put it in your freezer - the temperature will cause the fibres to become less attached to each other, and excess fibres will come off easier.

3. Leave in the freezer for a few hours before taking it out and shaking it again.

4. Wash the garment according to the instructions on the yarn label.

Pilling is a natural process that happens to even the most exclusive of fibers. It's a natural sign of wear and tear that is hard to avoid, and that is most visible in high friction areas of your garment like a sweater's arms and cuffs.

You can make your garment look as new by removing the pilling, using a fabric comb or a pill/lint remover.

Still can't find the answer you need? Then scroll down and leave your question so one of our experts can try to help you. This will be done normally within 5 to 10 working days.
In the meantime, you can read the questions and answers that others have left to this pattern or join the DROPS Workshop on Facebook to get help from fellow knitters/crocheters!

You might also like...

Post a comment to pattern DROPS 160-9

We would love to hear what you have to say about this pattern!

If you want to leave a question, please make sure you select the correct category in the form below, to speed up the answering process. Required fields are marked *.

Comments / Questions (52)

country flag Suzanne-Jocelyne Roy wrote:

Bien le bonjour, lorsque je fais mes torsades elles sont toutes parfaites sauf pour la 2ième A5 celle située entre les 2 séries de 48m jersey nonobstant le fait que je positionne l'aiguille auxiliaire sur le dos de mon travail. Je vois la torsade mais elle monte en serpentin. C'est la 2 ième fois que je recommance mon tricot et le résultat est le même. Pourriez-vous m'aider à élucider le tout ou m'apporter assistance? Merci à l'avance chères tricoteuses.

08.01.2021 - 19:38

DROPS Design answered:

Bonjour Mme Roy, tricotez-vous bien cette torsade de A.5 dès le 3ème rang et tous les 5 rangs? si vous avez décidé d'inverser la 2ème torsade de A.5, vous devez la tricoter comme A.3, elle devrait donc ressembler à celle de A.3. Montrez votre ouvrage à votre magasin (même par mail si besoin), il sera ainsi plus facile pour eux de vous aider. Vous pouvez également montrer votre photo sur le groupe DROPS Workshop où d'autres tricoteuses pourront probablement vous aider. Bon tricot!

11.01.2021 - 07:33

country flag Petra wrote:

Wenn ich der Anleitung folge oder auch dem Schnitt, bekomme ich einen viel zu engen Hals-Ausschnitt - gar nicht wie auf dem Foto!???

14.09.2018 - 18:43

DROPS Design answered:

Liebe Petra, stimmt Ihre Maschenprobe? Wenn Sie eine größere Hals-Ausschnitt möchten, können Sie gerne die Anleitung anpassen, gerne wird Ihnen Ihr DROPS Laden damit helfen - auch per Mail oder telefonisch. Viel Spaß beim stricken!

17.09.2018 - 08:00

country flag Silvia wrote:

Hallo, ik brei het vest in maat m, 290 steken opgezet en ik moet bij de 70 rechte tricot steken 2 keer 14 steken minderen, dan hou ik 262 steken over. In het patroon staat 248, wat zie ik over het hoofd?

27.07.2015 - 00:57

DROPS Design answered:

Hoi Silvia. Ìn de laatste naald van A.1 en A.2 heb je geminderd (zie de telpatronen) tegelijkertijd met de 2 keer 14 st minderen. Je breit A1 4 keer en A.2 1 keer = 8 en 6 st minder = 42 st in totaal en 248 st over.

28.07.2015 - 15:41

country flag Marie Magnusson wrote:

Jag vill veta om koftan på Er modell är stickad i Cotton Light eller Belle. Vilken färg? Vill ju att mitt resultat ska bli så likt som möjligt som på bilden. Tacksam för svar Marie

17.05.2015 - 10:19

DROPS Design answered:

Hej, Modellen är stickad i DROPS Cotton Light, men du får samma fina resultat i DROPS Belle. Välj den färg som passar dig och kom ihåg att färgen kan se lite annorlunda ut på skärmen. Lycka till!

18.05.2015 - 09:24

country flag GA wrote:

Bonjour J'ai une question sur ce modèle. Je prends la taille L pour exemple. Il faut pour la taille L monter 322 mailles puis ensuite, à la fin des côtes et du premier motif, il faut faire 2x18 diminutions. Cela devrait mener à 286 mailles. Or il est indiqué qu'il reste 272 mailles. Y-a-t-il plus de diminutions ou dois-je continuer avec 286 mailles ? Merci de votre aide Sincères salutations

10.04.2015 - 13:53

DROPS Design answered:

Bonjour Mme GA, on diminue effectivement 2 x 18 m dans les côtes 2/2, mais au dernier rang de A.1 et de A.2, on doit également diminuer: 2 m dans chaque A.1 (soit 2 m x 4 = 8m) et 6 m dans A.2, on a 322 m - 36 m diminuées dans les côtes - 14 m diminuées dans les diagrammes = 272 m. Bon tricot!

10.04.2015 - 14:13

country flag Inger wrote:

Drops Belle?? Hittar inte det i ert sortiment?

12.02.2015 - 14:16

DROPS Design answered:

Hej Inger. Den er helt ny. Glaed dig, der kommer snart en side til den :-)

12.02.2015 - 16:46

country flag Silvia Colombo wrote:

Lo devo fare ...

10.02.2015 - 20:02

country flag Lotte Thomsen wrote:

Super flot og elegant :)

02.02.2015 - 10:31

country flag Pattyalba wrote:

è molto chic!!!

23.01.2015 - 15:13

country flag Pattyalba wrote:

è molto chic!!!

23.01.2015 - 15:11