DROPS Cotton Light
DROPS Cotton Light
50% Cotton, 50% Polyester
from 1.15 £ /50g
Get the yarn to make this pattern from 12.65£.

The yarn cost is calculated from the pattern’s smallest size and the yarn’s cheapest product type. Looking for an even better price? You might find it on the DROPS Deals!

DROPS SS24

Riviera Maya

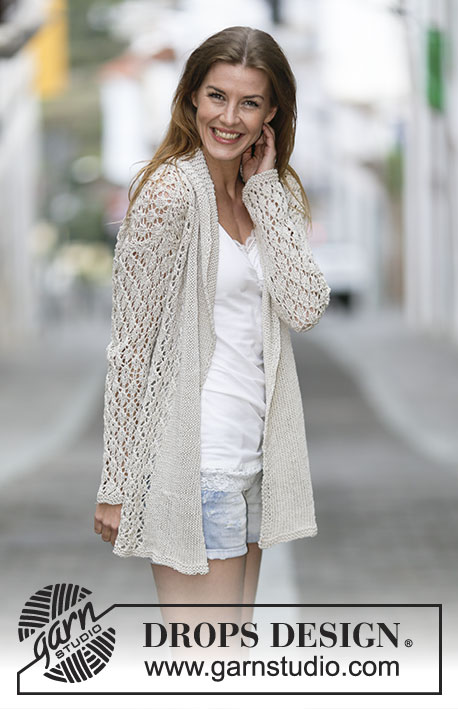
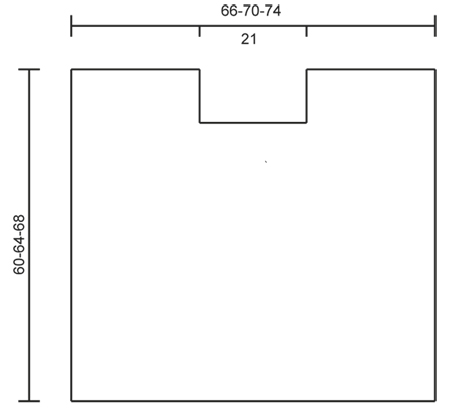
Knitted DROPS poncho with lace pattern and fringes in ”Cotton Light” or "Belle". Size: S - XXXL.

DROPS 159-1
DROPS design: Pattern no cl-037
Yarn group B
----------------------------------------------------------
Size: S/M - L/XL - XXL/ XXXL
Materials:
DROPS COTTON LIGHT from Garnstudio
550-600-650 g colour no 02, white

Or use:
DROPS BELLE from Garnstudio
500-550-600 g colour no 01, white

DROPS CIRCULAR NEEDLE (80 cm) SIZE 3.5 mm - or size needed to get 21 sts x 28 rows in stocking st = 10 x 10 cm.
DROPS CIRCULAR NEEDLE (80 cm) SIZE 3 mm – for edge.

-------------------------------------------------------

Alternative Yarn – See how to change yarns here
Yarn Groups A to F – Use the same pattern and change the yarn here
Yarn usage using an alternative yarn – Use our yarn converter here

-------------------------------------------------------

DROPS Cotton Light
DROPS Cotton Light
50% Cotton, 50% Polyester
from 1.15 £ /50g
Get the yarn to make this pattern from 12.65£.

The yarn cost is calculated from the pattern’s smallest size and the yarn’s cheapest product type. Looking for an even better price? You might find it on the DROPS Deals!

Pattern instructions

NOTE: This pattern is written in British English. All measurements in charts are in cm. For conversion from cm to inches - click here. There are different terms for crocheting in British and American English. If this pattern includes crochet, click for "crochet terms" here. For this pattern in American English, please click here.
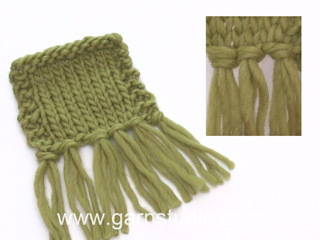
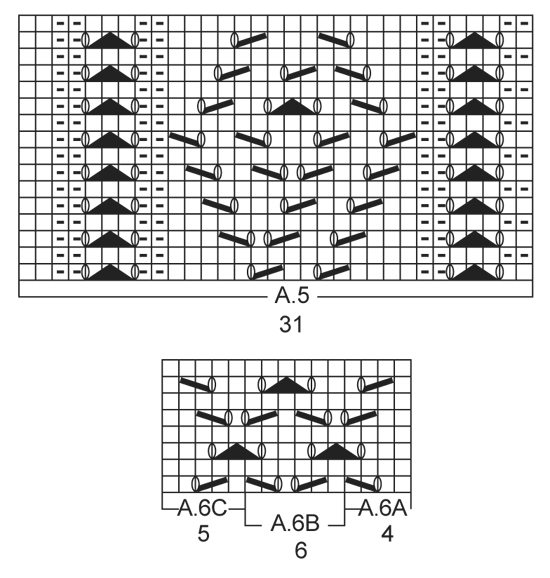
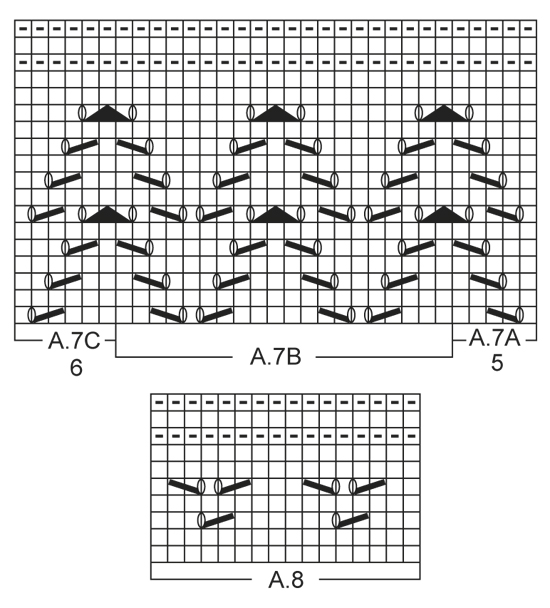
GARTER ST (back and forth):
K all rows. 1 ridge = 2 rows K.

PATTERN:
See diagrams A.1 to A.9. The diagrams show all rows in pattern seen from RS.

EDGE STS:
Work the outermost 4 sts in each side in garter st but on every 6th row (always from RS) work holes as follows:
At beg of row: K 2 tog, 1 YO, K 2 tog, 1 YO.
At end of row: 1 YO, K 2 tog, 1 YO, K 2 tog.
----------------------------------------------------------

PONCHO:
Worked in 2 parts that are sewn tog on the shoulders.

FRONT PIECE:
The piece is worked back and forth on circular needle because of no of sts.
Cast on 139-147-155 sts on circular needle size 3 mm with Cotton Light or Belle. Work first row as follows from RS: 4 EDGE STS - see explanation above, work pattern according to diagram A.1 until 5 sts remain on row, work 1st st in A.1 and finish with 4 EDGE STS. Continue the pattern like this - NOTE: On 7th row in A.1 K last st before edge sts. When A.1 has been worked, switch to circular needle size 3.5 mm. Insert 1 marker after the first 47-51-55 sts on needle and 1 marker after the next 45 sts (= 47-51-55 sts after last marker at the end of row).

ALL SIZES: Work next row as follows from RS: 4 edge sts as before, work A.2 over the next 12-16-20 sts, work A.4 (= 31 sts), 1st marker, A.6A (= 4 sts), work pattern according to diagram A.6B until 5 sts remain before 2nd marker, A.6C (= 5 sts), A.5 (= 31 sts), work A.3 over the next 12-16-20 sts and finish with 4 edge sts as before. Continue pattern like this. There will be lanes with lace pattern upwards on each side of markers and work borders with lace pattern between the 2 markers. REMEMBER THE KNITTING TENSION. Size S/M and L/XL: Continue to ALL SIZES.

Size XXL/XXXL: When A.6 has been worked one time vertically, work 3 ridges between markers (work the other sts as before), then work A.6 one more time between markers (continue the other sts as before).

ALL SIZES: When A.6 has been worked, work pattern according to diagram A.1 between the 2 markers mid front (continue the other sts as before) AT THE SAME TIME on next to last row in diagram (= RS) dec 4 sts evenly (= 41 sts between markers and 135-143-151 sts on row).
After A.1 work A.7 between the 2 markers as follows (continue the other sts as before): Work A.7A (= 5 sts), work A.7B until 6 sts remain before marker and finish with A.7C (= 6 sts).
When A.7 has been worked, work pattern according to diagram A.8 between the 2 markers (continue the other sts as before). AT THE SAME TIME on last row in diagram (= RS), inc 3 sts evenly (= 44 sts between markers and 138-146-154 sts in total on needle).
After A.8 work pattern according to diagram A.9 between the 2 markers. When entire A.9 has been worked (piece measures approx. 39-39-43 cm), there are 45 sts between markers. Then work pattern according to diagram A.1 between markers (continue the other sts as before).
After A.1 work A.6 between markers as follows: A.6A (= 4 sts), work A.6B until 5 sts remain before marker and finish with A.6C (= 5 sts). SIZE S/M: Continue to ALL SIZES.

SIZE L/XL + XXL/XXXL: When A.6 has been worked one time vertically, work 3 ridges between markers (work the other sts as before), then work A.6 one more time between markers (continue the other sts as before).

ALL SIZES: After A.6 work 3 ridges between markers (work the other sts as before), then cast off the 45 sts between markers for neck and finish each part separately.
Continue pattern back and forth as before over the 47-51-55 sts on shoulder - NOTE: Continue the outermost 2 sts towards the neck in garter st. When 4 cm remain before piece measures 60-64-68 cm (adjust so that next row is worked from RS), switch to circular needle size 3 mm. Continue with pattern according to diagram A.1 before loosely casting off. Repeat in the other side.

BACK PIECE:
Cast on and work as front piece.

ASSEMBLY:
Sew the shoulder seams. The poncho should be open in each side.

FRINGES:
Fasten fringes along the bottom edge of poncho both front and back. Fasten fringes in holes in A.1.
1 fringe = cut 6 lengths of 35 cm each. Fold them double, pull the loops true the holes and pull the yarn ends true the loops. Fasten each fringe approx. 3 cm apart. Then split the fringes in 2 and tie tog with next fringe. Continue like this with all fringes.

This pattern has been corrected.

Updated online: 10.04.2015
New diagram A.9 (top part of the diagram).

Diagram

symbols = K from RS, P from WS
symbols = P from RS, K from WS
symbols = Bobble: Work 5 sts in 1 st as follows: K 1, 1 YO, K 1, 1 YO, K 1, work 4 rows in stocking st back and forth over the 5 sts, then dec as follows: Pass 2nd st on right needle over 1st st, then 3rd st over 1st st, then 4th st over 1st st and finally 5th st over 1st st = 1 st remains
= no stitch, skip this square
symbols = no stitch, skip this square
symbols = 1 YO between 2 sts
symbols = K 2 tog
symbols = slip 1 st as if to K, K 1, psso
symbols = slip 1 st as if to K, K 2 tog, psso
symbols = slip 2 sts on cable needle behind piece, K 2, K 2 from cable needle
diagram
diagram
diagram
diagram
diagram

Each of our patterns has specific tutorial videos to help you.

Do you have a question? See a list of frequently asked questions (FAQ)

Knitting tension is what determines the final measurements of your work, and is usually measured per 10 x 10 cm. It is provided like so: number of stitches in width x number of rows in height - eg: 19 stitches x 26 rows = 10 x 10 cm.

The knitting tension is very individual; some people knit/crochet loosely while others work tightly. You adjust the knitting tension with the needle size, which is why the suggested needle size is only meant as a guide! You need to adjust this (up or down) to ensure that YOUR knitting tension matches the knitting tension provided in the pattern. If you work with a different knitting tension than provided you will have a different yarn consumption, and your work will have different measurements than what the pattern suggests.

The knitting tension also determines which yarns can replace each other. As long as you achieve the same knitting tension you can replace one yarn with another.

See DROPS lesson: How to measure your tension/gauge

See DROPS video: How to make a gauge tension swatch

The required amount of yarn is provided in grams, eg: 450 g. To calculate how many balls you’ll need you first need to know how many grams are in 1 ball (25g, 50g or 100g). This information is available if you click on the individual yarn quality on our pages. Divide the amount required with the amount of each ball. For example, if each ball is 50g (the most common amount), the calculation will be as follows: 450 / 50 = 9 balls.

The important thing when changing from one yarn to another is that the knitting/crochet tension remains the same. This is so that the measurements of the finished piece will be the same as on the sketch provided. It is easier to achieve the same knitting tension using yarns from the same yarn group. It is also possible to work with multiple strands of a thinner yarn to achieve the knitting tension of a thicker one. Please try our yarn converter. We recommend you to always work a test swatch.

Please NOTE: when changing yarn the garment might have a different look and feel to the garment in the photo, due to individual properties and qualities of each yarn.

See DROPS lesson: Can I use a different yarn than the one mentioned in the pattern?

All our yarns are categorised into yarn groups (from A to F) according to thickness and knitting tension – group A contains the thinnest yarns and group F the thickest. This makes it easier for you to find alternative yarns to our patterns, should you wish to switch yarn. All yarns within the same group have a similar knitting tension and can easily replace each other. However, different yarn qualities have different structures and properties which will give the finished work a unique look and feel.

Click here for an overview of the yarns in each yarn group

At the top of all our patterns you’ll find a link to our yarn calculator, which is a helpful tool should you wish to use a different yarn than suggested. By filling in the yarn quality you wish to replace, the amount (in your size) and number of strands, the calculator will present good alternative yarns with the same knitting tension. Additionally it will tell you how much you’ll require in the new qualities and whether you’ll need to work with multiple strands. Most skeins are 50g (some are 25g or 100g).

If the pattern is worked with multiple colours, every colour will have to be calculated separately. Similarly, if the pattern is worked with several strands of different yarns (for example 1 strand Alpaca and 1 strand Kid-Silk) you will have to find alternatives for each, individually.

Click here to see our yarn calculator

Since different yarns have different qualities and textures we have chosen to keep the original yarn in our patterns. However, you can easily find options among our available qualities by using our yarn calculator, or simply pick a yarn from the same yarn group.

It is possible that some retailers still have discontinued yarns in stock, or that someone has a few skeins at home that they would like to find patterns for.

The yarn calculator will provide both alternative yarn as well as required amount in the new quality.

If you think it's hard to decide what size to make, it can be a good idea to measure a garment you own already and like the size of. Then you can pick the size by comparing those measures with the ones available in the pattern's size chart.

You'll find the size chart at the bottom of the pattern.

See DROPS lesson: How to read size chart

The needle size provided in the pattern serves only as a guide, the important thing is to follow the knitting tension. And since knitting tension is very individual, you will have to adjust the needle size to ensure that YOUR tension is the same as in the pattern – maybe you’ll have to adjust 1, or even 2 needle sizes, up or down to achieve the correct tension. For this, we recommend that you work test swatches.

Should you work with a different knitting tension than the one provided, the measurements of the finished garment might deviate from the measurement sketch.

See DROPS lesson: How to measure your tension/gauge

See DROPS video: How to make a tension/gauge swatch

Working a garment top-down provides more flexibility and room for personal adjustment. For example it is easier to try the garment on while working, as well as making adjustments to length of yoke and shoulder caps.

The instructions are carefully explaining every step, in the correct order. Diagrams are adjusted to the knitting direction and are worked as usual.

The diagram depicts all rows/rounds, and every stitch seen from the right side. It is read from bottom to top, from right to left. 1 square = 1 stitch.

When working back and forth, every other row is worked from the right side and every other row is worked from the wrong side. When working from the wrong side, the diagram will have to be worked reversed: from left to right, knit stitches are purled, purl stitches are knit etc.

When working in the round every round is worked from the right side and the diagram are worked from right to left on all rounds.

See DROPS lesson: How to read knitting diagrams

The diagram depicts all rows/rounds, and every stitch seen from the right side. It is worked from bottom to top, from right to left.

When working back and forth every other row is worked from the right side: from right to left and every other row is worked from the wrong side: from left to right.

When working in the round, every row in the diagram are worked from the right side, from right to left.

When working a circular diagram you start in the middle and work your way outwards, counter clockwise, row by row.

The rows usually start with a given number of chain stitches (equivalent to the height of the following stitch), this will either be depicted in the diagram or explained in the pattern.

See DROPS lesson: How to read crochet diagrams

Instructions for working several diagrams after each other on the same row/round, will often be written like so: “work A.1, A.2, A.3 a total of 0-0-2-3-4 times". This means you work A.1 once, then A.2 is worked once, and A.3 is repeated (in width) the number of times provided for your size – in this case like so: S = 0 times, M = 0 times, L=2 times, XL= 3 times and XXL = 4 times.

The diagrams are worked as usual: begin with the first row in A.1, then work the first row in A.2 etc.

See DROPS lesson: How to read knitting diagrams

See DROPS lesson: How to read crochet diagrams

The total width of the garment (from wrist-to-wrist) will be larger in the larger sizes, despite the actual sleeves being shorter. The larger sizes have longer sleeve caps and wider shoulders, so there will be a good fit in all sizes.

The measurement sketch/schematic drawing provides information regarding the full length of the garment. If it’s a jumper or a jacket the length is measured from the highest point on the shoulder closest to the neckline, and straight down to the bottom of the garment. It is NOT measured from the tip of shoulder. Similarly, the length of yoke is measured from the highest point on the shoulder and down to where yoke is split into body and sleeves.

On a jacket measures are never taken along bands, unless specifically stated. Always measure inside band stitches when measuring the length.

See DROPS lesson: How to read a schematic drawing

Diagrams are often repeated on the round or in height. 1 repeat is the diagram the way it appears in the pattern. If it says to work 5 repeats of A.1 in the round, then you work A.1 a total of 5 times after/next to each other in the round. If it says to work 2 repeats of A.1 vertically/in height you work the entire diagram once, then begin again at the start and work the entire diagram one more time.

Chain stitches are slightly narrower than other stitches and to avoid working the cast-on edge too tight, we simply chain more stitches to begin with. The stitch count will be adjusted on the following row to fit the pattern and measurement sketch.

The rib edge is more elastic and will contract slightly compared to, for example, stocking stitch. By increasing before the rib edge, you avoid a visible difference in width between the rib edge and the rest of the body.

It’s very easy to cast off too tightly, and by making yarn overs while casting off (and simultaneously casting these off) you avoid a too tight cast off edge.

See DROPS video: How to bind off with yarn overs (yo)

To achieve an even increase (or decrease) you can increase on, for example: every 3rd and 4th row alternately, like so: work 2 rows and increase on the 3rd row, work 3 rows and increase on the 4th. Repeat this until the increase is complete.

See DROPS lesson: Increase or decrease 1 st on every 3rd and 4th row alternately

Should you prefer to work in the round instead of back and forth, you may of course adjust the pattern. You’ll need to add steeks mid-front (usually 5 stitches), and follow the instructions. When you would normally turn and work from the wrong side, simply work across the steek and continue in the round. At the end you’ll cut the piece open, pick up stitches to work bands, and cover the cut edges.

See DROPS video: How to knit steeks and cut open

Should you prefer to work back and forth instead of in the round, you may of course adjust the pattern so you work the pieces separately and then assemble them at the end. Divide the stitches for the body in 2, add 1 edge stitch in each side (for sewing) and work the front and back pieces separately.

See DROPS lesson: Can I adapt a pattern for circular needles into straight needles?

Pattern repeats can vary slightly in the different sizes, in order to get the correct proportions. If you’re not working the exact same size as the garment in the photo, yours might deviate slightly. This has been carefully developed and adjusted so that the complete impression of the garment is the same in all sizes.

Make sure to follow instructions and diagrams for your size!

If you have found a pattern you like which is available in women’s size it’s not very difficult to convert it to men’s size. The biggest difference will be the length of sleeves and body. Start working on the women size that you think would fit across the chest. The additional length will be worked right before you cast off for the armhole/sleeve cap. If the pattern is worked top-down you can add the length right after the armhole or before the first decrease on sleeve.

Regarding additional yarn amount, this will depend on how much length you add, but it is better with a skein too many than too few.

All yarns will have excess fibres (from production) that might come off as lint or shedding. Brushed yarns (ie hairier yarns) have more of these loose, excess fibres, causing more shedding.

Shedding also depends on what is worn under or over the garment, and whether this pulls at the yarn fibres. It’s therefore not possible to guarantee that there will be no shedding

Below are some tips on how to get the best result when working with hairier yarns:

1. When the garment is finished (before you wash it) shake it vigorously so the looser hairs come off. NOTE: do NOT use a lint roller, brush or any method that pulls at the yarn.

2. Place the garment in a plastic bag and put it in your freezer - the temperature will cause the fibres to become less attached to each other, and excess fibres will come off easier.

3. Leave in the freezer for a few hours before taking it out and shaking it again.

4. Wash the garment according to the instructions on the yarn label.

Pilling is a natural process that happens to even the most exclusive of fibers. It's a natural sign of wear and tear that is hard to avoid, and that is most visible in high friction areas of your garment like a sweater's arms and cuffs.

You can make your garment look as new by removing the pilling, using a fabric comb or a pill/lint remover.

Still can't find the answer you need? Then scroll down and leave your question so one of our experts can try to help you. This will be done normally within 5 to 10 working days.
In the meantime, you can read the questions and answers that others have left to this pattern or join the DROPS Workshop on Facebook to get help from fellow knitters/crocheters!

You might also like...

Sparkly Poncho

Cheryl, Canada

159-1 Riviera Maya

Nathalie, France

159-1 Riviera Maya

Nathalie, France

Post a comment to pattern DROPS 159-1

We would love to hear what you have to say about this pattern!

If you want to leave a question, please make sure you select the correct category in the form below, to speed up the answering process. Required fields are marked *.

Comments / Questions (116)

country flag Kim Dwyer wrote:

Hi, is this pattern available with written instructions? I am unable to follow chart patterns. Thank you.

11.02.2023 - 06:24

DROPS Design answered:

Dear Kim, the pattern is only available as posted online, with both written instructions and charts. You can check out the following lesson for help reading knitting charts: https://www.garnstudio.com/lesson.php?id=68&cid=19. Happy knitting!

13.02.2023 - 00:04

country flag Anna Auriemma wrote:

Buongiorno, volevo sapere se il diagramma A4 è stato aggiornato (la farfalla) se si dove lo trovo grazie

25.01.2023 - 20:56

DROPS Design answered:

Buonasera Anna, la farfalla è il diagramma A.9 ed è già stato aggiornato: quello sul sito è corretto. Buon lavoro!

25.01.2023 - 21:40

country flag Sharon wrote:

I am unable to use circular needles I have to knit with long pins - could I split this into back & front and if so how many extra stitches would I need to allow for seams? I love all your patterns, and am an experienced knitter. Just struggling to ‘go for it’ and purchase pattern and yarn….

24.07.2021 - 10:31

DROPS Design answered:

Dear Sharon, we have a lesson on how to adapt a pattern for straight needles HERE. I hope it will help. Happy Stitching!

24.07.2021 - 12:15

country flag Marilyn wrote:

Hallo, Ik zou graag dit patroon willen bestellen hoe doe ik dit,nog nooit gedaan ben dr helemaal weg van Ik hoor graag van u Vriendelijke groet Marilyn

19.07.2020 - 11:59

DROPS Design answered:

Dag Marilyn,

Je kunt het patroon gratis afdrukken door op de knop 'Afdrukken' onder de materialenlijst bij het patroon, te klikken. Vervolgens klik je op 'patroon' en dan in het venster dat dan in beeld komt, klik je helemaal rechts boven op 'Het patroon afdrukken' om hem naar je printer te sturen.

20.07.2020 - 08:35

country flag Vivi Lejsgaard wrote:

Hej igen:-) Diagram A1 = højde 14 , A2 og A3 højde på 12. Diagram A4 og A5 en højde på 16, hvordan passer det sammen? Hvis jeg strikker A5 + A6 + A7 (1 1/2 gang) hvad sker der så, når jeg når 8 rækker op, hvor der ikke kan opdeles i et halvt mønster? På forhånd tak:-) Mvh. Vivi

02.07.2020 - 14:37

DROPS Design answered:

Hei Vivi. Du strikker halve mønster i bredden, ikke i høyden. Så når du strikker A.7 (mellom merkene), strikkes diagrammene A.2, A.4, A5 og A.3 som før. Les gjerne vår steg-for-steg leksjon på "Hvordan lese strikkediagram", som du finner nederst på oppskriften. God Fornøyelse!

06.07.2020 - 09:54

country flag Vivi Lejsgaard wrote:

Jeg har brug for hjælp, for når der er 41 masker tilbage, kan jeg ikke lave diagram 7A til 7C, hvor der er 31 masker.

29.06.2020 - 20:25

DROPS Design answered:

Hej Vivi, jo du strikker A.7A (5masker), A.7B 1½gang (30 masker), A.7C (6masker) ialt 41 masker. God fornøjelse!

02.07.2020 - 11:02

country flag SIVIGNON wrote:

Bonjour, concernant le tricot de A6, au début, il est dit que pout toutes les tailles, il faut continuer ainsi, c'est à dire qu'on tricote le 3eme rang de A6 en entier A6A+A6B+A6C jusqu'à la fin de la grille càd 8 rangs? Merci de votre réponse. Valérie.

12.03.2020 - 12:01

DROPS Design answered:

Bonjour Mme Siviginon, je ne comprends pas votre question avec le 3ème rang de A.6. Vous devez tricotez les 8 rangs de A.6 ainsi: 4 m de bordure, continuez A.2 et A.4 comme avant, tricotez ensuite A.6 entre les marqueurs (= 1 x A.6A, répétez A.6B et terminez par 1 xA.6C), continuez A.5 et A.3 comme avant et terminez par 4 m de bordure. Au 3ème rang de A.6, tricotez la dernière m de A.6A avec les 2 premières m de A.6B, puis la dernière m de A.6B avec les 2 premières m du A.6B suivant/de A.6C (= le 1er jeté = dernière m du diagramme). Bon tricot!

12.03.2020 - 13:03

country flag Mimi wrote:

Bij de Nederlandse vertaling staat bij Rand st: ... brei elke 5e nld... Bij alle andere vertalingen wordt er de 6e nld genoemd. Wat is nu juist?

17.02.2020 - 11:42

DROPS Design answered:

Dag Mimi,

Het moet inderdaad iedere 6e naald zijn. Waarschijnlijk is er een foutje in de Nederlandse vertaling geslopen. Bedankt voor het doorgeven; het is nu aangepast. Veel breiplezier!

20.02.2020 - 21:27

Liely Aritanty wrote:

May I download free patten?

16.05.2018 - 04:00

DROPS Design answered:

Dear Mrs Aritanty, our pattern can only be printed but you can use a virtual printer to save them as a .PDF file. Happy knitting!

16.05.2018 - 09:54

country flag Regine wrote:

Bonjour je voudrais tricoter ce modèle car le fil Paris. Pouvez vous m aider merci. Cordialement

26.04.2018 - 17:15

DROPS Design answered:

Bonjour Régine, ce modèle se tricote avec un fil du groupe B alors que Paris appartient au groupe C. Découvrez ici tous les modèles que vous pouvez réaliser en Paris. Bon tricot!

27.04.2018 - 08:42