DROPS Bomull-Lin
DROPS Bomull-Lin
53% Cotton, 47% Linen
from 3.45 $ /50g
Get the yarn to make this pattern from 44.85$.

The yarn cost is calculated from the pattern’s smallest size and the yarn’s cheapest product type. Looking for an even better price? You might find it on the DROPS Deals!

DROPS SS24

Lace Affair

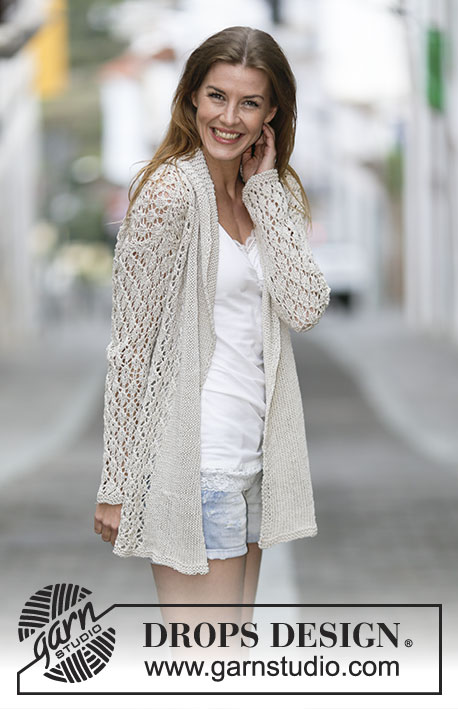
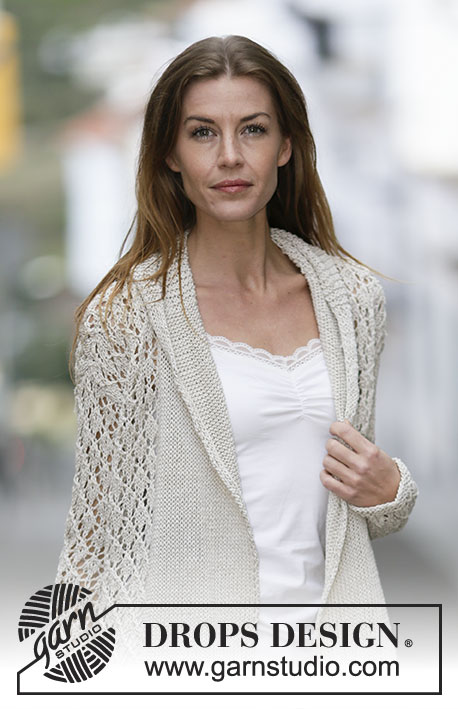
Knitted DROPS jacket with lace pattern and shawl collar in "Bomull-Lin" or "Paris". Size: S - XXXL.

DROPS 159-2
DROPS design: Pattern no l-131
Yarn group C or A + A
----------------------------------------------------------
Size: S - M - L - XL - XXL - XXXL
Finished measurements:
Bust: 96-106-112-126-136-146 cm / 37 3/4"-41 3/4"-44"-49½"-53½"-57½"
Full length: 62-64-66-68-70-72 cm / 24 3/8''-25¼''-26''-26¾''-27½''-28 3/8''

Materials:
DROPS BOMULL-LIN from Garnstudio
650-700-750-850-950-1000 g color no 03, light beige
Or use:
DROPS PARIS from Garnstudio
700-800-850-950-1050-1150 g color no 26, dark beige

DROPS CIRCULAR NEEDLE (80 cm / 32'') SIZE 5.5 mm / US 9 - or size needed to get 16 sts x 20 rows in stockinette st = 4'' x 4'' (10 x 10 cm).
DROPS CIRCULAR NEEDLE (80 cm / 32'') SIZE 4.5 mm/US 7 – for garter st.

-------------------------------------------------------

Alternative Yarn – See how to change yarns here
Yarn Groups A to F – Use the same pattern and change the yarn here
Yarn usage using an alternative yarn – Use our yarn converter here

-------------------------------------------------------

DROPS Bomull-Lin
DROPS Bomull-Lin
53% Cotton, 47% Linen
from 3.45 $ /50g
Get the yarn to make this pattern from 44.85$.

The yarn cost is calculated from the pattern’s smallest size and the yarn’s cheapest product type. Looking for an even better price? You might find it on the DROPS Deals!

Pattern instructions

NOTE: This pattern is written in American English. All measurements in charts are in cm. For conversion from inches to cm - click here. There are different terms for crocheting in American and British English. If this pattern includes crochet, click for "crochet terms" here. For this pattern in British English, please click here.
GARTER ST (back and forth):
K all rows. 1 ridge = K2 rows.

PATTERN:
See diagram A.1. The diagram show all rows in pattern seen from RS.

KNITTING TIP:
Band sts will wrinkle inwards when working but lay flat after assembly.

INCREASE TIP:
Inc 1 st by making 1 YO, on next row work YO twisted (i.e. work in the back loop of st instead front) to avoid holes.
----------------------------------------------------------

BODY:
Worked back and forth on circular needle from mid front.
Loosely cast on 185-201-211-235-251-265 sts on circular needle size 4.5 mm / US 7 with Bomull-Lin or Paris. Work 2 ridges in GARTER ST - see explanation above.
Switch to circular needle size 5.5 mm / US 9, work next row (= RS) as follows: 2 sts in stockinette st, P 1, and stockinette st over the next 26-28-27-27-26-24 sts (= band), work A.1A (= 4 sts), A.1B (= 6 sts) 20-22-24-28-31-34 times in total, A.1C (= 3 sts), work in stockinette st over the next 26-28-27-27-26-24 sts, P 1 and 2 sts in stockinette st (= band). Continue like this - READ KNITTING TIP AND REMEMBER THE KNITTING GAUGE. When piece measures approx. 46-47-48-49-50-51 cm / 18''-18½''-19''-19¼''-19¾''-20'', insert 2 markers; 54-58-60-67-71-75 sts in from each side (= 77-85-91-101-109-115 sts between markers on back piece). On next row bind off 3-4-5-6-7-8 sts for armholes on each side of both markers (= 6-8-10-12-14-16 bind off sts in each side). Now divide the piece and finish each part separately.

BACK PIECE:
= 71-77-81-89-95-99 sts. Continue pattern as before with 1 edge st in garter st in each side until piece measures 60-62-64-66-68-70 cm / 23 5/8''-24 3/8''-25¼''-26''-26¾''-27½''. Then bind off the middle 21-23-23-25-25-27 sts for neck and finish each shoulder separately. Continue to dec 1 st on next row from neck = 24-26-28-31-34-35 sts remain on the shoulder. Bind off when piece measures 62-64-66-68-70-72 cm / 24 3/8''-25¼''-26''-26¾''-27½''-28 3/8''.

LEFT FRONT PIECE:
= 51-54-55-61-64-67 sts. Work 1 edge st in garter st towards the armhole and continue with pattern as before, and finish with 26-27-27-27-27-24 sts in stockinette st, P 1 and 2 sts in stockinette st (= band sts) towards mid front until piece measures 62-64-66-68-70-72 cm / 24 3/8''-25¼''-26''-26¾''-27½''-28 3/8''. At beg of next row from RS bind off the first 24-26-28-31-34-36 sts for shoulder = 27-28-27-30-30-31 sts remain for collar. Work in garter st over these sts - AT THE SAME TIME work short rows, beg from WS as follows: * Work 1 ridge over all sts. On next row from WS K 21-22-21-24-24-25, turn and K back *, repeat from *-* until piece measures approx. 9-10-10-10½-10½-11 cm / 3½"-4"-4"-4 1/4"-4 1/4"-4½"' from bind off for shoulder (short side). Loosely bind off all sts.

RIGHT FRONT PIECE:
Work as left front piece but reversed. Beg short rows on collar from RS.

SLEEVE:
Worked back and forth on needle.
Loosely cast on 35-37-39-39-41-43 sts (includes 1 edge st each side) on circular needle size 4.5 mm / US 7 with Bomull-Lin or Paris. Work 2 ridges. Switch to circular needle size 5.5 mm / US 9, work next row (= RS) as follows: 1 edge st in garter st, 1-2-0-0-1-2 sts in stockinette st, work A.1A (= 4 sts), A.1B over the next 24-24-30-30-30-30 sts (= 4-4-5-5-5-5 times), A.1C (= 3 sts), 1-2-0-0-1-2 sts in stockinette st, finish with 1 edge st in garter st. When piece measures 8 cm / 3 1/8'', inc 1 st inside 1 edge st in each side - READ INCREASE TIP above, work the inc sts in pattern. Repeat inc every 4½-4-3½-3-2½-2½ cm / 1 3/4"-1½"-1 1/4"-1 1/8"-7/8"-7/8" 8-9-10-11-12-13 more times = 53-57-61-63-67-71 sts. When piece measures 45-44-43-40-39-37 cm / 17 3/4"-17 1/4"-17"-15 3/4"-15 1/4"-14½", insert 1 marker in each side of sleeve (for assembly). When piece measures 47-46-46-44-43-42 cm / 18½"-18"-18"-17 1/4"-17"-16½" (shorter measurements in the larger sizes because of wider shoulders), bind off all sts.

ASSEMBLY:
Sew shoulder seams and sew in sleeves in outer loops of edge sts. Sew the sleeve seams in one inside 1 edge st - NOTE: Section worked after marker at the top of sleeve should fit the bind off for armhole. Sew band tog mid back and sew band to the neck egde - NOTE! Seam should be at the back so that is is not visible when collar is folded down.
Lightly steam the band with iron, it will then be flat.

Diagram

All measurements in charts are in cm.

symbols = K from RS, P from WS
symbols = K 2 tog
symbols = slip 1 st as if to K, K 1, psso
symbols = slip 1 st as if to K, K 2 tog, psso
symbols = 1 YO between 2 sts
diagram
Do you have a question? See a list of frequently asked questions (FAQ)

Knitting tension is what determines the final measurements of your work, and is usually measured per 10 x 10 cm. It is provided like so: number of stitches in width x number of rows in height - eg: 19 stitches x 26 rows = 10 x 10 cm.

The knitting tension is very individual; some people knit/crochet loosely while others work tightly. You adjust the knitting tension with the needle size, which is why the suggested needle size only serve as a guide! You need to adjust this (up or down) to ensure that YOUR knitting tension matches the knitting tension provided in the pattern. If you work with a different knitting tension than provided you will have a different yarn consumption, and your work will have different measurements than what the pattern suggests.

The knitting tension also determines which yarns can replace each other. As long as you achieve the same knitting tension you can replace one yarn with another.

See DROPS lesson: How to measure your tension/gauge

See DROPS video: How to make a gauge tension swatch

The required amount of yarn is provided in grams, eg: 450 g. To calculate how many balls you’ll need you first need to know how many grams are in 1 ball (25g, 50g or 100g). This information is available if you click on the individual yarn quality on our pages. Divide the amount required with the amount of each ball. For example, if each ball is 50g (the most common amount), the calculation will be as follows: 450 / 50 = 9 balls.

The important thing when changing from one yarn to another is that the knitting/crochet tension remains the same. This is so that the measurements of the finished piece will be the same as on the sketch provided. It is easier to achieve the same knitting tension using yarns from the same yarn group. It is also possible to work with multiple strands of a thinner yarn to achieve the knitting tension of a thicker one. Please try our yarn converter. We recommend you to always work a test swatch.

Please NOTE: when changing yarn the garment might have a different look and feel to the garment in the photo, due to individual properties and qualities of each yarn.

See DROPS lesson: Can I use a different yarn than the one mentioned in the pattern?

All our yarns are categorised into yarn groups (from A to F) according to thickness and knitting tension – group A contains the thinnest yarns and group F the thickest. This makes it easier for you to find alternative yarns to our patterns, should you wish to switch yarn. All yarns within the same group have a similar knitting tension and can easily replace each other. However, different yarn qualities have different structures and properties which will give the finished work a unique look and feel.

Click here for an overview of the yarns in each yarn group

At the top of all our patterns you’ll find a link to our yarn converter, which is a helpful tool should you wish to use a different yarn than suggested. By filling in the yarn quality you wish to replace, the amount (in your size) and number of strands, the converter will present good alternative yarns with the same knitting tension. Additionally it will tell you how much you’ll require in the new qualities and whether you’ll need to work with multiple strands. Most skeins are 50g (some are 25g or 100g).

If the pattern is worked with multiple colours, every colour will have to be converted separately. Similarly, if the pattern is worked with several strands of different yarns (for example 1 strand Alpaca and 1 strand Kid-Silk) you will have to find alternatives for each, individually.

Click here to see our yarn converter

Since different yarns have different qualities and textures we have chosen to keep the original yarn in our patterns. However, you can easily find options among our available qualities by using our yarn converter, or simply pick a yarn from the same yarn group.

It is possible that some retailers still have discontinued yarns in stock, or that someone has a few skeins at home that they would like to find patterns for.

The yarn converter will provide both alternative yarn as well as required amount in the new quality.

If you think it's hard to decide what size to make, it can be a good idea to measure a garment you own already and like the size of. Then you can pick the size by comparing those measures with the ones available in the pattern's size chart.

You'll find the size chart at the bottom of the pattern.

See DROPS lesson: How to read size chart

The needle size provided in the pattern serves only as a guide, the important thing is to follow the knitting tension. And since knitting tension is very individual, you will have to adjust the needle size to ensure that YOUR tension is the same as in the pattern – maybe you’ll have to adjust 1, or even 2 needle sizes, up or down to achieve the correct tension. For this, we recommend that you work test swatches.

Should you work with a different knitting tension than the one provided, the measurements of the finished garment might deviate from the measurement sketch.

See DROPS lesson: How to measure your tension/gauge

See DROPS video: How to make a gauge tension swatch

Working a garment top-down provides more flexibility and room for personal adjustment. For example it is easier to try the garment on while working, as well as making adjustments to length of yoke and shoulder caps.

The instructions are carefully explaining every step, in the correct order. Diagrams are adjusted to the knitting direction and are worked as usual.

The diagram depicts all rows/rounds, and every stitch seen from the right side. It is read from bottom to top, from right to left. 1 square = 1 stitch.

When working back and forth, every other row is worked from the right side and every other row is worked from the wrong side. When working from the wrong side, the diagram will have to be worked reversed: from left to right, knit stitches are purled, purl stitches are knit etc.

When working in the round every round is worked from the right side and the diagram are worked from right to left on all rounds.

See DROPS lesson: How to read knitting diagrams

The diagram depicts all rows/rounds, and every stitch seen from the right side. It is worked from bottom to top, from right to left.

When working back and forth every other row is worked from the right side: from right to left and every other row is worked from the wrong side: from left to right.

When working in the round, every row in the diagram are worked from the right side, from right to left.

When working a circular diagram you start in the middle and work your way outwards, counter clockwise, row by row.

The rows usually start with a given number of chain stitches (equivalent to the height of the following stitch), this will either be depicted in the diagram or explained in the pattern.

See DROPS lesson: How to read crochet diagrams

Instructions for working several diagrams after each other on the same row/round, will often be written like so: “work A.1, A.2, A.3 a total of 0-0-2-3-4 times". This means you work A.1 once, then A.2 is worked once, and A.3 is repeated (in width) the number of times provided for your size – in this case like so: S = 0 times, M = 0 times, L=2 times, XL= 3 times and XXL = 4 times.

The diagrams are worked as usual: begin with the first row in A.1, then work the first row in A.2 etc.

See DROPS lesson: How to read knitting diagrams

See DROPS lesson: How to read crochet diagrams

The total width of the garment (from wrist-to-wrist) will be larger in the larger sizes, despite the actual sleeves being shorter. The larger sizes have longer sleeve caps and wider shoulders, so there will be a good fit in all sizes.

The measurement sketch/schematic drawing provides information regarding the full length of the garment. If it’s a jumper or a jacket the length is measured from the highest point on the shoulder (usually closest to the neckline), and straight down to the bottom of the garment. It is NOT measured from the tip of shoulder. Similarly, the length of yoke is measured from the highest point on the shoulder and down to where yoke is split into body and sleeves.

See DROPS lesson: How to read a schematic drawing

Diagrams are often repeated on the round or in height. 1 repeat is the diagram the way it appears in the pattern. If it says to work 5 repeats of A.1 in the round, then you work A.1 a total of 5 times after/next to each other in the round. If it says to work 2 repeats of A.1 vertically/in height you work the entire diagram once, then begin again at the start and work the entire diagram one more time.

Chain stitches are slightly narrower than other stitches and to avoid working the cast-on edge too tight, we simply chain more stitches to begin with. The stitch count will be adjusted on the following row to fit the pattern and measurement sketch.

The rib edge is more elastic and will contract slightly compared to, for example, stocking stitch. By increasing before the rib edge, you avoid a visible difference in width between the rib edge and the rest of the body.

It’s very easy to cast off too tightly, and by making yarn overs while casting off (and simultaneously casting these off) you avoid a too tight cast off edge.

See DROPS video: How to bind off with yarn overs (yo)

To achieve an even increase (or decrease) you can increase on, for example: every 3rd and 4th row alternately, like so: work 2 rows and increase on the 3rd row, work 3 rows and increase on the 4th. Repeat this until the increase is complete.

See DROPS lesson: Increase or decrease 1 st on every 3rd and 4th row alternately

Should you prefer to work in the round instead of back and forth, you may of course adjust the pattern. You’ll need to add steeks mid-front (usually 5 stitches), and follow the instructions. When you would normally turn and work from the wrong side, simply work across the steek and continue in the round. At the end you’ll cut the piece open, pick up stitches to work bands, and cover the cut edges.

See DROPS video: How to knit steeks and cut open

Should you prefer to work back and forth instead of in the round, you may of course adjust the pattern so you work the pieces separately and then assemble them at the end. Divide the stitches for the body in 2, add 1 edge stitch in each side (for sewing) and work the front and back pieces separately.

See DROPS lesson: Can I adapt a pattern for circular needles into straight needles?

Pattern repeats can vary slightly in the different sizes, in order to get the correct proportions. If you’re not working the exact same size as the garment in the photo, yours might deviate slightly. This has been carefully developed and adjusted so that the complete impression of the garment is the same in all sizes.

Make sure to follow instructions and diagrams for your size!

If you have found a pattern you like which is available in women’s size it’s not very difficult to convert it to men’s size. The biggest difference will be the length of sleeves and body. Start working on the women size that you think would fit across the chest. The additional length will be worked right before you cast off for the armhole/sleeve cap. If the pattern is worked top-down you can add the length right after the armhole or before the first decrease on sleeve.

Regarding additional yarn amount, this will depend on how much length you add, but it is better with a skein too many than too few.

All yarns will have excess fibres (from production) that might come off as lint or shedding. Brushed yarns (ie hairier yarns) have more of these loose, excess fibres, causing more shedding.

Shedding also depends on what is worn under or over the garment, and whether this pulls at the yarn fibres. It’s therefore not possible to guarantee that there will be no shedding

Below are some tips on how to get the best result when working with hairier yarns:

1. When the garment is finished (before you wash it) shake it vigorously so the looser hairs come off. NOTE: do NOT use a lint roller, brush or any method that pulls at the yarn.

2. Place the garment in a plastic bag and put it in your freezer - the temperature will cause the fibres to become less attached to each other, and excess fibres will come off easier.

3. Leave in the freezer for a few hours before taking it out and shaking it again.

4. Wash the garment according to the instructions on the yarn label.

Pilling is a natural process that happens to even the most exclusive of fibers. It's a natural sign of wear and tear that is hard to avoid, and that is most visible in high friction areas of your garment like a sweater's arms and cuffs.

You can make your garment look as new by removing the pilling, using a fabric comb or a pill/lint remover.

Still can't find the answer you need? Then scroll down and leave your question so one of our experts can try to help you. This will be done normally within 5 to 10 working days.
In the meantime, you can read the questions and answers that others have left to this pattern or join the DROPS Workshop on Facebook to get help from fellow knitters/crocheters!

You might also like...

Lace Affair

Isa, Germany

Villapaita

Anna, Finland

Shannon's Lace Affair

Susan, United States

Krajkový cardigan

Motánky, Czech Republic

Post a comment to pattern DROPS 159-2

We would love to hear what you have to say about this pattern!

If you want to leave a question, please make sure you select the correct category in the form below, to speed up the answering process. Required fields are marked *.

Comments / Questions (95)

country flag Mlb wrote:

Bonjour je réalise ce modèle. Pour les manches, en taille M, je ne comprends pas comment on arrive à 56 m après les augmentations : le nombre de mailles, au départ est impair et on augmente toujours par 2 mailles, ce qui ne peut pas faire un nombre pair de mailles à la fin. Si je calcule bien, on a 20 mailles de plus (2 fois 10) soit 57 mailles et non 56 comme c'est écrit sur le patron.Merci aux concepteurs et aux traducteurs de Drops !!

08.09.2015 - 21:31

DROPS Design answered:

Bonjour Mme Mlb et merci. Votre question a été transmise à nos stylistes qui vont vérifier. Merci d'avance pour votre patience.

09.09.2015 - 09:46

country flag Veerle Jonckheere wrote:

Ik moet nu het werk opsplitsen in het achterpand en 2 voorpanden. Ik brei maat XXL en zit in de 1e rij van het patroon. Als ik alles tel kom ik aan beide kanten aan 71 steken uit met tussen de markeerders 109 steken. Als ik nu het patroon begin te breien kom ik niet aan 64 steken die voor de voorpanden dienen. Ook tussen de markeerders kom ik geen 95 steken uit. Moet deze rij volgens het patroon gebreid worden? Of in ribbelsteek afkanten? Of afgekanten in de averechtse kant?

31.08.2015 - 16:37

DROPS Design answered:

Hoi Veerle. Ik denk dat je verkeerd hebt afgekant. Je hebt in totaal 251 st en markeerders 71 st vanaf elke kant (= voorpanden) met 109 st voor het achterpand. Je kant dan 7 st af aan beide kant van beide markeerders (14 st in totaal voor elk armsgat) = 71-7 = 64 voor beide voorpanden en 109-14 = 95 voor het achterpand. Je breit steeds het patroon en kant af in r of av = je mag op zowel de goede als de verkeerde kant afkanten.

02.09.2015 - 16:22

country flag Sonjamarie wrote:

Dankeschön für die Erklärung. Ich Dummerchen hatte Paris mit Muskat verwechselt. Tsss.

16.08.2015 - 01:06

country flag Nuala Headon wrote:

I'm following pattern with 211 stitches. allowing for 30 stitches at each end for the Band, I have done the pattern A1as follows; A(4 sts), B (6 sts) X 24, C(3 sts). All goes well until row 7 where it looks like B section is mixed with A&C. Row 7 looks like ABC have to be repeated together but the pattern looks wrong. What am I doing wrong.

11.08.2015 - 23:09

DROPS Design answered:

Dear Mrs Headon, the video below shows how to work this pattern on another jacket and should help you to get how to work row 7. Happy knitting!

12.08.2015 - 08:57

country flag Tina wrote:

Paris=75 m. Bomull-lin=85 m

11.08.2015 - 09:50

country flag Sonjamarie wrote:

Hallo liebesTeam! Warum benötigt man für dieses Modell in Paris 50g mehr als Bumull Lin, obwohl Paris doch eine mehr als 20% längere Lauflänge hat?

11.08.2015 - 00:10

DROPS Design answered:

Paris hat eine kürzere Lauflänge, 75 m, Bomull-Lin hingegen 85 m pro 50 g. Exemplarisch für Größe S berechnet: 650 g Bomull-Lin = 13 x 50 g = 13 x 85 m = 1105 m, Paris: 700 g = 14 x 15 g = 14 x 75 m = 1050 m, also gerundet auf eine ganze Knäuellänge die gleiche Anzahl an Laufmetern (die Abweichung beträgt ja nur 55 m, also weniger als 1 Knäuel).

11.08.2015 - 11:22

country flag Veerle wrote:

In de 7e rij van patroon A1, wat doe je dan met de herhaling van stuk B? A naar B en B naar C overlappen elkaar daar.. Alvast bedankt!

31.07.2015 - 23:33

DROPS Design answered:

Hoi Veerle. Je breit door. Het patroon is steeds hetzelfde (omslag, minderen, omslag) met 3 r st tussen. Je begint dan wel met 2 r st voor het patroon en je moet eindigen met patroon en 2 r steken.

03.08.2015 - 14:59

country flag Dlaine wrote:

I'm having some trouble with the end of the left front piece. I've got it at the correct length and did the bind off of the first 26 (working the medium pattern) and I now have 28 left. I'm confused because it says garter stich, but then it says short rows. Do I just work the 22 and turn? What about the remaining 6? Also not clear on the short rows after viewing multiple tutorials. Any help would be appreciated!

31.07.2015 - 08:44

DROPS Design answered:

Dear Dlaine, you are working now in short rows to shape the shawl collar: work 2 rows over the first 22 sts (the remaining 6 sts are unworked for 1 ridge), 2 rows over all sts - as in video below. Happy knitting!

31.07.2015 - 11:04

country flag Eline Sørgård wrote:

Jeg har kommet til rad 7 i mønsteret. I oppskriften står det at man skal strikke a1a 1 gang, 1b x-antall ganger, og så c1 1 gang. Men på rad 7 går maskene som skal strikkes sammen akkurat mellom overgangene mellom a b og c. Kan dere forklare hvordan rad 7 skal strikkes slik at det blir riktig i forhold til maske-antall? Takk 😀

27.07.2015 - 22:26

DROPS Design answered:

Hej Eline, Hvis du begynder med A således: 2 ret, 1kast, ta 1 m løs av p som om den skulle strikkes r, 2 r sm, løft den løse m over, 1 kast, 3 ret, 1 kast, ta 1 m løs av p som om den skulle strikkes r, 2 r sm, løft den løse m over, 1kast osv.... så du sørger for at altid strikke 3 ret imellem de 2 kast du ser i B. God fornøjelse!

28.07.2015 - 13:48

country flag Liesbeth Van Der Zel wrote:

Ik hoop dat iemand antwoord heeft op mijn vraag. Klopt het dat het patroon niet helemaal symetrisch is? Aan het begin van het patroon brei je 4 steken, vervolgens (in mijn geval) 31 x 6 steken en aan het eind 3 steken. Of begrijp ik iets niet goed?

14.07.2015 - 11:49

DROPS Design answered:

Hoi Liesbeth. Het patroon wordt symmetrisch. Je begint en eindigt met 1 r en motief. Door de opdeling van A, B en C lijkt het misschien niet zo, maar kijkend op de teltekening kan je zien dat ze wel gelijk zijn.

29.07.2015 - 14:55