DROPS Bomull-Lin
DROPS Bomull-Lin
53% Cotton, 47% Linen
from 3.45 $ /50g
Get the yarn to make this pattern from 44.85$.

The yarn cost is calculated from the pattern’s smallest size and the yarn’s cheapest product type. Looking for an even better price? You might find it on the DROPS Deals!

DROPS SS24

Lace Affair

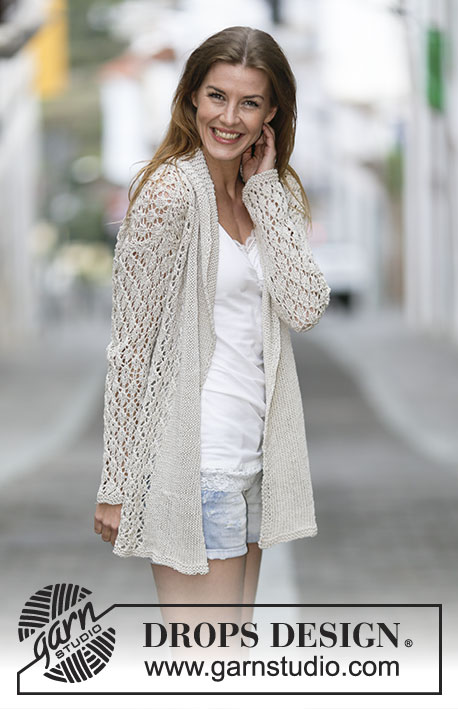
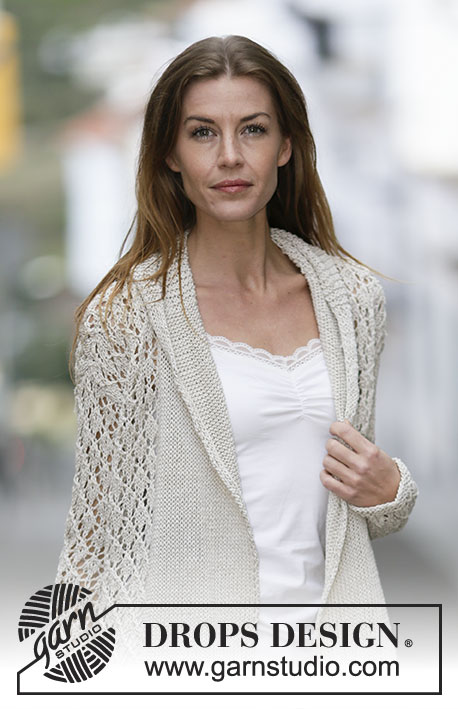
Knitted DROPS jacket with lace pattern and shawl collar in "Bomull-Lin" or "Paris". Size: S - XXXL.

DROPS 159-2
DROPS design: Pattern no l-131
Yarn group C or A + A
----------------------------------------------------------
Size: S - M - L - XL - XXL - XXXL
Finished measurements:
Bust: 96-106-112-126-136-146 cm / 37 3/4"-41 3/4"-44"-49½"-53½"-57½"
Full length: 62-64-66-68-70-72 cm / 24 3/8''-25¼''-26''-26¾''-27½''-28 3/8''

Materials:
DROPS BOMULL-LIN from Garnstudio
650-700-750-850-950-1000 g color no 03, light beige
Or use:
DROPS PARIS from Garnstudio
700-800-850-950-1050-1150 g color no 26, dark beige

DROPS CIRCULAR NEEDLE (80 cm / 32'') SIZE 5.5 mm / US 9 - or size needed to get 16 sts x 20 rows in stockinette st = 4'' x 4'' (10 x 10 cm).
DROPS CIRCULAR NEEDLE (80 cm / 32'') SIZE 4.5 mm/US 7 – for garter st.

-------------------------------------------------------

Alternative Yarn – See how to change yarns here
Yarn Groups A to F – Use the same pattern and change the yarn here
Yarn usage using an alternative yarn – Use our yarn converter here

-------------------------------------------------------

DROPS Bomull-Lin
DROPS Bomull-Lin
53% Cotton, 47% Linen
from 3.45 $ /50g
Get the yarn to make this pattern from 44.85$.

The yarn cost is calculated from the pattern’s smallest size and the yarn’s cheapest product type. Looking for an even better price? You might find it on the DROPS Deals!

Pattern instructions

NOTE: This pattern is written in American English. All measurements in charts are in cm. For conversion from inches to cm - click here. There are different terms for crocheting in American and British English. If this pattern includes crochet, click for "crochet terms" here. For this pattern in British English, please click here.
GARTER ST (back and forth):
K all rows. 1 ridge = K2 rows.

PATTERN:
See diagram A.1. The diagram show all rows in pattern seen from RS.

KNITTING TIP:
Band sts will wrinkle inwards when working but lay flat after assembly.

INCREASE TIP:
Inc 1 st by making 1 YO, on next row work YO twisted (i.e. work in the back loop of st instead front) to avoid holes.
----------------------------------------------------------

BODY:
Worked back and forth on circular needle from mid front.
Loosely cast on 185-201-211-235-251-265 sts on circular needle size 4.5 mm / US 7 with Bomull-Lin or Paris. Work 2 ridges in GARTER ST - see explanation above.
Switch to circular needle size 5.5 mm / US 9, work next row (= RS) as follows: 2 sts in stockinette st, P 1, and stockinette st over the next 26-28-27-27-26-24 sts (= band), work A.1A (= 4 sts), A.1B (= 6 sts) 20-22-24-28-31-34 times in total, A.1C (= 3 sts), work in stockinette st over the next 26-28-27-27-26-24 sts, P 1 and 2 sts in stockinette st (= band). Continue like this - READ KNITTING TIP AND REMEMBER THE KNITTING GAUGE. When piece measures approx. 46-47-48-49-50-51 cm / 18''-18½''-19''-19¼''-19¾''-20'', insert 2 markers; 54-58-60-67-71-75 sts in from each side (= 77-85-91-101-109-115 sts between markers on back piece). On next row bind off 3-4-5-6-7-8 sts for armholes on each side of both markers (= 6-8-10-12-14-16 bind off sts in each side). Now divide the piece and finish each part separately.

BACK PIECE:
= 71-77-81-89-95-99 sts. Continue pattern as before with 1 edge st in garter st in each side until piece measures 60-62-64-66-68-70 cm / 23 5/8''-24 3/8''-25¼''-26''-26¾''-27½''. Then bind off the middle 21-23-23-25-25-27 sts for neck and finish each shoulder separately. Continue to dec 1 st on next row from neck = 24-26-28-31-34-35 sts remain on the shoulder. Bind off when piece measures 62-64-66-68-70-72 cm / 24 3/8''-25¼''-26''-26¾''-27½''-28 3/8''.

LEFT FRONT PIECE:
= 51-54-55-61-64-67 sts. Work 1 edge st in garter st towards the armhole and continue with pattern as before, and finish with 26-27-27-27-27-24 sts in stockinette st, P 1 and 2 sts in stockinette st (= band sts) towards mid front until piece measures 62-64-66-68-70-72 cm / 24 3/8''-25¼''-26''-26¾''-27½''-28 3/8''. At beg of next row from RS bind off the first 24-26-28-31-34-36 sts for shoulder = 27-28-27-30-30-31 sts remain for collar. Work in garter st over these sts - AT THE SAME TIME work short rows, beg from WS as follows: * Work 1 ridge over all sts. On next row from WS K 21-22-21-24-24-25, turn and K back *, repeat from *-* until piece measures approx. 9-10-10-10½-10½-11 cm / 3½"-4"-4"-4 1/4"-4 1/4"-4½"' from bind off for shoulder (short side). Loosely bind off all sts.

RIGHT FRONT PIECE:
Work as left front piece but reversed. Beg short rows on collar from RS.

SLEEVE:
Worked back and forth on needle.
Loosely cast on 35-37-39-39-41-43 sts (includes 1 edge st each side) on circular needle size 4.5 mm / US 7 with Bomull-Lin or Paris. Work 2 ridges. Switch to circular needle size 5.5 mm / US 9, work next row (= RS) as follows: 1 edge st in garter st, 1-2-0-0-1-2 sts in stockinette st, work A.1A (= 4 sts), A.1B over the next 24-24-30-30-30-30 sts (= 4-4-5-5-5-5 times), A.1C (= 3 sts), 1-2-0-0-1-2 sts in stockinette st, finish with 1 edge st in garter st. When piece measures 8 cm / 3 1/8'', inc 1 st inside 1 edge st in each side - READ INCREASE TIP above, work the inc sts in pattern. Repeat inc every 4½-4-3½-3-2½-2½ cm / 1 3/4"-1½"-1 1/4"-1 1/8"-7/8"-7/8" 8-9-10-11-12-13 more times = 53-57-61-63-67-71 sts. When piece measures 45-44-43-40-39-37 cm / 17 3/4"-17 1/4"-17"-15 3/4"-15 1/4"-14½", insert 1 marker in each side of sleeve (for assembly). When piece measures 47-46-46-44-43-42 cm / 18½"-18"-18"-17 1/4"-17"-16½" (shorter measurements in the larger sizes because of wider shoulders), bind off all sts.

ASSEMBLY:
Sew shoulder seams and sew in sleeves in outer loops of edge sts. Sew the sleeve seams in one inside 1 edge st - NOTE: Section worked after marker at the top of sleeve should fit the bind off for armhole. Sew band tog mid back and sew band to the neck egde - NOTE! Seam should be at the back so that is is not visible when collar is folded down.
Lightly steam the band with iron, it will then be flat.

Diagram

All measurements in charts are in cm.

symbols = K from RS, P from WS
symbols = K 2 tog
symbols = slip 1 st as if to K, K 1, psso
symbols = slip 1 st as if to K, K 2 tog, psso
symbols = 1 YO between 2 sts
diagram
Do you have a question? See a list of frequently asked questions (FAQ)

Knitting tension is what determines the final measurements of your work, and is usually measured per 10 x 10 cm. It is provided like so: number of stitches in width x number of rows in height - eg: 19 stitches x 26 rows = 10 x 10 cm.

The knitting tension is very individual; some people knit/crochet loosely while others work tightly. You adjust the knitting tension with the needle size, which is why the suggested needle size only serve as a guide! You need to adjust this (up or down) to ensure that YOUR knitting tension matches the knitting tension provided in the pattern. If you work with a different knitting tension than provided you will have a different yarn consumption, and your work will have different measurements than what the pattern suggests.

The knitting tension also determines which yarns can replace each other. As long as you achieve the same knitting tension you can replace one yarn with another.

See DROPS lesson: How to measure your tension/gauge

See DROPS video: How to make a gauge tension swatch

The required amount of yarn is provided in grams, eg: 450 g. To calculate how many balls you’ll need you first need to know how many grams are in 1 ball (25g, 50g or 100g). This information is available if you click on the individual yarn quality on our pages. Divide the amount required with the amount of each ball. For example, if each ball is 50g (the most common amount), the calculation will be as follows: 450 / 50 = 9 balls.

The important thing when changing from one yarn to another is that the knitting/crochet tension remains the same. This is so that the measurements of the finished piece will be the same as on the sketch provided. It is easier to achieve the same knitting tension using yarns from the same yarn group. It is also possible to work with multiple strands of a thinner yarn to achieve the knitting tension of a thicker one. Please try our yarn converter. We recommend you to always work a test swatch.

Please NOTE: when changing yarn the garment might have a different look and feel to the garment in the photo, due to individual properties and qualities of each yarn.

See DROPS lesson: Can I use a different yarn than the one mentioned in the pattern?

All our yarns are categorised into yarn groups (from A to F) according to thickness and knitting tension – group A contains the thinnest yarns and group F the thickest. This makes it easier for you to find alternative yarns to our patterns, should you wish to switch yarn. All yarns within the same group have a similar knitting tension and can easily replace each other. However, different yarn qualities have different structures and properties which will give the finished work a unique look and feel.

Click here for an overview of the yarns in each yarn group

At the top of all our patterns you’ll find a link to our yarn converter, which is a helpful tool should you wish to use a different yarn than suggested. By filling in the yarn quality you wish to replace, the amount (in your size) and number of strands, the converter will present good alternative yarns with the same knitting tension. Additionally it will tell you how much you’ll require in the new qualities and whether you’ll need to work with multiple strands. Most skeins are 50g (some are 25g or 100g).

If the pattern is worked with multiple colours, every colour will have to be converted separately. Similarly, if the pattern is worked with several strands of different yarns (for example 1 strand Alpaca and 1 strand Kid-Silk) you will have to find alternatives for each, individually.

Click here to see our yarn converter

Since different yarns have different qualities and textures we have chosen to keep the original yarn in our patterns. However, you can easily find options among our available qualities by using our yarn converter, or simply pick a yarn from the same yarn group.

It is possible that some retailers still have discontinued yarns in stock, or that someone has a few skeins at home that they would like to find patterns for.

The yarn converter will provide both alternative yarn as well as required amount in the new quality.

If you think it's hard to decide what size to make, it can be a good idea to measure a garment you own already and like the size of. Then you can pick the size by comparing those measures with the ones available in the pattern's size chart.

You'll find the size chart at the bottom of the pattern.

See DROPS lesson: How to read size chart

The needle size provided in the pattern serves only as a guide, the important thing is to follow the knitting tension. And since knitting tension is very individual, you will have to adjust the needle size to ensure that YOUR tension is the same as in the pattern – maybe you’ll have to adjust 1, or even 2 needle sizes, up or down to achieve the correct tension. For this, we recommend that you work test swatches.

Should you work with a different knitting tension than the one provided, the measurements of the finished garment might deviate from the measurement sketch.

See DROPS lesson: How to measure your tension/gauge

See DROPS video: How to make a gauge tension swatch

Working a garment top-down provides more flexibility and room for personal adjustment. For example it is easier to try the garment on while working, as well as making adjustments to length of yoke and shoulder caps.

The instructions are carefully explaining every step, in the correct order. Diagrams are adjusted to the knitting direction and are worked as usual.

The diagram depicts all rows/rounds, and every stitch seen from the right side. It is read from bottom to top, from right to left. 1 square = 1 stitch.

When working back and forth, every other row is worked from the right side and every other row is worked from the wrong side. When working from the wrong side, the diagram will have to be worked reversed: from left to right, knit stitches are purled, purl stitches are knit etc.

When working in the round every round is worked from the right side and the diagram are worked from right to left on all rounds.

See DROPS lesson: How to read knitting diagrams

The diagram depicts all rows/rounds, and every stitch seen from the right side. It is worked from bottom to top, from right to left.

When working back and forth every other row is worked from the right side: from right to left and every other row is worked from the wrong side: from left to right.

When working in the round, every row in the diagram are worked from the right side, from right to left.

When working a circular diagram you start in the middle and work your way outwards, counter clockwise, row by row.

The rows usually start with a given number of chain stitches (equivalent to the height of the following stitch), this will either be depicted in the diagram or explained in the pattern.

See DROPS lesson: How to read crochet diagrams

Instructions for working several diagrams after each other on the same row/round, will often be written like so: “work A.1, A.2, A.3 a total of 0-0-2-3-4 times". This means you work A.1 once, then A.2 is worked once, and A.3 is repeated (in width) the number of times provided for your size – in this case like so: S = 0 times, M = 0 times, L=2 times, XL= 3 times and XXL = 4 times.

The diagrams are worked as usual: begin with the first row in A.1, then work the first row in A.2 etc.

See DROPS lesson: How to read knitting diagrams

See DROPS lesson: How to read crochet diagrams

The total width of the garment (from wrist-to-wrist) will be larger in the larger sizes, despite the actual sleeves being shorter. The larger sizes have longer sleeve caps and wider shoulders, so there will be a good fit in all sizes.

The measurement sketch/schematic drawing provides information regarding the full length of the garment. If it’s a jumper or a jacket the length is measured from the highest point on the shoulder (usually closest to the neckline), and straight down to the bottom of the garment. It is NOT measured from the tip of shoulder. Similarly, the length of yoke is measured from the highest point on the shoulder and down to where yoke is split into body and sleeves.

See DROPS lesson: How to read a schematic drawing

Diagrams are often repeated on the round or in height. 1 repeat is the diagram the way it appears in the pattern. If it says to work 5 repeats of A.1 in the round, then you work A.1 a total of 5 times after/next to each other in the round. If it says to work 2 repeats of A.1 vertically/in height you work the entire diagram once, then begin again at the start and work the entire diagram one more time.

Chain stitches are slightly narrower than other stitches and to avoid working the cast-on edge too tight, we simply chain more stitches to begin with. The stitch count will be adjusted on the following row to fit the pattern and measurement sketch.

The rib edge is more elastic and will contract slightly compared to, for example, stocking stitch. By increasing before the rib edge, you avoid a visible difference in width between the rib edge and the rest of the body.

It’s very easy to cast off too tightly, and by making yarn overs while casting off (and simultaneously casting these off) you avoid a too tight cast off edge.

See DROPS video: How to bind off with yarn overs (yo)

To achieve an even increase (or decrease) you can increase on, for example: every 3rd and 4th row alternately, like so: work 2 rows and increase on the 3rd row, work 3 rows and increase on the 4th. Repeat this until the increase is complete.

See DROPS lesson: Increase or decrease 1 st on every 3rd and 4th row alternately

Should you prefer to work in the round instead of back and forth, you may of course adjust the pattern. You’ll need to add steeks mid-front (usually 5 stitches), and follow the instructions. When you would normally turn and work from the wrong side, simply work across the steek and continue in the round. At the end you’ll cut the piece open, pick up stitches to work bands, and cover the cut edges.

See DROPS video: How to knit steeks and cut open

Should you prefer to work back and forth instead of in the round, you may of course adjust the pattern so you work the pieces separately and then assemble them at the end. Divide the stitches for the body in 2, add 1 edge stitch in each side (for sewing) and work the front and back pieces separately.

See DROPS lesson: Can I adapt a pattern for circular needles into straight needles?

Pattern repeats can vary slightly in the different sizes, in order to get the correct proportions. If you’re not working the exact same size as the garment in the photo, yours might deviate slightly. This has been carefully developed and adjusted so that the complete impression of the garment is the same in all sizes.

Make sure to follow instructions and diagrams for your size!

If you have found a pattern you like which is available in women’s size it’s not very difficult to convert it to men’s size. The biggest difference will be the length of sleeves and body. Start working on the women size that you think would fit across the chest. The additional length will be worked right before you cast off for the armhole/sleeve cap. If the pattern is worked top-down you can add the length right after the armhole or before the first decrease on sleeve.

Regarding additional yarn amount, this will depend on how much length you add, but it is better with a skein too many than too few.

All yarns will have excess fibres (from production) that might come off as lint or shedding. Brushed yarns (ie hairier yarns) have more of these loose, excess fibres, causing more shedding.

Shedding also depends on what is worn under or over the garment, and whether this pulls at the yarn fibres. It’s therefore not possible to guarantee that there will be no shedding

Below are some tips on how to get the best result when working with hairier yarns:

1. When the garment is finished (before you wash it) shake it vigorously so the looser hairs come off. NOTE: do NOT use a lint roller, brush or any method that pulls at the yarn.

2. Place the garment in a plastic bag and put it in your freezer - the temperature will cause the fibres to become less attached to each other, and excess fibres will come off easier.

3. Leave in the freezer for a few hours before taking it out and shaking it again.

4. Wash the garment according to the instructions on the yarn label.

Pilling is a natural process that happens to even the most exclusive of fibers. It's a natural sign of wear and tear that is hard to avoid, and that is most visible in high friction areas of your garment like a sweater's arms and cuffs.

You can make your garment look as new by removing the pilling, using a fabric comb or a pill/lint remover.

Still can't find the answer you need? Then scroll down and leave your question so one of our experts can try to help you. This will be done normally within 5 to 10 working days.
In the meantime, you can read the questions and answers that others have left to this pattern or join the DROPS Workshop on Facebook to get help from fellow knitters/crocheters!

You might also like...

Lace Affair

Isa, Germany

Villapaita

Anna, Finland

Shannon's Lace Affair

Susan, United States

Krajkový cardigan

Motánky, Czech Republic

Post a comment to pattern DROPS 159-2

We would love to hear what you have to say about this pattern!

If you want to leave a question, please make sure you select the correct category in the form below, to speed up the answering process. Required fields are marked *.

Comments / Questions (95)

country flag Debra Bland wrote:

Hi, sorry Im finding this so difficult, I must have a mental blockage. When increasing do I always start and finish with A and C or carry on with B until Im left with ss1 gs1

22.11.2016 - 13:17

DROPS Design answered:

Dear Mrs Bland, when inc you have to work the new sts in pattern so that pattern goes over these sts, A = last 4 sts in B, so when you have inc 3 sts you can work these 3 new sts as the 3 new sts in B (you will complete 1 repeat) etc. Remember more personnal assistance will be provided by your DROPS store. Happy knitting!

22.11.2016 - 14:36

country flag Debra Bland wrote:

Just to clarify, would it be after adding 6 stitches (Ab)each side before I started adding the patten or before?

21.11.2016 - 20:21

DROPS Design answered:

Dear Mrs Bland, when you will have inc 3 sts you will already be able to continue pattern on the new sts, then make always sure there are always enough sts to work dec and yos to avoid dec/inc number of sts. Happy knitting!

22.11.2016 - 09:01

country flag Debbie Bland wrote:

Hi, Im knitting the sleeves at the moment but dont know how to include the pattern into the increased stitches. Im knitting in small, have reached 8cm and increased 2 stitches on 4th purl row , so now have to include the extra stitches into my pattern on the 5th row but dont know how to do it

19.11.2016 - 17:39

DROPS Design answered:

Dear Mrs Bland, you will have to work all new sts first in stocking st until you can work them into pattern following diagram at the beg and at the end of round. Happy knitting!

21.11.2016 - 09:24

country flag Friederike wrote:

Das Muster A1 soll ja mit A anfangen dann bei Größe M 22x das Muster B stricken, und zum Schluss noch 1x C stricken. Allerdings geht ja die oberste Reihe des Muster (1 Umschlag, 1 M zum rechts stricken abheben, 2 M re zusstr und die abgehobene M überziehen, 1 Umschlag) genau über die Grenze von A zu B und B zu C. Wie genau soll ich da die 6 Maschen B 22x wiederholen? Danke für eine kurze Erklärung!

23.08.2016 - 09:35

DROPS Design answered:

Liebe Friederike, B endet mit einem Umschlag und beginnt wieder mit einer übergezogenen Abnahme.

31.08.2016 - 14:07

Janet wrote:

Why is the back collar joined by a seam rather than Kitchener stitch? Don't you think it would be neater and less bulky to graft the live stitches together? Also, it seems most people who follow the patten end up with a jacket at hip/waist length - about 15 cm shorter than the pattern picture. I think the picture is misleading and should be changed. Thanks.

14.06.2016 - 14:31

DROPS Design answered:

Dear Janet, you can of course rather graft sts from collar if you rather like it so. Remember to check your gauge and measurements under chart, feel free to adjust total length if desired. Happy knitting!

14.06.2016 - 14:42

country flag Desrousseaux wrote:

Bonjour Les explications pour la manche n'ont pas été corrigées depuis la 1ere demande de 09/2015. En effet en M, 37 +2x10 mailles cela fait 57 et non 56. En taille XXL, 43 + 2x14 cela fait cela fait 71 et non 69. en ici le modèle a tout faux. Par exemple on ne peut pas commencer le motif sur mailles augmentées tout de suite au risque de décaler le motif sur toutes autres mailles. Quand commencer? Merci

29.05.2016 - 14:28

DROPS Design answered:

Bonjour Mme Desrousseaux, les augmentations de la manche ont été corrigées, merci pour votre patience. Bon tricot!

15.09.2016 - 15:26

country flag Moa Leijon Lind wrote:

Jag stickar ärmen och har precis ökat två maskor efter 8 cm. Det står att de ökade maskorna stickas in i mönstret efterhand? Hur gör jag det? Sticka fler slätstickade kantmaskor?

26.03.2016 - 13:23

DROPS Design answered:

Hej Moa, nej kantm ingår inte i mönstret. När du har 2 nya m kan du sticka 2 ihop och 1 omslag, men se till att det stemmer med mönstret. Lycka till!

31.03.2016 - 12:19

country flag Silange wrote:

Bonjour je ne comprends pas la facon dont vous installer le motif tricoter A.1,A(=4 m) 20 fois A.1B=(6m)A.1 1C(3M)je n,arrive pas au total des mailles avec les 3 mailles et 26 mailles du debut et la din du rang Merci

08.02.2016 - 18:12

DROPS Design answered:

Bonjour Silange, on tricote 1 fois A.1A (= 4 m, soit au 1er rang: 1 m end, 2 m ens à l'end, 1 jeté, 1 m end), 20 fois A.1B (= 6 m: 1 jeté, glissez 1 m à l'end, 1 m end, passez la m glissée par-dessus la m tricotée, 1 m end, 2 m ens à l'end, 1 jeté, 1 m end) = et 1 fois A.1c (= 3 m: 1 jeté, 2 m ens à l'end, 1 m end). Placez un marqueur entre chaque partie du diagramme à répéter pour bien repérer le motif. Bon tricot!

09.02.2016 - 09:50

country flag Karin wrote:

Ich möchte das Modell stricken, mir ist aber die Maßangabe unklar. Bei der angegebenen Maschenprobe und 201 angeschlagenen Maschen für Größe M ergibt das eine Länge von 1,26m für das Rücken- und die beiden Vorderteils. Wie ergibt sich dieses Maß? Wo finde ich es in der Zeichnung? MfG. Karin

13.01.2016 - 22:12

DROPS Design answered:

Liebe Karin, das ist richtig. Sie sehen auf der Schnittzeichnung, dass die Vorderteile überlappen. Beim Tragen fällt die zusätzliche Weite aber locker, denn die Jacke wird ja offen getragen.

02.03.2016 - 09:40

country flag Charlotte Bygballe wrote:

Jeg fattede da heller ikke den måde mønstret var skrevet på!! Men tak. der skal altså stå: Strik A.1A 1 gang = 4m, strik A.1B 20 gange = 120m, strik A.1C 1 gang = 3m. I alt mønster = 127m. AHA! Dertil kommer så de 2 x 29m i siderne. Alt i alt 185m. DET kunne godt have været forklaret meget bedre.

11.11.2015 - 15:55