
Popular categories
Looking for a yarn?


|
|||||||
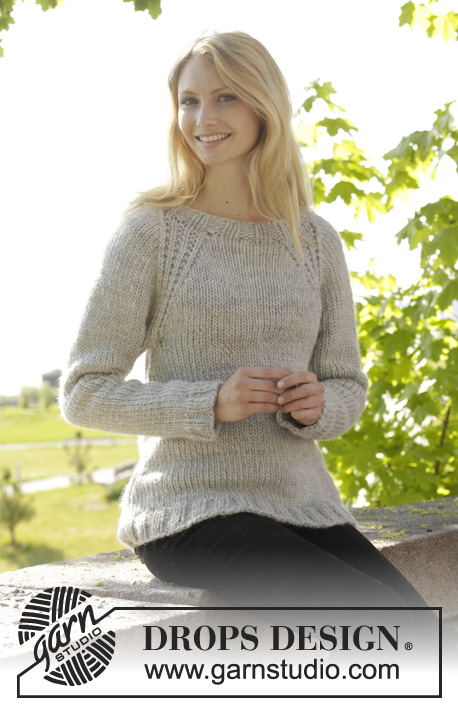
Virginia Cardigan |
|||||||
|
|
|||||||
Knitted DROPS jacket with rib and raglan, worked top down in ”Snow”. Size: S - XXXL.
DROPS 157-28 |
|||||||
|
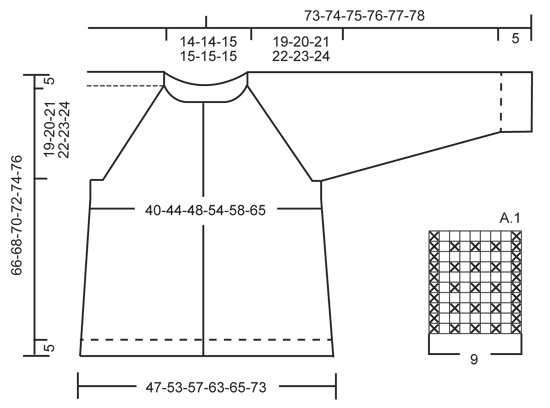
GARTER ST (back and forth on needle): K all rows. 1 ridge = K2 rows. PATTERN: See diagram A.1. The diagram shows all rows in pattern seen from RS. RAGLAN: Inc on each side of every A.1 by making 1 YO (= 8 inc on row). On next row work YOs twisted (i.e. work in the back loop of st instead of front) to avoid holes. INCREASE TIP (applies to body): Work until 1 st remains before marker, 1 YO, K 2, 1 YO = 2 sts inc. Repeat in the other side. On next row K YOs twisted (i.e. work in the back loop of st instead of front) to avoid holes. DECREASE TIP (applies to sleeves): Dec before marker and 1 st as follows: K 2 tog. Dec after marker and 1 st as follows: Slip 1 st as if to K, K 1, psso. BUTTONHOLES: Dec for buttonholes on right band. 1 buttonhole = K 2 tog and make 1 YO. Dec for buttonholes when piece measures (measured from edge at the bottom of body): SIZE S: 5, 14, 23, 32, 41, 50 and 59 cm / 2",5½",9",12½",16",19 3/4",23 1/4" SIZE M: 5, 15, 25, 34, 43, 52 and 61 cm / 2",6",9 3/4",13½",17",20½",24" SIZE L: 5, 15, 25, 35, 45, 54 and 63 cm / 2",6",9 3/4",13 3/4",17 3/4",21 1/4",24 3/4" SIZE XL: 5, 15, 25, 35, 45, 55 and 65 cm / 2",6",9 3/4",13 3/4",17 3/4",21½",25½" SIZE XXL: 5, 14, 23, 32, 41, 50, 59 and 67 cm / 2",5½",9",12½",16",19 3/4",23 1/4",26½" SIZE XXXL: 5, 15, 24, 33, 42, 51, 60 and 69 cm / 2",6",9½",13",16½",20",23½",27" ---------------------------------------------------------- JACKET: Worked back and forth, top down. Work sleeves in the round on double pointed needles. YOKE: Cast on 54-54-58-58-58-58 sts on circular needle size 8 mm / US 11. Continue to work rib as follows: P 2, * K 2, P 2 *, repeat from *-*. When rib has been worked for 3 cm / 1'', work 1 row in stockinette st from RS while AT THE SAME TIME inc 8-8-7-7-8-8 sts evenly = 62-62-65-65-66-66 sts. Now work pattern as follows: 5-5-6-6-6-6 sts in stockinette st (= front piece), A.1, 3 sts in stockinette st (= sleeve), A.1, 10-10-11-11-12-12 sts in stockinette st (= back piece), A.1, 3 sts in stockinette st (= sleeve ), A.1, 5-5-6-6-6-6 sts in stockinette st (= front piece). There is now 1 repetition A.1 in each raglan. REMEMBER THE GAUGE! Continue with pattern like this, AT THE SAME TIME on next row from RS beg inc for RAGLAN – see explanation above! Inc differently on body and sleeves: BODY: Repeat inc every row 0-2-5-8-10-12 times, every other row 4-4-3-4-4-8 times and every 4th row 5-5-5-4-4-2 times. SLEEVE: Repeat inc every row 6-6-7-7-10-11 times, every other row 3-4-4-5-4-4 times and every 4th row 4 times in all sizes. When all inc are done and piece measures 24-25-26-27-28-29 cm / 9½''-9 3/4''-10 1/4''-10 5/8''-11''-11 3/8'', there are 150-162-177-193-210-230 sts in total on needle. Then continue in stockinette st as follows: Work the first 18-20-23-26-28-32 sts, slip the next 39-41-43-45-49-51 sts on a stitch holder for sleeve, cast on 8 new sts under sleeve, insert a marker in the middle of these sts, work the next 36-40-45-51-56-64 sts, slip the next 39-41-43-45-49-51 sts on a stitch holder for sleeve, cast on 8 new sts under sleeve, insert a marker in the middle of these sts, work the remaining 18-20-23-26-28-32 sts. Work the new sts under each sleeve in stockinette st. BODY: There are now 88-96-106-118-128-144 sts for body. Continue in stockinette st. When piece measures 4 cm / 1½'' from the new sts under sleeve, beg inc on each side of markers - READ INCREASE TIP! Repeat inc every 8-6½-7-7-9-9 cm / 3"-2½"-2 3/4"-2 3/4"-3½"-3½" 3-4-4-4-3-3 more times = 104-116-126-138-144-160 sts. When piece measures 61-63-65-67-69-71 cm / 24''-24¾''-25½''-26 3/8''-27 1/8''-28'' in total, inc 2-2-4-4-2-2 sts = 106-118-130-142-146-162 sts. Now work rib as follows: P 2, * K 2, P 2 *, repeat from *-*. Continue like this until rib has been worked for 5 cm / 2''. Bind off with K over K and P over P. SLEEVE: Slip sts back on double pointed needles. Work in stockinette st and cast on 8 new sts at the end of row = 47-49-51-53-57-59 sts. Insert a marker in the middle of the new sts under the sleeve. NOW MEASURE THE PIECE FROM HERE. Then work in stockinette st in the round – AT THE SAME TIME dec 1 st on each side of marker – READ DECREASE TIP. Repeat dec every other round 2 more times in all sizes = 41-43-45-47-51-53 sts. Then dec every 4-3½-4-3½-3-3 cm / 1½"-1 1/4"-1½"-1 1/4"-1"-1" 9-10-9-10-12-11 times = 23-23-27-27-27-31 sts. When sleeve measures 42-42-41-41-41-41 cm / 16½"-16½"-16"-16"-16"-16", inc 1 st in all sizes = 24-24-28-28-28-32 sts. Continue with rib as follows: K 1, * P 2, K 2 *, repeat from *-* until 1 st remains, K 1. Continue like this until rib has been worked for 5 cm / 2''. Bind off with K over K and P over P. RIGHT BAND: Pick up sts for band as follows from RS: Beg at the bottom on right front piece and pick up 86-90-90-94-98-102 sts evenly inside 1 st in stockinette st. Then work rib, beg from WS as follows: 2 sts in GARTER ST – see explanation above -, * K 2, P 2 *, repeat from *-* until 4 sts remain, P 2, 2 sts in garter st. Continue like this back and forth, AT THE SAME TIME on 1st row from RS dec for BUTTONHOLES – see explanation above! LEFT BAND: Pick up sts and work band the same way as right band but reversed. I.e. pick up sts from neck edge st the top (= from RS). Do not dec for buttonholes. ASSEMBLY: Sew the holes under the sleeves. Sew the buttons on to the left band. |
|||||||
Diagram explanations |
|||||||
|
|||||||
|
|||||||
|
Have you made this or any other of our designs? Tag your pictures in social media with #dropsdesign so we can see them! Do you need help with this pattern?You'll find tutorial videos, a Comments/Questions area and more by visiting the pattern on garnstudio.com. © 1982-2024 DROPS Design A/S. We reserve all rights. This document, including all its sub-sections, has copyrights. Read more about what you can do with our patterns at the bottom of each pattern on our site. |
|||||||


With over 40 years in knitting and crochet design, DROPS Design offers one of the most extensive collections of free patterns on the internet - translated to 17 languages. As of today we count 304 catalogs and 11422 patterns - 11417 of which are translated into English (US/in).
We work hard to bring you the best knitting and crochet have to offer, inspiration and advice as well as great quality yarns at incredible prices! Would you like to use our patterns for other than personal use? You can read what you are allowed to do in the Copyright text at the bottom of all our patterns. Happy crafting!
Comments / Questions (54)
Oke omdat er in sommige antwoorden die Ik vertaal wel staat dat je ook moet meerderen aan de verkeerde kant, voor de raglan. Dus ik snap het niet helemaal.
08.07.2022 - 11:30DROPS Design answered:
Dag Jessica,
Ja, je hebt gelijk! Het is inderdaad iedere naald als er staat 'meerder elke nld'. Excuses, ik heb je verkeerd geïnformeerd. Dus eerst meerder je iedere naald 8 keer voor maat XL, dan om de naald (dus de ene naald wel en de andere naald niet) 4 keer en dan elke 4e naald 4 keer. (Dit geldt voor het lijf. Op de mouwen meerder je anders.)
17.07.2022 - 11:48Ik brei dit vest inmaat XL. In het patroon staat meerderen voor het lijf: elke naald 8 keer. Is dat alleen de goede kant dan? Of ook de verkeerde kant meerderen? Met vriendelijke groet Jessica Metscher
03.07.2022 - 23:23DROPS Design answered:
Dag Jessica,
Dit is alleen aan de goede kant, niet aan de verkeerde kant. Aan de verkeerde kant brei je de omslagen gedraaid recht om gaatjes te voorkomen.
08.07.2022 - 08:46Goedendag, ik brei maat XL en moet nu meerderen. Meerderen voor de raglan, is dat dus tegelijk voor de mouw meerderen? En bij het meerderen voor de lijf staat boven aan: brei tot er 1 st overblijft voor de markeerden..... Maar waar moet de markeerder komen op de naald? Lees daar niks van in het patroon. Met vriendelijke groet Jessica Metscher
03.07.2022 - 20:43DROPS Design answered:
Dag Jessica,
De raglanlijnen zitten tussen de mouwen en de panden, dus als je meerdert voor de raglan, meerder je op de mouwen en de panden. Je meerdert aan elke kant van A.1 zoals beschreven bij RAGLAN. (De tip voor het meerderen geldt voor de zijkanten van het lijf en niet voor de raglan.)
25.08.2022 - 11:52Buongiorno volevo chiedere per il raglan faccio solo un gettato prima di A1 e uno dopo A1 per aumentare? Le maglie del davanti dietro e maniche. Quanto devono aumentare rispetto al primo giro e dove suddivido gli aumenti?grazie
01.02.2022 - 11:26DROPS Design answered:
Buonasera Loretta, per gli aumenti del raglan deve seguire quanto riportato nel paragrafo "Raglan" e ripeterlo per il numero di volte indicato per gli aumenti per il davanti/dietro e maniche. Buon lavoro!
01.02.2022 - 22:21Buona sera, per il raglan quando arrivo alla fine delle prima 10 righe del diagramma A1 devo ricominciare dall'inizio del diagramma fino ad arrivare all'altezza prevista per la mia taglia? Grazie.
25.01.2022 - 16:35DROPS Design answered:
Buonasera Loretta, esatto, deve continuare a lavorare il diagramma A.1. Buon lavoro!
26.01.2022 - 22:08Buonasera, sempre per il raglan gli aumenti il gettato li devo fare prima di una maglia e dopo una maglia dal diagramma A1 come spiega nei suggerimenti per gli aumenti?
23.01.2022 - 20:57DROPS Design answered:
Buonasera Loretta, per il raglan deve aumentare prima di A.1 e dopo A.1 con 1 gettato. Buon lavoro!
24.01.2022 - 22:47Buongiorno chiedevo se per aumentare nel raglan devo seguire i suggerimenti per gli aumenti sul davanti e sul dietro o se devo fare un gettato prima e dopo il diagramma A1? Grazie
23.01.2022 - 16:46DROPS Design answered:
Buonasera Loretta, per aumentare per il raglan deve seguire quanto scritto nel paragrafo "RAGLAN". Buon lavoro!
23.01.2022 - 19:48Hei i’m making M size.I dont understand how to do increase on body i-e how many stitches and where ?is it before and after A.1?but my stitches are not exact as it is on pattren.can you please explain as easy as you can .thanks
17.03.2021 - 19:51DROPS Design answered:
Dear Maryyam, increases for raglan are worked before or/and after A.1; but they will be worked on a different rythm on body and on sleeves, ie you will either increase 4 sts (for ex when inc on sleeve on every row but on body on every other row) or 8 sts(when inc on sleeve and on body). Happy knitting!
18.03.2021 - 09:24Dank!!! Het kwam dus doordat er staat 'herhaal zoveel keer', alsof de eerste niet meetelt, maar het was dus een 'in totaal' zoveel keer (zoals bij andere patronen vaak wel staat). Ik kan weer verder, merci
08.05.2020 - 20:55Goedendag, ik brei maat S en denk een foute berekening te zien bij het meerderen van de raglan, want hoe vaak ik het ook nareken op papier, ik blijf op 158 steken komen i.p.v. op 150 na alle meerderingen. Klopt dit of zie ik toch ergens 8 steken die er niet zijn? ;-) Vriendelijke groet, Lizeth
06.05.2020 - 01:22DROPS Design answered:
Dag Lizeth,
Je meerdert op het lijf in totaal 9 keer 4 steken (om de naald 4 keer en elke 4e naald 5 keer) = 36 steken, op de mouwen in totaal 13 keer 4 steken ( elke naald 6 keer, om de naald 3 keer en elke 4e naald 4 keer) = 52 steken. 62 + 36 + 52 = 150 steken.
07.05.2020 - 10:18