
Popular categories
Looking for a yarn?


|
||||||||||||||||
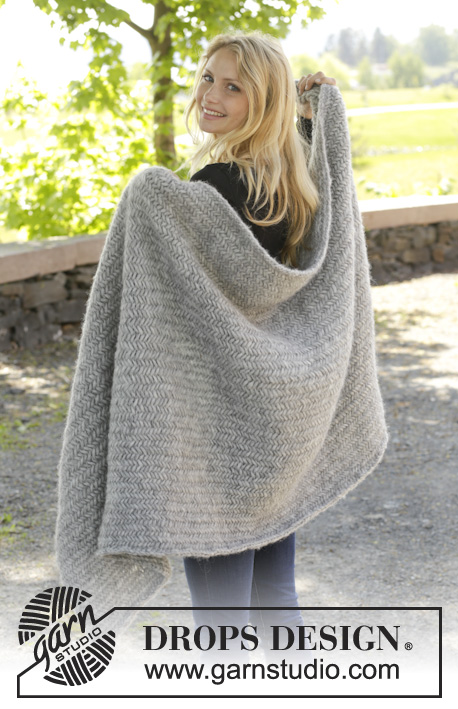
A Patch of Comfort |
||||||||||||||||
|
|
||||||||||||||||
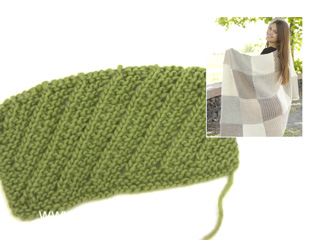
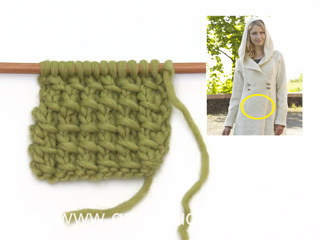
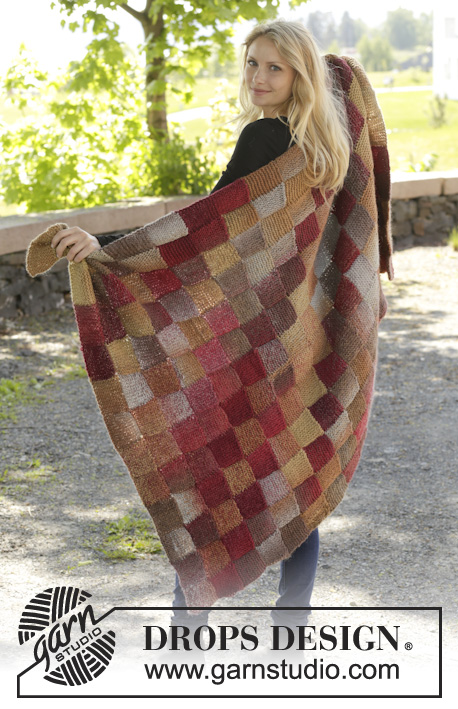
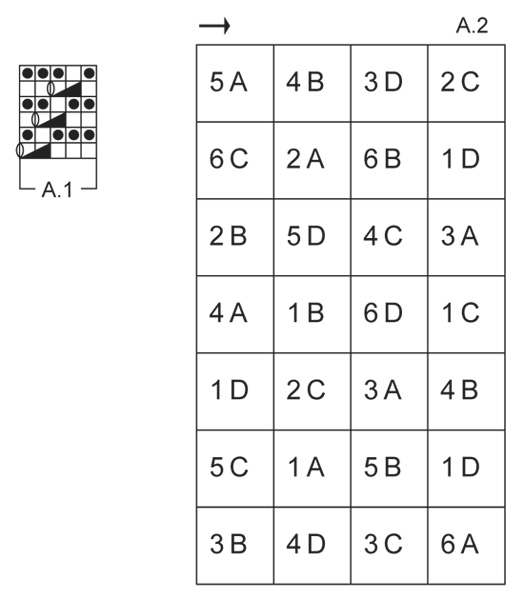
Knitted DROPS blanket with squares in garter st, star pattern, English rib, stripes, waffle pattern and bamboo pattern in ”Nepal"
DROPS 157-21 |
||||||||||||||||
|
SQUARE COLOURS: Square 1 (garter st): 1 beige, 1 light beige, 1 light grey, 3 off white. Square 2 (star pattern): 1 beige, 1 light beige, 2 light grey. Square 3 (English rib): 2 beige, 1 light beige, 1 light grey, 1 off white. Square 4 (stripes): 1 beige, 2 light beige, 1 light grey, 1 off white. Square 5 (waffle pattern): 1 beige, 1 light beige, 1 light grey, 1 off white. Square 6 (bamboo): 1 beige, 1 light beige, 1 light grey, 1 off white. GARTER ST (back and forth on needle): K all rows. 1 ridge = 2 rows K. PATTERN: See diagram A.1. Diagram shows all rows seen from RS. See diagram A.2 for assembly of squares. PATTERN TIP: Diagrams A.1 does not fit vertically when repeated but eyelet rows are continued diagonally upwards as before. SQUARE ASSEMBLY: Number indicate which Pattern square is used, letters indicate pattern colour: A = beige B = light beige C = light grey D = off white ---------------------------------------------------------- BLANKET: Work every square separately and sew tog when finished. Work every square back and forth on needle. Work different number of squares with different number of colours for each square – see SQUARE COLOURS above = 28 squares in total. 1 square measures approx. 22 x 22 cm. SQUARE 1 (GARTER ST): Cast on 33 sts on needle size 6 mm. Work in GARTER ST - see explanation above. REMEMBER THE KNITTING TENSION! Cast off when piece measures approx. 22 cm. SQUARE 2 (STAR PATTERN): Cast on 33 sts on needle size 6 mm. K 3 rows. K 1 row AT THE SAME TIME inc 4 sts evenly = 37 sts. Then work STAR PATTERN as follows: Row 1 (= RS): K 1 row. Row 2 (= WS): K 1, * P 3 tog without lifting them off the needle, 1 YO, P 3 tog in same 3 sts and drop them off the needle, K 1 * repeat from *-* the entire row. Row 3 (= RS): K 1 row. Row 4 (= WS): K 3, * P 3 tog without lifting them off the needle, 1 YO, P 3 tog in same 3 sts and drop them off the needle, K 1 *, repeat from *-* until 2 sts remain, K 2. Repeat rows 1 to 4. REMEMBER THE KNITTING TENSION! When piece measures 20½ cm, K 1 row AT THE SAME TIME dec 4 sts evenly = 33 sts. K 3 rows and cast off. SQUARE 3 (ENGLISH RIB): Cast on 33 sts on needle size 6 mm. K 3 rows. K 1 row AT THE SAME TIME dec 6 sts evenly = 27 sts. Then work ENGLISH RIB as follows: Row 1: K 2, * K 1, 1 YO, slip 1 st as if to P *, repeat from *-* until 3 sts remain, finish with K 3. Row 2: K 2, * 1 YO, slip 1 st as if to P, K YO and slipped st tog *, repeat from *-* until 3 sts remain, finish with 1 YO, slip 1 st as if to P, K 2. Row 3: K 2, * K YO and slipped st tog, 1 YO, slip 1 st as if to P *, repeat from *-* until 4 sts remain, K YO and slipped st tog, K 2. Repeat 2nd and 3rd row upwards. REMEMBER THE KNITTING TENSION! When piece measures 20 cm – adjust to finish after 2nd row and work next row as follows: K 2, * K YO and slipped st tog, slip 1 st as if to P *, repeat from *-* until 4 sts remain, K YO and slipped st tog, K 2. K 1 row AT THE SAME TIME inc 6 sts evenly = 33 sts. K 3 rows and cast off. SQUARE 4 (STRIPES): Cast on 33 sts on needle size 6 mm. K 3 rows. K 1 row AT THE SAME TIME inc 1 st = 34 sts. Work 2 sts in GARTER ST – see explanation above, pattern according to diagram A.1 (1st row = RS) over the next 30 sts, finish with 2 sts in garter st – read PATTERN TIP. REMEMBER THE KNITTING TENSION! When piece measures 20½ cm, K 1 row AT THE SAME TIME dec 1 st = 33 sts. K 3 rows and cast off. SQUARE 5 (WAFFLE PATTERN): Cast on 33 sts on needle size 6 mm. K 3 rows. K 1 row AT THE SAME TIME dec 7 sts evenly = 26 sts. K 1 row. Then work WAFFLE PATTERN as follows: Row 1 (WS): K from WS. Row 2 (RS): K 2, * K 1 in st from previous row and then drop st off left needle, K 1 *, repeat from *-* until 2 sts remain on needle, K 2. Row 3 (WS): K 2, * K 1, lift loop around st and work this K tog with st on needle *, repeat from *-* until 2 sts remain on needle, K 2. Row 4 (RS): K 2, * K 1, K 1 in st from previous row and then drop st off left needle *, repeat from *-* until 2 sts remain on row, K 2. Row 5 (WS): K 2, * lift loop around the st and K this st tog with st on needle, K 1*, repeat from *-* until 2 sts remain on row, K 2. Repeat 2nd-5th row upwards. REMEMBER THE KNITTING TENSION! When piece measures 20 cm – adjust so that next row is row no. 3 – work next row as explained but P st inside st in garter in stead of K. K 1 row AT THE SAME TIME inc 7 sts evenly = 33 sts, K 3 rows, cast off. SQUARE 6 (BAMBOO PATTERN): Cast on 33 sts on needle size 6 mm. K 3 rows. K 1 row AT THE SAME TIME inc 3 sts evenly = 36 sts. Then work BAMBOO PATTERN as follows: Row 1 (= RS): K 1, * 1 YO, K 2, pass YO over 2 K sts *, repeat from *-*, K 1. Row 2 (= WS): K 1, P until 1 st remains on row, finish with K 1. Repeat rows 1 and 2. REMEMBER THE KNITTING TENSION! When piece measures 20½ cm, K 1 row AT THE SAME TIME dec 3 sts evenly = 33 sts. K 3 rows and cast off. ASSEMBLY: Fasten the strands on every square. Sew tog all squares with light beige as shown in diagram A.2 - Read SQUARE ASSEMBLY above. Sew tog edge to edge in outer loops of edge sts to avoid a chunky seam. |
||||||||||||||||
Diagram explanations |
||||||||||||||||
|
||||||||||||||||
|
||||||||||||||||
|
Have you made this or any other of our designs? Tag your pictures in social media with #dropsdesign so we can see them! Do you need help with this pattern?You'll find tutorial videos, a Comments/Questions area and more by visiting the pattern on garnstudio.com. © 1982-2024 DROPS Design A/S. We reserve all rights. This document, including all its sub-sections, has copyrights. Read more about what you can do with our patterns at the bottom of each pattern on our site. |
||||||||||||||||


With over 40 years in knitting and crochet design, DROPS Design offers one of the most extensive collections of free patterns on the internet - translated to 17 languages. As of today we count 304 catalogues and 11422 patterns - 11422 of which are translated into English (UK/cm).
We work hard to bring you the best knitting and crochet have to offer, inspiration and advice as well as great quality yarns at incredible prices! Would you like to use our patterns for other than personal use? You can read what you are allowed to do in the Copyright text at the bottom of all our patterns. Happy crafting!
Comments / Questions (80)
Kære Drops Kan man strikke ruderne ved at slå 39 masker op eller kommer der så kludder i mønstrene? I stjernemønsteropskriftens første linje står der "= 37 m". Er det tal ikke 29 masker, når man tager 4 masker af. Og betyder dette, at man på de 33 masker selv bestemmer, hvor man enkeltvist tager en maske af pinden fire gange? På forhånd mange tak fra strikkenovicen
19.02.2018 - 19:37DROPS Design answered:
Hej Camilla, Du er nødt til at slå det antal masker op vi skriver i opskriften hvis du vil have samme størrelse på ruderne. Maskeantallet varierer i forhold til mønsteret i og med at mønsteret fylder forskelligt. God fornøjelse!
21.02.2018 - 14:38Kære Drops Kan man strikke ruderne ved at slå 39 masker op eller kommer der så kludder i mønstrene? I stjernemønsteropskriftens første linje står der "= 37 m". Er det tal ikke 29 masker, når man tager 4 masker af. Og betyder dette, at man på de 33 masker selv bestemmer, hvor man enkeltvist tager en maske af pinden fire gange? På forhånd mange tak fra strikkenovicen
15.02.2018 - 22:17Kann die Decke in 4 Streifen gestrickt werden, ohne dass zwischen den Quadraten abgekettet/neu angeschlagen werden muss?
14.02.2018 - 03:16DROPS Design answered:
Liebe Barbara, wahrscheinlich können Sie auch so stricken. Viel Spaß beim stricken!
14.02.2018 - 08:59Hallo, ich will mich endlich an diese schöne Decke wagen. Ich habe noch eine Frage zu den Randmaschen. Werden sie alle einfach im Muster gestrickt? Gibt es da irgendwas zu beachten? Meine Strickerfahrung hält sich leider noch in Grenzen... Beste Grüße
16.10.2017 - 09:25DROPS Design answered:
Liebe Julianne, die Randmaschen sind unter jedem Quadrat beschrieben, dh bei 2., 3. und 6. Quadrat stricken Sie 1 Randmasche rechts auf beiden Seiten, und bei 4. und 5. Quadrat stricken Sie 2 Maschen kraus rechts auf beiden Seiten. Viel Spaß beim stricken!
16.10.2017 - 10:09Sofia A. wrote:
Hello everyone! I'm thinking of knitting this pattern for a baby, using yarn group A (baby merino). Can you help me with the number of stitches than I need to cast on? And what about the increases and decreases needed? Thank you in advance !
19.08.2017 - 21:51DROPS Design answered:
Hi Sofia, this Blanket is knitted with a yarn belonging to group C. If you want to use a yarn belonging to group A, you'd better contact your DROPS retailer for any personal assistance. Happy knitting!
20.08.2017 - 08:41Kathy wrote:
It would be so lovely if your wonderful patterns were available in a PDF format for easy download - Thank you
31.07.2017 - 08:27DROPS Design answered:
Dear Kathy, our pattern can only be printed, but feel free to use any virtual printer to save them as pdf. Happy knitting!
31.07.2017 - 10:33How many skeins are needed for each color?
03.04.2017 - 03:03DROPS Design answered:
Dear Sissy, you will find amount of yarn in each colour under tab "Materials", ie 350 g in light beige divided by 50 g a ball Nepal = 7 balls in light beige + 6 balls in each of the 3 other colours. Happy knitting!
03.04.2017 - 11:16El diagrama A1 , no entiendo que es?
24.02.2017 - 19:37DROPS Design answered:
Hola Alexandra. Con el diagrama A.1 trabajamos la aplicación 4. Los símbolos del diagrama están explicados encima.
25.02.2017 - 23:49Bonjour, Je me suis demandé s'il était possible de tricoter toute la couverture en un morceau ou s'il y a des décalages entre les différents carrés ? Merci pour votre magnifique travail !
20.02.2017 - 20:50DROPS Design answered:
Bonjour Nathalie, la couverture se compose de carrés tricotés dans différentes couleurs et points fantaisie comme indiqué dans le schéma, il est ainsi plus simple de les tricoter séparément pour les assembler ensuite. Bon tricot!
21.02.2017 - 09:30Ik heb nu vier van de lapjes gemaakt. Echter is de breedte niet bij alle patronen hetzelfde. Sterpatroon is 18cm breed Bamboesteek is 19cm breed Ribbelsteek is 21,5cm breed Strepen is 23cm breed Kan ik deze vakjes straks gewoon aan elkaar maken of trekt de deken dan 'scheef'? Of kan ik beter de 'te smalle' patronen opnieuw breien met meer steken op de naald?
08.12.2016 - 20:19DROPS Design answered:
Hoi Peggy. Vanwege de verschillende soorten steken kan de lapjes licht verschillen in afmetingen. Je kan ze vochtig maken en blocken in dezelfde afmetingen, dan komt het goed.
13.12.2016 - 13:35