DROPS Karisma
DROPS Karisma
100% Wool
from 3.00 $ /50g
Get the yarn to make this pattern from 39.00$.

The yarn cost is calculated from the pattern’s smallest size and the yarn’s cheapest product type. Looking for an even better price? You might find it on the DROPS Deals!

DROPS SS24

Angel Falls

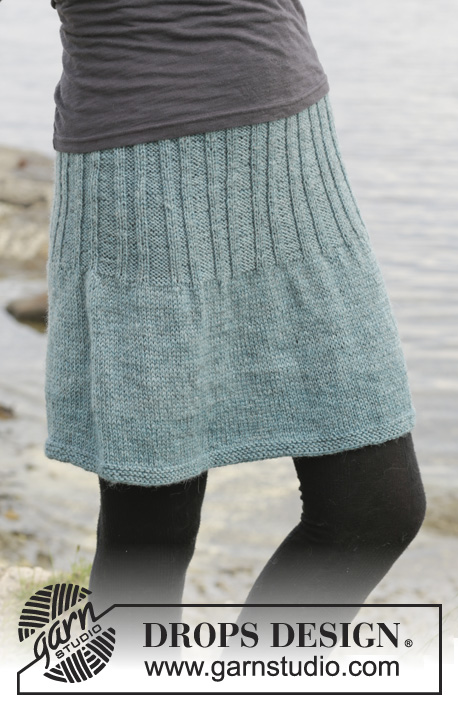
Knitted DROPS dress in garter st with rib and raglan, worked top down in ”Karisma”. Size: S - XXXL.

DROPS 156-3
DROPS design: Pattern no u-742
Yarn group B
-----------------------------------------------------------
Size: S - M - L - XL - XXL - XXXL
Finished measurements:
Bust: 80-88-98-106-120-132 cm / 31½''-34 5/8''-38½''-41¾''-47¼''-52''
Full length: 78-81-84-88-90-93 cm / 30 3/4"-32"-33"-34½"-35½"-36½"

Materials:
DROPS KARISMA from Garnstudio
650-700-800-850-950-1050 g color no 50, green

DROPS DOUBLE POINTED NEEDLES AND CIRCULAR NEEDLE (60 and 80 cm / 24'' and 32'') SIZE 4 mm /US 6 - or size needed to get 21 sts x 28 rows in stockinette st = 4'' x 4'' (10 x 10 cm).
DROPS DOUBLE POINTED NEEDLES and CIRCULAR NEEDLE (60 cm / 24'') SIZE 3.5 mm / US 4 - for rib and garter st.

-------------------------------------------------------

Alternative Yarn – See how to change yarns here
Yarn Groups A to F – Use the same pattern and change the yarn here
Yarn usage using an alternative yarn – Use our yarn converter here

-------------------------------------------------------

DROPS Karisma
DROPS Karisma
100% Wool
from 3.00 $ /50g
Get the yarn to make this pattern from 39.00$.

The yarn cost is calculated from the pattern’s smallest size and the yarn’s cheapest product type. Looking for an even better price? You might find it on the DROPS Deals!

Pattern instructions

NOTE: This pattern is written in American English. All measurements in charts are in cm. For conversion from inches to cm - click here. There are different terms for crocheting in American and British English. If this pattern includes crochet, click for "crochet terms" here. For this pattern in British English, please click here.
GARTER ST (in the round on double pointed needles/circular needle):
* K 1 round and P 1 round *, repeat from *-*. 1 ridge = 2 rounds.

RAGLAN:
Inc on each side of marker as follows:
Work until 2 sts before 1st marker, 1 YO, K 5, 1 YO, continue until 3 sts before 2nd marker, 1 YO, K 5, 1 YO, continue until 2 sts before 3rd marker, 1 YO, K 5, 1 YO, continue until 3 sts before 4th marker, 1 YO, K 5, 1 YO, work the rest of round (= 8 sts inc on round).
On next round K YO twisted (i.e. work in back loop of st instead of front) to avoid holes.

DECREASE TIP:
Dec on each side of marker as follows: Work until 3 sts before marker, K 2 tog, K 2 (marker is between these sts), slip 1 st as if to K, K 1, psso.
----------------------------------------------------------

DRESS:
Worked top down in the round on circular needle.

YOKE:
Cast on 126-126-132-132-136-136 sts on circular needle size 3.5 mm / US 4 with Karisma. Work 3 ridges in GARTER ST – see explanation above, AT THE SAME TIME on last round in garter st inc 24-24-24-26-26-26 sts evenly on round = 150-150-156-158-162-162 sts. Now work an elevation in the back of neck in garter st as follows: Work 10-10-12-12-14-14 sts, turn, work 20-20-24-24-28-28 sts, turn, work 25-25-29-29-33-33 sts, turn, work 30-30-34-34-38-38 sts, turn. Continue like this by working 5 sts more on every turn until 70-70-74-74-78-78 sts are worked. Turn and work back to beg of round. Switch to circular needle size 4 mm / US 6 and work as follows from mid back: 21-21-22-23-24-24 sts in stockinette st, insert 1st marker, 34 sts in stockinette st, insert 2nd marker, 41-41-44-45-47-47 sts in stockinette st, insert 3rd marker, 34 sts in stockinette st, insert 4th marker, 20-20-22-22-23-23 sts in stockinette st. REMEMBER THE GAUGE! Continue in stockinette st, AT THE SAME TIME on next round beg inc for RAGLAN – see explanation above! Repeat inc every round 7-12-15-21-27-37 more times, every other round 5-4-4-4-4-3 times and every 3rd round 5-5-5-4-3-1 times = 294-326-356-398-442-498 sts. When all inc are done and piece measures 21-22-23-24-25-26 cm / 8¼''-8¾''-9''-9½''-9¾''-10¼'' from shoulder, work as follows: Work 39-43-47-53-59-66 sts (= half back piece), slip the next 70-78-84-94-104-118 sts on 1 stitch holder (= sleeve), cast on 8 new sts for armhole, insert a marker in the middle of these 8 sts, work 77-85-94-105-117-131 sts (= front piece), slip the next 70-78-84-94-104-118 sts on a stitch holder (= sleeve), cast on 8 new sts for armhole, insert a marker in the middle of these 8 sts, work the remaining 38-42-47-52-58-65 sts (= half back piece).

BODY:
There are now 170-186-204-226-250-278 sts for body. Now work 1 round in stockinette st AT THE SAME TIME dec 30-32-36-40-44-50 sts evenly = 140-154-168-186-206-228 sts. Switch to circular needle size 3.5 mm / US 4. Then work in garter st, AT THE SAME TIME when piece measures 4 cm / 1½'' from the new sts under sleeves, dec 1 st on each side of marker in each side of piece – READ DECREASE TIP. Repeat dec every 2-2½-2½-2½-3-3½ cm / 3/4"-7/8"-7/8"-7/8"-1"-1 1/4" 3 more times = 124-138-152-170-190-212 sts on round. When piece measures 13-14-15-16-17-18 cm / 5 1/8''-5½''-6''-6¼''-6¾''-7'' from new sts under sleeve, work in stockinette st AT THE SAME TIME inc 26-32-38-40-40-48 sts evenly = 150-170-190-210-230-260 sts. Continue to work rib as follows: K 1, P 3, * K 2, P 3 *, repeat from *-* the entire round until 1 st remains, K 1. When rib has been worked for 7 cm / 2¾'', inc 1 st in every other repetition with P sts (= 15-17-19-21-23-26 sts inc) = 165-187-209-231-253-286 sts. When rib has been worked for 14 cm / 5½'', inc the same way in every repetition with 4 P sts (= 15-17-19-21-23-26 sts inc) = 180-204-228-252-276-312 sts. Continue like this until rib has been worked for 24-25-26-27-28-29 cm / 9½''-9 3/4''-10 1/4''-10 5/8''-11''-11 3/8''. On next round switch to circular needle size 4 mm / US 6 and work in stockinette st, AT THE SAME TIME inc 30-26-12-8-4-4 sts = 210-230-240-260-280-316 sts. Continue in stockinette st for 19 cm / 7½''. Switch to circular needle size 3.5 mm / US 4 and work 3 ridges. Loosely bind off.

SLEEVE:
Worked in the round on double pointed needles.
Slip the 70-78-84-94-104-118 sts back on double pointed needles size 4 mm / US 6. Work in stockinette st over all sts and cast on 8 sts under sleeve = 78-86-92-102-112-126 sts. Insert a marker in the middle of the new sts. On first round dec 1 st on each side of marker - READ DECREASE TIP. Repeat dec every other round 7 more times = 62-70-76-86-96-110 sts. Then dec every 5½-3½-3-2-1½-1 cm / 2 1/4"-1 1/4"-1"-3/4"-½"-1/4" 7-10-12-16-21-27 times = 48-50-52-54-54-56 sts. When sleeve measures 45-45-44-44-44-44 cm / 17 3/4"-17 3/4"-17 1/4"-17 1/4"-17 1/4"-17 1/4" from marker mid under sleeve, switch to needle size 3.5 mm / US 4 and work in garter st for 8 cm / 3 1/8''. Bind off.

ASSEMBLY:
Sew the openings under the sleeves tog.

Diagram

All measurements in charts are in cm.

diagram measurements

Each of our patterns has specific tutorial videos to help you.

Do you have a question? See a list of frequently asked questions (FAQ)

Knitting tension is what determines the final measurements of your work, and is usually measured per 10 x 10 cm. It is provided like so: number of stitches in width x number of rows in height - eg: 19 stitches x 26 rows = 10 x 10 cm.

The knitting tension is very individual; some people knit/crochet loosely while others work tightly. You adjust the knitting tension with the needle size, which is why the suggested needle size only serve as a guide! You need to adjust this (up or down) to ensure that YOUR knitting tension matches the knitting tension provided in the pattern. If you work with a different knitting tension than provided you will have a different yarn consumption, and your work will have different measurements than what the pattern suggests.

The knitting tension also determines which yarns can replace each other. As long as you achieve the same knitting tension you can replace one yarn with another.

See DROPS lesson: How to measure your tension/gauge

See DROPS video: How to make a gauge tension swatch

The required amount of yarn is provided in grams, eg: 450 g. To calculate how many balls you’ll need you first need to know how many grams are in 1 ball (25g, 50g or 100g). This information is available if you click on the individual yarn quality on our pages. Divide the amount required with the amount of each ball. For example, if each ball is 50g (the most common amount), the calculation will be as follows: 450 / 50 = 9 balls.

The important thing when changing from one yarn to another is that the knitting/crochet tension remains the same. This is so that the measurements of the finished piece will be the same as on the sketch provided. It is easier to achieve the same knitting tension using yarns from the same yarn group. It is also possible to work with multiple strands of a thinner yarn to achieve the knitting tension of a thicker one. Please try our yarn converter. We recommend you to always work a test swatch.

Please NOTE: when changing yarn the garment might have a different look and feel to the garment in the photo, due to individual properties and qualities of each yarn.

See DROPS lesson: Can I use a different yarn than the one mentioned in the pattern?

All our yarns are categorised into yarn groups (from A to F) according to thickness and knitting tension – group A contains the thinnest yarns and group F the thickest. This makes it easier for you to find alternative yarns to our patterns, should you wish to switch yarn. All yarns within the same group have a similar knitting tension and can easily replace each other. However, different yarn qualities have different structures and properties which will give the finished work a unique look and feel.

Click here for an overview of the yarns in each yarn group

At the top of all our patterns you’ll find a link to our yarn converter, which is a helpful tool should you wish to use a different yarn than suggested. By filling in the yarn quality you wish to replace, the amount (in your size) and number of strands, the converter will present good alternative yarns with the same knitting tension. Additionally it will tell you how much you’ll require in the new qualities and whether you’ll need to work with multiple strands. Most skeins are 50g (some are 25g or 100g).

If the pattern is worked with multiple colours, every colour will have to be converted separately. Similarly, if the pattern is worked with several strands of different yarns (for example 1 strand Alpaca and 1 strand Kid-Silk) you will have to find alternatives for each, individually.

Click here to see our yarn converter

Since different yarns have different qualities and textures we have chosen to keep the original yarn in our patterns. However, you can easily find options among our available qualities by using our yarn converter, or simply pick a yarn from the same yarn group.

It is possible that some retailers still have discontinued yarns in stock, or that someone has a few skeins at home that they would like to find patterns for.

The yarn converter will provide both alternative yarn as well as required amount in the new quality.

If you think it's hard to decide what size to make, it can be a good idea to measure a garment you own already and like the size of. Then you can pick the size by comparing those measures with the ones available in the pattern's size chart.

You'll find the size chart at the bottom of the pattern.

See DROPS lesson: How to read size chart

The needle size provided in the pattern serves only as a guide, the important thing is to follow the knitting tension. And since knitting tension is very individual, you will have to adjust the needle size to ensure that YOUR tension is the same as in the pattern – maybe you’ll have to adjust 1, or even 2 needle sizes, up or down to achieve the correct tension. For this, we recommend that you work test swatches.

Should you work with a different knitting tension than the one provided, the measurements of the finished garment might deviate from the measurement sketch.

See DROPS lesson: How to measure your tension/gauge

See DROPS video: How to make a gauge tension swatch

Working a garment top-down provides more flexibility and room for personal adjustment. For example it is easier to try the garment on while working, as well as making adjustments to length of yoke and shoulder caps.

The instructions are carefully explaining every step, in the correct order. Diagrams are adjusted to the knitting direction and are worked as usual.

The diagram depicts all rows/rounds, and every stitch seen from the right side. It is read from bottom to top, from right to left. 1 square = 1 stitch.

When working back and forth, every other row is worked from the right side and every other row is worked from the wrong side. When working from the wrong side, the diagram will have to be worked reversed: from left to right, knit stitches are purled, purl stitches are knit etc.

When working in the round every round is worked from the right side and the diagram are worked from right to left on all rounds.

See DROPS lesson: How to read knitting diagrams

The diagram depicts all rows/rounds, and every stitch seen from the right side. It is worked from bottom to top, from right to left.

When working back and forth every other row is worked from the right side: from right to left and every other row is worked from the wrong side: from left to right.

When working in the round, every row in the diagram are worked from the right side, from right to left.

When working a circular diagram you start in the middle and work your way outwards, counter clockwise, row by row.

The rows usually start with a given number of chain stitches (equivalent to the height of the following stitch), this will either be depicted in the diagram or explained in the pattern.

See DROPS lesson: How to read crochet diagrams

Instructions for working several diagrams after each other on the same row/round, will often be written like so: “work A.1, A.2, A.3 a total of 0-0-2-3-4 times". This means you work A.1 once, then A.2 is worked once, and A.3 is repeated (in width) the number of times provided for your size – in this case like so: S = 0 times, M = 0 times, L=2 times, XL= 3 times and XXL = 4 times.

The diagrams are worked as usual: begin with the first row in A.1, then work the first row in A.2 etc.

See DROPS lesson: How to read knitting diagrams

See DROPS lesson: How to read crochet diagrams

The total width of the garment (from wrist-to-wrist) will be larger in the larger sizes, despite the actual sleeves being shorter. The larger sizes have longer sleeve caps and wider shoulders, so there will be a good fit in all sizes.

The measurement sketch/schematic drawing provides information regarding the full length of the garment. If it’s a jumper or a jacket the length is measured from the highest point on the shoulder (usually closest to the neckline), and straight down to the bottom of the garment. It is NOT measured from the tip of shoulder. Similarly, the length of yoke is measured from the highest point on the shoulder and down to where yoke is split into body and sleeves.

See DROPS lesson: How to read a schematic drawing

Diagrams are often repeated on the round or in height. 1 repeat is the diagram the way it appears in the pattern. If it says to work 5 repeats of A.1 in the round, then you work A.1 a total of 5 times after/next to each other in the round. If it says to work 2 repeats of A.1 vertically/in height you work the entire diagram once, then begin again at the start and work the entire diagram one more time.

Chain stitches are slightly narrower than other stitches and to avoid working the cast-on edge too tight, we simply chain more stitches to begin with. The stitch count will be adjusted on the following row to fit the pattern and measurement sketch.

The rib edge is more elastic and will contract slightly compared to, for example, stocking stitch. By increasing before the rib edge, you avoid a visible difference in width between the rib edge and the rest of the body.

It’s very easy to cast off too tightly, and by making yarn overs while casting off (and simultaneously casting these off) you avoid a too tight cast off edge.

See DROPS video: How to bind off with yarn overs (yo)

To achieve an even increase (or decrease) you can increase on, for example: every 3rd and 4th row alternately, like so: work 2 rows and increase on the 3rd row, work 3 rows and increase on the 4th. Repeat this until the increase is complete.

See DROPS lesson: Increase or decrease 1 st on every 3rd and 4th row alternately

Should you prefer to work in the round instead of back and forth, you may of course adjust the pattern. You’ll need to add steeks mid-front (usually 5 stitches), and follow the instructions. When you would normally turn and work from the wrong side, simply work across the steek and continue in the round. At the end you’ll cut the piece open, pick up stitches to work bands, and cover the cut edges.

See DROPS video: How to knit steeks and cut open

Should you prefer to work back and forth instead of in the round, you may of course adjust the pattern so you work the pieces separately and then assemble them at the end. Divide the stitches for the body in 2, add 1 edge stitch in each side (for sewing) and work the front and back pieces separately.

See DROPS lesson: Can I adapt a pattern for circular needles into straight needles?

Pattern repeats can vary slightly in the different sizes, in order to get the correct proportions. If you’re not working the exact same size as the garment in the photo, yours might deviate slightly. This has been carefully developed and adjusted so that the complete impression of the garment is the same in all sizes.

Make sure to follow instructions and diagrams for your size!

If you have found a pattern you like which is available in women’s size it’s not very difficult to convert it to men’s size. The biggest difference will be the length of sleeves and body. Start working on the women size that you think would fit across the chest. The additional length will be worked right before you cast off for the armhole/sleeve cap. If the pattern is worked top-down you can add the length right after the armhole or before the first decrease on sleeve.

Regarding additional yarn amount, this will depend on how much length you add, but it is better with a skein too many than too few.

All yarns will have excess fibres (from production) that might come off as lint or shedding. Brushed yarns (ie hairier yarns) have more of these loose, excess fibres, causing more shedding.

Shedding also depends on what is worn under or over the garment, and whether this pulls at the yarn fibres. It’s therefore not possible to guarantee that there will be no shedding

Below are some tips on how to get the best result when working with hairier yarns:

1. When the garment is finished (before you wash it) shake it vigorously so the looser hairs come off. NOTE: do NOT use a lint roller, brush or any method that pulls at the yarn.

2. Place the garment in a plastic bag and put it in your freezer - the temperature will cause the fibres to become less attached to each other, and excess fibres will come off easier.

3. Leave in the freezer for a few hours before taking it out and shaking it again.

4. Wash the garment according to the instructions on the yarn label.

Pilling is a natural process that happens to even the most exclusive of fibers. It's a natural sign of wear and tear that is hard to avoid, and that is most visible in high friction areas of your garment like a sweater's arms and cuffs.

You can make your garment look as new by removing the pilling, using a fabric comb or a pill/lint remover.

Still can't find the answer you need? Then scroll down and leave your question so one of our experts can try to help you. This will be done normally within 5 to 10 working days.
In the meantime, you can read the questions and answers that others have left to this pattern or join the DROPS Workshop on Facebook to get help from fellow knitters/crocheters!

You might also like...

Post a comment to pattern DROPS 156-3

We would love to hear what you have to say about this pattern!

If you want to leave a question, please make sure you select the correct category in the form below, to speed up the answering process. Required fields are marked *.

Comments / Questions (104)

country flag Louison wrote:

Bonjour, pour la poitrine je fais du L et après sous la poitrine je fais du M. Comment puis-je faire pour arriver au M (40cm) sur le patron? Merci

26.01.2022 - 17:40

DROPS Design answered:

Bonjour Louison, comparez un vêtement similaire que vous avez et dont vous aimez la forme avec les mesures du schéma, c'est le moyen le plus simple de trouver la bonne taille. Retrouvez plus d'infos ici. Bon tricot!

27.01.2022 - 08:16

country flag Stefanie Messerschmitt wrote:

Das Kleid ist richtig toll geworden. Perfekte Anleitung und sehr schöne Wolle, die gut zu verarbeiten ist. Vielen Dank dafür.

04.10.2021 - 10:38

country flag Catharina wrote:

Hallo, ik ben bezig met het breien van dit model. Op een bepaald moment staat er: Als alle meerderingen gemaakt zijn en het werk ongeveer 21-22-23-24-25-26 cm meet vanaf de schouder.... Het werk is niet overal even lang na alle meerderingen. Waar meet ik het? Daar waar het het langst is (=achterkant) of aan de zijkant?

23.03.2021 - 11:33

DROPS Design answered:

Dag Catharina,

Dit is gemeten vanaf de opzet rand over de schouder, dus in de richting van de steken.

26.03.2021 - 16:27

country flag Sunny Bünger wrote:

Jeg forstår ikke springet i maskeantal fra bærestykkets 398 m til ryg & forstykkets 226. mangler der et afsnit, hvor indtagninger er angivet

01.03.2021 - 15:13

DROPS Design answered:

Hej Sunny, Jo når du har sat maskerne i hver side på en tråd til ærmer, så har du 226 masker tilbage - det er beskrevet i opskriften hvordan du gør :)

03.03.2021 - 14:44

country flag Zeline wrote:

Bonjour Je tricote cette robe actuellement dans une laine et avec des aiguilles qui me donnent le bon échantillon. Comme je la trouvais trop décolletée j'ai ajouté un col. J'en suis quasi à la fin des augmentations (il m'en reste 1) et l'ouvrage ne mesure que 14 cm et non les 21 cm au niveau de l'épaule (et comme je tricote en rond l'ouvrage mesure partout la même longueur)... Une idée ? Un conseil ? MErci

18.04.2020 - 16:15

DROPS Design answered:

Bonjour Zeline, votre échantillon en hauteur doit être différent, dans ce cas, il vous faudrait ajouter à intervalles réguliers des rangs sans augmentations entre les rangs avec augmentations pour que vous ayez la bonne hauteur pour l'empiècement. Bon tricot!

20.04.2020 - 09:50

country flag Wendy Stephens wrote:

Hi I am really confused about the Raglan section. I am doing size S. could you explain very simply please? Is one round the same as one row? Is the raglan pattern made up of one round that is repeated but just that after the first round I need to do twisted yarnover to stop holes? how many rows/ rounds do I do? And am I increasing by 8 stitches each row? I don't understand what this means : Repeat inc every round 7 more times, every other round 5 times and every 3rd round 5 times. Thank you

05.04.2020 - 13:42

DROPS Design answered:

Dear Mrs Stephens, you will increase for raglan 8 sts on every decrease round - see RAGLAN as follows: on every round a total of 8 times ( = 8 rounds with 8 increases), then on every other round a total of 5 times (= work 1 round without inc, 1 round inc 8 sts and repeat these 2 rounds a total of 5 times = 10 rounds in total) and then then on every 3rd round a total of 5 times (= work 2 rounds without inc, 1 round increasing 8 sts and repeat these 3 rounds a total of 5 times = 15 rounds in total). You have worked: 8 rounds + 10 rounds + 15 rounds = 33 rounds in total - continue until piece measures 21 cm from shoulder and work dividing round. Happy knitting!

09.04.2020 - 13:46

country flag Hannele wrote:

Hei. Mikä lanka sopisi parhaiten Karisman tilalle tähän mekkoon? Haluaisin käyttää lankaa joka ei kutita iholla, vaan tuntuisi mukavan pehmoiselta, mutta näyttäisi kuitenkin yhtä hyvältä ellei paremmalta kuin Karisma.

30.01.2020 - 18:13

DROPS Design answered:

Voit käyttää esimerkiksi DROPS Puna-lankaa, joka koostuu alpakasta, tai DROPS Sky-lankaa (alpakkaa, polyamidia, villaa), joka on hyvin pehmeä lanka. Mikäli et halua käyttää villa- tai alpakkalankaa, voit neuloa mekon DROPS Belle-langasta (puuvillaa, viskoosia ja pellavaa). Löydät lisää vaihtoehtoja Lankaryhmästä B sivuillamme.

10.02.2020 - 18:00

country flag Andrea wrote:

Wenn ich am Halsbündchen die verkürzten Maschen kraus rechts stricke, dann wird der Rippenbund hinten wesentlich breiter als vorne? Ist das so gewollt? Oder soll da glatt rechts gestrickt werden? Normalerweise ist das Bündchen doch gleich breit?

12.01.2020 - 21:36

DROPS Design answered:

Liebe Andrea, das ist ja so gewollt, die Erhöhung wird hier kraus rechts gestrickt. Viel Spaß beim stricken!

13.01.2020 - 10:06

country flag Melanie wrote:

Wird am Anfang jede Runde als Raglanrunde zugenommen? Das heißt, ich stricke die Umschläge der Vorrunde verschränkt und danach direkt den neuen Umschlag? Oder werden erst die Umschläge der Vorrunde verschränkt gestrickt und in der nächsten Runde die neuen Raglanzunahmen? Danke und beste Grüße?

05.01.2020 - 08:12

DROPS Design answered:

Liebe Melanie, die Umschläge werden bei der nächsten Runde verschränkt gestrickt, und die neuen Umschläge sind beidseitig der selben 5 Maschen gestrickt, dh wie unter RAGLANZUNAHMEN erklärt. Viel Spaß beim stricken!

06.01.2020 - 08:54

country flag Marion wrote:

Bonjour. Pour le raglan en taille S, j’ai tricoté 8+2x5+3x5=33 rangs, et obtenu environ 12 cm de hauteur (ce qui correspond à l’échantillon 10 cm = 28 rangs) Comment suis-je sensée obtenir 21 cm?

09.12.2019 - 20:15

DROPS Design answered:

Bonjour Marion, ajoutez les 3 côtes au point mousse du début et vous devez avoir environ 13 cm depuis le milieu devant, comme dans le schéma. Et l'ouvrage doit mesurer 21 cm depuis l'épaule (placez votre ouvrage à plat et mesurez depuis l'épaule - cf schéma). Bon tricot!

10.12.2019 - 09:37