DROPS Karisma
DROPS Karisma
100% Wool
from 3.00 $ /50g
Get the yarn to make this pattern from 39.00$.

The yarn cost is calculated from the pattern’s smallest size and the yarn’s cheapest product type. Looking for an even better price? You might find it on the DROPS Deals!

DROPS SS24

Angel Falls

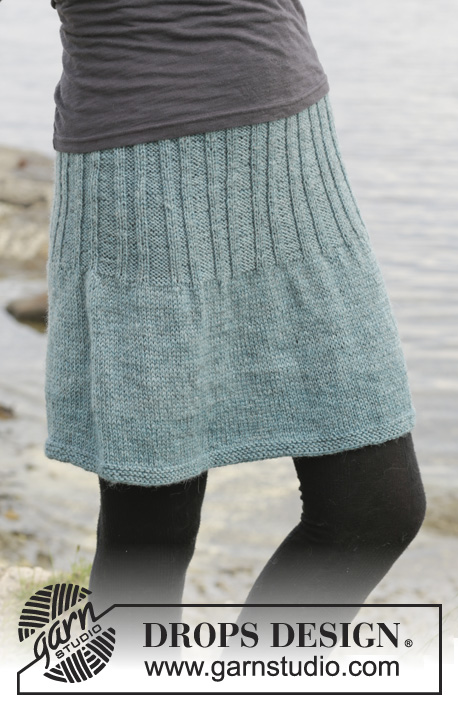
Knitted DROPS dress in garter st with rib and raglan, worked top down in ”Karisma”. Size: S - XXXL.

DROPS 156-3
DROPS design: Pattern no u-742
Yarn group B
-----------------------------------------------------------
Size: S - M - L - XL - XXL - XXXL
Finished measurements:
Bust: 80-88-98-106-120-132 cm / 31½''-34 5/8''-38½''-41¾''-47¼''-52''
Full length: 78-81-84-88-90-93 cm / 30 3/4"-32"-33"-34½"-35½"-36½"

Materials:
DROPS KARISMA from Garnstudio
650-700-800-850-950-1050 g color no 50, green

DROPS DOUBLE POINTED NEEDLES AND CIRCULAR NEEDLE (60 and 80 cm / 24'' and 32'') SIZE 4 mm /US 6 - or size needed to get 21 sts x 28 rows in stockinette st = 4'' x 4'' (10 x 10 cm).
DROPS DOUBLE POINTED NEEDLES and CIRCULAR NEEDLE (60 cm / 24'') SIZE 3.5 mm / US 4 - for rib and garter st.

-------------------------------------------------------

Alternative Yarn – See how to change yarns here
Yarn Groups A to F – Use the same pattern and change the yarn here
Yarn usage using an alternative yarn – Use our yarn converter here

-------------------------------------------------------

DROPS Karisma
DROPS Karisma
100% Wool
from 3.00 $ /50g
Get the yarn to make this pattern from 39.00$.

The yarn cost is calculated from the pattern’s smallest size and the yarn’s cheapest product type. Looking for an even better price? You might find it on the DROPS Deals!

Pattern instructions

NOTE: This pattern is written in American English. All measurements in charts are in cm. For conversion from inches to cm - click here. There are different terms for crocheting in American and British English. If this pattern includes crochet, click for "crochet terms" here. For this pattern in British English, please click here.
GARTER ST (in the round on double pointed needles/circular needle):
* K 1 round and P 1 round *, repeat from *-*. 1 ridge = 2 rounds.

RAGLAN:
Inc on each side of marker as follows:
Work until 2 sts before 1st marker, 1 YO, K 5, 1 YO, continue until 3 sts before 2nd marker, 1 YO, K 5, 1 YO, continue until 2 sts before 3rd marker, 1 YO, K 5, 1 YO, continue until 3 sts before 4th marker, 1 YO, K 5, 1 YO, work the rest of round (= 8 sts inc on round).
On next round K YO twisted (i.e. work in back loop of st instead of front) to avoid holes.

DECREASE TIP:
Dec on each side of marker as follows: Work until 3 sts before marker, K 2 tog, K 2 (marker is between these sts), slip 1 st as if to K, K 1, psso.
----------------------------------------------------------

DRESS:
Worked top down in the round on circular needle.

YOKE:
Cast on 126-126-132-132-136-136 sts on circular needle size 3.5 mm / US 4 with Karisma. Work 3 ridges in GARTER ST – see explanation above, AT THE SAME TIME on last round in garter st inc 24-24-24-26-26-26 sts evenly on round = 150-150-156-158-162-162 sts. Now work an elevation in the back of neck in garter st as follows: Work 10-10-12-12-14-14 sts, turn, work 20-20-24-24-28-28 sts, turn, work 25-25-29-29-33-33 sts, turn, work 30-30-34-34-38-38 sts, turn. Continue like this by working 5 sts more on every turn until 70-70-74-74-78-78 sts are worked. Turn and work back to beg of round. Switch to circular needle size 4 mm / US 6 and work as follows from mid back: 21-21-22-23-24-24 sts in stockinette st, insert 1st marker, 34 sts in stockinette st, insert 2nd marker, 41-41-44-45-47-47 sts in stockinette st, insert 3rd marker, 34 sts in stockinette st, insert 4th marker, 20-20-22-22-23-23 sts in stockinette st. REMEMBER THE GAUGE! Continue in stockinette st, AT THE SAME TIME on next round beg inc for RAGLAN – see explanation above! Repeat inc every round 7-12-15-21-27-37 more times, every other round 5-4-4-4-4-3 times and every 3rd round 5-5-5-4-3-1 times = 294-326-356-398-442-498 sts. When all inc are done and piece measures 21-22-23-24-25-26 cm / 8¼''-8¾''-9''-9½''-9¾''-10¼'' from shoulder, work as follows: Work 39-43-47-53-59-66 sts (= half back piece), slip the next 70-78-84-94-104-118 sts on 1 stitch holder (= sleeve), cast on 8 new sts for armhole, insert a marker in the middle of these 8 sts, work 77-85-94-105-117-131 sts (= front piece), slip the next 70-78-84-94-104-118 sts on a stitch holder (= sleeve), cast on 8 new sts for armhole, insert a marker in the middle of these 8 sts, work the remaining 38-42-47-52-58-65 sts (= half back piece).

BODY:
There are now 170-186-204-226-250-278 sts for body. Now work 1 round in stockinette st AT THE SAME TIME dec 30-32-36-40-44-50 sts evenly = 140-154-168-186-206-228 sts. Switch to circular needle size 3.5 mm / US 4. Then work in garter st, AT THE SAME TIME when piece measures 4 cm / 1½'' from the new sts under sleeves, dec 1 st on each side of marker in each side of piece – READ DECREASE TIP. Repeat dec every 2-2½-2½-2½-3-3½ cm / 3/4"-7/8"-7/8"-7/8"-1"-1 1/4" 3 more times = 124-138-152-170-190-212 sts on round. When piece measures 13-14-15-16-17-18 cm / 5 1/8''-5½''-6''-6¼''-6¾''-7'' from new sts under sleeve, work in stockinette st AT THE SAME TIME inc 26-32-38-40-40-48 sts evenly = 150-170-190-210-230-260 sts. Continue to work rib as follows: K 1, P 3, * K 2, P 3 *, repeat from *-* the entire round until 1 st remains, K 1. When rib has been worked for 7 cm / 2¾'', inc 1 st in every other repetition with P sts (= 15-17-19-21-23-26 sts inc) = 165-187-209-231-253-286 sts. When rib has been worked for 14 cm / 5½'', inc the same way in every repetition with 4 P sts (= 15-17-19-21-23-26 sts inc) = 180-204-228-252-276-312 sts. Continue like this until rib has been worked for 24-25-26-27-28-29 cm / 9½''-9 3/4''-10 1/4''-10 5/8''-11''-11 3/8''. On next round switch to circular needle size 4 mm / US 6 and work in stockinette st, AT THE SAME TIME inc 30-26-12-8-4-4 sts = 210-230-240-260-280-316 sts. Continue in stockinette st for 19 cm / 7½''. Switch to circular needle size 3.5 mm / US 4 and work 3 ridges. Loosely bind off.

SLEEVE:
Worked in the round on double pointed needles.
Slip the 70-78-84-94-104-118 sts back on double pointed needles size 4 mm / US 6. Work in stockinette st over all sts and cast on 8 sts under sleeve = 78-86-92-102-112-126 sts. Insert a marker in the middle of the new sts. On first round dec 1 st on each side of marker - READ DECREASE TIP. Repeat dec every other round 7 more times = 62-70-76-86-96-110 sts. Then dec every 5½-3½-3-2-1½-1 cm / 2 1/4"-1 1/4"-1"-3/4"-½"-1/4" 7-10-12-16-21-27 times = 48-50-52-54-54-56 sts. When sleeve measures 45-45-44-44-44-44 cm / 17 3/4"-17 3/4"-17 1/4"-17 1/4"-17 1/4"-17 1/4" from marker mid under sleeve, switch to needle size 3.5 mm / US 4 and work in garter st for 8 cm / 3 1/8''. Bind off.

ASSEMBLY:
Sew the openings under the sleeves tog.

Diagram

All measurements in charts are in cm.

diagram measurements

Each of our patterns has specific tutorial videos to help you.

Do you have a question? See a list of frequently asked questions (FAQ)

Knitting tension is what determines the final measurements of your work, and is usually measured per 10 x 10 cm. It is provided like so: number of stitches in width x number of rows in height - eg: 19 stitches x 26 rows = 10 x 10 cm.

The knitting tension is very individual; some people knit/crochet loosely while others work tightly. You adjust the knitting tension with the needle size, which is why the suggested needle size only serve as a guide! You need to adjust this (up or down) to ensure that YOUR knitting tension matches the knitting tension provided in the pattern. If you work with a different knitting tension than provided you will have a different yarn consumption, and your work will have different measurements than what the pattern suggests.

The knitting tension also determines which yarns can replace each other. As long as you achieve the same knitting tension you can replace one yarn with another.

See DROPS lesson: How to measure your tension/gauge

See DROPS video: How to make a gauge tension swatch

The required amount of yarn is provided in grams, eg: 450 g. To calculate how many balls you’ll need you first need to know how many grams are in 1 ball (25g, 50g or 100g). This information is available if you click on the individual yarn quality on our pages. Divide the amount required with the amount of each ball. For example, if each ball is 50g (the most common amount), the calculation will be as follows: 450 / 50 = 9 balls.

The important thing when changing from one yarn to another is that the knitting/crochet tension remains the same. This is so that the measurements of the finished piece will be the same as on the sketch provided. It is easier to achieve the same knitting tension using yarns from the same yarn group. It is also possible to work with multiple strands of a thinner yarn to achieve the knitting tension of a thicker one. Please try our yarn converter. We recommend you to always work a test swatch.

Please NOTE: when changing yarn the garment might have a different look and feel to the garment in the photo, due to individual properties and qualities of each yarn.

See DROPS lesson: Can I use a different yarn than the one mentioned in the pattern?

All our yarns are categorised into yarn groups (from A to F) according to thickness and knitting tension – group A contains the thinnest yarns and group F the thickest. This makes it easier for you to find alternative yarns to our patterns, should you wish to switch yarn. All yarns within the same group have a similar knitting tension and can easily replace each other. However, different yarn qualities have different structures and properties which will give the finished work a unique look and feel.

Click here for an overview of the yarns in each yarn group

At the top of all our patterns you’ll find a link to our yarn converter, which is a helpful tool should you wish to use a different yarn than suggested. By filling in the yarn quality you wish to replace, the amount (in your size) and number of strands, the converter will present good alternative yarns with the same knitting tension. Additionally it will tell you how much you’ll require in the new qualities and whether you’ll need to work with multiple strands. Most skeins are 50g (some are 25g or 100g).

If the pattern is worked with multiple colours, every colour will have to be converted separately. Similarly, if the pattern is worked with several strands of different yarns (for example 1 strand Alpaca and 1 strand Kid-Silk) you will have to find alternatives for each, individually.

Click here to see our yarn converter

Since different yarns have different qualities and textures we have chosen to keep the original yarn in our patterns. However, you can easily find options among our available qualities by using our yarn converter, or simply pick a yarn from the same yarn group.

It is possible that some retailers still have discontinued yarns in stock, or that someone has a few skeins at home that they would like to find patterns for.

The yarn converter will provide both alternative yarn as well as required amount in the new quality.

If you think it's hard to decide what size to make, it can be a good idea to measure a garment you own already and like the size of. Then you can pick the size by comparing those measures with the ones available in the pattern's size chart.

You'll find the size chart at the bottom of the pattern.

See DROPS lesson: How to read size chart

The needle size provided in the pattern serves only as a guide, the important thing is to follow the knitting tension. And since knitting tension is very individual, you will have to adjust the needle size to ensure that YOUR tension is the same as in the pattern – maybe you’ll have to adjust 1, or even 2 needle sizes, up or down to achieve the correct tension. For this, we recommend that you work test swatches.

Should you work with a different knitting tension than the one provided, the measurements of the finished garment might deviate from the measurement sketch.

See DROPS lesson: How to measure your tension/gauge

See DROPS video: How to make a gauge tension swatch

Working a garment top-down provides more flexibility and room for personal adjustment. For example it is easier to try the garment on while working, as well as making adjustments to length of yoke and shoulder caps.

The instructions are carefully explaining every step, in the correct order. Diagrams are adjusted to the knitting direction and are worked as usual.

The diagram depicts all rows/rounds, and every stitch seen from the right side. It is read from bottom to top, from right to left. 1 square = 1 stitch.

When working back and forth, every other row is worked from the right side and every other row is worked from the wrong side. When working from the wrong side, the diagram will have to be worked reversed: from left to right, knit stitches are purled, purl stitches are knit etc.

When working in the round every round is worked from the right side and the diagram are worked from right to left on all rounds.

See DROPS lesson: How to read knitting diagrams

The diagram depicts all rows/rounds, and every stitch seen from the right side. It is worked from bottom to top, from right to left.

When working back and forth every other row is worked from the right side: from right to left and every other row is worked from the wrong side: from left to right.

When working in the round, every row in the diagram are worked from the right side, from right to left.

When working a circular diagram you start in the middle and work your way outwards, counter clockwise, row by row.

The rows usually start with a given number of chain stitches (equivalent to the height of the following stitch), this will either be depicted in the diagram or explained in the pattern.

See DROPS lesson: How to read crochet diagrams

Instructions for working several diagrams after each other on the same row/round, will often be written like so: “work A.1, A.2, A.3 a total of 0-0-2-3-4 times". This means you work A.1 once, then A.2 is worked once, and A.3 is repeated (in width) the number of times provided for your size – in this case like so: S = 0 times, M = 0 times, L=2 times, XL= 3 times and XXL = 4 times.

The diagrams are worked as usual: begin with the first row in A.1, then work the first row in A.2 etc.

See DROPS lesson: How to read knitting diagrams

See DROPS lesson: How to read crochet diagrams

The total width of the garment (from wrist-to-wrist) will be larger in the larger sizes, despite the actual sleeves being shorter. The larger sizes have longer sleeve caps and wider shoulders, so there will be a good fit in all sizes.

The measurement sketch/schematic drawing provides information regarding the full length of the garment. If it’s a jumper or a jacket the length is measured from the highest point on the shoulder (usually closest to the neckline), and straight down to the bottom of the garment. It is NOT measured from the tip of shoulder. Similarly, the length of yoke is measured from the highest point on the shoulder and down to where yoke is split into body and sleeves.

See DROPS lesson: How to read a schematic drawing

Diagrams are often repeated on the round or in height. 1 repeat is the diagram the way it appears in the pattern. If it says to work 5 repeats of A.1 in the round, then you work A.1 a total of 5 times after/next to each other in the round. If it says to work 2 repeats of A.1 vertically/in height you work the entire diagram once, then begin again at the start and work the entire diagram one more time.

Chain stitches are slightly narrower than other stitches and to avoid working the cast-on edge too tight, we simply chain more stitches to begin with. The stitch count will be adjusted on the following row to fit the pattern and measurement sketch.

The rib edge is more elastic and will contract slightly compared to, for example, stocking stitch. By increasing before the rib edge, you avoid a visible difference in width between the rib edge and the rest of the body.

It’s very easy to cast off too tightly, and by making yarn overs while casting off (and simultaneously casting these off) you avoid a too tight cast off edge.

See DROPS video: How to bind off with yarn overs (yo)

To achieve an even increase (or decrease) you can increase on, for example: every 3rd and 4th row alternately, like so: work 2 rows and increase on the 3rd row, work 3 rows and increase on the 4th. Repeat this until the increase is complete.

See DROPS lesson: Increase or decrease 1 st on every 3rd and 4th row alternately

Should you prefer to work in the round instead of back and forth, you may of course adjust the pattern. You’ll need to add steeks mid-front (usually 5 stitches), and follow the instructions. When you would normally turn and work from the wrong side, simply work across the steek and continue in the round. At the end you’ll cut the piece open, pick up stitches to work bands, and cover the cut edges.

See DROPS video: How to knit steeks and cut open

Should you prefer to work back and forth instead of in the round, you may of course adjust the pattern so you work the pieces separately and then assemble them at the end. Divide the stitches for the body in 2, add 1 edge stitch in each side (for sewing) and work the front and back pieces separately.

See DROPS lesson: Can I adapt a pattern for circular needles into straight needles?

Pattern repeats can vary slightly in the different sizes, in order to get the correct proportions. If you’re not working the exact same size as the garment in the photo, yours might deviate slightly. This has been carefully developed and adjusted so that the complete impression of the garment is the same in all sizes.

Make sure to follow instructions and diagrams for your size!

If you have found a pattern you like which is available in women’s size it’s not very difficult to convert it to men’s size. The biggest difference will be the length of sleeves and body. Start working on the women size that you think would fit across the chest. The additional length will be worked right before you cast off for the armhole/sleeve cap. If the pattern is worked top-down you can add the length right after the armhole or before the first decrease on sleeve.

Regarding additional yarn amount, this will depend on how much length you add, but it is better with a skein too many than too few.

All yarns will have excess fibres (from production) that might come off as lint or shedding. Brushed yarns (ie hairier yarns) have more of these loose, excess fibres, causing more shedding.

Shedding also depends on what is worn under or over the garment, and whether this pulls at the yarn fibres. It’s therefore not possible to guarantee that there will be no shedding

Below are some tips on how to get the best result when working with hairier yarns:

1. When the garment is finished (before you wash it) shake it vigorously so the looser hairs come off. NOTE: do NOT use a lint roller, brush or any method that pulls at the yarn.

2. Place the garment in a plastic bag and put it in your freezer - the temperature will cause the fibres to become less attached to each other, and excess fibres will come off easier.

3. Leave in the freezer for a few hours before taking it out and shaking it again.

4. Wash the garment according to the instructions on the yarn label.

Pilling is a natural process that happens to even the most exclusive of fibers. It's a natural sign of wear and tear that is hard to avoid, and that is most visible in high friction areas of your garment like a sweater's arms and cuffs.

You can make your garment look as new by removing the pilling, using a fabric comb or a pill/lint remover.

Still can't find the answer you need? Then scroll down and leave your question so one of our experts can try to help you. This will be done normally within 5 to 10 working days.
In the meantime, you can read the questions and answers that others have left to this pattern or join the DROPS Workshop on Facebook to get help from fellow knitters/crocheters!

You might also like...

Post a comment to pattern DROPS 156-3

We would love to hear what you have to say about this pattern!

If you want to leave a question, please make sure you select the correct category in the form below, to speed up the answering process. Required fields are marked *.

Comments / Questions (104)

country flag Jeannine Grassinger wrote:

Die Anleitung stimmt ab dem Rumpfteil nicht! Wenn ich nach allen Zunahmen weitersttricke habe ich bei der Größe S nur 154 Maschen auf der Nadel und nicht wie angegeben 170 - somit stimmen die Abnahmen im Rumpfteil nicht mehr!

15.02.2016 - 13:02

DROPS Design answered:

Doch, die Anleitung stimmt. Sie haben vor den Raglanzunahmen 150 M. Dann nehmen Sie insgesamt 18 x für die Raglanärmel zu, also 18 x 8 M = 144 M = 294 M insgesamt. Dann legen Sie 2x 70 M für die Ärmel still und schlagen zudem je 8 M an der unteren Ärmelmitte an = 294 M - 2x 70 M + 2x 8 M = 170 M.

16.02.2016 - 13:18

country flag Jacky78 wrote:

Bei der Passe steht das man wenn man die Maschen für die Armausschnitte stillgelegt hat 8 neue Maschen anschlagen und in der Mitte davon einen Maschenmarkierer anbringen. DAs gleiche steht bei den Ärmeln dann auch wieder. Handelt es sich hier nur um eine Wiederholung oder mussman wirklich 2x8M neu anschlagen unter den Armen? Bitte um Info! lg, Jacky

14.02.2016 - 11:40

DROPS Design answered:

An den Ärmeln handelt es sich ja um das Gegenstück zu den angeschlagenen Maschen an der Passe, das ist die Stelle unter den Armen. Sie schlagen also sowohl am Ärmel als jeweils auch unter dem Arm an der Passe 8 M neu an. Zum Schluss nähen Sie die 8 neu angeschlagenenen M des Ärmels an die 8 neu angeschlagenen M der Passe.

15.02.2016 - 10:27

country flag Mia wrote:

Jeg har lige strikket halsen og skal i gang med forhøjningen til nakken, men nu er jeg altså i tvivl om, om den skal strikkes ret på ret side og vrang på vrangside når jeg vender. Eller om det bare skal strkkes ret på begge sider?

11.02.2016 - 23:50

DROPS Design answered:

Hej Mia. "Nu strikkes der forhøjning bag i nakken i retstrik således:", saa du skal strikke ret paa alle pinde

12.02.2016 - 12:33

country flag Åsa B wrote:

Sorry, hade ju en fråga till. Hur vet jag vilken storlek jag behöver ha? Ser ju bilden på klänningen med siffror på olika ställen, är det centimetrar? Eller vad står siffrorna för? MVH Åsa.

09.01.2016 - 20:23

DROPS Design answered:

Hej. Ja det är cm i de olika storlekarna (S - M - L - XL - XXL - XXXL). Lycka till!

12.01.2016 - 11:29

country flag Åsa Bruhn wrote:

Hej. Under garnsort står det 2 olika garner. Är det 2 olika garner i klänningen? Eller är det 2 olika som är likvärdiga att välja mellan? När man klickar på "Beställ" verkar man ju komma till samma sida? MVH Åsa.

09.01.2016 - 20:19

DROPS Design answered:

Hej. Det är uppdelat på mixfärger och enfärgade i garnet DROPS Karisma, du kan använda antingen mix- eller en enfärgad (på bilden har färg nr 50 använts). Lycka till!

12.01.2016 - 11:28

country flag Lotta wrote:

Varför ska resåren stickas med 3,5? Vad händer om man istället stickar med 4? Jag tycker det är bekvämare med stickor i strl 4.

06.12.2015 - 21:56

DROPS Design answered:

Hej Lotta, om du stickar med 3,5 blir arbetet mindre än om du stickar med 4. Lycka till!

07.12.2015 - 10:13

country flag Lotta Lyttkens wrote:

Hej! Jag är klar med ökningarna till raglan och ska nu sätta 94 (xl) maskor på tråd till ärm. Därefter ska jag lägga upp 8 maskor till ärmhål. Hur och var gör jag det? Med vänlig hälsning, Lotta

30.11.2015 - 14:14

DROPS Design answered:

Hej Lotta, du lägger 8 m upp direkt efter att du har stickat halva bakst, sätter de 94 m på en tråd och fortsätter direkt efter de nya 8 med m på framst. Lycka till!

30.11.2015 - 14:59

country flag Kody Doisy wrote:

Bonjour a vous Drops , je cherche une vidéo pour faire la rehausse de ce modèle SVP Merci pour votre réponse Bon A M et bon week end

10.10.2015 - 15:19

DROPS Design answered:

Bonjour Kody Doisy, vous trouverez sous l'onglet "vidéos" 2 vidéos montrant comment faire les rangs raccourcis au point mousse. L'empiècement se commence en rond, mais pour la ré-hausse de l'encolure, on tricote en aller-retours sur quelques rangs: tricotez 10-14m sur l'endroit, tournez et tricotez 20-28 m sur l'envers, tournez et tricotez 25-33 m, tournez et tricotez 30-38 m et continuez ainsi en tricotant 5 m de plus à chaque rang jusqu'à ce que vous ayez tricotez 70-78 m, puis continuez de nouveau en rond (= ssur l'endroit). Bon tricot!

12.10.2015 - 09:24

country flag GIOVANNA DEGL'INNOCENTI wrote:

Buongiorno, ho scelto i modelli che intendo realizzare ma non sono sicura della taglia. Sul sito non sono riuscita a trovare indicazioni al riguardo ( informazioni come quanti cm è lunga la manica o il punto vita nella taglia M ad esempio). Come posso fare per orientarmi per l'ordine? Grazie infinite

05.10.2015 - 13:10

DROPS Design answered:

Buongiorno Giovanna. Alla fine della spiegazione dei modelli, trova un grafico con l’indicazione delle misure per le singole parti. Confrontando il grafico con un capo analogo della sua misura, dovrebbe essere in grado di individuare la taglia corretta e il quantitativo di filato da ordinare. Buon lavoro!

05.10.2015 - 14:04

country flag Kody Doisy wrote:

Bonjour j'aimerai exécuter ce modèle de robe mais avec un petit changement . Je souhaiterai faire le haut devant de la robe a rayures . Est ce possible ou pas ? j'ai déjà réaliser la jupe et j'ai eu grand plaisir a la tricoter . J'aimerai avoir votre avis . Merci et bonne continuation j'adore vos modèles de tricot . A bientot .

20.09.2015 - 11:50

DROPS Design answered:

Bonjour Kody Doisy et merci. la robe se tricote de haut en bas en une seule pièce en commençant par l'empiècement. Vous pouvez soit adapter les explications pour tricoter le devant séparément avec les rayures, soit tricoter en rond comme indiqué en coupant les fils à chaque transition du devant pour changer de couleur. Votre magasin DROPS saura vous aider et vous conseiller si besoin. Bon tricot!

21.09.2015 - 09:09