
Popular categories
Looking for a yarn?


|
||||||||||||||||||||||
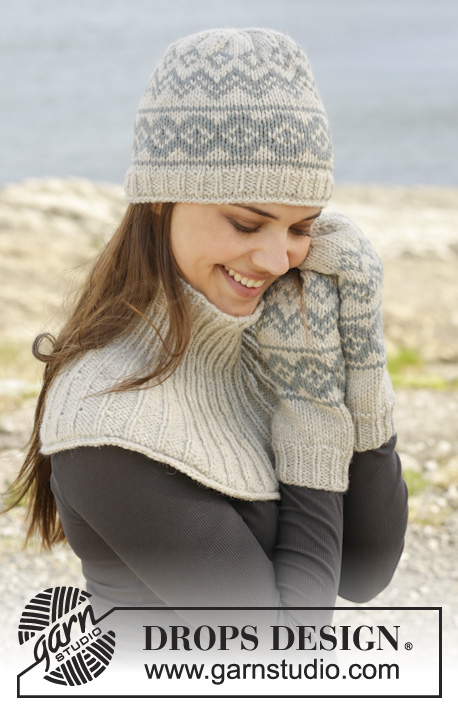
September Morning |
||||||||||||||||||||||
 |
 |
|||||||||||||||||||||
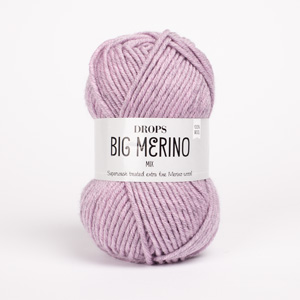
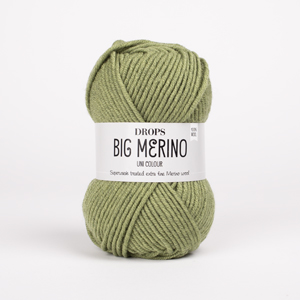
Crochet DROPS hat, neck warmer and wrist warmers with lace pattern and fan edge in “Big Merino” or "Nepal".
DROPS 156-22 |
||||||||||||||||||||||
|
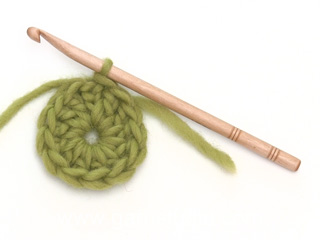
PATTERN: See diagram A.1. ROUNDS WITH TR AND CH: Work every round with tr and ch as follows: Turn piece so that WS is towards you, work 5 ch (= 1st tr + 2 ch), skip 1st ch-space (= last ch from previous round), * 1 tr in next ch-space, 2 ch *. Repeat from *-*, finish round with 1 tr in last ch-space (= ch-space with 5 ch from previous round), 1 sl st in ch-space with 5 ch at beg of round - i.e. work alternately from RS and WS to get a nice finish/beg on round. CROCHET INFO: Replace first tr at beg of every tr round with 3 ch, and finish every round with 1 sl st in 3rd ch at beg of round. DECREASE TIP: Dec 1 tr by working 2 tr tog as follows: Work 1 tr but wait with last pull through (= 2 sts on hook), then work next tr but on last pull through, pull yarn through all 3 sts on hook. ---------------------------------------------------------- HAT: The piece is worked top down in the round. Work 4 ch on hook size 4 mm with lavender and form a ring with 1 sl st in first ch - READ CROCHET INFO. ROUND 1: Work 9 tr in ch-ring. ROUND 2: Work 2 tr in every tr the entire round = 18 tr. ROUND 3: Work * 1 tr in first tr, 2 tr in next tr *, repeat from *-* the entire round = 27 tr. ROUND 4: Work * 1 tr in each of the first 2 tr, 2 tr in next tr *, repeat from *-* the entire round = 36 tr. REMEMBER THE CROCHET TENSION! Continue inc like this until there are 81-90 tr on round (i.e. there is 1 tr more on every round worked before working 2 tr in same tr = 9 tr inc on every round). Work 1 round with 1 tr in every tr AT THE SAME TIME inc 3-0 tr evenly = 84-90 tr. Continue to work as follows: Work 5 ch (= 1st tr + 2 ch), * skip 2 ch, 1 tr in next tr, 2 ch *, repeat from *-* the entire round AT THE SAME TIME inc 6 ch-spaces evenly as follows: Work 1 tr, 2 ch, 1 tr, 2 ch in same tr on previous round, finish with 1 sl st in ch-space with 5 ch at beg of round = 34-36 ch-spaces (= 102-108 tr + ch). Then work ROUNDS WITH TR AND CH – see explanation above. When piece measures approx. 18-19 cm, work as follows: * 1 tr in next tr, 2 tr in next ch-space *, repeat from *-* the entire round = 102-108 tr. On next round work 1 tr in every tr AT THE SAME TIME dec 18 sts evenly – READ DECREASE TIP = 84-90 tr on round. Then work 1 tr in every tr. When piece measures 26-27 cm vertically, work 1 round as follows: Work 5 ch (= 1st tr + 2 ch), * skip 2 ch, 1 tr in next tr, 2 ch *, repeat from *-* the entire round AT THE SAME TIME inc 2 ch-spaces evenly as follows: Work 1 tr, 2 ch, 1 tr, 2 ch in same tr on previous round, finish with 1 sl st in ch-space with 5 ch at beg of round = 30-32 ch-spaces (= 90-96 tr + ch). Switch colour to amethyst and work a fan edge as follows: 1 ch, * 1 dc in every tr and 2 dc in every ch *, repeat from *-* the entire round = 90-96 dc. Finish with 1 sl st in first ch. Work 1 round with fans as follows: 1 ch, * skip 2 dc, 6 tr in next dc, skip 2 dc, 1 dc in next dc *, repeat from *-* the entire round and finish with 1 sl st in first ch (= 15-16 fans). Fasten off. ---------------------------------------------------------- WRIST WARMER: Worked in the round. Work 36 ch on hook size 4 mm with lavender and form a ring with 1 sl st in first ch - READ CROCHET INFO. Work * 1 tr in each of the next 5 ch, skip 1 ch *, repeat from *-* the entire round = 30 tr. Then work 1 tr in every tr until piece measures 12 cm. REMEMBER THE CROCHET TENSION! On next round work as follows: Work 5 ch (= 1st tr + 2 ch), * skip 2 tr, 1 tr in next tr, 2 ch *, repeat from *-* the entire round and finish with 1 sl st in ch-space with 5 ch at beg of round = 10 ch-space (30 tr + ch). Switch colour to amethyst and work a fan edge as follows: 1 ch, * 1 dc in every tr and 2 dc in every ch-space *, repeat from *-* the entire round and finish with 1 sl st in first ch = 30 dc. Work next round as follows: 1 ch, 1 dc in first dc, * skip 2 dc, in next dc work 6 tr (= 1 fan), skip 2 dc, 1 dc in next dc *, repeat from *-* 5 times in total, but last time finish with 1 sl st at beg of round instead of 1 dc = 5 fans on round. Work A.1 1 time vertically. Fasten off. Wrist warmer measures approx. 18 cm vertically. Work another wrist warmer the same way. ---------------------------------------------------------- NECK WARMER: Worked in the round. Work 200 loose ch on hook size 5 mm with lavender and form a ring with 1 sl st in first ch. Work 5 ch (= 1st tr + 2 ch), * skip 1 ch, 1 tr in next ch, 2 ch *, repeat from *-* the entire round and finish with 1 sl st in ch-space with 5 ch at beg of round = 100 tr. Then work ROUNDS WITH TR AND CH – see explanation above. REMEMBER THE CROCHET TENSION! When piece measures 22 cm vertically, switch to amethyst and work a fan edge as follows: 1 ch, * 1 dc in every tr and 1 dc in every ch-space *, repeat from *-* the entire round, AT THE SAME TIME inc 2 sts on round by working 2 dc in 2 of the ch-spaces on round = 102 dc. Finish with 1 sl st in first ch. Work next round as follows: 1 ch, * skip 2 dc, 6 tr in next dc, skip 2 dc, 1 dc in next dc *, repeat from *-* the entire round and finish with 1 sl st in first ch = 17 fans. Fasten off. |
||||||||||||||||||||||
Diagram explanations |
||||||||||||||||||||||
|
||||||||||||||||||||||

|
||||||||||||||||||||||
|
Have you made this or any other of our designs? Tag your pictures in social media with #dropsdesign so we can see them! Do you need help with this pattern?You'll find tutorial videos, a Comments/Questions area and more by visiting the pattern on garnstudio.com. © 1982-2024 DROPS Design A/S. We reserve all rights. This document, including all its sub-sections, has copyrights. Read more about what you can do with our patterns at the bottom of each pattern on our site. |
||||||||||||||||||||||


With over 40 years in knitting and crochet design, DROPS Design offers one of the most extensive collections of free patterns on the internet - translated to 17 languages. As of today we count 304 catalogues and 11422 patterns - 11422 of which are translated into English (UK/cm).
We work hard to bring you the best knitting and crochet have to offer, inspiration and advice as well as great quality yarns at incredible prices! Would you like to use our patterns for other than personal use? You can read what you are allowed to do in the Copyright text at the bottom of all our patterns. Happy crafting!
Comments / Questions (11)
The wrist warmers are beautiful!. After CH3 do I turn my work before continuing? If I do not turn my work after CH3, it creates a hole. Thank you in advance!
21.11.2023 - 22:51DROPS Design answered:
Dear Lori, wrist warmers are worked in the round, start every round with 3 chains and do not turn, just continue working 1 dc (US-English) in each dc from previous round - see also this video. Happy crocheting!
22.11.2023 - 09:07Hej Jeg skal til og hækle viftekant. Jeg har 100 st i mit tørklæde. Og nu skal jeg hækle 1 fm i hver st og i hver lm bue og samtidig tage 2 m ud. Jeg skulle så til slut ha 102 fm. Det forstår slet ikke, det kan man da umuligt ha. Hvis man siger feks, (5 st = 9fm) man tæller vel alle fm.... 4 af dem er jo om lm buen.. derfor giver det 9. Er i ikke søde at hjælpe mig??? Mvh Maria
04.07.2020 - 23:40DROPS Design answered:
Hei Maria. Du har nå heklet omganger med STAVER og LUFTMASKER og arbeidet måler 22 cm, nå skal du bytte farge og hekle 1 omgang slik: 1 lm, *1 fm i hver stav og 1 fm om hver lm-bue (ikke i hver av disse 2 lm, men om luftmaske buen) *, gjenta fra *-* rundt hele omg (husk å øke 2 masker på omgangen ved å hekle 2 fm i 2 av lm-buene på omg = 102 fm). NÅ så skal du hekle viftene slik: 1 lm, * hopp over 2 fm, 6 staver i neste fm, hopp over 2 fm, 1 fm i neste fm*, gjenta fra *-* omgangen rundt og avslutt med 1 kjm i første lm= 17 vifter. God Fornøyelse!
06.07.2020 - 14:03I love this pattern. Clear, easy explanations. I've made several sets of the wrists warmers already and am working on the neck warmer next. It's something fun and easy to make in the evening. They come out so pretty! Thank you.
05.01.2020 - 17:21I find your pattern very difficult. the AT THE SAME time increases are not well explained. I had to abandon the hat after getting to 90 stitches. I have never seen another pattern written this way. asking us to increase evenly. why not just write the increases into the pattern. also why not number the rounds?
24.01.2018 - 11:17DROPS Design answered:
Dear Mrs Miller, to increase 1 ch-space work: (1 dc, ch 2, 1 dc, 2 ch in same dc on previous round) = 2 ch-space instead of 1. Repeat this a total of 6 times to get 36 ch-spaces and 108dc + ch. Happy crocheting!
24.01.2018 - 15:57I am unable to fully decipher the diagram for the wrist warmer. I understand the fan rounds, but the alternate rounds are confusing me. What do the short dashes between the double crochets represent? I know the long ones are chains, but I see no short dashes in the symbols chart. Are they supposed to represent single crochet stitches? Also, what does Fig. 1 describe? If possible, could you write A.1 out? I'm still learning how to read diagrams. Thank you.
30.11.2014 - 19:40DROPS Design answered:
Dear Mrs Murdock, the short dashes on round 2 and 4 between 2 dc are ch 1, so that you start round 2 with 4 ch, 1 dc in sl st, ch 5, in next sc work: *1 dc, 1 ch, 1 dc, 5 ch* repeat from *-* around. Fig. 1 shows how to crochet the sc from round 3 & 5 ie crochet the sc around ch from previous round between the 3rd and 4th dc from fan 2 rounds below. Happy crocheting!
01.12.2014 - 11:17Ich häkele gerade den Pulswärmer und verstehe nicht, wie ich das Muster zu verstehen habe. Stricke ich wirklich einmal rechts und einmal links herum? Und lese ich dann das Muster in der 3. Reihe von rechts nach links oder umgekehrt?
30.09.2014 - 15:50DROPS Design answered:
Nein, Sie häkeln das Muster in Runden ohne zu wenden. D.h. Sie häkeln die Rd immer so lange, bis Sie wieder am Rd-Anfang angekommen sind und häklen dann die nächste Rd, Sie lesen dafür alle Rd des Diagramms von rechts nach links.
30.09.2014 - 16:11I am working on the September Morning hat (already finished the cowl) and it seems it is missing something in the pattern. The way it is written implies the hat starts with a spiral rather than with connected rounds. I don't see how this will work out right. Seems there should be a slip stitch and some chains to start each round and there is not.
15.09.2014 - 17:35Mary answered:
See: Crochet info before the pattern.
16.09.2014 - 08:21Super!
10.07.2014 - 10:40Wunderschön!
07.07.2014 - 21:38Lauren McRoberts wrote:
I love this entire set! Please offer this year!
03.06.2014 - 13:24