DROPS Karisma
DROPS Karisma
100% Wool
from 2.30 £ /50g
Get the yarn to make this pattern from 32.20£.

The yarn cost is calculated from the pattern’s smallest size and the yarn’s cheapest product type. Looking for an even better price? You might find it on the DROPS Deals!

DROPS SS24

Silver Dream

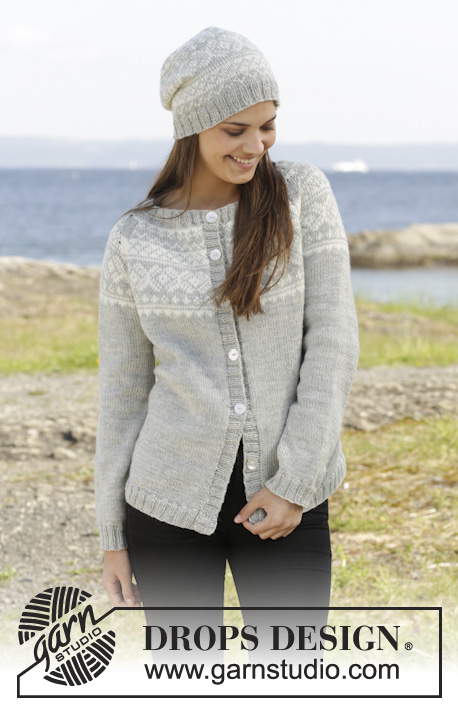
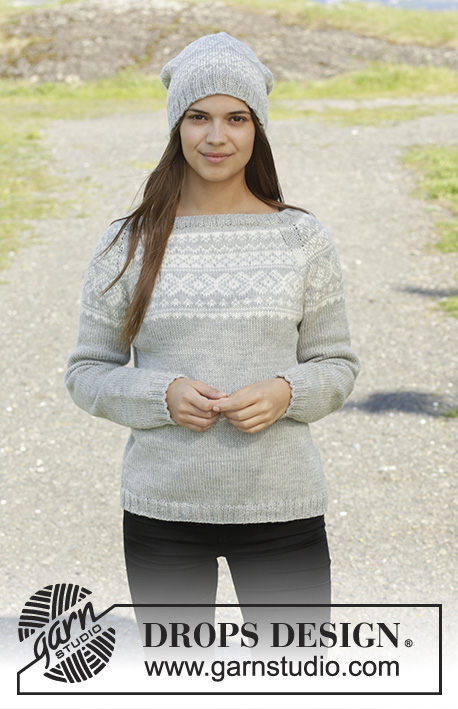
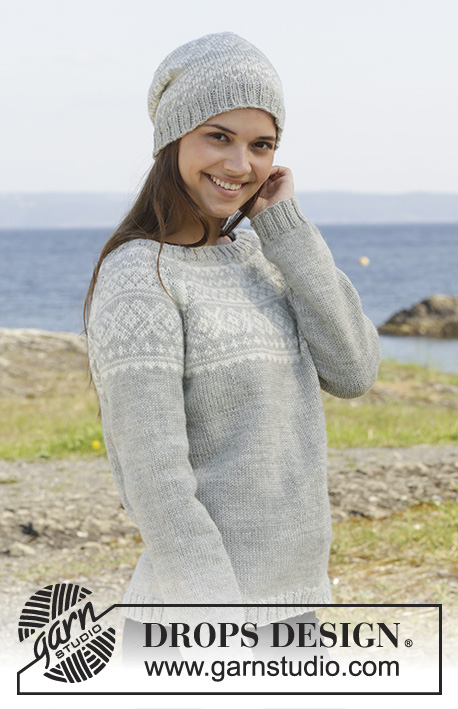
Knitted DROPS jumper and hat with Norwegian pattern in ”Karisma”. Size: S - XXXL.

DROPS 157-2
DROPS design: Pattern no u-729
Yarn group B
----------------------------------------------------------
JUMPER:
Size: S - M - L - XL - XXL - XXXL
Materials:
DROPS KARISMA from Garnstudio
450-500-550-600-700-750 g colour no 72, light pearl grey
100-100-150-150-150-150 g colour no 01, off white

DROPS DOUBLE POINTED NEEDLES AND CIRCULAR NEEDLE (40 and 80 cm) SIZE 4 mm - or size needed to get 21 sts x 28 rows in stocking st = 10 x 10 cm.
DROPS DOUBLE POINTED NEEDLES and CIRCULAR NEEDLE (40 and 80 cm) SIZE 3.5 mm - for rib.

HAT:
Size: One-size
Head circumference: approx. 56/58 cm
Materials:
DROPS KARISMA from Garnstudio
100 g colour no 72, light pearl grey
50 g colour no 01, off white

DROPS DOUBLE POINTED NEEDLES and CIRCULAR NEEDLE (40 cm) SIZE 4 mm - or size needed to get 21 sts x 28 rows in stocking st = 10 x 10 cm.
DROPS CIRCULAR NEEDLE (40 cm) SIZE 3.5 mm – for rib.

-------------------------------------------------------

Alternative Yarn – See how to change yarns here
Yarn Groups A to F – Use the same pattern and change the yarn here
Yarn usage using an alternative yarn – Use our yarn converter here

-------------------------------------------------------

DROPS Karisma
DROPS Karisma
100% Wool
from 2.30 £ /50g
Get the yarn to make this pattern from 32.20£.

The yarn cost is calculated from the pattern’s smallest size and the yarn’s cheapest product type. Looking for an even better price? You might find it on the DROPS Deals!

Pattern instructions

NOTE: This pattern is written in British English. All measurements in charts are in cm. For conversion from cm to inches - click here. There are different terms for crocheting in British and American English. If this pattern includes crochet, click for "crochet terms" here. For this pattern in American English, please click here.
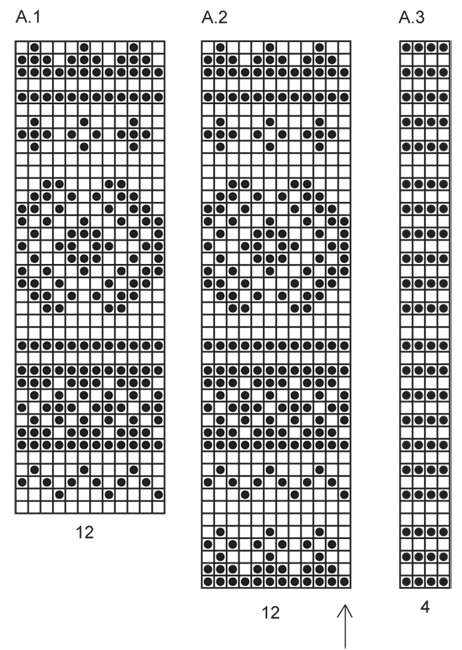
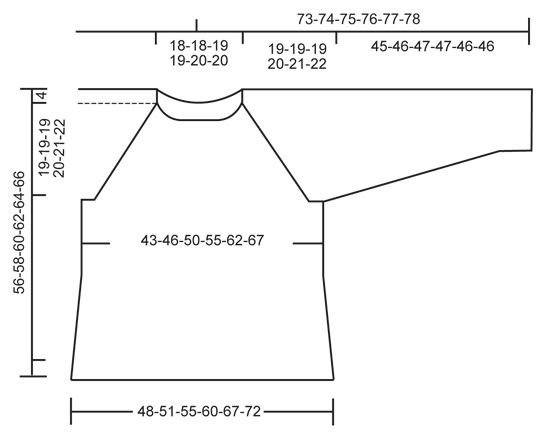
PATTERN:
See diagrams A.1-A.3. Work entire pattern from RS in stocking st.

INCREASE TIP (applies to raglan):
Inc 1 st by making a YO before and after the 4 sts between markers on front piece/back piece and sleeves. K YO twisted on next round. Work the inc sts in the pattern.

PATTERN TIP:
Diagram A.3 shows how to work the 4 raglan sts to avoid large spaces between sts. After diagram work piece with light pearl grey until finished.
----------------------------------------------------------

JUMPER:
Worked in the round on circular needle, top down. Cast on 120-120-124-124-128-128 sts on circular needle size 3.5 mm with light pearl grey. K 1 round. Then work rib (= K 2/P 2). Switch to circular needle size 4 mm when piece measures 2 cm. Then work in stocking st AT THE SAME TIME on first round dec 12-12-12-8-8-8 sts evenly = 108-108-112-116-120-120 sts (this is done to give the garment better shape). Work 1 round. On next round, inc 12-28-36-40-36-52 sts evenly = 120-136-148-156-156-172 sts. REMEMBER THE KNITTING TENSION!
Work 1 round and at the same time insert 8 markers and 4 strands in the piece as follows: insert a marker in the first stitch on the round (mid st on back piece). Work the first 21-24-27-28-28-30 sts, insert a marker. Work 4 sts, insert a marker, work 6-7-7-8-8-10 sts, insert a strand in the last st on right needle (= mid st on sleeve). Work 5-6-6-7-7-9 sts, insert a marker. Work 4 sts, insert a marker, work 21-24-27-28-28-30 sts, insert a strand in the last st on right needle (= middle of front piece). Work 20-23-26-27-27-29 sts, insert a marker. Work 4 sts, insert a marker, work 6-7-7-8-8-10 sts, insert a strand in the last st on right needle (= middle of sleeve). Work 5-6-6-7-7-9 sts, insert a marker. Work 4 sts, insert a marker. Work 20-23-26-27-27-29 sts until first marker.

READ ALL OF THE FOLLOWING SECTION BEFORE CONTINUING:
Now work PATTERN according to diagram A.2 - READ PATTERN TIP! NOTE: St with strand on back piece, front piece and sleeves should fit st with arrow in diagram. Count out towards the side (i.e. the pattern will not fit in transitions between body and sleeves). AT THE SAME TIME inc for raglan in every transition between body and sleeves as follows - READ INCREASE TIP:
ON BODY: Inc every round 0-0-0-2-10-14 times in total, every other round 14-15-17-19-20-20 times in total and then every 4th round 6-6-5-4-2-2 times in total (= 81-89-97-105-119-131 sts on back piece and 81-89-97-105-119-131 sts on front piece)
ON SLEEVE: Inc every other round 14-15-19-20-25-23 times in total and every 4th round 6-6-4-4-2-4 times in total (= 59-63-67-71-77-81 sts on sleeve). Piece measures approx. 19-19-19-20-21-22 cm from cast-on edge at the front.
After all inc for raglan, there are 280-304-328-352-392-424 sts. Work next round as follows: Work the first 41-45-49-53-60-66 sts (= half back piece), slip the next 59-63-67-71-77-81 sts on stitch holder (= sleeve), cast on 8-8-8-10-10-10 new sts, work 81-89-97-105-119-131 sts (= front piece), slip the next 59-63-67-71-77-81 sts on stitch holder (= sleeve), cast on 8-8-8-10-10-10 new sts, work the last 40-44-48-52-59-65 sts (= half back piece) = 178-194-210-230-258-282 sts. Insert 1 marker in the middle of the 8-8-8-10-10-10 new sts under each sleeve. Then work in stocking st until piece measures approx. 36-37-38-39-40-41 cm. Then inc 1 st on each side of 2 sts in each side by making a YO (marker is in the middle of these sts), K YO twisted on next round (= 4 sts inc). Repeat inc every 4-4-4-5-5-5 cm 2 more times (= 3 times in total) = 190-206-222-242-270-294 sts. Work until piece measures 52-54-56-58-60-62 cm. On next round inc 10 sts evenly in all sizes = 200-216-232-252-280-304 sts. Switch to circular needle size 3.5 mm. Work rib = K 2/P 2 until rib measures approx. 4 cm. Cast off with K over K and P over P.

SLEEVE:
Work piece in the round on circular needle in stocking st. Slip sts from one stitch holder back on circular needle size 4 mm (= 59-63-67-71-77-81 sts). Work in stocking st and cast on 8-8-8-10-10-10 new sts at the end of round = 67-71-75-81-87-91 sts. Insert a marker in the middle of the new sts under the sleeve. When piece measures approx. 3 cm, dec 1 st on each side of the 2 sts mid under sleeve (marker is in the middle of these 2 sts). Switch to double pointed needles when needed. Repeat dec every 3½-3½-3-2½-2-2 cm 8-9-10-12-15-16 more times (= 9-10-11-13-16-17 times in total) = 49-51-53-55-55-57 sts. When piece measures 41-42-43-43-42-42 cm, inc 7-5-7-5-9-7 st evenly = 56-56-60-60-64-64 sts. Switch to double pointed needles size 3.5 mm. Work rib K 2, P 2 until piece measures 45-46-47-47-46-46 cm from where new sts were cast on. Cast off with K over K and P over P. Work the other sleeve the same way.

ASSEMBLY:
Sew the holes under the sleeves. Fasten the yarn.

----------------------------------------------------------

HAT:
Worked in the round on circular needle, switch to double pointed needles when needed. Cast on 116 sts with light pearl grey on circular needle size 3.5 mm. Work rib = K 2/P 2 until piece measures approx. 4 cm. Switch to circular needle size 4 mm. K 1 round with pearl grey while AT THE SAME TIME dec 8 sts evenly = 108 sts. Then work pattern according to diagram A.1 (= 9 repetitions on round). REMEMBER THE KNITTING TENSION! When A.1 has been worked 1 time vertically, continue with light pearl grey and stocking st. Work 1 round AT THE SAME TIME insert 9 markers in the hat with 12 sts between every marker. On next round, dec 1 st after every marker by K 2 tog (= 9 sts dec). Repeat dec every other round 10 times in total = 18 sts. On next round K tog all sts 2 by 2 = 9 sts. Cut the yarn and pull it through the remaining sts, tighten tog and fasten. The hat measures approx. 25 cm vertically.

This pattern has been corrected.

Updated online: 08.08.2017
under JUMPER
(New numbers: ...inc 10 sts evenly in all sizes = 200-216-232-252-280-304 sts):
Work until piece measures 52-54-56-58-60-62 cm. On next round inc 10 sts evenly in all sizes = 200-216-232-252-280-304 sts. ...

Diagram

symbols = off white
symbols = light pearl grey
diagram
diagram

Each of our patterns has specific tutorial videos to help you.

Do you have a question? See a list of frequently asked questions (FAQ)

Knitting tension is what determines the final measurements of your work, and is usually measured per 10 x 10 cm. It is provided like so: number of stitches in width x number of rows in height - eg: 19 stitches x 26 rows = 10 x 10 cm.

The knitting tension is very individual; some people knit/crochet loosely while others work tightly. You adjust the knitting tension with the needle size, which is why the suggested needle size is only meant as a guide! You need to adjust this (up or down) to ensure that YOUR knitting tension matches the knitting tension provided in the pattern. If you work with a different knitting tension than provided you will have a different yarn consumption, and your work will have different measurements than what the pattern suggests.

The knitting tension also determines which yarns can replace each other. As long as you achieve the same knitting tension you can replace one yarn with another.

See DROPS lesson: How to measure your tension/gauge

See DROPS video: How to make a gauge tension swatch

The required amount of yarn is provided in grams, eg: 450 g. To calculate how many balls you’ll need you first need to know how many grams are in 1 ball (25g, 50g or 100g). This information is available if you click on the individual yarn quality on our pages. Divide the amount required with the amount of each ball. For example, if each ball is 50g (the most common amount), the calculation will be as follows: 450 / 50 = 9 balls.

The important thing when changing from one yarn to another is that the knitting/crochet tension remains the same. This is so that the measurements of the finished piece will be the same as on the sketch provided. It is easier to achieve the same knitting tension using yarns from the same yarn group. It is also possible to work with multiple strands of a thinner yarn to achieve the knitting tension of a thicker one. Please try our yarn converter. We recommend you to always work a test swatch.

Please NOTE: when changing yarn the garment might have a different look and feel to the garment in the photo, due to individual properties and qualities of each yarn.

See DROPS lesson: Can I use a different yarn than the one mentioned in the pattern?

All our yarns are categorised into yarn groups (from A to F) according to thickness and knitting tension – group A contains the thinnest yarns and group F the thickest. This makes it easier for you to find alternative yarns to our patterns, should you wish to switch yarn. All yarns within the same group have a similar knitting tension and can easily replace each other. However, different yarn qualities have different structures and properties which will give the finished work a unique look and feel.

Click here for an overview of the yarns in each yarn group

At the top of all our patterns you’ll find a link to our yarn calculator, which is a helpful tool should you wish to use a different yarn than suggested. By filling in the yarn quality you wish to replace, the amount (in your size) and number of strands, the calculator will present good alternative yarns with the same knitting tension. Additionally it will tell you how much you’ll require in the new qualities and whether you’ll need to work with multiple strands. Most skeins are 50g (some are 25g or 100g).

If the pattern is worked with multiple colours, every colour will have to be calculated separately. Similarly, if the pattern is worked with several strands of different yarns (for example 1 strand Alpaca and 1 strand Kid-Silk) you will have to find alternatives for each, individually.

Click here to see our yarn calculator

Since different yarns have different qualities and textures we have chosen to keep the original yarn in our patterns. However, you can easily find options among our available qualities by using our yarn calculator, or simply pick a yarn from the same yarn group.

It is possible that some retailers still have discontinued yarns in stock, or that someone has a few skeins at home that they would like to find patterns for.

The yarn calculator will provide both alternative yarn as well as required amount in the new quality.

If you think it's hard to decide what size to make, it can be a good idea to measure a garment you own already and like the size of. Then you can pick the size by comparing those measures with the ones available in the pattern's size chart.

You'll find the size chart at the bottom of the pattern.

See DROPS lesson: How to read size chart

The needle size provided in the pattern serves only as a guide, the important thing is to follow the knitting tension. And since knitting tension is very individual, you will have to adjust the needle size to ensure that YOUR tension is the same as in the pattern – maybe you’ll have to adjust 1, or even 2 needle sizes, up or down to achieve the correct tension. For this, we recommend that you work test swatches.

Should you work with a different knitting tension than the one provided, the measurements of the finished garment might deviate from the measurement sketch.

See DROPS lesson: How to measure your tension/gauge

See DROPS video: How to make a tension/gauge swatch

Working a garment top-down provides more flexibility and room for personal adjustment. For example it is easier to try the garment on while working, as well as making adjustments to length of yoke and shoulder caps.

The instructions are carefully explaining every step, in the correct order. Diagrams are adjusted to the knitting direction and are worked as usual.

The diagram depicts all rows/rounds, and every stitch seen from the right side. It is read from bottom to top, from right to left. 1 square = 1 stitch.

When working back and forth, every other row is worked from the right side and every other row is worked from the wrong side. When working from the wrong side, the diagram will have to be worked reversed: from left to right, knit stitches are purled, purl stitches are knit etc.

When working in the round every round is worked from the right side and the diagram are worked from right to left on all rounds.

See DROPS lesson: How to read knitting diagrams

The diagram depicts all rows/rounds, and every stitch seen from the right side. It is worked from bottom to top, from right to left.

When working back and forth every other row is worked from the right side: from right to left and every other row is worked from the wrong side: from left to right.

When working in the round, every row in the diagram are worked from the right side, from right to left.

When working a circular diagram you start in the middle and work your way outwards, counter clockwise, row by row.

The rows usually start with a given number of chain stitches (equivalent to the height of the following stitch), this will either be depicted in the diagram or explained in the pattern.

See DROPS lesson: How to read crochet diagrams

Instructions for working several diagrams after each other on the same row/round, will often be written like so: “work A.1, A.2, A.3 a total of 0-0-2-3-4 times". This means you work A.1 once, then A.2 is worked once, and A.3 is repeated (in width) the number of times provided for your size – in this case like so: S = 0 times, M = 0 times, L=2 times, XL= 3 times and XXL = 4 times.

The diagrams are worked as usual: begin with the first row in A.1, then work the first row in A.2 etc.

See DROPS lesson: How to read knitting diagrams

See DROPS lesson: How to read crochet diagrams

The total width of the garment (from wrist-to-wrist) will be larger in the larger sizes, despite the actual sleeves being shorter. The larger sizes have longer sleeve caps and wider shoulders, so there will be a good fit in all sizes.

The measurement sketch/schematic drawing provides information regarding the full length of the garment. If it’s a jumper or a jacket the length is measured from the highest point on the shoulder closest to the neckline, and straight down to the bottom of the garment. It is NOT measured from the tip of shoulder. Similarly, the length of yoke is measured from the highest point on the shoulder and down to where yoke is split into body and sleeves.

On a jacket measures are never taken along bands, unless specifically stated. Always measure inside band stitches when measuring the length.

See DROPS lesson: How to read a schematic drawing

Diagrams are often repeated on the round or in height. 1 repeat is the diagram the way it appears in the pattern. If it says to work 5 repeats of A.1 in the round, then you work A.1 a total of 5 times after/next to each other in the round. If it says to work 2 repeats of A.1 vertically/in height you work the entire diagram once, then begin again at the start and work the entire diagram one more time.

Chain stitches are slightly narrower than other stitches and to avoid working the cast-on edge too tight, we simply chain more stitches to begin with. The stitch count will be adjusted on the following row to fit the pattern and measurement sketch.

The rib edge is more elastic and will contract slightly compared to, for example, stocking stitch. By increasing before the rib edge, you avoid a visible difference in width between the rib edge and the rest of the body.

It’s very easy to cast off too tightly, and by making yarn overs while casting off (and simultaneously casting these off) you avoid a too tight cast off edge.

See DROPS video: How to bind off with yarn overs (yo)

To achieve an even increase (or decrease) you can increase on, for example: every 3rd and 4th row alternately, like so: work 2 rows and increase on the 3rd row, work 3 rows and increase on the 4th. Repeat this until the increase is complete.

See DROPS lesson: Increase or decrease 1 st on every 3rd and 4th row alternately

Should you prefer to work in the round instead of back and forth, you may of course adjust the pattern. You’ll need to add steeks mid-front (usually 5 stitches), and follow the instructions. When you would normally turn and work from the wrong side, simply work across the steek and continue in the round. At the end you’ll cut the piece open, pick up stitches to work bands, and cover the cut edges.

See DROPS video: How to knit steeks and cut open

Should you prefer to work back and forth instead of in the round, you may of course adjust the pattern so you work the pieces separately and then assemble them at the end. Divide the stitches for the body in 2, add 1 edge stitch in each side (for sewing) and work the front and back pieces separately.

See DROPS lesson: Can I adapt a pattern for circular needles into straight needles?

Pattern repeats can vary slightly in the different sizes, in order to get the correct proportions. If you’re not working the exact same size as the garment in the photo, yours might deviate slightly. This has been carefully developed and adjusted so that the complete impression of the garment is the same in all sizes.

Make sure to follow instructions and diagrams for your size!

If you have found a pattern you like which is available in women’s size it’s not very difficult to convert it to men’s size. The biggest difference will be the length of sleeves and body. Start working on the women size that you think would fit across the chest. The additional length will be worked right before you cast off for the armhole/sleeve cap. If the pattern is worked top-down you can add the length right after the armhole or before the first decrease on sleeve.

Regarding additional yarn amount, this will depend on how much length you add, but it is better with a skein too many than too few.

All yarns will have excess fibres (from production) that might come off as lint or shedding. Brushed yarns (ie hairier yarns) have more of these loose, excess fibres, causing more shedding.

Shedding also depends on what is worn under or over the garment, and whether this pulls at the yarn fibres. It’s therefore not possible to guarantee that there will be no shedding

Below are some tips on how to get the best result when working with hairier yarns:

1. When the garment is finished (before you wash it) shake it vigorously so the looser hairs come off. NOTE: do NOT use a lint roller, brush or any method that pulls at the yarn.

2. Place the garment in a plastic bag and put it in your freezer - the temperature will cause the fibres to become less attached to each other, and excess fibres will come off easier.

3. Leave in the freezer for a few hours before taking it out and shaking it again.

4. Wash the garment according to the instructions on the yarn label.

Pilling is a natural process that happens to even the most exclusive of fibers. It's a natural sign of wear and tear that is hard to avoid, and that is most visible in high friction areas of your garment like a sweater's arms and cuffs.

You can make your garment look as new by removing the pilling, using a fabric comb or a pill/lint remover.

Still can't find the answer you need? Then scroll down and leave your question so one of our experts can try to help you. This will be done normally within 5 to 10 working days.
In the meantime, you can read the questions and answers that others have left to this pattern or join the DROPS Workshop on Facebook to get help from fellow knitters/crocheters!

You might also like...

Silver Dream

Marion Van Elk, Belgium

Silver Dream

Emily, United States

Lavender dream

Lingus, Sweden

Post a comment to pattern DROPS 157-2

We would love to hear what you have to say about this pattern!

If you want to leave a question, please make sure you select the correct category in the form below, to speed up the answering process. Required fields are marked *.

Comments / Questions (77)

country flag Louise wrote:

Der er en fejl i den danske opskrift under forhøjning. Der står: "Vend og strik 1 p over alle m. Vend og strik til midt bagpå." Der skulle i stedet stå "Vend og strik til midt bagpå." - ligesom i den engelske og norske opskrift. Ellers kommer der til at være 8 pinde i venstre og 6 pinde i højre side.

24.02.2017 - 14:32

country flag Louise wrote:

Jeg har nu fundet svar på nedenstående spørgsmål, så det kan bare fjernes. Undskyld ulejligheden.

19.02.2017 - 11:33

DROPS Design answered:

Hej Louise. Dejligt at höre, tak for update.

20.02.2017 - 14:21

country flag Louise wrote:

Jeg forstår ikke hvad diagram A.3 skal bruges til. Der står de 4 ranglan-masker, men er det ikke de 4 masker man har markeret med mærketråd? Eller hvilke masker er det?

18.02.2017 - 16:22

DROPS Design answered:

Hej Louise MØNSTERTIPS: Diag A.3 viser hvordan de 4 raglan-m kan strikkes for at få kortere afstand mellem m. Efter diagram strikkes arb færdig med lys perlegrå.

16.11.2017 - 09:17

country flag Bourgeois wrote:

Bonjour combien de pelotes de laine me faudrait il pour tricoter ce pull en taille S. Je n'arrive pas à calculer. Merci

21.01.2017 - 10:42

DROPS Design answered:

Bonjour Mme Bourgeois, la quantité est toujours indiquée au poids pour chaque taille, soit: 450 g en gris perle et 100 g en naturel pour la taille S, Karisma = pelotes de 50 g, il vous faudra donc: 450/50 = 9 pelotes en gris perle et 2 pelotes en naturel. Rappelez-vous que votre magasin DROPS saura toujours vous aider si besoin. Bon tricot!

23.01.2017 - 09:33

country flag Teresa Dziedzic wrote:

Dzień dobry, w rozmiarze XXXL: początek raglanu 59 oczek +4 +19 +4 + 59 +4 + 19 +4 = 172 o. Koniec raglanu 59 +72 +4 +19 +62 +4 +59 +72 +4 +19 +62 +4 = 440 o. W opisie jest 424 o, czyli nie uwzględniono 16 oczek rozdzielających przód i tył od rękawów. Gdzie są te oczka? Czy bierze się je przy dodawaniu nowych oczek pod rękawem? ( w tym rozmiarze to 10 oczek)? Nie mogę się doczytać, proszę o pomoc i serdecznie pozdrawiam.

15.01.2017 - 13:34

DROPS Design answered:

Witaj Tereso! Przy kalkulacji w dodawaniu o. na rękawy są wliczone te 4 oczka rozdzielające przód i tył od rękawów. „RĘKAWY: dodawać o. 14-15-19-20-25-23 razy co 2 okr. i 6-6-4-4-2-4 razy co 4 okr. (= 59-63-67-71-77-81 o. na każdy rękaw).” Rękaw miał początkowo 19 oczek, dodajemy o. 23 razy co 2 okr. i 4 razy co 4 okr. (23+4=27, 27x2=54). mamy dodane na reglan 54 o. + 19 o. początkowych daje 73 oczka. Powiększając to o 4x2=8 mamy 73+8=81. Po dodaniu wszystkich o. na reglan, przód i tył mają po 131 o., a każdy rękaw ma 81. 131x2 + 81x2 = 262+162=424 oczka. POWODZENIA!

17.01.2017 - 09:00

country flag Charlotte Gandrup wrote:

Kan ikke rigtig se hvor langt man skal strikke fra rib til ærmegab?

09.11.2016 - 18:23

DROPS Design answered:

Hej Charlotte. Er det höjden fra start til du skal strikke m paa en traad til aermet? Det staar i opskriften: Arb måler nu ca 19-19-19-20-21-22 cm fra opslåningskanten foran.

10.11.2016 - 14:39

country flag Brodtan wrote:

Bonsoir. Nous devons augmenter des mailles à 36 cm de hauteur...Mais du dos ou du devant? Merci à vous. Cordialement

08.07.2016 - 21:20

DROPS Design answered:

Bonjour Mme Brodtan, on mesure ici à partir de l'épaule jusqu'aux mailles sur l'aiguille. Bon tricot!

11.07.2016 - 08:46

country flag Diane Robinson wrote:

I am completely lost when I come to increases. I understand the yarn over before the marker and after the marker for the raglan sleeves, but how do I increase the front and back or sweater at the same time. I have started this section at least three times. I just don't understand how to increase on both body and sleeves at the same time.

15.06.2016 - 02:45

DROPS Design answered:

Dear Mrs Robinson, Inc for raglan with 1 YO after the K4 on raglan at beg of front/back/sleeve + YO before the K4 on raglan at end of front/back/sleeve. But to keep correct shape, the inc for body and sleeves are not done at the same time, depending on your size, you will inc on each piece (= 8 inc per round), only on body (= 4 sts inc per round) or only on sleeve (4 sts inc per round). Happy knitting!

15.06.2016 - 08:50

country flag Veera wrote:

Hei! Aivan ohjeen alussa koossa M neuvotaan lisäämään 108 silmukkaan 28 silmukkaa tasavälein. Miten ne saadaan tuohon määrään tasavälein? Veera

11.02.2016 - 16:18

DROPS Design answered:

Hei! Lasket lisäyskohdat seuraavalla tavalla: Jaa kerroksen silmukkaluku (108) lisäysten määrän kanssa (28) = n. 3,9. Eli lisäät aina n. joka 4. silmukan jälkeen.

11.02.2016 - 17:11

country flag Marion wrote:

Bonjour, je désespère avec ce modèle que j'ai déjà recommencé plusieurs fois. Je n'arrive pas à comprendre les augmentations du raglan. Pour le dos/devant, en taille S, il faut augmenter 14 fois tous les 2 tours et 6 fois tous les 4 tours. Ce qui nous fait un total de 28 + 24 tours, soit 52 rangs. Or le diagramme A2 n’a que 44 rangs. Je suis totalement perdue, pouvez-vous me dire ce que je comprends de travers ? Merci pour votre aide. Marion

11.02.2016 - 12:50

DROPS Design answered:

Bonjour Marion, quand le diagramme A.2 est terminé, continuez l'empiècement et les augmentations en jersey gris. Bon tricot!

11.02.2016 - 15:26