DROPS Nepal
DROPS Nepal
65% Wool, 35% Alpaca
from 2.40 £ /50g
Get the yarn to make this pattern from 21.60£.

The yarn cost is calculated from the pattern’s smallest size and the yarn’s cheapest product type. Looking for an even better price? You might find it on the DROPS Deals!

DROPS SS24

Orange Crush

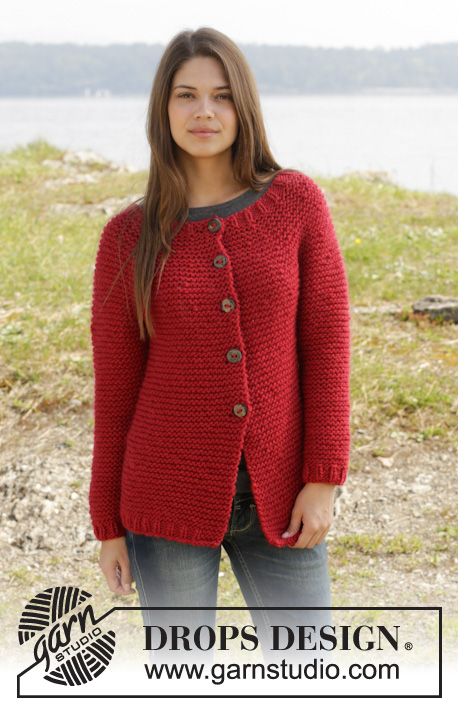
Knitted DROPS jumper with rib and raglan worked top down in ”Nepal”. Size: S - XXXL.

DROPS 158-18
DROPS design: Pattern no ne-166
Yarn group C or A + A
----------------------------------------------------------
Size: S - M - L - XL - XXL - XXXL
Materials:
DROPS NEPAL from Garnstudio
450-500-550-600-650-700 g colour no 2920, orange

DROPS DOUBLE POINTED NEEDLES AND CIRCULAR NEEDLE (60 or 80 cm) SIZE 5.5 mm - or size needed to get 16 sts x 20 rows in stocking st = 10 x 10 cm.
DROPS DOUBLE POINTED NEEDLES and CIRCULAR NEEDLE (40 and 80 cm) SIZE 5 mm - for rib.

-------------------------------------------------------

Alternative Yarn – See how to change yarns here
Yarn Groups A to F – Use the same pattern and change the yarn here
Yarn usage using an alternative yarn – Use our yarn converter here

-------------------------------------------------------

DROPS Nepal
DROPS Nepal
65% Wool, 35% Alpaca
from 2.40 £ /50g
Get the yarn to make this pattern from 21.60£.

The yarn cost is calculated from the pattern’s smallest size and the yarn’s cheapest product type. Looking for an even better price? You might find it on the DROPS Deals!

Pattern instructions

NOTE: This pattern is written in British English. All measurements in charts are in cm. For conversion from cm to inches - click here. There are different terms for crocheting in British and American English. If this pattern includes crochet, click for "crochet terms" here. For this pattern in American English, please click here.
INCREASE TIP:
Back and forth on needle: Inc 1 st from RS by making 1 YO, on next row P YO twisted.
In the round on needle: Inc 1 st by making 1 YO, on next round K YO twisted.

DECREASE TIP:
Dec 1 st before marker as follows: Work until 2 sts remain before marker, slip 1 st as if to K, K 1, psso.
Dec 1 st after marker as follows: K 2 tog.
----------------------------------------------------------

JUMPER:
Worked top down in the round on circular needle/double pointed needles. First work back and forth until sts have been cast on for front piece, then work in the round. Pick up a neck edge at the end.

RAGLAN:
Cast on 48-50-52-52-52-58 sts on circular needle size 5.5 mm with Nepal.
ROW 1 (= WS): P all sts. Insert 1 marker 8-8-8-8-6-6 sts in from each side (= 8-8-8-8-6-6 sts on sleeve in each side, 32-34-36-36-40-46 sts on back piece between markers). Move the markers upwards when working.
ROW 2 (= RS): K 2, * inc 1 st - READ INCREASE TIP, K until 2 sts remain before next marker, inc 1 st, K 4 (marker is in the middle of these sts), inc 1 st, K until 2 sts remain before next marker, inc 1 st, K 4 (marker is in the middle of these sts), inc 1 st *, K until 2 sts remain on needle, inc 1 st, K 2 = 6 inc sts. Now cast on 4 sts on needle for front piece = 58-60-62-62-62-68 sts. (NOTE: Repeat *-* in 4th and 6th row as explained below).
ROW 3: P all sts, at the end of row cast on 4 sts = 62-64-66-66-66-72 sts. Insert 1 new marker 4 sts in from each side (= 4 sts on front piece in each side, 4 markers in total in piece).
ROW 4: K 6, (1st marker is after the first 4 sts), repeat from *-* from 2nd row, K until 2 sts remain before last marker, inc 1 st, K 6 (last marker is before the last 4 sts) = 6 inc sts. Cast on 4 sts = 72-74-76-76-76-82 sts.
ROW 5: P all sts, at the end of row cast on 4 sts = 76-78-80-80-80-86 sts (= 8 sts on front piece in each side).
ROW 6: K 10, (1st marker is after the first 8 sts), repeat from *-* from 2nd row, K until 2 sts remain before last marker, inc 1 st, K 10 = 6 inc sts (last marker is before the last 8 sts). Cast on 11-12-13-13-15-18 sts = 93-96-99-99-101-110 sts.
ROW 7: P, at the end of row, cast on 11-12-13-13-15-18 sts = 104-108-112-112-116-128 sts on needle (= 19-20-21-21-23-26 sts on front piece in each side, 38-40-42-42-46-52 sts on back piece and 14-14-14-14-12-12 sts on each sleeve). REMEMBER THE KNITTING TENSION!

Then work piece in the round as follows:
ROUND 1: * K until 2 sts remain before next marker, inc 1 st, K 4 (marker is between these sts), inc 1 st *, repeat from *-* 3 more times (= 4 times in total), K the remaining sts (= 8 inc sts) = 112-116-120-120-124-136 sts.
ROUND 2: K all sts.
Then inc 8 sts on round the same way - i.e. inc 1 st on each side of every marker - every other round 10-11-12-17-20-21 more times (11-12-13-18-21-22 inc in total on front piece), then every 4th round 3-3-3-1-0-0 time = 216-228-240-264-284-304 sts (= 66-70-74-80-88-96 sts on front piece and back piece, 42-44-46-52-54-56 sts on each sleeve). NOTE! Insert 1 marker in the middle on front piece (marks front piece which has shorter raglan). Work next round as follows: Work 66-70-74-80-88-96 sts on front piece, * slip the next 42-44-46-52-54-56 sts (= sleeve) on 1 stitch holder, cast on 6-8-10-12-14-16 sts for armhole, insert a marker in the middle of these new sts *, work the next 66-70-74-80-88-96 sts on back piece, repeat from *-* 1 more time = 144-156-168-184-204-224 sts for body.

BODY:
Then work in stocking st. When piece measures 10 cm from new sts under sleeve, inc 1 st on each side of markers in the side as follows: Work until 1 st before first marker, 1 YO, 2 sts in stocking st, 1 YO, repeat inc in the other side (= 4 sts inc) = 148-160-172-188-208-228 sts. Repeat inc when piece measures 20-22-24-26-28-30 cm = 152-164-176-192-212-232 sts. When piece measures 55-57-59-61-63-65 cm in total vertically (measured at the back), inc 8 sts evenly on round = 160-172-184-200-220-240 sts. On next round switch to circular needle size 5 mm.
Continue to work rib as follows: * K 2, P 2 *, repeat from *-* the entire round until rib has been worked for 3 cm. Cast off with K over K and P over P.

SLEEVE:
Slip the 42-44-46-52-54-56 sts from stitch holder back on double pointed needles size 5.5 mm. Cast on 6-8-10-12-14-16 sts at the end of row = 48-52-56-64-68-72 sts. Insert a marker in the middle of the new sts under the sleeve. NOW MEASURE THE PIECE FROM HERE. Continue to work in stocking st in the round for 3 cm. On next round dec 1 st - READ DECREASE TIP - on each side of marker. Repeat dec every 5-4-3½-2½-2-2 cm 6-7-8-12-13-14 more times = 34-36-38-38-40-42 sts. Continue in stocking st until piece measures 38-37-37-36-35-33 cm. On next round switch to double pointed needles size 5 mm. Work in stocking st AT THE SAME TIME inc 6-4-6-6-8-6 sts evenly = 40-40-44-44-48-48 sts. Continue to work rib as follows: * K 2, P 2 *, repeat from *-* the entire round. When rib measures 5 cm, loosely cast off all sts with K over K and P over P, sleeve measures approx. 43-42-42-41-40-38 cm (shorter measurements in the larger sizes because of wider shoulders).

ASSEMBLY:
Sew tog hole under the sleeves.

NECK EDGE:
Beg mid back and pick up 88-92-96-96-100-112 sts on circular needle size 5 mm around the neck. Then work rib as follows: K 1, * P 2, K 2 *, repeat from *-* until 3 sts remain, P 2, K 1. Continue like this until rib has been worked for 5 cm. Cast off with K over K and P over P.

Diagram

diagram measurements

Each of our patterns has specific tutorial videos to help you.

Do you have a question? See a list of frequently asked questions (FAQ)

Knitting tension is what determines the final measurements of your work, and is usually measured per 10 x 10 cm. It is provided like so: number of stitches in width x number of rows in height - eg: 19 stitches x 26 rows = 10 x 10 cm.

The knitting tension is very individual; some people knit/crochet loosely while others work tightly. You adjust the knitting tension with the needle size, which is why the suggested needle size is only meant as a guide! You need to adjust this (up or down) to ensure that YOUR knitting tension matches the knitting tension provided in the pattern. If you work with a different knitting tension than provided you will have a different yarn consumption, and your work will have different measurements than what the pattern suggests.

The knitting tension also determines which yarns can replace each other. As long as you achieve the same knitting tension you can replace one yarn with another.

See DROPS lesson: How to measure your tension/gauge

See DROPS video: How to make a gauge tension swatch

The required amount of yarn is provided in grams, eg: 450 g. To calculate how many balls you’ll need you first need to know how many grams are in 1 ball (25g, 50g or 100g). This information is available if you click on the individual yarn quality on our pages. Divide the amount required with the amount of each ball. For example, if each ball is 50g (the most common amount), the calculation will be as follows: 450 / 50 = 9 balls.

The important thing when changing from one yarn to another is that the knitting/crochet tension remains the same. This is so that the measurements of the finished piece will be the same as on the sketch provided. It is easier to achieve the same knitting tension using yarns from the same yarn group. It is also possible to work with multiple strands of a thinner yarn to achieve the knitting tension of a thicker one. Please try our yarn converter. We recommend you to always work a test swatch.

Please NOTE: when changing yarn the garment might have a different look and feel to the garment in the photo, due to individual properties and qualities of each yarn.

See DROPS lesson: Can I use a different yarn than the one mentioned in the pattern?

All our yarns are categorised into yarn groups (from A to F) according to thickness and knitting tension – group A contains the thinnest yarns and group F the thickest. This makes it easier for you to find alternative yarns to our patterns, should you wish to switch yarn. All yarns within the same group have a similar knitting tension and can easily replace each other. However, different yarn qualities have different structures and properties which will give the finished work a unique look and feel.

Click here for an overview of the yarns in each yarn group

At the top of all our patterns you’ll find a link to our yarn calculator, which is a helpful tool should you wish to use a different yarn than suggested. By filling in the yarn quality you wish to replace, the amount (in your size) and number of strands, the calculator will present good alternative yarns with the same knitting tension. Additionally it will tell you how much you’ll require in the new qualities and whether you’ll need to work with multiple strands. Most skeins are 50g (some are 25g or 100g).

If the pattern is worked with multiple colours, every colour will have to be calculated separately. Similarly, if the pattern is worked with several strands of different yarns (for example 1 strand Alpaca and 1 strand Kid-Silk) you will have to find alternatives for each, individually.

Click here to see our yarn calculator

Since different yarns have different qualities and textures we have chosen to keep the original yarn in our patterns. However, you can easily find options among our available qualities by using our yarn calculator, or simply pick a yarn from the same yarn group.

It is possible that some retailers still have discontinued yarns in stock, or that someone has a few skeins at home that they would like to find patterns for.

The yarn calculator will provide both alternative yarn as well as required amount in the new quality.

If you think it's hard to decide what size to make, it can be a good idea to measure a garment you own already and like the size of. Then you can pick the size by comparing those measures with the ones available in the pattern's size chart.

You'll find the size chart at the bottom of the pattern.

See DROPS lesson: How to read size chart

The needle size provided in the pattern serves only as a guide, the important thing is to follow the knitting tension. And since knitting tension is very individual, you will have to adjust the needle size to ensure that YOUR tension is the same as in the pattern – maybe you’ll have to adjust 1, or even 2 needle sizes, up or down to achieve the correct tension. For this, we recommend that you work test swatches.

Should you work with a different knitting tension than the one provided, the measurements of the finished garment might deviate from the measurement sketch.

See DROPS lesson: How to measure your tension/gauge

See DROPS video: How to make a tension/gauge swatch

Working a garment top-down provides more flexibility and room for personal adjustment. For example it is easier to try the garment on while working, as well as making adjustments to length of yoke and shoulder caps.

The instructions are carefully explaining every step, in the correct order. Diagrams are adjusted to the knitting direction and are worked as usual.

The diagram depicts all rows/rounds, and every stitch seen from the right side. It is read from bottom to top, from right to left. 1 square = 1 stitch.

When working back and forth, every other row is worked from the right side and every other row is worked from the wrong side. When working from the wrong side, the diagram will have to be worked reversed: from left to right, knit stitches are purled, purl stitches are knit etc.

When working in the round every round is worked from the right side and the diagram are worked from right to left on all rounds.

See DROPS lesson: How to read knitting diagrams

The diagram depicts all rows/rounds, and every stitch seen from the right side. It is worked from bottom to top, from right to left.

When working back and forth every other row is worked from the right side: from right to left and every other row is worked from the wrong side: from left to right.

When working in the round, every row in the diagram are worked from the right side, from right to left.

When working a circular diagram you start in the middle and work your way outwards, counter clockwise, row by row.

The rows usually start with a given number of chain stitches (equivalent to the height of the following stitch), this will either be depicted in the diagram or explained in the pattern.

See DROPS lesson: How to read crochet diagrams

Instructions for working several diagrams after each other on the same row/round, will often be written like so: “work A.1, A.2, A.3 a total of 0-0-2-3-4 times". This means you work A.1 once, then A.2 is worked once, and A.3 is repeated (in width) the number of times provided for your size – in this case like so: S = 0 times, M = 0 times, L=2 times, XL= 3 times and XXL = 4 times.

The diagrams are worked as usual: begin with the first row in A.1, then work the first row in A.2 etc.

See DROPS lesson: How to read knitting diagrams

See DROPS lesson: How to read crochet diagrams

The total width of the garment (from wrist-to-wrist) will be larger in the larger sizes, despite the actual sleeves being shorter. The larger sizes have longer sleeve caps and wider shoulders, so there will be a good fit in all sizes.

The measurement sketch/schematic drawing provides information regarding the full length of the garment. If it’s a jumper or a jacket the length is measured from the highest point on the shoulder closest to the neckline, and straight down to the bottom of the garment. It is NOT measured from the tip of shoulder. Similarly, the length of yoke is measured from the highest point on the shoulder and down to where yoke is split into body and sleeves.

On a jacket measures are never taken along bands, unless specifically stated. Always measure inside band stitches when measuring the length.

See DROPS lesson: How to read a schematic drawing

Diagrams are often repeated on the round or in height. 1 repeat is the diagram the way it appears in the pattern. If it says to work 5 repeats of A.1 in the round, then you work A.1 a total of 5 times after/next to each other in the round. If it says to work 2 repeats of A.1 vertically/in height you work the entire diagram once, then begin again at the start and work the entire diagram one more time.

Chain stitches are slightly narrower than other stitches and to avoid working the cast-on edge too tight, we simply chain more stitches to begin with. The stitch count will be adjusted on the following row to fit the pattern and measurement sketch.

The rib edge is more elastic and will contract slightly compared to, for example, stocking stitch. By increasing before the rib edge, you avoid a visible difference in width between the rib edge and the rest of the body.

It’s very easy to cast off too tightly, and by making yarn overs while casting off (and simultaneously casting these off) you avoid a too tight cast off edge.

See DROPS video: How to bind off with yarn overs (yo)

To achieve an even increase (or decrease) you can increase on, for example: every 3rd and 4th row alternately, like so: work 2 rows and increase on the 3rd row, work 3 rows and increase on the 4th. Repeat this until the increase is complete.

See DROPS lesson: Increase or decrease 1 st on every 3rd and 4th row alternately

Should you prefer to work in the round instead of back and forth, you may of course adjust the pattern. You’ll need to add steeks mid-front (usually 5 stitches), and follow the instructions. When you would normally turn and work from the wrong side, simply work across the steek and continue in the round. At the end you’ll cut the piece open, pick up stitches to work bands, and cover the cut edges.

See DROPS video: How to knit steeks and cut open

Should you prefer to work back and forth instead of in the round, you may of course adjust the pattern so you work the pieces separately and then assemble them at the end. Divide the stitches for the body in 2, add 1 edge stitch in each side (for sewing) and work the front and back pieces separately.

See DROPS lesson: Can I adapt a pattern for circular needles into straight needles?

Pattern repeats can vary slightly in the different sizes, in order to get the correct proportions. If you’re not working the exact same size as the garment in the photo, yours might deviate slightly. This has been carefully developed and adjusted so that the complete impression of the garment is the same in all sizes.

Make sure to follow instructions and diagrams for your size!

If you have found a pattern you like which is available in women’s size it’s not very difficult to convert it to men’s size. The biggest difference will be the length of sleeves and body. Start working on the women size that you think would fit across the chest. The additional length will be worked right before you cast off for the armhole/sleeve cap. If the pattern is worked top-down you can add the length right after the armhole or before the first decrease on sleeve.

Regarding additional yarn amount, this will depend on how much length you add, but it is better with a skein too many than too few.

All yarns will have excess fibres (from production) that might come off as lint or shedding. Brushed yarns (ie hairier yarns) have more of these loose, excess fibres, causing more shedding.

Shedding also depends on what is worn under or over the garment, and whether this pulls at the yarn fibres. It’s therefore not possible to guarantee that there will be no shedding

Below are some tips on how to get the best result when working with hairier yarns:

1. When the garment is finished (before you wash it) shake it vigorously so the looser hairs come off. NOTE: do NOT use a lint roller, brush or any method that pulls at the yarn.

2. Place the garment in a plastic bag and put it in your freezer - the temperature will cause the fibres to become less attached to each other, and excess fibres will come off easier.

3. Leave in the freezer for a few hours before taking it out and shaking it again.

4. Wash the garment according to the instructions on the yarn label.

Pilling is a natural process that happens to even the most exclusive of fibers. It's a natural sign of wear and tear that is hard to avoid, and that is most visible in high friction areas of your garment like a sweater's arms and cuffs.

You can make your garment look as new by removing the pilling, using a fabric comb or a pill/lint remover.

Still can't find the answer you need? Then scroll down and leave your question so one of our experts can try to help you. This will be done normally within 5 to 10 working days.
In the meantime, you can read the questions and answers that others have left to this pattern or join the DROPS Workshop on Facebook to get help from fellow knitters/crocheters!

You might also like...

Post a comment to pattern DROPS 158-18

We would love to hear what you have to say about this pattern!

If you want to leave a question, please make sure you select the correct category in the form below, to speed up the answering process. Required fields are marked *.

Comments / Questions (43)

country flag MJ wrote:

I have just finished Row 7. To have the working yarn on the right needle in order to join in the round, I end up with the wrong side facing out. Am I doing something wrong?

15.01.2019 - 22:50

DROPS Design answered:

Dear Mj, last row (= row 7) has been worked from WS, turn piece to work next round from RS and work round 1 from RS as explained, at the end of round 1, join in the round, insert a marker to mark the beg of round and work round 2. Happy knitting!

16.01.2019 - 08:30

country flag Benedetta wrote:

Grazie!

15.01.2019 - 15:44

country flag Benedetta wrote:

Buongiorno e grazie per l'aiuto! Ho finito l'ultimo aumento degli 11 dello sprone. Adesso devo aumentare ogni 4 ferri x 3 volte, ma sempre prima e dopo ogni segnapunti, o solo le maniche o solo davanti/dietro? Grazie

15.01.2019 - 12:02

DROPS Design answered:

Buongiorno Benedetta. Sì, deve aumentare sia prima che dopo ogni segnapunti. Buon lavoro!

15.01.2019 - 12:17

country flag Benedetta wrote:

Buonasera, sono all'inizio del 4 ferro. 6 dir, (il primo segnapunti é dopo le prime 4 maglie) etc.... Non capisco il seguito se devo contare anche le 4 m avviate.Potete spiegarmi tutto il ferro? Grazie mille

13.01.2019 - 20:44

DROPS Design answered:

Buonasera Benedetta. Le prime 4 m sul ferro sono le 4 m avviate alla fine del terzo ferro. Al ferro 3 ha anche inserito altri 2 segnapunti: dopo le prime 4 m e prima delle ultime 4 m. Lavora 6 m (le 4 avviate al ferro precedente, segno, 2 m), segue le istruzioni tra gli * come indicato al ferro 2, lavora a dir finché non rimangono 2 m prima dell’ultimo segnapunti (in tutto rimangono 6 m sul ferro: 2 m, segnapunti, 4 m) aumenta 1 m, e poi lavora le ultime 6 m sul ferro. Su questo ferro aumenta 10 m. Buon lavoro!

13.01.2019 - 21:58

country flag Bärbel wrote:

Der Übergang von geraden Reihen stricken auf Stricken in Runden geht von links stricken auf rechts stricken (weilen Runden gestrickt werden muss) nicht. Wie gehe ich vor?

23.08.2018 - 11:36

DROPS Design answered:

Liebe Bärbel, die letzte Reihe, die Sie stricken, ist ja eine Rück-Reihe. Die nächste Reihe wäre also eine Hin-Reihe, wenn Sie dann die Arbeit zur Runde schließen, stricken Sie automatisch auf der Vorderseite der Arbeit, wie es für Runden ja normal ist. Gutes Gelingen!

26.08.2018 - 10:15

country flag Mathieu Anne-Marie wrote:

Bonjour, je suis arrivée à la fin des premières augmentations répétées tous les 2 rgs soit dans ma taille 10 (S). j\'ai été jusque 11 puisque il est indiqué 11 au total et c\'est là que j\'ai un doute car j\'ai 200m. Hors si je dois maintenant augmenter 3 fois 8 mailles tous les 4 rgs, je vais avoir plus de 216 m... Je ne comprends pas pourquoi on distingue devant et dos. Merci de votre réponse. Anne-Marie

16.04.2018 - 18:07

DROPS Design answered:

Bonjour Mme Mathieu, Après le 1er tour, vous augmentez 8 m et avez 112 m au total. Vous répétez ces augmentations encore 10 fois tous les 2 tours et 3 fois tous les 4 tours soit (10x8 + 3x4) = 104 augmentations au total + les 112 m = 216 m. On distingue le devant et le dos car on a commencé en rangs et on a augmenté davantage pour le dos que pour le devant. Bon tricot!

17.04.2018 - 09:52

country flag Rianne Wiesje Kompier Krijnen wrote:

In het patroon staat "Plaats 1 markeerder 8-8-8-8-6-6 st vanaf elke kant middenvoor om de zijkanten aan te geven (= 8-8-8-8-6-6 st op de mouw aan elke kant en 32-34-36-36-40-46 st op het achterpand tussen de markeerders. Wat bedoelt men met middenvoor in deze zin??? Middenvoor is toch het deel dat ontstaat door het opzetten van extra steken aan weerszijden van het werk?

08.02.2018 - 15:25

DROPS Design answered:

Hoi Rianne, Dat klopt inderdaad. Je voegt 8 st vanaf elke kant een markeerdraad in, maar die 8 steken zijn eigenlijk de mouwen en de steken van het voorpand moet je nog opzetten. Ik heb het woordje middenvoor verwijderd, want dat is alleen maar verwarrend. Bedankt voor het doorgeven.

16.02.2018 - 12:05

country flag Marie wrote:

Excusez moi, je n'avais pas bien lu les explications. Je retire ma question précédente.

17.09.2017 - 20:18

country flag Marie Laure KAMINSKI wrote:

Bonjour Je ne comrends pas le raglan: il ne peut pas se faire sur 7 rangs, mais sur beaucoup plus de rangs. Merci d'avance pour vos explications.

17.09.2017 - 20:15

DROPS Design answered:

Bonjour Mme Kaminski, les 7 premiers rangs décrivent comment tricoter les augmentations du raglan et comment augmenter en même temps pour l'encolure devant. Continuez ensuite en rond en augmentant tous les 2 tours, puis éventuellement tous les 4 tours comme indiqué pour votre taille. Bon tricot!

18.09.2017 - 09:21

Fran Hoffman wrote:

I have studied the schematic for this sweater and cannot determine the bust size. You referred another questioner to the schematic. Can you just tell me what are the bust sizes?

17.09.2016 - 17:13

DROPS Design answered:

Dear Mrs Hoffman, the measurement chart at the bottom of the page does not have a bust measure for this model, but you can find the bottom measures (hip measure) in cm: use this to find the right size. Happy knitting!

18.09.2016 - 23:28