Around the World

Crochet DROPS jacket with lace pattern in ”Big Delight”. Size: S - XXXL

DROPS 156-42
DROPS design: Pattern no db-035
Yarn group C or A + A
-----------------------------------------------------------
Size: S - M - L - XL – XXL - XXXL
Materials:
DROPS BIG DELIGHT from Garnstudio
400-500-500-600-600-700 g color no 02, summer meadow

DROPS CROCHET HOOK size 5 mm / H/8 – or size needed to get approx. 3 x (1 dc + 3 ch) in width x 7 rounds = 4'' x 4'' (10 x 10 cm).

-------------------------------------------------------

Alternative Yarn – See how to change yarns here
Yarn Groups A to F – Use the same pattern and change the yarn here
Yarn usage using an alternative yarn – Use our yarn converter here

-------------------------------------------------------

Pattern instructions

NOTE: This pattern is written in American English. All measurements in charts are in cm. For conversion from inches to cm - click here. There are different terms for crocheting in American and British English. If this pattern includes crochet, click for "crochet terms" here. For this pattern in British English, please click here.
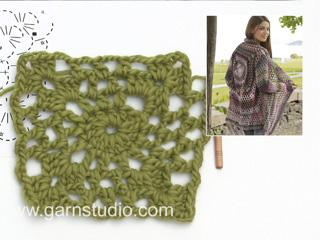
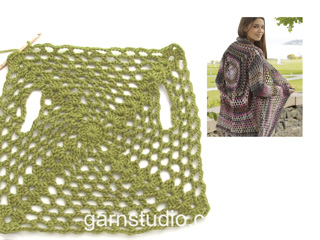
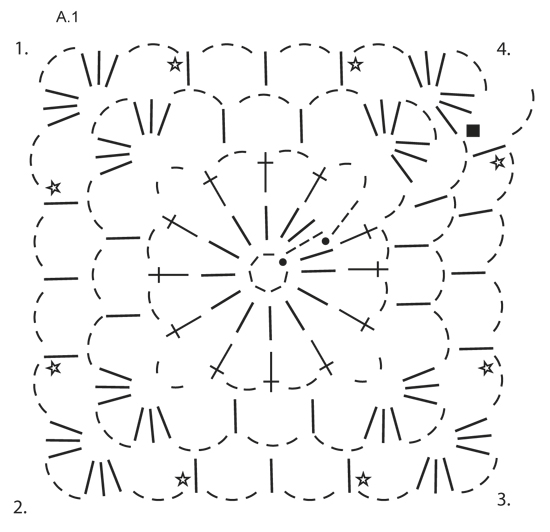
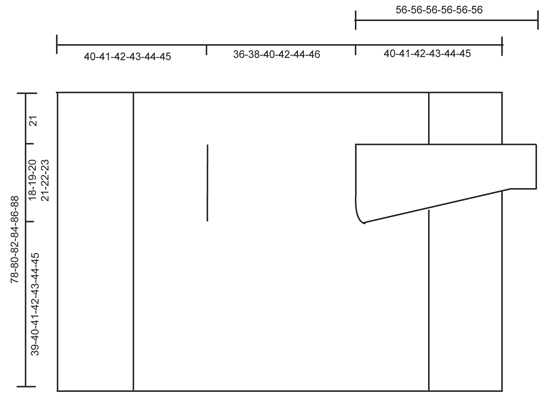
PATTERN:
See diagram A.1.

DECREASE TIP (applies to sleeves):
Dec 1 repetition (= 1 dc + 3 ch) by not working ch, but work 2 dc into 1 dc as follows: Work 1 dc but wait with last pull through (= 2 strands on hook), then work next dc but on last pull through, pull yarn through all sts on hook.
----------------------------------------------------------

BODY:
Worked in the round from mid back on the back. Work 6 ch on hook size 5 mm / H/8 with Big Delight and form a ring with 1 sl st in first ch.
Work according to diagram A.1, i.e. work as follows:
ROUND 1: Work ch 3, 13 dc in ch-ring, finish with 1 sl st in 3rd ch from beg of round.
ROUND 2: ch 5, skip 1 dc, 1 dc in next dc, * ch 2, 1 dc in next dc *, repeat from *-* the entire round, finish with 2 ch = 12 dc + 2 ch.
ROUND 3: Now work the circle into a square, i.e. work as follows: Work 3 dc + 3 ch + 3 dc (= corner) in first ch-space, ch 3, 1 dc in next ch-space, ch 3, 1 dc in next ch-space, ch 3, * 3 dc + 3 ch + 3 dc (= corner) in next ch-space, ch 3, 1 dc in next ch-space, ch 3, 1 dc in next ch-space, 3 ch *, repeat from *-* 3 times in total, 1 dc in next ch-space (= last 2 ch from previous round), 3 ch.
ROUND 4: Work 3 dc + 3 ch + 3 dc (= corner) in first ch-space, * ch 3, 1 dc in next ch-space, ch 3, 1 dc in next ch-space, ch 3, 1 dc in next ch-space, ch 3, 3 dc + 3 ch + 3 dc (= corner) in next ch-space *, repeat from *-* 3 times in total, ch 3, 1 dc in next ch-space, ch 3, 1 dc in next ch-space, ch 3, 1 dc in next ch-space, ch 3, 1 dc in next ch-space, 3 ch. REMEMBER THE CROCHET GAUGE!
Repeat 4th round with inc, i.e. work 1 dc + 3 ch more between each corner on every round (= 4 inc per round) AT THE SAME TIME on every 6th round inc 1 dc + 3 ch extra on each side of each corner – see star in diagram (= 8 extra inc per round). Continue like this until square measures 36-38-40-42-44-46 cm x 36-38-40-42-44-46 cm / 14¼''-15''-15¾''-16½''-17¼''-18'' x 14¼''-15''-15¾''-16½''-17¼''-18''.
Now work armhole as follows: Work as before until first corner, work 3 dc + 3 ch + 3 dc in ch-space in the corner. Now work ch until the middle of next side (i.e. in the middle between 1st and 2nd corner) as follows: Work 1 ch for every ch/dc skipped. Then work pattern as before until the middle between 3rd and 4th corner. Now work ch until beg of round as follows: Work 1 ch for every ch/dc skipped. On next round work pattern and inc as before over all sts, also in ch for armholes.
Continue like this until square measures 78-80-82-84-86-88 cmx 78-80-82-84-86-88 cm / 30¾''-31½''-32¼''-33''-33 7/8''-34 5/8'' x 30¾''-31½''-32¼''-33''-33 7/8''-34 5/8'' (i.e. 21 cm / 8 1/4'' in all sizes from armhole). Fasten off.

FRONT PIECE:
Now work back and forth between first and second corner. NOTE! Work front piece without inc.
1st ROW: Work from first corner as follows: 3 dc in ch-space in the corner, * ch 3, 1 dc in ch-space *, repeat from *-* ending with 3 ch and 3 dc in the corner.
2nd ROW: Turn and work like this: 1 dc in each of the first 3 dc, * 1 dc in the ch-space, 3 ch *, repeat from *-* ending with 1 dc in the last ch-space and 1 dc in each of the 3 dc.
3rd ROW: Turn and work like this: 1 dc in each of the first 3 dc, * ch 3, 1 dc in the ch-space *, repeat from *-* and end with 3 ch and 1 dc in each of the last 3 dc.
Continue repeating 2nd and 3rd row.
Continue working like this until 19-20-21-22-23-24 cm / 7½''-8''-8¼''-8¾''-9''-9½'' have been worked back and forth, fasten off. Repeat on the other side, now work back and forth from third to fourth corner. Finally work a round around the entire square, work pattern as before but in ch-space in each corner work 6 dc. Fasten off.

SLEEVE:
Work in the round, top down from armhole, beg from mid under sleeve from RS.
ROUND 1: Work 6 ch (= 1 dc + 3 ch), * 1 dc in next ch-space, 3 ch *, repeat from *-* 16-17-18-19-20-21 times in total, finish with 1 sl st in 3rd ch.
ROUND 2: Work ch 5, * 1 dc in next ch-space, 3 ch *, repeat from *-* 16-17-18-19-20-21 times in total, work ch 1, finish with 1 sl st in 3rd ch at beg of round.
Repeat 1st and 2nd ROUND - AT THE SAME TIME dec 1 dc + 3 ch at beg of 4th-6th-6th-8th-8th-6th round by working 2 dc tog – READ DECREASE TIP – mid under sleeve. Repeat dec every 6th-6th-6th-4th-4th-4th round = 12-12-13-13-14-14 dc. Repeat round without dec until sleeve measures approx. 56 cm / 22'' in all sizes. Fasten off. Work another sleeve.

This pattern has been corrected.

Updated online: 02.10.2014
FRONT PIECE:
Now work back and forth between first and second corner. NOTE! Work front piece without inc.
1st ROW: Work from first corner as follows: 3 dc ch in ch-space in the corner, * ch 3, 1 dc ch in ch-space *, repeat from *-* ending with 3 ch and 3 dc ch in the corner.
2nd ROW: Turn and work like this: 1 dc ch in each of the first 3 dc ch, * 1 dc ch in the ch-space, 3 ch *, repeat from *-* ending with 1 dc ch in the last ch-space and 1 dc ch in each of the 3 dc.
3rd ROW: Turn and work like this: 1 dc ch in each of the first 3 dc ch, * ch 3, 1 dc ch in the ch-spance *, repeat from *-* and end with 3 ch and 1 dc ch in each of the last 3 dc ch.
Continue repeating 2nd and 3rd row.

Diagram

All measurements in charts are in cm.

symbols = ch
symbols = sl st
symbols = dc in st below
symbols = dc in ch-space below
symbols = 4th ROUND
symbols = corner no
symbols = here inc 1 extra dc + 3 ch in
ch-space every 6th round
diagram
diagram
Do you have a question? See a list of frequently asked questions (FAQ)

Knitting tension is what determines the final measurements of your work, and is usually measured per 10 x 10 cm. It is provided like so: number of stitches in width x number of rows in height - eg: 19 stitches x 26 rows = 10 x 10 cm.

The knitting tension is very individual; some people knit/crochet loosely while others work tightly. You adjust the knitting tension with the needle size, which is why the suggested needle size only serve as a guide! You need to adjust this (up or down) to ensure that YOUR knitting tension matches the knitting tension provided in the pattern. If you work with a different knitting tension than provided you will have a different yarn consumption, and your work will have different measurements than what the pattern suggests.

The knitting tension also determines which yarns can replace each other. As long as you achieve the same knitting tension you can replace one yarn with another.

See DROPS lesson: How to measure your tension/gauge

See DROPS video: How to make a gauge tension swatch

The required amount of yarn is provided in grams, eg: 450 g. To calculate how many balls you’ll need you first need to know how many grams are in 1 ball (25g, 50g or 100g). This information is available if you click on the individual yarn quality on our pages. Divide the amount required with the amount of each ball. For example, if each ball is 50g (the most common amount), the calculation will be as follows: 450 / 50 = 9 balls.

The important thing when changing from one yarn to another is that the knitting/crochet tension remains the same. This is so that the measurements of the finished piece will be the same as on the sketch provided. It is easier to achieve the same knitting tension using yarns from the same yarn group. It is also possible to work with multiple strands of a thinner yarn to achieve the knitting tension of a thicker one. Please try our yarn converter. We recommend you to always work a test swatch.

Please NOTE: when changing yarn the garment might have a different look and feel to the garment in the photo, due to individual properties and qualities of each yarn.

See DROPS lesson: Can I use a different yarn than the one mentioned in the pattern?

All our yarns are categorised into yarn groups (from A to F) according to thickness and knitting tension – group A contains the thinnest yarns and group F the thickest. This makes it easier for you to find alternative yarns to our patterns, should you wish to switch yarn. All yarns within the same group have a similar knitting tension and can easily replace each other. However, different yarn qualities have different structures and properties which will give the finished work a unique look and feel.

Click here for an overview of the yarns in each yarn group

At the top of all our patterns you’ll find a link to our yarn converter, which is a helpful tool should you wish to use a different yarn than suggested. By filling in the yarn quality you wish to replace, the amount (in your size) and number of strands, the converter will present good alternative yarns with the same knitting tension. Additionally it will tell you how much you’ll require in the new qualities and whether you’ll need to work with multiple strands. Most skeins are 50g (some are 25g or 100g).

If the pattern is worked with multiple colours, every colour will have to be converted separately. Similarly, if the pattern is worked with several strands of different yarns (for example 1 strand Alpaca and 1 strand Kid-Silk) you will have to find alternatives for each, individually.

Click here to see our yarn converter

Since different yarns have different qualities and textures we have chosen to keep the original yarn in our patterns. However, you can easily find options among our available qualities by using our yarn converter, or simply pick a yarn from the same yarn group.

It is possible that some retailers still have discontinued yarns in stock, or that someone has a few skeins at home that they would like to find patterns for.

The yarn converter will provide both alternative yarn as well as required amount in the new quality.

If you think it's hard to decide what size to make, it can be a good idea to measure a garment you own already and like the size of. Then you can pick the size by comparing those measures with the ones available in the pattern's size chart.

You'll find the size chart at the bottom of the pattern.

See DROPS lesson: How to read size chart

The needle size provided in the pattern serves only as a guide, the important thing is to follow the knitting tension. And since knitting tension is very individual, you will have to adjust the needle size to ensure that YOUR tension is the same as in the pattern – maybe you’ll have to adjust 1, or even 2 needle sizes, up or down to achieve the correct tension. For this, we recommend that you work test swatches.

Should you work with a different knitting tension than the one provided, the measurements of the finished garment might deviate from the measurement sketch.

See DROPS lesson: How to measure your tension/gauge

See DROPS video: How to make a gauge tension swatch

Working a garment top-down provides more flexibility and room for personal adjustment. For example it is easier to try the garment on while working, as well as making adjustments to length of yoke and shoulder caps.

The instructions are carefully explaining every step, in the correct order. Diagrams are adjusted to the knitting direction and are worked as usual.

The diagram depicts all rows/rounds, and every stitch seen from the right side. It is read from bottom to top, from right to left. 1 square = 1 stitch.

When working back and forth, every other row is worked from the right side and every other row is worked from the wrong side. When working from the wrong side, the diagram will have to be worked reversed: from left to right, knit stitches are purled, purl stitches are knit etc.

When working in the round every round is worked from the right side and the diagram are worked from right to left on all rounds.

See DROPS lesson: How to read knitting diagrams

The diagram depicts all rows/rounds, and every stitch seen from the right side. It is worked from bottom to top, from right to left.

When working back and forth every other row is worked from the right side: from right to left and every other row is worked from the wrong side: from left to right.

When working in the round, every row in the diagram are worked from the right side, from right to left.

When working a circular diagram you start in the middle and work your way outwards, counter clockwise, row by row.

The rows usually start with a given number of chain stitches (equivalent to the height of the following stitch), this will either be depicted in the diagram or explained in the pattern.

See DROPS lesson: How to read crochet diagrams

Instructions for working several diagrams after each other on the same row/round, will often be written like so: “work A.1, A.2, A.3 a total of 0-0-2-3-4 times". This means you work A.1 once, then A.2 is worked once, and A.3 is repeated (in width) the number of times provided for your size – in this case like so: S = 0 times, M = 0 times, L=2 times, XL= 3 times and XXL = 4 times.

The diagrams are worked as usual: begin with the first row in A.1, then work the first row in A.2 etc.

See DROPS lesson: How to read knitting diagrams

See DROPS lesson: How to read crochet diagrams

The total width of the garment (from wrist-to-wrist) will be larger in the larger sizes, despite the actual sleeves being shorter. The larger sizes have longer sleeve caps and wider shoulders, so there will be a good fit in all sizes.

The measurement sketch/schematic drawing provides information regarding the full length of the garment. If it’s a jumper or a jacket the length is measured from the highest point on the shoulder (usually closest to the neckline), and straight down to the bottom of the garment. It is NOT measured from the tip of shoulder. Similarly, the length of yoke is measured from the highest point on the shoulder and down to where yoke is split into body and sleeves.

See DROPS lesson: How to read a schematic drawing

Diagrams are often repeated on the round or in height. 1 repeat is the diagram the way it appears in the pattern. If it says to work 5 repeats of A.1 in the round, then you work A.1 a total of 5 times after/next to each other in the round. If it says to work 2 repeats of A.1 vertically/in height you work the entire diagram once, then begin again at the start and work the entire diagram one more time.

Chain stitches are slightly narrower than other stitches and to avoid working the cast-on edge too tight, we simply chain more stitches to begin with. The stitch count will be adjusted on the following row to fit the pattern and measurement sketch.

The rib edge is more elastic and will contract slightly compared to, for example, stocking stitch. By increasing before the rib edge, you avoid a visible difference in width between the rib edge and the rest of the body.

It’s very easy to cast off too tightly, and by making yarn overs while casting off (and simultaneously casting these off) you avoid a too tight cast off edge.

See DROPS video: How to bind off with yarn overs (yo)

To achieve an even increase (or decrease) you can increase on, for example: every 3rd and 4th row alternately, like so: work 2 rows and increase on the 3rd row, work 3 rows and increase on the 4th. Repeat this until the increase is complete.

See DROPS lesson: Increase or decrease 1 st on every 3rd and 4th row alternately

Should you prefer to work in the round instead of back and forth, you may of course adjust the pattern. You’ll need to add steeks mid-front (usually 5 stitches), and follow the instructions. When you would normally turn and work from the wrong side, simply work across the steek and continue in the round. At the end you’ll cut the piece open, pick up stitches to work bands, and cover the cut edges.

See DROPS video: How to knit steeks and cut open

Should you prefer to work back and forth instead of in the round, you may of course adjust the pattern so you work the pieces separately and then assemble them at the end. Divide the stitches for the body in 2, add 1 edge stitch in each side (for sewing) and work the front and back pieces separately.

See DROPS lesson: Can I adapt a pattern for circular needles into straight needles?

Pattern repeats can vary slightly in the different sizes, in order to get the correct proportions. If you’re not working the exact same size as the garment in the photo, yours might deviate slightly. This has been carefully developed and adjusted so that the complete impression of the garment is the same in all sizes.

Make sure to follow instructions and diagrams for your size!

If you have found a pattern you like which is available in women’s size it’s not very difficult to convert it to men’s size. The biggest difference will be the length of sleeves and body. Start working on the women size that you think would fit across the chest. The additional length will be worked right before you cast off for the armhole/sleeve cap. If the pattern is worked top-down you can add the length right after the armhole or before the first decrease on sleeve.

Regarding additional yarn amount, this will depend on how much length you add, but it is better with a skein too many than too few.

All yarns will have excess fibres (from production) that might come off as lint or shedding. Brushed yarns (ie hairier yarns) have more of these loose, excess fibres, causing more shedding.

Shedding also depends on what is worn under or over the garment, and whether this pulls at the yarn fibres. It’s therefore not possible to guarantee that there will be no shedding

Below are some tips on how to get the best result when working with hairier yarns:

1. When the garment is finished (before you wash it) shake it vigorously so the looser hairs come off. NOTE: do NOT use a lint roller, brush or any method that pulls at the yarn.

2. Place the garment in a plastic bag and put it in your freezer - the temperature will cause the fibres to become less attached to each other, and excess fibres will come off easier.

3. Leave in the freezer for a few hours before taking it out and shaking it again.

4. Wash the garment according to the instructions on the yarn label.

Pilling is a natural process that happens to even the most exclusive of fibers. It's a natural sign of wear and tear that is hard to avoid, and that is most visible in high friction areas of your garment like a sweater's arms and cuffs.

You can make your garment look as new by removing the pilling, using a fabric comb or a pill/lint remover.

Still can't find the answer you need? Then scroll down and leave your question so one of our experts can try to help you. This will be done normally within 5 to 10 working days.
In the meantime, you can read the questions and answers that others have left to this pattern or join the DROPS Workshop on Facebook to get help from fellow knitters/crocheters!

You might also like...

Post a comment to pattern DROPS 156-42

We would love to hear what you have to say about this pattern!

If you want to leave a question, please make sure you select the correct category in the form below, to speed up the answering process. Required fields are marked *.

Comments / Questions (128)

country flag Lelel Mas wrote:

En el delantero, como se continua el patrón sin que salgan aumentos, si se trabaja un punto alto en cada arco aumenta igual que antes.

01.04.2015 - 09:34

DROPS Design answered:

Hola Lelel, gracias por escribir. Repasando el patrón he encontrado una corrección del delantero sin actualizar en español. Ahora está actualizado. Sentimos las molestias y esperamos que la corrección te ayude a realizar el delantero.

05.04.2015 - 12:12

country flag Cara Weeks wrote:

Can you download your free patterns or just print them?

25.03.2015 - 19:21

DROPS Design answered:

Dear Mrs Weeks, you can use a virtual printer to save them as pdf if you rather like that way. Happy crocheting!

26.03.2015 - 08:51

country flag Veerle Dol wrote:

Kan u misschien wat meer uitleg over de mouwen geven? Ik heb nu 21 steken zoals aangegeven, maar wanneer minder ik nu? Snap dit goed in welke toeren ik dit moet doen?

22.03.2015 - 20:45

DROPS Design answered:

Hoi Veerle. Er staat in het patroon (voor maat XXXL): Herhaal de 1e en 2e TOER - minder TEGELIJKERTIJD 1 stk en 3 l aan het begin van de 6e toer door 2 stk samen te haken – LEES TIP VOOR HET MINDEREN – midden onder de mouw. Herhaal dit minderen elke 4e toer = 14 stk. Dwz, je mindert de eerste keer in de 6e toer en daarna herhaal je in elke 4e toer tot je 14 stk over hebt.

23.03.2015 - 14:44

country flag Liz wrote:

Hi I'm just starting this pattern, about 10 rounds in. I'm increasing by 1 tr and 3 chain in between each corner and I find it's creating a very scalloped/wavy effect on the work. It's certainly not flat. Is this correct? I'm hoping as the pattern grows in size the scalloping will reduce. I increase at the same tr space each time, should I increase at a different space each time round? Appreciate your help.

11.03.2015 - 14:50

DROPS Design answered:

Dear Liz, make sure you get the correct tension 3 x (1 tr + 3 ch) in width x 7 rounds = 10 x 10 cm and keep this tension when working the square. Happy crocheting!

11.03.2015 - 15:05

country flag Veerle wrote:

Ik snap de voorpanden niet. Ook niet als ik het uitteken, eerst rij heb ik gedaan, maar hoe ga je dan verder met rij 2? Moeten er eerst lossen om te keren? Want als ik het volg, krijg ik een rare zijkant en minder hokjes dan in rij 1. Vind het zo een mooie trui, maar is het misschien mogelijk,een diagram van het voorpand te maken?

05.03.2015 - 17:04

DROPS Design answered:

Hoi Veerle. Je haakt heen en weer over de voorpanden, het aantal lussen moet gelijk blijven. Ik kan helaas niet een tekening voor je maken.

25.03.2015 - 16:07

country flag Marisa wrote:

When you say chain for armho!e shaping, do you mean slip stitch along or create a chain loop?

18.02.2015 - 12:08

DROPS Design answered:

Dear Marisa, you create a ch-loop to make the hole for sleeve, ie you work 1 ch for every st (ch or tr) skipped on the side. Happy crocheting!

18.02.2015 - 14:57

country flag Gina wrote:

How many stitches do I skip for the arm holes? And what does it mean until the middle of corners?

21.01.2015 - 22:58

DROPS Design answered:

Dear Gina, number of sts skiped for armholes depends on your size and tension, ie work round to first corner and work 3dc,3ch,3dc in the ch-space on 1st corner, then count number of sts between first corner and middle side between 1st and 2nd corner and ch this number of sts, then continue as before until 3rd corner and repeat from the middle between 3rd and 4th corner, and work 3dc,3ch,3dc in ch-space on 4th corner. Happy crocheting!

22.01.2015 - 10:03

country flag Mayte Olmo Méndez wrote:

Me he quedado parada cuando empezamos a tejer las sisas, No entiendo muy bien que debo hacer. este paragrafo no logro descifrarlo. Trabajar 1 p.de cad. por cada p.de cad/p.a. saltado. Me podriais echar una mano?

03.01.2015 - 17:55

DROPS Design answered:

Hola Mayte! debes realizar una cadeneta para la sisa. El largo de la cadeneta se calcula así: 1 pt de cad por cada pt que vamos a saltar y luego unimos el extremo de esta cadeneta en el pt sig al último pt saltado.

18.01.2015 - 20:51

country flag Stanske wrote:

Goede avond, Als beginnende haakster zit ik al vast in t begin namelijk het proeflapje... moet ik eerst een rij losse haken? hoeveel? moet ik extra losse rekenen of gelijk met het stokje beginnen? Ik haak nu 12 losse+3 losse omdat ik een stokje moet haken keer het om en haak dan 3 X 1 stokje en 3 losse waarbij ik bij de losse 3 steken oversla en in de 4de steek een stokje haak, maar dan zit ik op t einde met 3 losse over ... Help!!!!!! Van een radeloze beginner

06.12.2014 - 22:53

DROPS Design answered:

Hoi Stanske. Bij dit vest zou ik eigenlijk maar beginnen in het midden en het diagram volgen. Als je 7 toeren in de hoogte hebt met 1 stk + 3 l, meet je de steekverhouding.

10.12.2014 - 14:02

country flag Jessica wrote:

Hello, I'm new to crocheting..only about 8 months. I'm not sure what do do for the armholes. I'm lost on that part of the pattern. Please help. Thank you

03.12.2014 - 05:25

DROPS Design answered:

Dear Jessica, to shape armholes, you will crochet some chains and at the same time skip some sts (to create "holes" for sleeves each side), ie work until 1st corner, 3dc+3ch+3ch in ch-space at corner, then chain for 1st armhole: count number of sts you have to skip until 1st and 2nd corner and chain this number of sts, continue working as before until 2nd corner as before, then as before again until middle side between 3rd and 4th corner and ch same number of sts as for 1st armhole, and crochet 3dc,3ch,3dc in 4th corner. Happy crocheting!

03.12.2014 - 10:18