
Popular categories
Looking for a yarn?


|
|
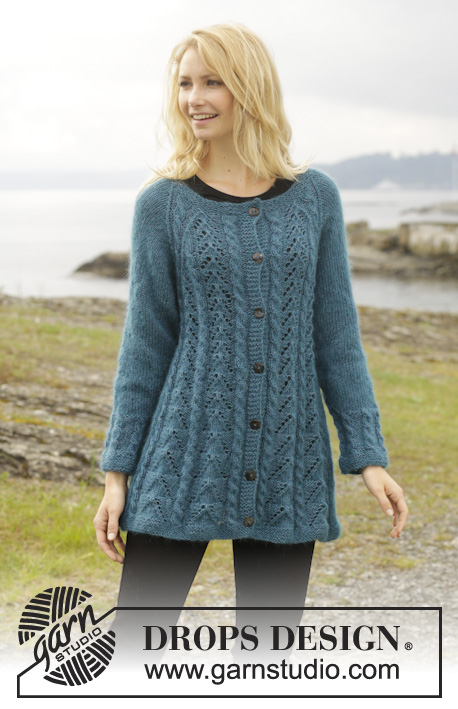
Winter Solstice |
|
 |
 |
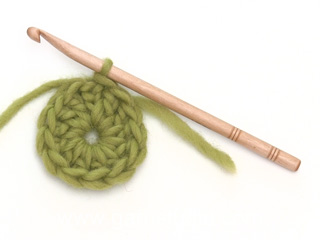
Crochet DROPS jacket worked in a circle in "Alpaca". Size: S - XXXL.
DROPS 158-10 |
|
|
CROCHET INFO: Beg every round/row with 3 ch that replace 1st dc and finish every round/row with 1 sl st in 3rd ch from beg of round/row. PATTERN GROUP: Each pattern group consists of: ch 1, 2 dc WORKED TOG - see explanation below, ch 2, 2 dc worked tog and 1 ch. DC WORKED TOG: * Make 1 YO, insert hook in ch-space, get yarn, make a YO, pull through 2 of the sts on hook *, repeat from *-* one more time, make 1 YO and pull yarn through all 3 sts on hook. CROCHET 3 dc TOG: Work 3 dc into 1 dc at beg of row as follows: Work 2 ch (= replace 1 dc), work 1 dc, but wait with last pull through (= 2 strands on hook), then work next dc but on last pull through, pull yarn through all sts on hook. DECREASE TIP (applies to sleeves): Dec at beg of row by working 1 sl st over the dc to be dec. Dec at end of row by working until 1 dc to be dec remains, turn piece. -------------------------------------------------------- CIRCLE: Work 5 ch on hook size 3.5 mm/E with Alpaca and form a ring with 1 sl st in first ch. READ CROCHET INFO. ROUND 1: Work 13 dc in ch-ring. ROUND 2: Work * 2 dc in every dc*, repeat from *-* the entire round = 26 dc. ROUND 3: Work * 2 dc in first dc, then 1 dc in next dc *, repeat from *-* the entire round = 39 dc. ROUND 4: Work * 2 dc in first dc, then 1 dc in each of the next 2 dc *, repeat from *-* the entire round = 52 dc. ROUND 5: Work * 1 dc in next dc, then ch 2, skip 1 dc *, repeat from *-* the entire round = 26 ch-spaces and 26 dc. REMEMBER THE CROCHET GAUGE! ROUND 6: In first dc work PATTERN GROUP - see explanation above, * 1 dc in next dc, 1 pattern group in next dc *, repeat from *-* until 1 dc remains, 1 dc in last dc = 13 pattern groups with 1 dc between each. Then work piece back and forth. Work every row tog at the end of row with 1 sl st in first st on row. Turn piece. ROW 7 (= from WS): 2 dc in first dc, * 1 pattern group in next pattern group, 2 dc in next dc (= dc-group) *, repeat from *-* until 1 pattern group from previous row remains, 1 pattern group = 13 pattern groups with 13 dc-groups between each. Turn piece. ROW 8: 1 pattern groups in first pattern group, * 2 dc in first dc, 1 dc in each of the next dc in dc-group, 1 pattern group in next pattern group *, repeat from *-* until 1 dc-group remains, 2 dc in first dc, 1 dc in each of the next dc in dc-group = 13 groups with 3 dc between each. Turn piece. ROW 9: 2 dc in first dc, 1 dc in each of the next dc in dc-group, * 1 pattern group in pattern group, 2 dc in first dc of dc-group, 1 dc in each of the next dc *, repeat from *-* until 1 pattern group from previous row remains, 1 pattern group = 13 groups with 4 dc between each. Turn piece. Then repeat 8th and 9th row until 6 rounds + 18-20-22 rows have been worked (= 19-21-23 dc between every pattern group) = 247-273-299 dc and 13 pattern group. Piece measures approx. 20-22-23 cm / 8"-8¾"-9" from middle and outwards. Now work armholes as follows in the different sizes: SIZE S/M: ROW 25 (= from WS): Inc in every groups with dc as before. Work 20 dc, 1 pattern group, 20 dc, work 50 loose ch (= right armhole), skip 2 dc-groups and 2 pattern groups. Then work dc-groups and pattern groups as before over the next 114 dc, work 50 loose ch (= left armhole), skip 2 dc-groups and 2 pattern groups, work as before the rest of row, finish with 1 sl st in first dc on row = 180 dc and 100 ch. Turn piece. ROW 26: Continue with pattern and inc as before but work first ch-row (= left armhole) as follows: 10 dc, skip ch 1, 11 dc, skip ch 1, 1 pattern group, skip ch 1, 11 dc, skip ch 1, 10 dc, skip ch 1, 1 pattern group and skip 1 ch. I next ch-row (= right armhole) work the same way but in opposite order, i.e. beg by skipping ch 1, 1 pattern group and finish with dc = 273 dc. ROW 27-50: Work pattern as before but now inc only on even numbered rows until 50 rows have been worked in total = 429 dc (33 dc in every dc-group). Piece measures approx. 42 cm / 16½" from middle and outwards. Fasten off. SIZE L/XL: ROW 27 (= from WS): Inc in every groups with dc as before. Work 22 dc, 1 pattern group, 22 dc, work 54 loose ch (= right armhole), skip 2 dc-groups and 2 pattern groups. Then work pattern as before over the next 126 dc, work 54 loose ch (= left armhole), skip 2 dc-groups and 2 pattern groups, work as before the rest of row, finish with 1 sl st in first dc on row = 198 dc and 108 ch. Turn piece. ROW 28: Continue with pattern and inc as before but work first ch-row (= left armhole) as follows: 11 dc, skip ch 1, 12 dc, skip ch 1, 1 pattern group, skip ch 1, 12 dc, skip ch 1, 11 dc, skip ch 1, 1 pattern group and skip 1 ch. I second ch-row (= right armhole) work the same way but in opposite order, i.e. beg by skipping ch 1, 1 pattern group and finish with dc = 299 dc. ROW 29-52: Work pattern as before but now inc only on even numbered rows until 52 rows have been worked in total = 455 dc (35 dc in every dc-group). Piece measures approx. 43 cm / 17" from middle and outwards. Fasten off. SIZE XXL/XXXL: ROW 29 (= from WS): Inc in every groups with dc as before. Work 24 dc, 1 pattern group, 24 dc, work 58 loose ch (= right armhole), skip 2 dc-groups and 2 pattern groups. Then work pattern as before over the next 138 dc, work 58 loose ch (= left armhole), skip 2 dc-groups and 2 pattern groups, work as before the rest of row, finish with 1 sl st in first pattern group on row = 216 dc and 116 ch. Turn piece. ROW 30: Continue with pattern and inc as before but work first ch-row (= left armhole) as follows: 12 dc, skip ch 1, 13 dc, skip ch 1, 1 pattern group, skip ch 1, 13 dc, skip ch 1, 12 dc, skip ch 1, 1 pattern group and skip 1 ch. I second ch-row (= right armhole) work the same way but in opposite order, i.e. beg by skipping ch 1, 1 pattern group and finish with dc = 325 dc. ROW 31-54: Work pattern as before but now inc only on even numbered rows until 54 rows have been worked in total = 481 dc and 37 dc in every dc-group. Piece measures approx. 45 cm / 17¾" from middle and outwards. Fasten off. ALL SIZES: Insert 4 markers in the piece as follows from WS: Work 16- 17-18, insert 1st marker here, work 17-18-19 dc, * 1 pattern group, 33-35-37 dc *, repeat from *-* 3 more times, insert 2nd marker here (1st-2nd marker = right front piece). Work 1 pattern group, 33-35-37 dc, 1 pattern group, 33-35-37 dc and 1 pattern group, insert 3rd marker here. * Work 33-35-37 dc, 1 pattern group *, repeat from *-* 3 more times, 17-18-19 dc, insert 4th marker. (3rd-4th marker = left front piece). Work the rest of row. Sts between 1st and 4th marker are up towards neck. Cut the yarn and fasten. RIGHT FRONT PIECE: Now work right front piece between 1st and 2nd marker, beg from 2nd marker (i.e. from RS) = 149-158-167 dc and 4 pattern groups. Continue inc on every row in dc-groups as before BUT do not inc in dc-groups in each side of front piece - AT THE SAME TIME dec 2 dc at beg of every row by CROCHET 3 dc TOG - see explanation above. Continue to work until 12-14-16 rows have been worked over front piece. Cut the yarn and fasten. LEFT FRONT PIECE: Work left front piece between 3rd and 4th marker the same way as right front piece, beg from 4th marker (i.e. from RS). SLEEVES: Work back and forth from armhole and down, work every row tog with 1 sl st at the end of row. Use hook size 3.5 mm and Alpaca. Beg by working 86-94-102 dc around the opening for sleeve, beg of row should be under sleeve. Then work 3 rows with 1 dc in every dc. Continue with 1 dc in every dc - AT THE SAME TIME dec in the different sizes as follows: READ DECREASE TIP! SIZE S/M: Dec 1 st in each side of piece every other row 4 times and then every 3rd row 12 times (= 16 times in total) = 54 dc. SIZE L/XL: Dec 1 st in each side of piece alternately every 3rd and 2nd row 18 times in total = 58 dc. SIZE XXL/XXXL: Dec 1 st in each side of piece every other row 17 times and then every 3rd row 4 times (= 21 times in total) = 60 dc. Then work pattern groups as follows: ROW 1: 2 dc, 1 ch * work the next 2 dc tog, 1 ch *, repeat from *-* and finish with 2 dc. ROW 2: Work 2 dc, * in next ch work 1 pattern group, skip 1 ch *, repeat from *-*, and finish with 1 dc in each of the last 2 dc. Turn piece. ROW 3: Work 2 dc, 1 pattern group in each of the next pattern groups until 2 dc remain, work 1 dc in each of these. Turn piece. Repeat 3rd row until piece measures approx. 61 cm / 24" in all sizes. Fasten off. CROCHET EDGE: Work 1 round with around the entire jacket as follows: * 1 pattern group, skip 2 dc/1 row *, repeat from *-* the entire round. |
|

|
|
|
Have you made this or any other of our designs? Tag your pictures in social media with #dropsdesign so we can see them! Do you need help with this pattern?You'll find tutorial videos, a Comments/Questions area and more by visiting the pattern on garnstudio.com. © 1982-2024 DROPS Design A/S. We reserve all rights. This document, including all its sub-sections, has copyrights. Read more about what you can do with our patterns at the bottom of each pattern on our site. |
|


With over 40 years in knitting and crochet design, DROPS Design offers one of the most extensive collections of free patterns on the internet - translated to 17 languages. As of today we count 304 catalogs and 11422 patterns - 11417 of which are translated into English (US/in).
We work hard to bring you the best knitting and crochet have to offer, inspiration and advice as well as great quality yarns at incredible prices! Would you like to use our patterns for other than personal use? You can read what you are allowed to do in the Copyright text at the bottom of all our patterns. Happy crafting!
Comments / Questions (295)
Sachant que dans la description de motif vous dites 1 ml 2 brides écoulées ensemble 2 ml 2 brides écoulées ensemble 1ml et on repart en bride jusqu\'au motif suivant je vois mal comment on peut les superposer en faisant des brides écoulées ensemble dans les 2ml du rang précédent. C\'est pas clair... J\'ai vraiment envie de réussir mais je bloque là.
15.02.2019 - 19:06DROPS Design answered:
Bonjour Mailys, au lieu de faire les 2 b, 2 ml, 2b dans la m comme au tour 6 (1er tour des groupes de motifs), crochetez 2 b,2ml 2b dans les 2 ml du tour 5 (= au milieu des 2 b écoulées ensemble). Bon crochet!
18.02.2019 - 08:36Je ne comprends pas bien... Chaque tour quand on fait un motif dans le motif du tour précédent on fait les brides assemblées ensemble dans les 2 ml et pas les brides assemblées du tour précédent ?
15.02.2019 - 19:02Bonjour j'ai un doute sur les tours 7 et 8...quand il s'agit de faire le motif on le reproduit exactement à l'identique du tour suivant ? Ou on le fait dans les ml entre les brides écoulées ensemble ou on recrée un motif par lot de deux brides écoulées ensemble ? Merci pour la réponse.
15.02.2019 - 18:58DROPS Design answered:
Bonjour Mailsy, les groupes de motifs s'alignent les uns au-dessus des autres en crochetant simplement (1 ml, 2 B écoulées en, 2 ml, 2 B écoulées ens, 1 ml) autour des 2 ml du groupe de motif du tour précédent. La 1ère fois vous crochetez le groupe de motif dans une bride, quand vous répétez les motifs en hauteur, vous les crochetez dans l'arceau de 2 ml au milieu du groupe de motif précédent. Bon crochet!
18.02.2019 - 08:34Bonjour j'ai un doute sur les tours 7 et 8...quand il s'agit de faire le motif on le reproduit exactement à l'identique du tour suivant ? Ou on le fait dans les ml entre les brides écoulées ensemble ou on recrée un motif par lot de deux brides écoulées ensemble ? Merci pour la réponse.
10.02.2019 - 20:45DROPS Design answered:
Bonjour Mailsy, les groupes de motifs sont alignés les uns au-dessus des autres, on crochète 1 ml, 2 b écoulées ens, 2 ml, 2 b écoulées ens autour des 2 ml du tour précédent, 1 ml. Bon crochet!
11.02.2019 - 11:13Ik kom niet uit toer zes waar ik patroongroepen moet maken.
16.01.2019 - 23:17DROPS Design answered:
Dag Karlijn,
Hoe je de patroongroep maakt staat bovenaan mij instructies voor het patroon aangegeven. In toer 6 zijn deze patroongroepen verwerkt en je herhaalt steeds wat tussen de sterretjes staat.
17.01.2019 - 09:34Is there a way to make this jacket a size xsm/sm? Sm/md is way to big for me. Thanks.
13.01.2019 - 20:58DROPS Design answered:
Dear Manon, we are unfortunately not able to adjust every pattern to every single request. For any individual assistance please contact the store where you bought the yarn. Happy crocheting!
14.01.2019 - 12:29I want to make this., But make the moon/sun a different color. Is there a chart so that I can figure out which stitches to change colors?
04.01.2019 - 23:56DROPS Design answered:
Dear Mrs Murphy, there is no chart to this pattern, but it looks like you should then start the circle with the moon/sun colour and then work the pattern groups with this colour while work the dc-groups with the colour of the background. Happy crocheting!
07.01.2019 - 09:25For row 3 at the end of the sleeve. When doing the pattern group, do you only do 1-ch between groups or two? Doing two ch between each group makes the sleeve get wider which is not how the end of the sleeves look in the picture. Thank you for your help
18.11.2018 - 22:15DROPS Design answered:
Dear Lynn, you can keep only 1 chain between the pattern-group so that the bottom of sleeves will not be larger. Happy crocheting!
19.11.2018 - 09:15TOER 6: haak in eerste stk PATROONGROEP.\r\nkun je me dit even int nederlands uitleggen aub want ik snap het niet alvast bedankt\r\nvriendelijke groeten Carola
08.11.2018 - 13:06For XXL/XXXL row 30 I had to do left arm hole pattern opposite of how it is written to have established pattern continue. For the right arm hole, I followed the written directions for the left in order to keep established pattern. Is it possible the written instructions are reversed?
14.10.2018 - 04:25DROPS Design answered:
Dear Lynn, it should be right since you are crocheting alternately from RS and from WS, but make sure to keep pattern as established (pattern-group over pattern groups etc.). Happy crocheting!
15.10.2018 - 09:34