
Popular categories
Looking for a yarn?


|
|
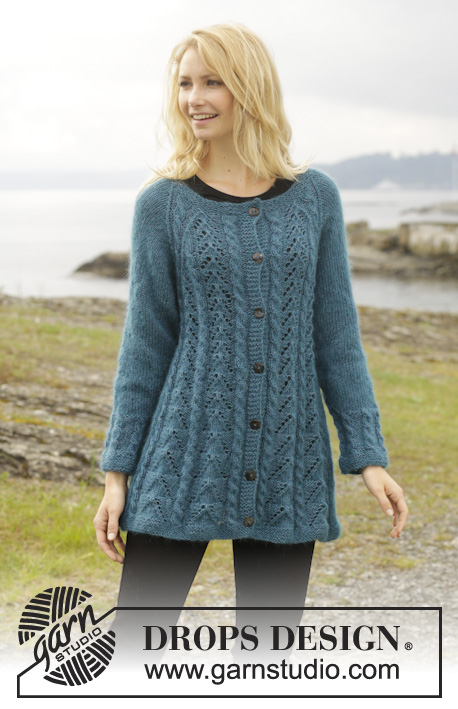
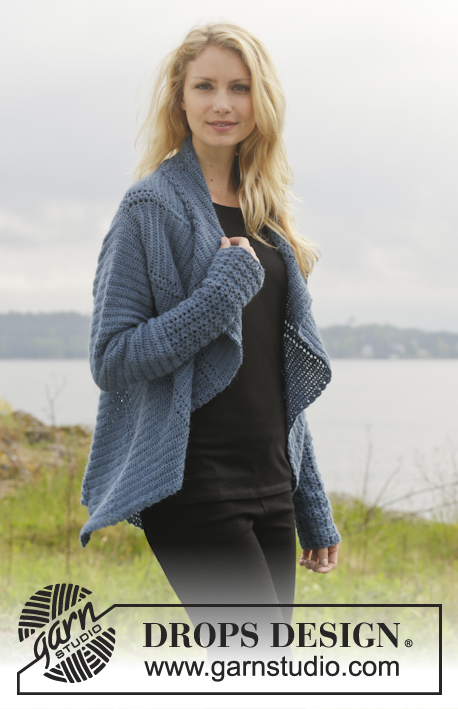
Winter Solstice |
|
 |
 |
Crochet DROPS jacket worked in a circle in "Alpaca". Size: S - XXXL.
DROPS 158-10 |
|
|
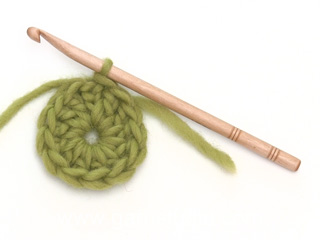
CROCHET INFO: Beg every round/row with 3 ch that replace 1st tr and finish every round/row with 1 sl st in 3rd ch from beg of round/row. PATTERN GROUP: Each pattern group consists of: 1 ch, 2 TR WORKED TOG - see explanation below, 2 ch, 2 tr worked tog and 1 ch. TR WORKED TOG: * Make 1 YO, insert hook in ch-space, get yarn, make a YO, pull through 2 of the sts on hook *, repeat from *-* one more time, make 1 YO and pull yarn through all 3 sts on hook. CROCHET 3 TR TOG: Work 3 tr into 1 tr at beg of row as follows: Work 2 ch (= replace 1 tr), work 1 tr, but wait with last pull through (= 2 strands on hook), then work next tr but on last pull through, pull yarn through all sts on hook. DECREASE TIP (applies to sleeves): Dec at beg of row by working 1 sl st over the tr to be dec. Dec at end of row by working until 1 tr to be dec remains, turn piece. -------------------------------------------------------- CIRCLE: Work 5 ch on hook size 3.5 mm with Alpaca and form a ring with 1 sl st in first ch. READ CROCHET INFO. ROUND 1: Work 13 tr in ch-ring. ROUND 2: Work * 2 tr in every tr*, repeat from *-* the entire round = 26 tr. ROUND 3: Work * 2 tr in first tr, then 1 tr in next tr *, repeat from *-* the entire round = 39 tr. ROUND 4: Work * 2 tr in first tr, then 1 tr in each of the next 2 tr *, repeat from *-* the entire round = 52 tr. ROUND 5: Work * 1 tr in next tr, then 2 ch, skip 1 tr *, repeat from *-* the entire round = 26 ch-spaces and 26 tr. REMEMBER THE CROCHET TENSION! ROUND 6: In first tr work PATTERN GROUP - see explanation above, * 1 tr in next tr, 1 pattern group in next tr *, repeat from *-* until 1 tr remains, 1 tr in last tr = 13 pattern groups with 1 tr between each. Then work piece back and forth. Work every row tog at the end of row with 1 sl st in first st on row. Turn piece. ROW 7 (= from WS): 2 tr in first tr, * 1 pattern group in next pattern group, 2 tr in next tr (= tr-group) *, repeat from *-* until 1 pattern group from previous row remains, 1 pattern group = 13 pattern groups with 13 tr-groups between each. Turn piece. ROW 8: 1 pattern groups in first pattern group, * 2 tr in first tr, 1 tr in each of the next tr in tr-group, 1 pattern group in next pattern group *, repeat from *-* until 1 tr-group remains, 2 tr in first tr, 1 tr in each of the next tr in tr-group = 13 groups with 3 tr between each. Turn piece. ROW 9: 2 tr in first tr, 1 tr in each of the next tr in tr-group, * 1 pattern group in pattern group, 2 tr in first tr of tr-group, 1 tr in each of the next tr *, repeat from *-* until 1 pattern group from previous row remains, 1 pattern group = 13 groups with 4 tr between each. Turn piece. Then repeat 8th and 9th row until 6 rounds + 18-20-22 rows have been worked (= 19-21-23 tr between every pattern group) = 247-273-299 tr and 13 pattern group. Piece measures approx. 20-22-23 cm from centre and outwards. Now work armholes as follows in the different sizes: SIZE S/M: ROW 25 (= from WS): Inc in every group with tr as before. Work 20 tr, 1 pattern group, 20 tr, work 50 loose ch (= right armhole), skip 2 tr-groups and 2 pattern groups. Then work tr-groups and pattern groups as before over the next 114 tr, work 50 loose ch (= left armhole), skip 2 tr-groups and 2 pattern groups, work as before the rest of row, finish with 1 sl st in first tr on row = 180 tr and 100 ch. Turn piece. ROW 26: Continue with pattern and inc as before but work first ch-row (= left armhole) as follows: 10 tr, skip 1 ch, 11 tr, skip 1 ch, 1 pattern group, skip 1 ch, 11 tr, skip 1 ch, 10 tr, skip 1 ch, 1 pattern group and skip 1 ch. I next ch-row (= right armhole) work the same way but in opposite order, i.e. beg by skipping 1 ch, 1 pattern group and finish with tr = 273 tr. ROW 27-50: Work pattern as before but now inc only on even numbered rows until 50 rows have been worked in total = 429 tr (33 tr in every tr-group). Piece measures approx. 42 cm from centre and outwards. SIZE L/XL: ROW 27 (= from WS): Inc in every group with tr as before. Work 22 tr, 1 pattern group, 22 tr, work 54 loose ch (= right armhole), skip 2 tr-groups and 2 pattern groups. Then work pattern as before over the next 126 tr, work 54 loose ch (= left armhole), skip 2 tr-groups and 2 pattern groups, work as before the rest of row, finish with 1 sl st in first tr on row = 198 tr and 108 ch. Turn piece. ROW 28: Continue with pattern and inc as before but work first ch-row (= left armhole) as follows: 11 tr, skip 1 ch, 12 tr, skip 1 ch, 1 pattern group, skip 1 ch, 12 tr, skip 1 ch, 11 tr, skip 1 ch, 1 pattern group and skip 1 ch. I second ch-row (= right armhole) work the same way but in opposite order, i.e. beg by skipping 1 ch, 1 pattern group and finish with tr = 299 tr. ROW 29-52: Work pattern as before but now inc only on even numbered rows until 52 rows have been worked in total = 455 tr (35 tr in every tr-group). Piece measures approx. 43 cm from centre and outwards. SIZE XXL/XXXL: ROW 29 (= from WS): Inc in every group with tr as before. Work 24 tr, 1 pattern group, 24 tr, work 58 loose ch (= right armhole), skip 2 tr-groups and 2 pattern groups. Then work pattern as before over the next 138 tr, work 58 loose ch (= left armhole), skip 2 tr-groups and 2 pattern groups, work as before the rest of row, finish with 1 sl st in first pattern group on row = 216 tr and 116 ch. Turn piece. ROW 30: Continue with pattern and inc as before but work first ch-row (= left armhole) as follows: 12 tr, skip 1 ch, 13 tr, skip 1 ch, 1 pattern group, skip 1 ch, 13 tr, skip 1 ch, 12 tr, skip 1 ch, 1 pattern group and skip 1 ch. I second ch-row (= right armhole) work the same way but in opposite order, i.e. beg by skipping 1 ch, 1 pattern group and finish with tr = 325 tr. ROW 31-54: Work pattern as before but now inc only on even numbered rows until 54 rows have been worked in total = 481 tr and 37 tr in every tr-group. Piece measures approx. 45 cm from centre and outwards. ALL SIZES: Insert 4 markers in the piece as follows from WS: Work 16-17-18 tr, insert 1st marker here, work 17-18-19 tr, * 1 pattern group, 33-35-37 tr *, repeat from *-* 3 more times, insert 2nd marker here (1st-2nd marker = right front piece). Work 1 pattern group, 33-35-37 tr, 1 pattern group, 33-35-37 tr and 1 pattern group, insert 3rd marker here. * Work 33-35-37 tr, 1 pattern group *, repeat from *-* 3 more times, 17-18-19 tr, insert 4th marker. (3rd-4th marker = left front piece). Work the rest of row. Sts between 1st and 4th marker are up towards neck. Cut the yarn and fasten. RIGHT FRONT PIECE: Now work right front piece between 1st and 2nd marker, beg from 2nd marker (i.e. from RS) = 149-158-167 tr and 4 pattern groups. Continue inc on every row in tr-groups as before BUT do not inc in tr-groups in each side of front piece - AT THE SAME TIME dec 2 tr at beg of every row by CROCHET 3 TR TOG - see explanation above. Continue to work until 12-14-16 rows have been worked over front piece. Cut the yarn and fasten. LEFT FRONT PIECE: Work left front piece between 3rd and 4th marker the same way as right front piece, beg from 4th marker (i.e. from RS). SLEEVES: Work back and forth from armhole and down, work every row tog with 1 sl st at the end of row. Use hook size 3.5 mm and Alpaca. Beg by working 86-94-102 tr around the opening for sleeve, beg of row should be under sleeve. Then work 3 rows with 1 tr in every tr. Continue with 1 tr in every tr - AT THE SAME TIME dec in the different sizes as follows: READ DECREASE TIP! SIZE S/M: Dec 1 st in each side of piece every other row 4 times and then every 3rd row 12 times (= 16 times in total) = 54 tr. SIZE L/XL: Dec 1 st in each side of piece alternately every 3rd and 2nd row 18 times in total = 58 tr. SIZE XXL/XXXL: Dec 1 st in each side of piece every other row 17 times and then every 3rd row 4 times (= 21 times in total) = 60 tr. Then work pattern groups as follows: ROW 1: 2 tr, 1 ch * work the next 2 tr tog, 1 ch *, repeat from *-* and finish with 2 tr. ROW 2: Work 2 tr, * in next ch work 1 pattern group, skip 1 ch *, repeat from *-*, and finish with 1 tr in each of the last 2 tr. Turn piece. ROW 3: Work 2 tr, 1 pattern group in each of the next pattern groups until 2 tr remain, work 1 tr in each of these. Turn piece. Repeat 3rd row until piece measures approx. 61 cm in all sizes. Cut the yarn and fasten. CROCHET EDGE: Work 1 round with around the entire jacket as follows: * 1 pattern group, skip 2 tr/1 row *, repeat from *-* the entire round. |
|

|
|
|
Have you made this or any other of our designs? Tag your pictures in social media with #dropsdesign so we can see them! Do you need help with this pattern?You'll find tutorial videos, a Comments/Questions area and more by visiting the pattern on garnstudio.com. © 1982-2024 DROPS Design A/S. We reserve all rights. This document, including all its sub-sections, has copyrights. Read more about what you can do with our patterns at the bottom of each pattern on our site. |
|


With over 40 years in knitting and crochet design, DROPS Design offers one of the most extensive collections of free patterns on the internet - translated to 17 languages. As of today we count 304 catalogues and 11422 patterns - 11422 of which are translated into English (UK/cm).
We work hard to bring you the best knitting and crochet have to offer, inspiration and advice as well as great quality yarns at incredible prices! Would you like to use our patterns for other than personal use? You can read what you are allowed to do in the Copyright text at the bottom of all our patterns. Happy crafting!
Comments / Questions (295)
Bonjour , J'en suis aux manches. Je ne comprends les diminutions de la taille xxl/xxxl... A l'aide !
15.11.2020 - 22:58DROPS Design answered:
Bonjour Pomme, vous crochetez les manches en rond, mais alternativement sur l'endroit et sur l'envers en diminuant comme indiqué sous DIMINUTIONS (manches), en taille XXL/XXXL vous diminuerez: d'abord 1 m de chaque côté 17 x tous les 2 rangs (= 1 rang de diminutions, 1 rang sans diminuer et on répète 16 fois ces 2 rangs, on termine par 1 rang de diminutions) puis 4 fois tous les 3 rangs (= 1 rang de diminutions, 2 rangs sans diminuer), on répète ces 3 rangs encore 3 fois. Bon crochet!
16.11.2020 - 16:12Hi am I correct in presuming that when you say *pattern group, 37tr* repeat 3 more time it then will be actually done 4 times? Thank you
10.10.2020 - 16:40DROPS Design answered:
Dea Adri, yes. When stated do something and X more time, you repeat that X+1 times. When a pattern states you should repeat something Y times total, then it should be repeated Y times only. In this case it says 3 more time, then the first repeat plus 3 times = 4 times. Hope that helps! Happy crafting!
11.10.2020 - 07:03Hi. I'm struggling a bit with counting the TR in Row 25 s/m. My first armhole starts before a pattern group and then finishes in a pattern group (ie my armhole covers pattern, tr group, pattern, tr group). How do I count out 114 tr from there? A tr group is 20 tr. How many tr do I count for a pattern group? I just can't work it out so that it comes to 114. thanks
28.09.2020 - 23:06DROPS Design answered:
Dear Sonja, on row 25 you will work 20 tr, 1 pattern group, 20 tr, work 50 loose ch (= right armhole), skip 1 tr-group, 1 pattern group, 1 tr-group, 1 pattern group, then work tr-groups and pattern groups as before over the next 114 tr (= 6 x 20 tr + the pattern groups, work the last pattern troup, then crochet 50 loose ch (= left armhole), skip 1 tr-group, 1 pattern group, 1 tr-group, 1 pattern group, work as before the rest of row, finish with 1 sl st in first tr on row. Happy crocheting!
29.09.2020 - 07:57Ganz genauso konnte ich es auch in der Anleitung lesen, nur passt es an meiner Häkelei nicht. Ich habe schon alles abgezählt und finde den Fehler leider nicht.
17.08.2020 - 14:37DROPS Design answered:
Liebe Josephine, am besten zeigen Sie Ihr Strickstück Ihr DROPS Laden (auch ein Foto per mail können Sie gerne senden), dort kann man Ihnen weiterhelfen. Viel Spaß beim häkeln!
17.08.2020 - 15:55Hallo, ich komme bei der 25. R, Gr. S/M nicht weiter. Die ersten 50 Lm starten VOR einer Mustergruppe? Nach den ausgelassenen Gruppen wird wieder IN einer Mustergruppe begonnen? Nach 114 Stäbchen zur gegenüberliegenden Seite beginne ich wieder VOR der Mustergruppe mit der Lm.-Kette und steche nach der Auslasung beginnend in ein Stb.? Ist das richtig? Dann sind die Ärmel allerdings leicht zueinander versetzt und das Muster stimmt nicht mehr. Bitte um Rat!
16.08.2020 - 22:37DROPS Design answered:
Liebe Josephine, die 25. Reihe ist eine Rückreihe: 20 Stb wie zuvor häkeln, dann 1 Mustergruppe, 20 Stb wie zuvor häkeln, jetzt 50 Lm häkeln und (1 Mustergruppe + 20 Stb + 1 Mustergruppe, 20 Stb) überspringen (= Armausschnitt). Bei der 2. Armausschnitt übersrpingen Sie 20 Stb + 1 Mustergruppe + 20 Stb + 1 Mustergruppe so sind die beide Armausschnitte gleiche. Viel Spaß beim häkeln!
17.08.2020 - 09:15Hi, I’m working on the S/M size. After I’ve completed the Right and Left front pieces, they are off centered by 1dc group. I tripled check that I did my armholes from the WS and started my stitch marker placement row on WS as well. For the front pieces to be centered I would need to work 1 dc group, 1 pattern group, 17 dc and place stitch marker. Or did I make a mistake elsewhere? Thanks.
02.08.2020 - 00:47DROPS Design answered:
Dear Lily, from WS pattern start with dc, not with a pattern group, this means when working armholes, you work 20 dc, 1 pattern group, 20 dc, 1st armhole. And when adding marker, you work round starting with dc too: 16 dc, first marker, 17 dc and so on. After adding marker, fold piece double and markers/armhole should match on both sides. Happy crocheting!
03.08.2020 - 08:02Después de terminar la parte de las sisas ( según la talla) pasamos al apartado "todas las tallas", donde la labor se separa para trabajar los delanteros. Mi pregunta es en que parte del patrón comienzo con: Insertar 4 marcapuntos en la pieza, de la manera sig, por el LR: Tejer 16-17-18 p.a., insertar el 1er marcapuntos aquí.
25.07.2020 - 21:56DROPS Design answered:
Hola Marcela. Después de terminar las sisas, comenzamos a trabajar los delanteros (apartado todas las tallas) y a partir de allí insertamos los marcapuntos.
16.08.2020 - 17:00I made this sweater for my daughters birthday. When I came to the sleeves - instead of following the pattern - I followed the design decreasing between the pattern groups. When my daughter tried it on - it hit about belt level and she likes longer sweaters. So I went back and followed the pattern group for another 6 or 7 inches. I have pictures but don't know how to send them to you. If I make it again, I will extend the back before I put the trim on.
23.07.2020 - 21:32Tengo una duda .... Dice "TODAS LAS TALLAS: Insertar 4 marcapuntos en la pieza, de la manera sig, por el LR: Tejer 16-17-18 p.a., insertar el 1er marcapuntos aquí... " ¿ En qué parte del patrón se comienza a trabajar esta hilera ? Gracias !
29.06.2020 - 06:46DROPS Design answered:
Hola Marcela. Después de terminar la parte de las sisas ( según la talla) pasamos al apartado "todas las tallas", donde la labor se separa para trabajar los delanteros.
29.06.2020 - 20:37Hello, I have a question about row 27-50 (size S/M). Do I have to turn after each row (same as before in row 8 and 9)? Or do I keep working at the same (= right) side without turning?
21.06.2020 - 14:37DROPS Design answered:
Dear Lianne, continue working back and forth (joining at the end of each row) as before. Happy crocheting!
22.06.2020 - 08:34