
Popular categories
Looking for a yarn?


|
||||||||||||||||||||||||||||
Alana |
||||||||||||||||||||||||||||
 |
 |
|||||||||||||||||||||||||||
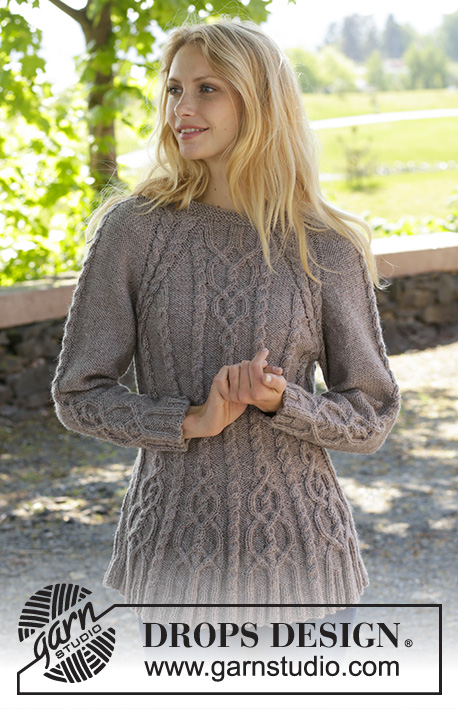
Knitted DROPS jumper with cables and raglan, worked top down in ”Karisma”. Size S-XXL
DROPS 156-19 |
||||||||||||||||||||||||||||
|
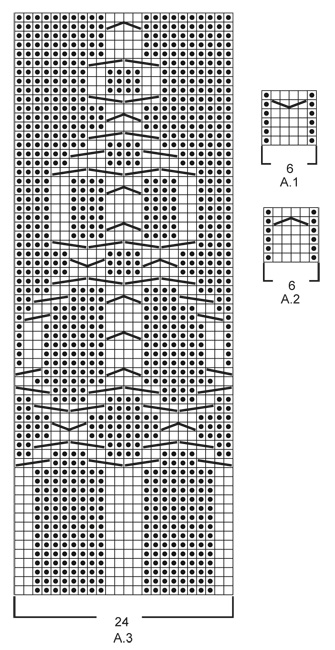
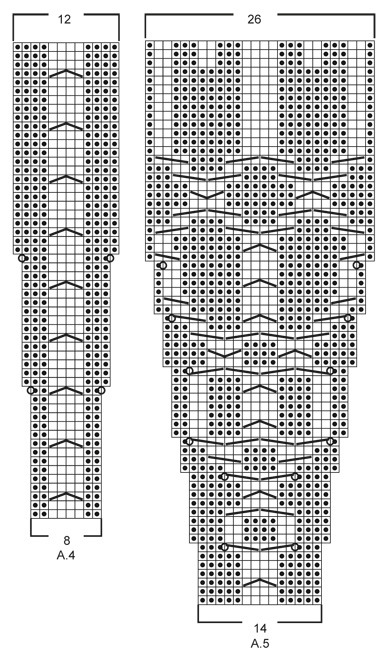
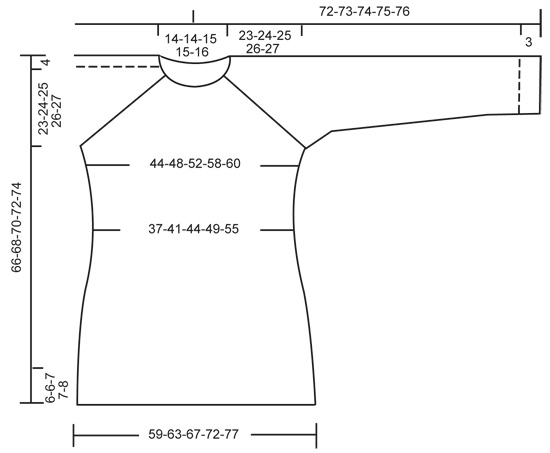
GARTER ST (in the round on circular needle): * K 1 round and P 1 round *, repeat from *-*. 1 ridge = 2 rounds. GARTER ST (back and forth on needle): K all rows. 1 ridge = K2 rows. PATTERN: See diagrams A.1 - A.5. The diagrams show all rows in pattern seen from RS. RAGLAN: Inc on each side of raglan sts (A.1/A.2, marker, A.2/A.1) by making 1 YO = 8 inc on round. On next round K the YOs twisted to avoid holes. Then P the new sts on sleeves, and on front and back piece work the new sts in pattern as explained below. DECREASE TIP (applies to sleeves): Dec on each side of marker as follows: Work until 3 sts remain before marker, P 2 tog, P 2, P 2 tog = 2 sts dec. INCREASE TIP: Inc 1 st by making a YO. On next round P YOs twisted, i.e. work in the back loop of st instead of front to avoid holes. P the new sts. ---------------------------------------------------------- JUMPER: Worked top down in the round on circular needle. Work sleeve in the round on circular needle/double pointed needles. YOKE: Cast on 92-92-97-97-101 sts on circular needle size 4 mm / US 6 with Karisma. Work 3 ridges in GARTER ST in the round on circular needle - see explanation above. Continue to work an elevation in GARTER ST back and forth -see explanation above, from mid back as follows (1st row = RS): Now work 5-5-7-7-9 sts, turn, work 10-10-14-14-18 sts, turn, work 15-15-19-19-23 sts, turn, work 20-20-24-24-28 sts, turn, work 25-25-29-29-33 sts, turn, work 30-30-34-34-38 sts, turn, work 35-35-39-39-43 sts, turn, work 40-40-43-43-48 sts, turn, work back to beg of round. Now K 1 round AT THE SAME TIME inc 24-24-23-23-27 sts evenly = 116-116-120-120-128 sts. P 18-18-19-19-21, insert 1st marker here (= this is now beg of round), A.2, P 2, A.2, P 2, A.1, insert 2nd marker here, A.2, P 0-0-1-1-3, A.3, P 0-0-1-1-3, A.1, insert 3rd marker here, A.2, P 2, A.2, P 2, A.1, insert 4th marker here, A.2, P 0-0-1-1-3, A.3, P 0-0-1-1-3, A.1. READ THE NEXT 2 SECTIONS BEFORE CONTINUING! REMEMBER THE GAUGE! On next round beg inc for RAGLAN – see explanation above, AT THE SAME TIME work pattern as follows: RAGLAN: Repeat inc every round 0-2-10-20-20 times in total. Then inc every other round 23-32-30-26-27 times and every 3rd round 6-0-0-0-0 times = 348-388-440-488-504 sts. PATTERN: Work pattern on body as follows (P the inc sts on sleeves): Work the first 6 sts inc in A.2, then P next 8-9-7-8-8 inc sts, work the next 6 inc sts in A.2, P the next 8-9-7-8-8 inc sts. NOTE: (Size M-L-XL-XXL): When A.3 has been worked 1 time vertically, continue with A.2 over cable and P the remaining sts from A.3 until start of body. S/M: Then inc as before on sleeve and inc inside A.1/A.2 (i.e. between A.1 and A.2, towards marker for raglan) on front and back piece 1-4 more times. P the new sts. L/XL/XXL: Continue with A.2 over the next 6 inc sts, P the next 7-8-8 inc sts, then inc as before on sleeve and inc inside A.1/A.2 (i.e. between A.1 and A.2, towards marker for raglan) on front and back piece 1-4-5 more times. P the last 1-4-5 inc sts. Piece now measures 27-28-29-30-31 cm / 10½"-11"-11½"-11 3/4"-12 1/4" from shoulder. Now work as follows: Slip the first 80-90-102-114-116 sts on a stitch holder for sleeve, cast on 12 new sts under sleeve, insert a blue marker in the middle of these new sts, work the next 94-104-118-130-136 sts (= front piece), slip the next 80-90-102-114-116 sts on a stitch holder for sleeve, cast on 12 new sts under sleeve, insert a blue marker in the middle of these new sts, work the remaining 94-104-118-130-136 sts on round (= back piece). NOW MEASURE THE PIECE FROM HERE. BODY: There are now 212-232-260-284-296 sts for body. Then continue pattern as follows: S/M: P 6-3, * A.2 0-1 time in width, P 7-7, A.2, P 8-9, insert a marker, A.2, P 8-9, insert a marker, A.2, P 9-9, A.2, P 9-9, A.2, insert a marker, P 8-9, A.2, insert a marker, P 8-9, A.1*, P 7-7, repeat from *-* 1 more time, P 1-4 L/XL/XXL: P 3-3-0, * A.2 1-1-2 times in width, P 4-6-5, A.2, P 7-8-8, insert a marker, A.2, P 7-8-8, insert a marker, A.2, P 7-8-8, insert a marker, A.2, P 10-11-12, A.2, P 10-11-12, A.2, insert a marker, P 7-8-8, A.2, insert a marker, P 7-8-8, A.2, insert a marker, P 7-8-8, A.1 *, P 4-6-5, repeat from *-* 1 more time, P 1-3-5. READ THE NEXT 2 SECTIONS BEFORE CONTINUING! Now dec and inc at the same time as follows: DECREASE: Dec differently as follows - READ DECREASE TIP: Dec 1 st on each side of the middle cable on front and back piece. Repeat dec every 2-2-1½-1½-1½ cm / ½"-½"-½"-3/4"-3/4" 3-3-4-4-6 more times. AT THE SAME TIME dec 1 st towards cable in every section with P sts with marker in (= 8-8-12-12-12 markers). Repeat dec every 3-2½-5-4-4 cm / 1 1/8"-7/8"-2"-1½"-1½" 2-3-1-2-2 more times. INCREASE (towards the sides): When piece measures 3 cm / 1'', inc along the cable towards the sleeve (i.e. cable from raglan) in P section towards the sides – READ INCREASE TIP! Inc 4 sts on round. Repeat inc every 1½-1½-2½-1½-1 cm / ½"-½"-7/8"-½"-3/8" 3-4-2-4-10 more times. When all dec and inc are done, 188-204-228-248-276 sts remain. When piece measures 11-12-12-13-14 cm / 4½"-4 3/4"-4 3/4"-5"-5½", work pattern as follows: P 6-3-6-6-0, A.2 0-1-1-1-2 times in width, P 7-8-6-11-15, A.4 0-0-1-1-1 time in width, * A.5, A.4 *, repeat from *-* 2-2-3-3-3 more times in width, A.5 1-1-0-0-0 times in width, P 7-8-6-11-15, A.2 0-1-1-1-2 times in width, P 7-8-6-11-15, A.4 0-0-1-1-1 time in width, * A.5, A.4 *, repeat from *-* 2-2-3-3-3 more times in width, A.5 1-1-0-0-0 times in width, P 1-5-0-5-15. NOTE: Adjust the first cable in A.4 and A.5 to get a nice transition between diagrams. Continue with pattern and inc according to diagram. When A.4 and A.5 have been worked vertically and piece measures approx. 33-34-34-35-35 cm / 13"-13½"-13½"-13 3/4"-13 3/4", there are 308-324-364-384-412 sts on round. Insert a marker here. NOW MEASURE THE PIECE FROM HERE. Now work rib as follows: S/M: * Work K over K and P over P until 7-11 sts remain before the blue marker in the side, P 2, K 2, P 3-4 *, repeat from *-* 1 more time and continue with K over K and P over P the rest of round. L/XL/XXL: * Work K over K and P over P until 8-14-21 sts remain before the blue marker in the side, K 2-2-2, P 3-4-3, K 0-2-2, P 0-3-3, K 0-0-2, P 0-0-3 *, repeat from *-* 1 more time and continue with K over K and P over P the rest of round. When rib has been worked for 2 cm / 3/4'' from marker, inc by making 1 YO before first P st in every P section - remember INCREASE TIP. When rib has been worked for 5-5-6-6-6 cm / 2"-2"-2½"-2½"-2½", bind off with K over K and P over P. SLEEVES: Slip the 80-90-102-114-116 sts from stitch holder back on circular needle. K 1 row over all sts and cast on 12 new sts at the end of row = 92-102-114-126-128 sts. Insert a marker in the middle of the new sts (i.e. 6 sts on each side of marker). NOW MEASURE THE PIECE FROM HERE. Then work sleeve in the round on circular needle/double pointed needles. Continue the middle cable on sleeve as before but work P over cables in raglan. On 2nd round beg dec on each side of marker - READ DECREASE TIP. Repeat dec in every other round 6 more times = 78-88-100-112-114 sts. Then dec 1 st on each side of marker every 2-1½-1-1-1 cm / 3/4"-½"-3/8"-3/8"-3/8" 13-17-22-27-27 times = 52-54-56-58-60 sts. AT THE SAME TIME when piece measures 15 cm / 6'', work A.5 over cable in the middle of sleeve - adjust the first cable in A.5 to get a nice transition between diagrams. NOTE: Do not inc in A.5 on sleeve, i.e. do not work YOs in diagram. When A.5 is finished and sleeve measures 37 cm / 14½'', work rib as follows from marker at beg of round: P 0-0-1-2-3, K 1-2-2-2-2, P 3, K 2, P 3, K 2, P 2, continue rib as on last row in A.5 (= 26 sts), P 2, K 2, P 3, K 2, P 3, K 1-2-2-2-2, P 0-0-1-2-3. Continue like this for 3 cm / 1'', bind off with K over K and P over P. ASSEMBLY: Sew the holes under the sleeves. |
||||||||||||||||||||||||||||
Diagram explanations |
||||||||||||||||||||||||||||
|
||||||||||||||||||||||||||||
|
||||||||||||||||||||||||||||
|
||||||||||||||||||||||||||||
|
||||||||||||||||||||||||||||
|
Have you made this or any other of our designs? Tag your pictures in social media with #dropsdesign so we can see them! Do you need help with this pattern?You'll find tutorial videos, a Comments/Questions area and more by visiting the pattern on garnstudio.com. © 1982-2024 DROPS Design A/S. We reserve all rights. This document, including all its sub-sections, has copyrights. Read more about what you can do with our patterns at the bottom of each pattern on our site. |
||||||||||||||||||||||||||||


With over 40 years in knitting and crochet design, DROPS Design offers one of the most extensive collections of free patterns on the internet - translated to 17 languages. As of today we count 304 catalogs and 11422 patterns - 11417 of which are translated into English (US/in).
We work hard to bring you the best knitting and crochet have to offer, inspiration and advice as well as great quality yarns at incredible prices! Would you like to use our patterns for other than personal use? You can read what you are allowed to do in the Copyright text at the bottom of all our patterns. Happy crafting!
Comments / Questions (218)
Hej Jeg er lige begyndt på Alana blusen i str xL men synes det er meget svært at tyde hvor raglan udtagningerne skal begynde (A.1/A.2, mærket, A.2/A.1) der er jo en del A.1 og A2 hvor skal udtagningerne være? Og hvilke masker skal være imellem udtagningerne? opskriften er meget forvirrende at finde ud af.
10.01.2020 - 23:22DROPS Design answered:
Hej Nolita, du har A.1/A.2 i hver af de 4 raglanovergange og du tager ud på hver side af disse overgange = ialt 8 udtagninger på hver udtagningsovergang. Sæt gerne et mærke på hver side af A.1/A.2 så du tydeligt kan se hvilke snoninger som hører til raglangovergangen. God fornøjelse!
10.02.2020 - 16:00Bonjour, je voudrai faire le même avec un laine n°8/9 Acrylique. Serait il possible d'avoir des explications totales en taille 38. merci beaucoup cordialement
18.12.2019 - 16:57DROPS Design answered:
Bonjour Moumette, Nous sommes en mesure de pouvoir proposer des modèles gratuits grâce à nos fils à tricoter et à crocheter vendus dans le monde entier. Vous comprendrez ainsi que nous ne pouvons que vous recommander d’utiliser l’une de nos laines. N’hésitez pas à contacter votre magasin DROPS en France pour toute assistance. Merci pour votre compréhension.
19.12.2019 - 07:38I have been knitting since I was 8, so for 66 years. I must admit that this pattern required me to slow down and think about what the end result should look like. North American patterns tend to ''spoon feed you''. This one makes the assumption that you understand how the pattern develops. I have now reached R61 of Chart A3., size M. Should I be introducing another A2 cable to the body at the raglan (cable) edge? I have done A2 (raglan edge),P9, A2, P9,A2 then A3 but cont. to incrrease.
07.12.2019 - 04:34DROPS Design answered:
Dear Helen, in size M you increase a total of 34 times: A.2 (= 6 sts), P9, A.2 (= 6 sts), P9 and P the last 4 sts (= 6+9+6+9+4=34 sts inc). Happy knitting!
09.12.2019 - 08:03Goddank dat de werktekeningen en het aantal steken kloppen ! Met de close-up foto erbij kon ik zelf uitwerken hoe deze trui gebreid moet worden. Uren puzzelen, dat wel, zelfs als ervaren breister. De beschrijving van dit patroon is een chaos waar niemand uit kan komen, omdat het zo onlogisch is: 'Meerder 4 steken op de naald' ??? Echt heel vervelend geweest.
02.10.2019 - 10:16I find the instructions confusing in the Yoke. The pattern says to work first inc st in A2 pattern. ; then purl next 7 inc? (I'm making a L). Does this mean wait until you have increased 6 times on both sides of the markers? I literally have made several Drops patterns and this one is the most difficult and confusing I've come across.
28.08.2019 - 13:13DROPS Design answered:
Dear Denise, the first 6 stiches increased will be worked in A.2, then the next 7 sts will be purled, and then the next 6 sts increased will be worked in .A2, P the next 7 increases and on body P the last increase = you have increased 6 + 7 + 6 + 7 + 6+7+ 1 sts on each side of raglan on body = 40 sts increased at the beg + 40 sts increased at the end of front piece/back piece = 80 sts increased in total. (= every round a total of 10 times + every other round a total of 30 times). You work the 6 sts as shown in A.2 (= P1, K4, P1), and make the cables only when there are enough stitches to work them. Happy knitting!
28.08.2019 - 13:47Una colección estupenda, por cierto (como siempre). Tengo puestos varios marcapuntos, gracias. La talla es la pequeña.
25.08.2019 - 15:04DROPS Design answered:
Hola Esther. El número de puntos es diferente en las trenzas (A.2) en el delantero y la espalda, es decir, para la talla S hay 5 trenzas (A.2) en el delantero y 5 trenzas (A.2) en la espalda. Antes de la primera trenza A.2 hay 13 puntos desde el inicio de la vuelta, después 8 puntos antes de la 2ª trenza A.2, 9 puntos antes de la 3ª (la trenza central), 9 puntos antes de la 4ª y 8 puntos antes de la 5ª. Después se trabajan 8 puntos, A.1 y 14 puntos bajo la manga. Se repite igual para la espalda y se termina con 1 punto para completar los 14 puntos bajo la manga.
25.08.2019 - 18:33Bueno, como no contestabais, he buscado las preguntas en inglés y creo que pone que son 8 puntos para la talla pequeña. Me arriesgaré. Hace una semana que tengo la labor parada y quiero continuar
24.08.2019 - 20:58Me gustaría saber cuántos puntos hay entre un gráfico A2 y otro en el delantero y la espalda. Me refiero al que se va formando con los aumentos a los lados del A3. He leído las explicaciones una y otra vez y no consigo encontrar la respuesta. Es un patrón maravilloso, aunque un poco complicado. Se me está resistiendo, aunque he hecho ya bastantes patrones Drops.
16.08.2019 - 19:53DROPS Design answered:
Hola Esther. Siempre intentamos contestar a las preguntas lo más pronto posible. Ahora estamos publicando la nueva colección y por tanto, estamos muy atareadas con los nuevos patrones. Los puntos entre los diagramas A.2 dependen de la talla que estés trabajando, ( que no has mencionado en la pregunta). Te recomiendo colocar marcapuntos para repartir mejor los dibujos.
25.08.2019 - 14:07Hei, kan dere ikke lage en mulighet for å se kommentarer kun på eget språk/engelsk i kommentarfeltet? Det er lite brukervennlig å måtte scrolle gjennom en mengde sider på tysk, spansk osc for å lete etter kommentarer en kan forstå. :)
03.06.2019 - 15:57DROPS Design answered:
Hei Bente. For tiden har vi dessverre ikke den funksjonen, men vi har notert ønsket ditt :) hilsen DROPS
04.06.2019 - 07:44Hei. Det må være en feil i oppskriften her. Der man skal sette to masker foran på hovedfletten så skal vel de første to strikkes vrang, og de to fra hjelpepinnen rett?
27.04.2019 - 16:46DROPS Design answered:
Hei Tonje. Ja, det har du helt rett i. Der det settes 2 masker på hjelpepinne foran arbeidet, skal det strikkes 2 masker vrang og 2 masker rett fra hjelpepinnen. Vi skal rette dette i oppsrkiften snarest. Takk for beskjed, og god fornøyelse
29.04.2019 - 08:04