
Popular categories
Looking for a yarn?


|
||||||||||||||||||||||||||||
Alana |
||||||||||||||||||||||||||||
 |
 |
|||||||||||||||||||||||||||
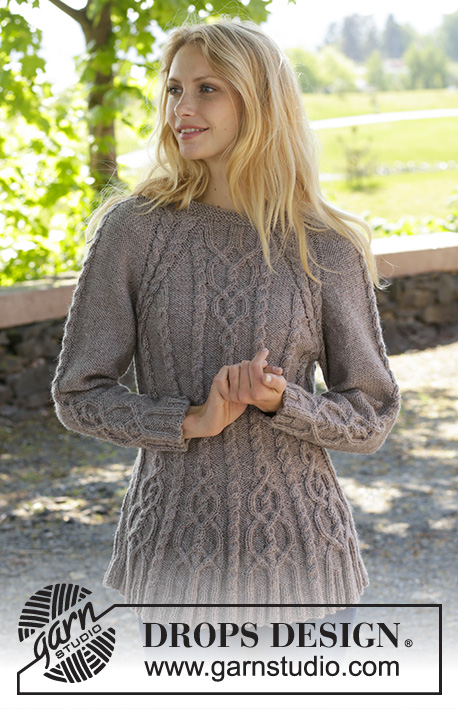
Knitted DROPS jumper with cables and raglan, worked top down in ”Karisma”. Size S-XXL
DROPS 156-19 |
||||||||||||||||||||||||||||
|
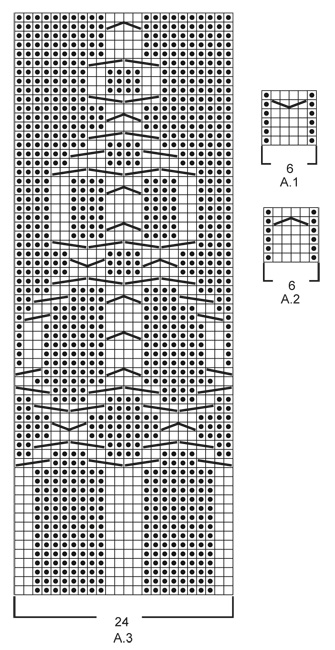
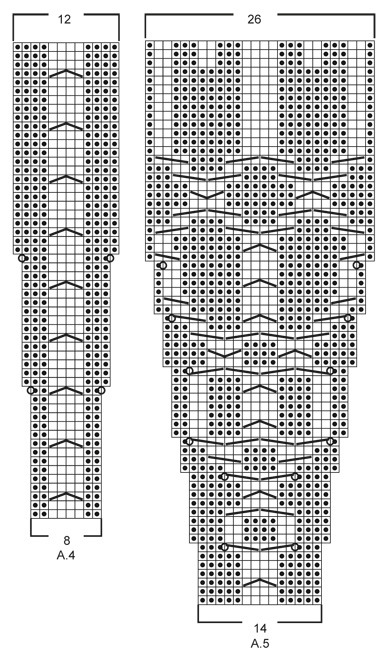
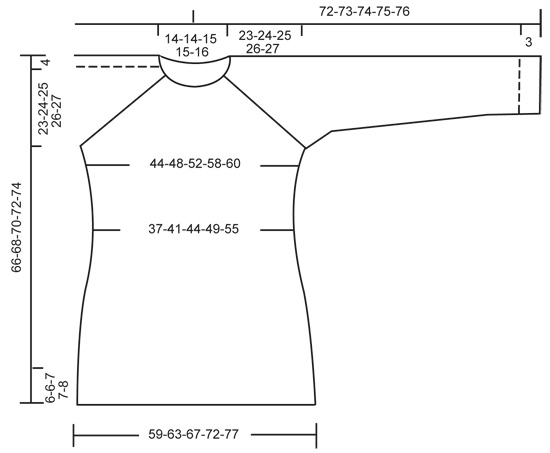
GARTER ST (in the round on circular needle): * K 1 round and P 1 round *, repeat from *-*. 1 ridge = 2 rounds. GARTER ST (back and forth on needle): K all rows. 1 ridge = K2 rows. PATTERN: See diagrams A.1 - A.5. The diagrams show all rows in pattern seen from RS. RAGLAN: Inc on each side of raglan sts (A.1/A.2, marker, A.2/A.1) by making 1 YO = 8 inc on round. On next round K the YOs twisted to avoid holes. Then P the new sts on sleeves, and on front and back piece work the new sts in pattern as explained below. DECREASE TIP (applies to sleeves): Dec on each side of marker as follows: Work until 3 sts remain before marker, P 2 tog, P 2, P 2 tog = 2 sts dec. INCREASE TIP: Inc 1 st by making a YO. On next round P YOs twisted, i.e. work in the back loop of st instead of front to avoid holes. P the new sts. ---------------------------------------------------------- JUMPER: Worked top down in the round on circular needle. Work sleeve in the round on circular needle/double pointed needles. YOKE: Cast on 92-92-97-97-101 sts on circular needle size 4 mm / US 6 with Karisma. Work 3 ridges in GARTER ST in the round on circular needle - see explanation above. Continue to work an elevation in GARTER ST back and forth -see explanation above, from mid back as follows (1st row = RS): Now work 5-5-7-7-9 sts, turn, work 10-10-14-14-18 sts, turn, work 15-15-19-19-23 sts, turn, work 20-20-24-24-28 sts, turn, work 25-25-29-29-33 sts, turn, work 30-30-34-34-38 sts, turn, work 35-35-39-39-43 sts, turn, work 40-40-43-43-48 sts, turn, work back to beg of round. Now K 1 round AT THE SAME TIME inc 24-24-23-23-27 sts evenly = 116-116-120-120-128 sts. P 18-18-19-19-21, insert 1st marker here (= this is now beg of round), A.2, P 2, A.2, P 2, A.1, insert 2nd marker here, A.2, P 0-0-1-1-3, A.3, P 0-0-1-1-3, A.1, insert 3rd marker here, A.2, P 2, A.2, P 2, A.1, insert 4th marker here, A.2, P 0-0-1-1-3, A.3, P 0-0-1-1-3, A.1. READ THE NEXT 2 SECTIONS BEFORE CONTINUING! REMEMBER THE GAUGE! On next round beg inc for RAGLAN – see explanation above, AT THE SAME TIME work pattern as follows: RAGLAN: Repeat inc every round 0-2-10-20-20 times in total. Then inc every other round 23-32-30-26-27 times and every 3rd round 6-0-0-0-0 times = 348-388-440-488-504 sts. PATTERN: Work pattern on body as follows (P the inc sts on sleeves): Work the first 6 sts inc in A.2, then P next 8-9-7-8-8 inc sts, work the next 6 inc sts in A.2, P the next 8-9-7-8-8 inc sts. NOTE: (Size M-L-XL-XXL): When A.3 has been worked 1 time vertically, continue with A.2 over cable and P the remaining sts from A.3 until start of body. S/M: Then inc as before on sleeve and inc inside A.1/A.2 (i.e. between A.1 and A.2, towards marker for raglan) on front and back piece 1-4 more times. P the new sts. L/XL/XXL: Continue with A.2 over the next 6 inc sts, P the next 7-8-8 inc sts, then inc as before on sleeve and inc inside A.1/A.2 (i.e. between A.1 and A.2, towards marker for raglan) on front and back piece 1-4-5 more times. P the last 1-4-5 inc sts. Piece now measures 27-28-29-30-31 cm / 10½"-11"-11½"-11 3/4"-12 1/4" from shoulder. Now work as follows: Slip the first 80-90-102-114-116 sts on a stitch holder for sleeve, cast on 12 new sts under sleeve, insert a blue marker in the middle of these new sts, work the next 94-104-118-130-136 sts (= front piece), slip the next 80-90-102-114-116 sts on a stitch holder for sleeve, cast on 12 new sts under sleeve, insert a blue marker in the middle of these new sts, work the remaining 94-104-118-130-136 sts on round (= back piece). NOW MEASURE THE PIECE FROM HERE. BODY: There are now 212-232-260-284-296 sts for body. Then continue pattern as follows: S/M: P 6-3, * A.2 0-1 time in width, P 7-7, A.2, P 8-9, insert a marker, A.2, P 8-9, insert a marker, A.2, P 9-9, A.2, P 9-9, A.2, insert a marker, P 8-9, A.2, insert a marker, P 8-9, A.1*, P 7-7, repeat from *-* 1 more time, P 1-4 L/XL/XXL: P 3-3-0, * A.2 1-1-2 times in width, P 4-6-5, A.2, P 7-8-8, insert a marker, A.2, P 7-8-8, insert a marker, A.2, P 7-8-8, insert a marker, A.2, P 10-11-12, A.2, P 10-11-12, A.2, insert a marker, P 7-8-8, A.2, insert a marker, P 7-8-8, A.2, insert a marker, P 7-8-8, A.1 *, P 4-6-5, repeat from *-* 1 more time, P 1-3-5. READ THE NEXT 2 SECTIONS BEFORE CONTINUING! Now dec and inc at the same time as follows: DECREASE: Dec differently as follows - READ DECREASE TIP: Dec 1 st on each side of the middle cable on front and back piece. Repeat dec every 2-2-1½-1½-1½ cm / ½"-½"-½"-3/4"-3/4" 3-3-4-4-6 more times. AT THE SAME TIME dec 1 st towards cable in every section with P sts with marker in (= 8-8-12-12-12 markers). Repeat dec every 3-2½-5-4-4 cm / 1 1/8"-7/8"-2"-1½"-1½" 2-3-1-2-2 more times. INCREASE (towards the sides): When piece measures 3 cm / 1'', inc along the cable towards the sleeve (i.e. cable from raglan) in P section towards the sides – READ INCREASE TIP! Inc 4 sts on round. Repeat inc every 1½-1½-2½-1½-1 cm / ½"-½"-7/8"-½"-3/8" 3-4-2-4-10 more times. When all dec and inc are done, 188-204-228-248-276 sts remain. When piece measures 11-12-12-13-14 cm / 4½"-4 3/4"-4 3/4"-5"-5½", work pattern as follows: P 6-3-6-6-0, A.2 0-1-1-1-2 times in width, P 7-8-6-11-15, A.4 0-0-1-1-1 time in width, * A.5, A.4 *, repeat from *-* 2-2-3-3-3 more times in width, A.5 1-1-0-0-0 times in width, P 7-8-6-11-15, A.2 0-1-1-1-2 times in width, P 7-8-6-11-15, A.4 0-0-1-1-1 time in width, * A.5, A.4 *, repeat from *-* 2-2-3-3-3 more times in width, A.5 1-1-0-0-0 times in width, P 1-5-0-5-15. NOTE: Adjust the first cable in A.4 and A.5 to get a nice transition between diagrams. Continue with pattern and inc according to diagram. When A.4 and A.5 have been worked vertically and piece measures approx. 33-34-34-35-35 cm / 13"-13½"-13½"-13 3/4"-13 3/4", there are 308-324-364-384-412 sts on round. Insert a marker here. NOW MEASURE THE PIECE FROM HERE. Now work rib as follows: S/M: * Work K over K and P over P until 7-11 sts remain before the blue marker in the side, P 2, K 2, P 3-4 *, repeat from *-* 1 more time and continue with K over K and P over P the rest of round. L/XL/XXL: * Work K over K and P over P until 8-14-21 sts remain before the blue marker in the side, K 2-2-2, P 3-4-3, K 0-2-2, P 0-3-3, K 0-0-2, P 0-0-3 *, repeat from *-* 1 more time and continue with K over K and P over P the rest of round. When rib has been worked for 2 cm / 3/4'' from marker, inc by making 1 YO before first P st in every P section - remember INCREASE TIP. When rib has been worked for 5-5-6-6-6 cm / 2"-2"-2½"-2½"-2½", bind off with K over K and P over P. SLEEVES: Slip the 80-90-102-114-116 sts from stitch holder back on circular needle. K 1 row over all sts and cast on 12 new sts at the end of row = 92-102-114-126-128 sts. Insert a marker in the middle of the new sts (i.e. 6 sts on each side of marker). NOW MEASURE THE PIECE FROM HERE. Then work sleeve in the round on circular needle/double pointed needles. Continue the middle cable on sleeve as before but work P over cables in raglan. On 2nd round beg dec on each side of marker - READ DECREASE TIP. Repeat dec in every other round 6 more times = 78-88-100-112-114 sts. Then dec 1 st on each side of marker every 2-1½-1-1-1 cm / 3/4"-½"-3/8"-3/8"-3/8" 13-17-22-27-27 times = 52-54-56-58-60 sts. AT THE SAME TIME when piece measures 15 cm / 6'', work A.5 over cable in the middle of sleeve - adjust the first cable in A.5 to get a nice transition between diagrams. NOTE: Do not inc in A.5 on sleeve, i.e. do not work YOs in diagram. When A.5 is finished and sleeve measures 37 cm / 14½'', work rib as follows from marker at beg of round: P 0-0-1-2-3, K 1-2-2-2-2, P 3, K 2, P 3, K 2, P 2, continue rib as on last row in A.5 (= 26 sts), P 2, K 2, P 3, K 2, P 3, K 1-2-2-2-2, P 0-0-1-2-3. Continue like this for 3 cm / 1'', bind off with K over K and P over P. ASSEMBLY: Sew the holes under the sleeves. |
||||||||||||||||||||||||||||
Diagram explanations |
||||||||||||||||||||||||||||
|
||||||||||||||||||||||||||||
|
||||||||||||||||||||||||||||
|
||||||||||||||||||||||||||||
|
||||||||||||||||||||||||||||
|
Have you made this or any other of our designs? Tag your pictures in social media with #dropsdesign so we can see them! Do you need help with this pattern?You'll find tutorial videos, a Comments/Questions area and more by visiting the pattern on garnstudio.com. © 1982-2024 DROPS Design A/S. We reserve all rights. This document, including all its sub-sections, has copyrights. Read more about what you can do with our patterns at the bottom of each pattern on our site. |
||||||||||||||||||||||||||||


With over 40 years in knitting and crochet design, DROPS Design offers one of the most extensive collections of free patterns on the internet - translated to 17 languages. As of today we count 304 catalogs and 11422 patterns - 11417 of which are translated into English (US/in).
We work hard to bring you the best knitting and crochet have to offer, inspiration and advice as well as great quality yarns at incredible prices! Would you like to use our patterns for other than personal use? You can read what you are allowed to do in the Copyright text at the bottom of all our patterns. Happy crafting!
Comments / Questions (218)
Jeg ville elske en udvidelse af denne her til kjole med bred vidde i bunden :)
13.11.2023 - 13:10I am having difficulty figuring where to do the YOs on the raglan set-up row. Would it be possible for you to write out that row for me, please.
09.11.2023 - 17:05DROPS Design answered:
Dear Beth, the yarn overs worked as increases for raglan are made on each side of each A.1 or A.2 as follows: work until A.1/A.2, make 1 yarn over, work A.1/A.2 as before following diagram, make 1 yarn over = you will increase 2 sts at each A.1/A.2 and a total of 8 sts on the round. Happy knitting!
10.11.2023 - 09:09I'm having a problem understanding the following: L/XL/XXL: Continue with A.2 over the next 6 inc sts, P the next 7-8-8 inc sts, then inc as before on sleeve & inc inside A.1/A.2 (i.e. between A.1 & A.2, towards marker for raglan) on front & back piece 1-4-5 more times. P the last 1-4-5 inc sts. I'm making XXL. Where am I increasing? How many increases are on this round? Is this only done on 1 round? If I have 504 sts already how many sts will I have after this round?
08.10.2023 - 08:32DROPS Design answered:
Dear Carol, the RAGLAN and PATTERN sections are worked at the same time. So you should be working the increases stated in RAGLAN for the sleeves and A.1/A.2 and the pattern indicated here. Therefore, you will have 20 rounds with increases = 504 stitches. The increases are worked as stated in RAGLAN in explanations for the pattern: increase by making 1 yarn over on each side of the raglan sts, so 8 increases on the round. After working all 20 rounds, you will have 504 sts. Happy knitting!
09.10.2023 - 00:04J'ai l'habitude des patrons compliqués. Mais ici je ne comprends pas dès le raglan. Je ne comprends pas où faire les augmentations, j'ai essayé de schématiser mais je suis complètement perdue.
03.10.2023 - 19:52Has anyone ever made this sweater? the English pattern is near impossible,l designed sweaters many years ago, when I had wool shops and worked with a designer.In my opinion full graphs,would be beneficial,for all different countries. Please reply.
03.08.2023 - 16:57DROPS Design answered:
Dear Anne, this pattern is only available as a combination of graphs and written instructions. If you have difficulties following the written instructions, please indicate to us which section is confusing for you and we will try to clarify it. Happy knitting!
06.08.2023 - 19:30I am making size XL. I am having difficulty with the Body. I have moved the sleeve stitches to a holder and have added the 12 stitches twice for a totally of 284 stitches. I do not understand the next instruction. Where do I start this row as nothing lines up with the existing cables.
19.04.2023 - 17:55DROPS Design answered:
Dear Ali Christensen! Start body from one side and continue with small cables A.2 and A.1 as before. Hope it helps! Happy knitting!
06.06.2023 - 16:31Existe t il le modèle alana expliqué pour 2 aiguilles? Merci
20.02.2023 - 14:25DROPS Design answered:
Bonjour Mme Akcalde, nos modèles ne sont toujours disponibles qu'en une seule version, et, en l'occurrence, on tricote ici en rond, de haut en bas. Bon tricot!
20.02.2023 - 14:44I need clarification of how many stiches from the beginning of the round is the mid back to work the elevation starting in the fourth round at the beginning of the pattern?
08.01.2023 - 22:51DROPS Design answered:
Dear Mari, the short rows for the elevation on back piece are worked from mid back, this means you will work on first row 5-5-7-7-9 sts from RS and on 2nd row 10-10-14-14-18 sts from WS. Work the number of sts stated for your size, you will work a total of 8 rows (4 from RS + 4 from WS) then turn and work from RS until mid back - increase then evenly and work 18 to 21 sts (see size) to displace the beg. of the rounds before the raglan stitches. Happy knitting!
09.01.2023 - 10:38Wat een prachtige trui! Ik kom 21 steken tekort, bij maat XXL. Precies het getal van die eerste 21steken averecht. Wat is de functie van die 21 steken ? Als ik alles brei zoals het geschreven staat in de nld waarin de markeerders geplaatst worden, kom ik telkens weer uit op 149steken. Wat doe ik verkeerd?
04.12.2022 - 21:10DROPS Design answered:
Dag Lieve,
Na het opzetten en breien van verkorte toeren, brei je 1 naald rechte waarbij je steken gelijkmatig mindert, zodat je uitkomt op 128 steken. Daarna brei je 21 steken averecht en dan plaats je op dat punt de markeerder. Vanaf nu is dit steeds het begin van de naald, maar je hebt nog steeds 128 steken op de naald. Je breit nu de telpatronen in de rondte zoals aangegeven in de beschrijving.
07.12.2022 - 20:45Bonjour, Pouvez vous m'expliquer pas à pas s'il vous plait:Tricoter en point fantaisie sur le devant et le dos ainsi (tricoter les augmentations des manches à l'env): Tricoter les 6 premières augmentations en A.2, tricoter ensuite à l'env les 8-9-7-8-8 augmentations suivantes, En vous remerciant pour votre compréhension et votre patience, Brigitte
31.10.2022 - 17:49DROPS Design answered:
Bonjour Brigitte, les augmentations des raglans se tricotent différemment sur les manches et le dos/le devant, celles des manches vont se tricoter en jersey envers, pour celles du dos/devant, vous allez élargir le point fantaisie, autrement dit, les 5 premières augmentations vont se tricoter progressivement en A.2 (= la 1ère à l'env, les 4 suivantes à l'end et la dernière à l'env), on a ainsi 2 torsades A.2 en plus de chaque côté des raglans dos/devant; tricotez ensuite les 7, 8 ou 9 suivantes (cf taille) en jersey envers. Bon tricot!
01.11.2022 - 10:16