DROPS Highlander
DROPS Highlander
90% Wool, 10% Nylon
Discontinued
find alternatives
DROPS SS24
DROPS 72-2
Sizes: S - M - L - XL
Finished measurements: 102-112-120-128 cm

Materials: DROPS HIGHLANDER
(alternative SNOW from Garnstudio)
500-550-600-650 g. col. no. 02, brown.

DROPS 9 mm needles, or size needed to obtain correct gauge.

-------------------------------------------------------

Alternative Yarn – See how to change yarns here
Yarn Groups A to F – Use the same pattern and change the yarn here
Yarn usage using an alternative yarn – Use our yarn converter here

-------------------------------------------------------

DROPS Highlander
DROPS Highlander
90% Wool, 10% Nylon
Discontinued
find alternatives

Pattern instructions

NOTE: This pattern is written in British English. All measurements in charts are in cm. For conversion from cm to inches - click here. There are different terms for crocheting in British and American English. If this pattern includes crochet, click for "crochet terms" here. For this pattern in American English, please click here.
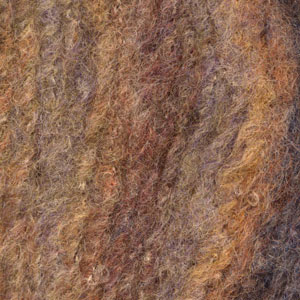
Gauge: 9 sts x 14 rows in stockinette st = 10 x 10 cm

Garter st, when knitting flat: Knit all sts, all rows.

Decreasing tips (for neck):
All decs are made on right side rows inside 9 edge sts in garter st and increased collar sts as follows:
After edge sts + collar sts: sl 1, K 1, psso.
Before edge sts + collar sts: K 2 tog.

Back: Cast on 48-52-56-60 sts. Knit 10 rows garter st, change to stockinette st. When the piece measures 48-50-51-52 cm bind off for armhole at each side every other row: 3 sts 1-1-1-1 time, 2 sts 0-1-1-2 times and 1 st 4-3-5-4 times = 34-36-36-38 sts. When the piece measures 68-70-72-74 cm bind off the center 10-12-12-12 sts for the neck. Dec 1 st at each neck edge on the next row = 11-11-11-12 sts remain on each shoulder. Bind off when the piece measures 70-72-74-76 cm.

Left front: Cast on 29-31-33-35 sts. Knit 10 rows garter st, change to stockinette st, but keep the 9 edge sts at the front edge in garter st throughout.
Read the entire next section before knitting
Collar: When the piece measures 32-33-34-35 cm inc 1 st inside 1 edge st at the center front for collar - knit the increased sts in garter st. On the following 2 rows knit garter st over only the outermost 10 sts (short rows). Then knit 2 rows over all sts, then on the next row inc 1 st inside 1 edge st. On the following 2 rows knit garter st over only the outermost 10 sts (short rows). Then inc 1 st inside 1 edge st 6 times every other row then 6 times every 4 rows = 14 sts increased for collar.
Neck shaping: At the same time when the piece measures 36-37-38-39 cm shape the neck (continue to inc for collar – dec inside the 9 garter st button band sts + the collar sts - see knitting tips). Dec 1 st 6-7-7-7 times every other row and then 1 st 5-5-5-5 times every 4 row.
Armhole: At the same time when the piece measures 48-50-51-52 cm bind off for armhole at the side as on back. After neck and armhole shaping is complete continue with 2-2-2-3 sts stockinette st at the side and the remaining sts in garter st. When the piece measures 70-72-74-76 cm bind off the 11-11-11-12 shoulder sts. The 14 garter st collar sts remain on needles. Continue in garter st over these sts as follows: * 2 rows garter st over all sts, 2 rows garter st over only the outermost 10 sts (short rows) *, repeat from * - * until the collar measures approx. 7-8-8-8 cm (to center back). Put all sts on a st holder.

Right front: Cast on and knit the same as the left front, reversing all shaping.

Sleeve: Cast on 26-27-27-28 sts. Knit garter st for 14 cm . Change to stockinette st, and inc 1 st at each side every 5-5-4.5-3.5 cm cm 7-7-7-8 times = 40-41-41-44 sts. When sleeve measures 48-47-45-44 cm bind off for sleeve cap at each side every other row: 3 sts 1-1-1-0 time, 2 sts 2-1-1-1 times and 1 st 2-4-6-7 times, then bind off 2 sts at each side every other row until the piece measures 58 cm. Bind off the remaining sts.
Assembly: Sew shoulder seams. Weave the collar together at center back and sew the collar to neck. Sew in sleeves. Sew sleeve and side seams.

Belt: Cast on 7 sts and knit garter st for approx. 125 cm , or to desired length. Bind off.


VEST AND WRISTWARMERS IN ALPACA AND SILKE-TWEED:

Sizes: S - M - L - XL
Finished measurements:
Bust: 88-94-100-106 cm
Waist: 80-86-92-98 cm

Materials: DROPS ALPACA from Garnstudio
200-200-200-250 g. col. no. 401, brown.
50 - 50 - 50 - 50 g. col. no. 4400, dark plum.
and use: Garnstudio SILKE-TWEED from Garnstudio
50 - 50 - 50 - 50 g. col. no. 02, brown.
50 - 50 - 50 - 50 g. col. no. 09, flint.

DROPS 3.5 mm and 4.5 mm needles, or sizes needed to obtain correct gauge.

5 DROPS Coconut buttons, nr 516

Gauge: 21 sts x 40 rows on larger needles in garter st = 10 x 10 cm.

Garter st, when knitting flat: Knit all sts, all rows.

Pattern: See chart. The pattern is seen from the right side. 1 row of chart = 2 rows garter st.

Knitting tips (for armhole and neck):
In the instructions in this knitting tip numbers for armhole are in front of ( ); numbers for neck are in ( ). All decs are made on right side rows inside 4 (6) sts knit as follows from edge: 3 (5) sts garter st then P 1 (as seen from the right side – K this st on wrong side rows). These 4 (6) sts are knit in brown Alpaca throughout.
After 4 (6) edge sts: K 2 tog.
Before 4 (6) edge sts: sl 1, K 1, psso.

Back: Cast on 86-93-99-105 sts on smaller needles with brown Alpaca. Knit Pattern 1, and after 10 rows change to larger needles.
Read the entire next section before knitting:
After Pattern 1 knit Pattern 2, then Pattern 1 and Pattern 2 again, then knit garter st with brown Alpaca to finished measurements.
At the same time when the piece measures 6 cm inc 1 st at each side every 4-4-5-5 cm a total of 4 times = 94-101-107-113 sts.
At the same time when the piece measures 28-29-31-32 cm bind off 4-4-5-6 sts at each side for armhole. Then dec 1 st for armhole inside 4 edge sts every other row a total of 5-8-10-11 times - see knitting tips = 76-77-77-79 sts. After all shaping is complete, continue to knit 4 edge sts at each side as explained under decreasing tips.
Read the entire next section before knitting
When the piece measures 48-50-52-54 cm bind off the center 24-25-25-27 sts for the neck. Then dec 1 st at each neck edge inside 6 edge sts every other row 2 times - see knitting tips. At the same time when the piece measures 48-50-52-54 cm bind off 6 sts from side edge every other row 4 times for shoulder. When all sts are bound off the piece measures approx. 50-52-54-56 cm

Left front: Cast on 48-52-55-58 sts on smaller needles with brown Alpaca. Knit Pattern 1, but knit the 6 button band sts with brown Alpaca as follows (from center front edge): 5 sts garter st, P 1 (seen from the right side – K this st on wrong side rows). After 10 rows change to larger needles. Continue with the pattern – after Pattern 1 knit Pattern 2, then Pattern 1 and Pattern 2 again, then knit garter st with brown Alpaca to finished measurements.
When the piece measures 6 cm inc at the side as on back = 52-56-59-62 sts. When the piece measures 28-29-31-32 cm bind off for armhole at the side as on back = 43-44-44-45 sts. When the piece measures 31-32-34-35 cm dec 1 st at neck edge inside 6 sts – see knitting tips – every other row: 11-12-12-12 times then every 4 rows: 8-8-8-9 times = 24 sts remain on each shoulder. When the piece measures 48-50-52-54 cm bind off for shoulder as on back. When all sts are bound off the piece measures approx. 50-52-54-56 cm .

Right front: Cast on and knit the same as the left,
reversing all shaping. Make buttonholes on button bands (1 buttonhole = bind off the 4th st from edge and on the next row yo over the bound off st).
Make buttonholes when the piece measures:
Size S: 4, 11, 17, 24 and 30 cm

Size M: 5, 12, 18, 25 and 31 cm

Size L: 5, 12, 19, 26 and 33 cm

Size XL: 4, 12, 19, 27 and 34 cm


Assembly: Sew side and shoulder seams. Sew on buttons.

Wristwarmers: Cast on 38 sts on larger needles with brown Alpaca. Knit Pattern 3 until piece measures approx. 18 cm (to fit around wrist), bind off. Sew cast-on and bound-off edges together.

Diagram

symbols = brown Alpaca
symbols = dark plum Alpaca
symbols = brown Silke-Tweed
symbols = flint Silke-Tweed
diagram
diagram
diagram

Each of our patterns has specific tutorial videos to help you.

Do you have a question? See a list of frequently asked questions (FAQ)

Knitting tension is what determines the final measurements of your work, and is usually measured per 10 x 10 cm. It is provided like so: number of stitches in width x number of rows in height - eg: 19 stitches x 26 rows = 10 x 10 cm.

The knitting tension is very individual; some people knit/crochet loosely while others work tightly. You adjust the knitting tension with the needle size, which is why the suggested needle size is only meant as a guide! You need to adjust this (up or down) to ensure that YOUR knitting tension matches the knitting tension provided in the pattern. If you work with a different knitting tension than provided you will have a different yarn consumption, and your work will have different measurements than what the pattern suggests.

The knitting tension also determines which yarns can replace each other. As long as you achieve the same knitting tension you can replace one yarn with another.

See DROPS lesson: How to measure your tension/gauge

See DROPS video: How to make a gauge tension swatch

The required amount of yarn is provided in grams, eg: 450 g. To calculate how many balls you’ll need you first need to know how many grams are in 1 ball (25g, 50g or 100g). This information is available if you click on the individual yarn quality on our pages. Divide the amount required with the amount of each ball. For example, if each ball is 50g (the most common amount), the calculation will be as follows: 450 / 50 = 9 balls.

The important thing when changing from one yarn to another is that the knitting/crochet tension remains the same. This is so that the measurements of the finished piece will be the same as on the sketch provided. It is easier to achieve the same knitting tension using yarns from the same yarn group. It is also possible to work with multiple strands of a thinner yarn to achieve the knitting tension of a thicker one. Please try our yarn converter. We recommend you to always work a test swatch.

Please NOTE: when changing yarn the garment might have a different look and feel to the garment in the photo, due to individual properties and qualities of each yarn.

See DROPS lesson: Can I use a different yarn than the one mentioned in the pattern?

All our yarns are categorised into yarn groups (from A to F) according to thickness and knitting tension – group A contains the thinnest yarns and group F the thickest. This makes it easier for you to find alternative yarns to our patterns, should you wish to switch yarn. All yarns within the same group have a similar knitting tension and can easily replace each other. However, different yarn qualities have different structures and properties which will give the finished work a unique look and feel.

Click here for an overview of the yarns in each yarn group

At the top of all our patterns you’ll find a link to our yarn calculator, which is a helpful tool should you wish to use a different yarn than suggested. By filling in the yarn quality you wish to replace, the amount (in your size) and number of strands, the calculator will present good alternative yarns with the same knitting tension. Additionally it will tell you how much you’ll require in the new qualities and whether you’ll need to work with multiple strands. Most skeins are 50g (some are 25g or 100g).

If the pattern is worked with multiple colours, every colour will have to be calculated separately. Similarly, if the pattern is worked with several strands of different yarns (for example 1 strand Alpaca and 1 strand Kid-Silk) you will have to find alternatives for each, individually.

Click here to see our yarn calculator

Since different yarns have different qualities and textures we have chosen to keep the original yarn in our patterns. However, you can easily find options among our available qualities by using our yarn calculator, or simply pick a yarn from the same yarn group.

It is possible that some retailers still have discontinued yarns in stock, or that someone has a few skeins at home that they would like to find patterns for.

The yarn calculator will provide both alternative yarn as well as required amount in the new quality.

If you think it's hard to decide what size to make, it can be a good idea to measure a garment you own already and like the size of. Then you can pick the size by comparing those measures with the ones available in the pattern's size chart.

You'll find the size chart at the bottom of the pattern.

See DROPS lesson: How to read size chart

The needle size provided in the pattern serves only as a guide, the important thing is to follow the knitting tension. And since knitting tension is very individual, you will have to adjust the needle size to ensure that YOUR tension is the same as in the pattern – maybe you’ll have to adjust 1, or even 2 needle sizes, up or down to achieve the correct tension. For this, we recommend that you work test swatches.

Should you work with a different knitting tension than the one provided, the measurements of the finished garment might deviate from the measurement sketch.

See DROPS lesson: How to measure your tension/gauge

See DROPS video: How to make a tension/gauge swatch

Working a garment top-down provides more flexibility and room for personal adjustment. For example it is easier to try the garment on while working, as well as making adjustments to length of yoke and shoulder caps.

The instructions are carefully explaining every step, in the correct order. Diagrams are adjusted to the knitting direction and are worked as usual.

The diagram depicts all rows/rounds, and every stitch seen from the right side. It is read from bottom to top, from right to left. 1 square = 1 stitch.

When working back and forth, every other row is worked from the right side and every other row is worked from the wrong side. When working from the wrong side, the diagram will have to be worked reversed: from left to right, knit stitches are purled, purl stitches are knit etc.

When working in the round every round is worked from the right side and the diagram are worked from right to left on all rounds.

See DROPS lesson: How to read knitting diagrams

The diagram depicts all rows/rounds, and every stitch seen from the right side. It is worked from bottom to top, from right to left.

When working back and forth every other row is worked from the right side: from right to left and every other row is worked from the wrong side: from left to right.

When working in the round, every row in the diagram are worked from the right side, from right to left.

When working a circular diagram you start in the middle and work your way outwards, counter clockwise, row by row.

The rows usually start with a given number of chain stitches (equivalent to the height of the following stitch), this will either be depicted in the diagram or explained in the pattern.

See DROPS lesson: How to read crochet diagrams

Instructions for working several diagrams after each other on the same row/round, will often be written like so: “work A.1, A.2, A.3 a total of 0-0-2-3-4 times". This means you work A.1 once, then A.2 is worked once, and A.3 is repeated (in width) the number of times provided for your size – in this case like so: S = 0 times, M = 0 times, L=2 times, XL= 3 times and XXL = 4 times.

The diagrams are worked as usual: begin with the first row in A.1, then work the first row in A.2 etc.

See DROPS lesson: How to read knitting diagrams

See DROPS lesson: How to read crochet diagrams

The total width of the garment (from wrist-to-wrist) will be larger in the larger sizes, despite the actual sleeves being shorter. The larger sizes have longer sleeve caps and wider shoulders, so there will be a good fit in all sizes.

The measurement sketch/schematic drawing provides information regarding the full length of the garment. If it’s a jumper or a jacket the length is measured from the highest point on the shoulder closest to the neckline, and straight down to the bottom of the garment. It is NOT measured from the tip of shoulder. Similarly, the length of yoke is measured from the highest point on the shoulder and down to where yoke is split into body and sleeves.

On a jacket measures are never taken along bands, unless specifically stated. Always measure inside band stitches when measuring the length.

See DROPS lesson: How to read a schematic drawing

Diagrams are often repeated on the round or in height. 1 repeat is the diagram the way it appears in the pattern. If it says to work 5 repeats of A.1 in the round, then you work A.1 a total of 5 times after/next to each other in the round. If it says to work 2 repeats of A.1 vertically/in height you work the entire diagram once, then begin again at the start and work the entire diagram one more time.

Chain stitches are slightly narrower than other stitches and to avoid working the cast-on edge too tight, we simply chain more stitches to begin with. The stitch count will be adjusted on the following row to fit the pattern and measurement sketch.

The rib edge is more elastic and will contract slightly compared to, for example, stocking stitch. By increasing before the rib edge, you avoid a visible difference in width between the rib edge and the rest of the body.

It’s very easy to cast off too tightly, and by making yarn overs while casting off (and simultaneously casting these off) you avoid a too tight cast off edge.

See DROPS video: How to bind off with yarn overs (yo)

To achieve an even increase (or decrease) you can increase on, for example: every 3rd and 4th row alternately, like so: work 2 rows and increase on the 3rd row, work 3 rows and increase on the 4th. Repeat this until the increase is complete.

See DROPS lesson: Increase or decrease 1 st on every 3rd and 4th row alternately

Should you prefer to work in the round instead of back and forth, you may of course adjust the pattern. You’ll need to add steeks mid-front (usually 5 stitches), and follow the instructions. When you would normally turn and work from the wrong side, simply work across the steek and continue in the round. At the end you’ll cut the piece open, pick up stitches to work bands, and cover the cut edges.

See DROPS video: How to knit steeks and cut open

Should you prefer to work back and forth instead of in the round, you may of course adjust the pattern so you work the pieces separately and then assemble them at the end. Divide the stitches for the body in 2, add 1 edge stitch in each side (for sewing) and work the front and back pieces separately.

See DROPS lesson: Can I adapt a pattern for circular needles into straight needles?

Pattern repeats can vary slightly in the different sizes, in order to get the correct proportions. If you’re not working the exact same size as the garment in the photo, yours might deviate slightly. This has been carefully developed and adjusted so that the complete impression of the garment is the same in all sizes.

Make sure to follow instructions and diagrams for your size!

If you have found a pattern you like which is available in women’s size it’s not very difficult to convert it to men’s size. The biggest difference will be the length of sleeves and body. Start working on the women size that you think would fit across the chest. The additional length will be worked right before you cast off for the armhole/sleeve cap. If the pattern is worked top-down you can add the length right after the armhole or before the first decrease on sleeve.

Regarding additional yarn amount, this will depend on how much length you add, but it is better with a skein too many than too few.

All yarns will have excess fibres (from production) that might come off as lint or shedding. Brushed yarns (ie hairier yarns) have more of these loose, excess fibres, causing more shedding.

Shedding also depends on what is worn under or over the garment, and whether this pulls at the yarn fibres. It’s therefore not possible to guarantee that there will be no shedding

Below are some tips on how to get the best result when working with hairier yarns:

1. When the garment is finished (before you wash it) shake it vigorously so the looser hairs come off. NOTE: do NOT use a lint roller, brush or any method that pulls at the yarn.

2. Place the garment in a plastic bag and put it in your freezer - the temperature will cause the fibres to become less attached to each other, and excess fibres will come off easier.

3. Leave in the freezer for a few hours before taking it out and shaking it again.

4. Wash the garment according to the instructions on the yarn label.

Pilling is a natural process that happens to even the most exclusive of fibers. It's a natural sign of wear and tear that is hard to avoid, and that is most visible in high friction areas of your garment like a sweater's arms and cuffs.

You can make your garment look as new by removing the pilling, using a fabric comb or a pill/lint remover.

Still can't find the answer you need? Then scroll down and leave your question so one of our experts can try to help you. This will be done normally within 5 to 10 working days.
In the meantime, you can read the questions and answers that others have left to this pattern or join the DROPS Workshop on Facebook to get help from fellow knitters/crocheters!

Post a comment to pattern DROPS 72-2

We would love to hear what you have to say about this pattern!

If you want to leave a question, please make sure you select the correct category in the form below, to speed up the answering process. Required fields are marked *.