
Popular categories
Looking for a yarn?


|
|
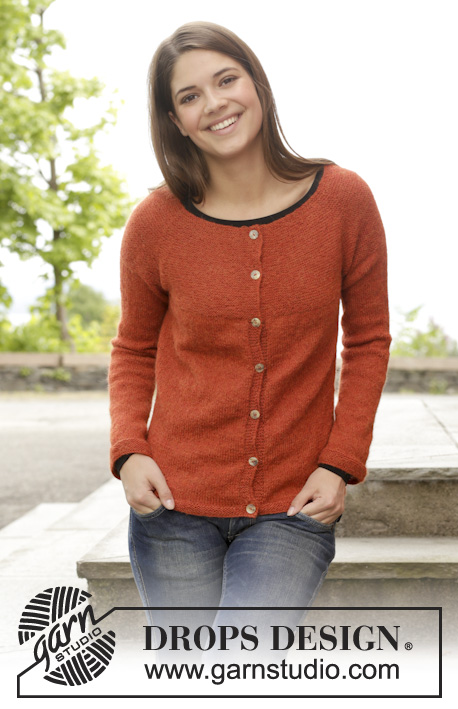
Take It Easy |
|
 |
 |
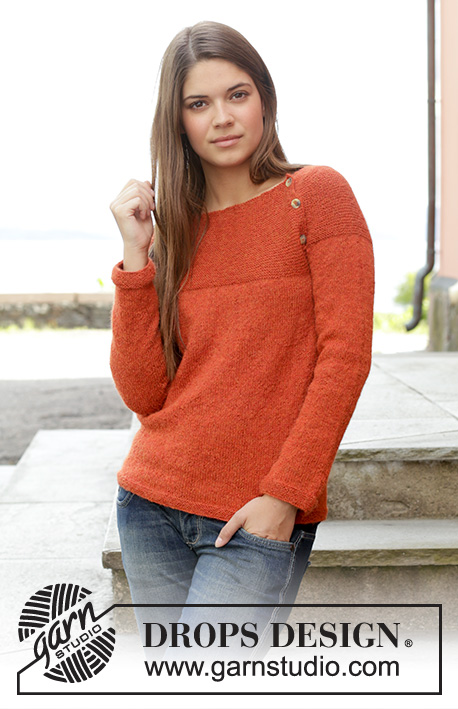
Knitted DROPS jumper in garter st with round yoke, worked top down in "Alpaca". Size: S - XXXL.
DROPS 158-3 |
|
|
GARTER ST (back and forth on needle): K all rows. 1 ridge = K2 rows. GARTER ST (in the round on circular needle/double pointed needles): * K 1 round and P 1 round *, repeat from *-*. 1 ridge = 2 rounds. INCREASE TIP: Inc 1 st by making a YO. On next row K YO twisted (i.e. work in back loop of st instead of front) to avoid holes. DECREASE TIP: Dec 1 st before marker as follows: Work until 2 sts remain before marker, slip 1 st as if to K, K 1, psso. Dec 1 st after marker as follows: K 2 tog. BUTTONHOLES: Dec for buttonholes in band sts on left shoulder. 1 buttonhole = K tog third and fourth st from edge and make 1 YO. Dec for buttonholes when piece measures (measured from cast-on edge): SIZE S: 1, 8 and 15 cm / 3/8",3 1/8, 6'' SIZE M: 1, 9 and 17 cm / 3/8", 3½", 6 3/4" SIZE L: 1, 9 and 17 cm / 3/8", 3½", 6 3/4" SIZE XL: 1, 7, 13 and 19 cm / 3/8", 2 3/4", 5 1/8", 7½" SIZE XXL: 1, 8, 15 and 22 cm / 3/8", 3 1/8", 6", 8 3/4" SIZE XXXL: 1, 8, 15 and 22 cm / 3/8", 3 1/8", 6", 8 3/4" ---------------------------------------------------------- JUMPER: The piece is worked top down. YOKE: Worked back and forth on circular needle. Cast on 114-118-122-126-130-134 sts (includes 6 band sts in one side of piece) on circular needle size 3 mm / US 2.5 with Alpaca. Work 1 ridge in GARTER ST - see explanation above. Insert 8 markers in piece from RS as follows: K 6, insert 1st marker, K 20 (= sleeve), insert 2nd marker, K 5, insert 3rd marker, K 24-26-28-30-32-34 (= back piece), insert 4th marker, K 5, insert 5th marker, K 20 (= sleeve), insert 6th marker, K 5, insert 7th marker, K 23-25-27-29-31-33, insert 8th marker, finish with K 6 band sts (= front piece). REMEMBER THE GAUGE! Now work piece in garter st. Remember BUTTONHOLES - see explanation above. Then inc 1 st – READ INCREASE TIP, after 1st-3rd-5th and 7th marker and before 2nd-4th-6th and 8th marker (= 8 sts inc). Repeat inc every 4th row 20-22-23-24-26-28 more times. AT THE SAME TIME when piece measures 4-3-2-2-2-1½ cm / 1½"-1 1/8"-3/4"-3/4"-3/4"-½", inc as follows: Inc 4 sts evenly on back piece, 1 st on each sleeve and 4 sts evenly on front piece (= 10 sts inc). Repeat inc every 4-3-2-2-2-1½ cm / 1½"-1 1/8"-3/4"-3/4"-3/4"-½" 3-5-7-9-9-11 more times. When all inc are done there are 322-362-394-426-446-486 sts on needle. Piece measures approx. 18-19-20-21-23-24 cm / 7"-7½"-8"-8 1/4"-9"-9½". Work next row as follows from RS: bind off the first 6 sts, slip the next 66-72-76-80-84-90 sts on a stitch holder for sleeve, cast on 10-10-10-12-12-12 new sts, insert 1 marker in the middle of the new sts, K 92-106-118-130-136-150 sts, slip the next 66-72-76-80-84-90 sts on a stitch holder for sleeve, cast on 10-10-10-12-12-12 new sts, insert 1 marker in the middle of the new sts, work the next 92-106-118-130-136-150 sts = 204-232-256-284-296-324 sts. NOW MEASURE PIECE FROM HERE! BODY: Work piece in the round on circular needle in stockinette st. When piece measures 4 cm / 1½'', dec 1 st on each side of markers in the side - READ DECREASE TIP (= 4 sts dec). Repeat dec every 8-4-4-3-7-10 cm / 3 1/8"-1½"-1½"-1 1/8"-2 3/4"-4'' 3-6-7-9-4-3 more times = 188-204-224-244-276-308 sts. When piece measures 36-37-38-39-39-40 cm / 14 1/4"-14½"-15"-15 1/4"-15 1/4"-15 3/4", switch to circular needle size 2.5 mm / US 1.5. Work 5 ridges–see explanations above. Bind off. SLEEVE: Worked in the round on double pointed needles. Slip the 66-72-76-80-84-90 sts from stitch holder back on double pointed needles size 3 mm / US 2.5. Cast on 10-10-10-12-12-12 new sts under sleeve, insert 1 marker in the middle of the new sts = 76-82-86-92-96-102 sts. Work in stockinette st. When piece measures 4 cm / 1½'', dec 1 st on each side of marker. Repeat dec every 4-3-2½-2-2-1½ cm / 1½"-1 1/8"-7/8"-3/4"-3/4"-½" 9-12-13-15-16-18 more times = 56-56-58-60-62-64 sts. Work in stockinette st until piece measures 44-44-43-43-42-42 cm / 17 1/4"-17 1/4"-17"-17"-16½"-16½". Switch to double pointed needles size 2.5 mm / US 1.5. Work in garter st. Bind off when piece measures 47-47-46-46-45-45 cm / 18½"-18½"-18"-18"-17 3/4"-17 3/4" (shorter measurements in the larger sizes because of wider shoulders). Work the other sleeve the same way. ASSEMBLY: Sew tog under sleeves. Place band on the back of yoke and fasten. Sew on buttons. |
|

|
|
|
Have you made this or any other of our designs? Tag your pictures in social media with #dropsdesign so we can see them! Do you need help with this pattern?You'll find tutorial videos, a Comments/Questions area and more by visiting the pattern on garnstudio.com. © 1982-2024 DROPS Design A/S. We reserve all rights. This document, including all its sub-sections, has copyrights. Read more about what you can do with our patterns at the bottom of each pattern on our site. |
|


With over 40 years in knitting and crochet design, DROPS Design offers one of the most extensive collections of free patterns on the internet - translated to 17 languages. As of today we count 304 catalogs and 11422 patterns - 11417 of which are translated into English (US/in).
We work hard to bring you the best knitting and crochet have to offer, inspiration and advice as well as great quality yarns at incredible prices! Would you like to use our patterns for other than personal use? You can read what you are allowed to do in the Copyright text at the bottom of all our patterns. Happy crafting!
Comments / Questions (83)
Comment fait-on pour monter la patte de boutonage des 6 premières mailles, sur l'aiguille circulaire, de façon à pouvoir rabattre cette patte , sur les 6 autres mailles de l'empiècement, une fois l'empiècement terminé ? QUEL EST LE PROCEDE ?
03.08.2015 - 18:16DROPS Design answered:
Bonjour Mme Piffero, les 6 m de la patte de boutonnage sont rabattues au même rang où on glisse les mailles des manches en attente/on monte les mailles sous l'emmanchure. Quand le pull est terminé, on glisse ces 6 m sur l'envers de l'empiècement sous les 6 premières m de l'autre côté et on fait quelques points pour les fixer en bas. Bon tricot!
04.08.2015 - 08:54Jeg står fast. Skal begynne med bolen, og har begynt med å felle 6 masker, og sette 72 masker på tråd. (Strikker størrelse M). Men så skjønner jeg ikke hva jeg skal gjøre. Skal jeg klippe av tråden, som er ved de 6 maskene jeg felte? Og hvordan legger jeg opp 10 nye masker? Har prøvd å se instruksjonsvideoer om å legge opp midt i en strikking, men kan ikke finne ut av dette. Og skal merket sitte midt i de nye maskene?
03.08.2015 - 00:22DROPS Design answered:
Hej, jo sådan her legger du opp 10 nye m, inden du strikker videre ifølge opskriften.
Jeg får alt for mange masker når jeg laver strikkeprøven på pind nr. 3, jeg prøver nu på pind 4 og 4 1/2 men så er garnet meget tyndt til den pindstørrelse og trøjen vil næsten blive gennemsigtig.. Har i et godt alternativ til garn eller en anden løsning på dette problem?
20.07.2015 - 21:40DROPS Design answered:
Hej Katrine, DROPS Alpaca passer perfekt til pinde 3 og 24 m på 10 cm som der står i denne opskrift. God fornøjelse!
29.07.2015 - 13:05Overvidde på str.M, strikker denne i et garn der 22m er 10 cm, og i oppskrifta er det 24 m på 10 cm. hvordan får jeg dette til å bli rett.
22.05.2015 - 22:41DROPS Design answered:
Hej Berit, For at få målene som står i måleskitsen er du nødt til at bruge det rigtige garn eller et alternativ hvor 24 m måler 10 cm i bredden, ellers vil arbejdet blive alt for stort. God fornøjelse!
25.05.2015 - 10:02Ich möchte Größe S stricken, aber meine Maschenprobe stimmt nicht. Kann ich einfach den Maßen der XL folgen, mit kleineren Nadeln und dünnerem Garn, oder würde das zu einem anderen Ergebnis führen?
11.03.2015 - 21:39DROPS Design answered:
Antwort siehe unten! :-)
11.03.2015 - 21:46Ich möchte Größe S stricken, aber meine Maschenprobe stimmt nicht. Kann ich einfach den Maßen der XL folgen, mit kleineren Nadeln und dünnerem Garn, oder würde das zu einem anderen Ergebnis führen?
11.03.2015 - 21:39DROPS Design answered:
Antwort siehe unten! :-)
11.03.2015 - 21:46Ich möchte Größe S stricken, aber meine Maschenprobe stimmt nicht. Kann ich einfach den Maßen der XL folgen, mit kleineren Nadeln und dünnerem Garn, oder würde das zu einem anderen Ergebnis führen?
11.03.2015 - 21:33DROPS Design answered:
Zunächst möchte ich zurückfragen: Wie fällt denn Ihre Maschenprobe aus, wie sehr weicht sie ab und mit welcher Nadel haben Sie sie gestrickt? Grundsätzlich ist es möglich, die Angaben einer größeren Größe zu verwenden, wenn Sie damit die Maße für die kleinere Größe erreichen. Nur bei den cm-Angaben müssten Sie dann wieder die Maße für die kleinere Größe nehmen. Besser ist es aber, eine andere Nadelstärke zu nehmen und zu versuchen, damit die Maschenprobe zu erreichen, darum meine Eingangsfragen.
11.03.2015 - 21:46Als ik het lijf verder brei met rondbreinaald 2,5 mm en ik brei 5 ribbels en kant af, dan krult de ribbelrand om. Wat doe ik niet goed of heeft u tips om dit te voorkomen?
13.02.2015 - 08:05DROPS Design answered:
Hoi José. Je kan na het wassen de trui in vorm brengen en plat laten drogen. Meestal is het krullen van de randen dan weg. Als niet kan je de randen licht persen met een strijkijzer (met een theedoek tussen).
13.02.2015 - 17:08Strikker denne genseren i står M. Ifølge oppskrifta skal det då vere 362 m etter bærestykket, men eg får det berre til å bli 354. Kan dette stemme?
12.02.2015 - 15:15DROPS Design answered:
Hej Margunn, Str M: Du starter med 118 m, øger ved mærketrådene ialt 23 gange 8 = 184, herefter 10m x 6= 60 = 362m. God fornøjelse!
26.05.2015 - 16:00Hej, Jag är inte en jättevan stickare, så har lite svårt att tolka "Upprepa ökningen på vart 4:e v 20-22-23-24-26-28 ggr till". Betyder det: v. 1 ökning v. 2 vanligt v. 3 vanligt v. 4 ökning eller ska det ökas först på varv 5? Jag har nämligen gjort det sistnämnda, men hinner inte med alla 22 ökningsvarv (stl M) innan oket mäter 19 cm.
22.01.2015 - 18:48DROPS Design answered:
Hej Jennifer, jo du ökar på 1-5-9-13:e v 22 ggr. dvs ca 88 varv. Du har 48 varv på 10 cm när du stickar rätst, så du bör hinna med 22 ökningar. Kolla stickfastheten! Lycka till!
29.05.2015 - 13:23