DROPS Karisma
DROPS Karisma
100% Wool
from 2.30 £ /50g
Get the yarn to make this pattern from 20.70£.

The yarn cost is calculated from the pattern’s smallest size and the yarn’s cheapest product type. Looking for an even better price? You might find it on the DROPS Deals!

DROPS SS24

Grapevine

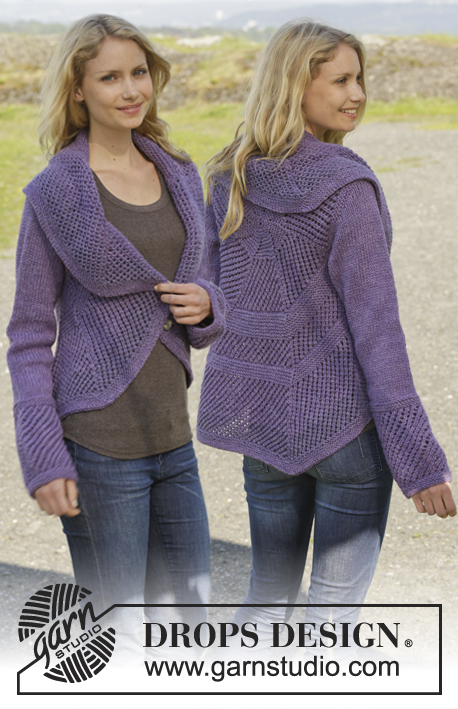
Knitted DROPS jumper or jacket with lace pattern and buttons on the back in ”Karisma” or "Belle". Size: S - XXXL.

DROPS 156-36
DROPS design: Pattern no u-746
Yarn group B
-----------------------------------------------------------
Size: S - M - L - XL - XXL - XXXL
Materials:
DROPS KARISMA from Garnstudio
450-500-550-600-700-750 g colour no 74, lavender

Or use:
DROPS BELLE from Garnstudio
400-450-500-500-600-650 g colour no 18, violet

DROPS CIRCULAR NEEDLE (60 cm) SIZE 4 mm - or size needed to get 21 sts x 28 rows in stocking st = 10 x 10 cm.
DROPS CIRCULAR NEEDLE SIZE 3.5 mm – for edges in garter st.
DROPS MOTHER-OF-PEARL BUTTON NO 522: 6 pieces for all sizes

-------------------------------------------------------

Alternative Yarn – See how to change yarns here
Yarn Groups A to F – Use the same pattern and change the yarn here
Yarn usage using an alternative yarn – Use our yarn converter here

-------------------------------------------------------

DROPS Karisma
DROPS Karisma
100% Wool
from 2.30 £ /50g
Get the yarn to make this pattern from 20.70£.

The yarn cost is calculated from the pattern’s smallest size and the yarn’s cheapest product type. Looking for an even better price? You might find it on the DROPS Deals!

Pattern instructions

NOTE: This pattern is written in British English. All measurements in charts are in cm. For conversion from cm to inches - click here. There are different terms for crocheting in British and American English. If this pattern includes crochet, click for "crochet terms" here. For this pattern in American English, please click here.
GARTER ST (back and forth on needle):
K all rows. 1 ridge = 2 rows K.

PATTERN:
See diagrams A.1 and A.2. The diagrams show all rows in pattern seen from RS.

DECREASE TIP:
Dec inside 1 edge st in garter st. All dec are done from RS!
Dec before 1 edge st as follows: K 2 tog.
Dec after 1 edge st as follows: Slip 1 st as if to K, K 1, psso.

INCREASE TIP:
All inc are done from RS.
Inc 1 st by making 1 YO, on next row P YO twisted (i.e. work in the back loop of st instead front) to avoid holes.

BUTTONHOLES:
Dec for buttonholes on right band. 1 buttonhole = K tog third and fourth st from edge and make 1 YO.
Dec for buttonholes when piece measures:
SIZE S: 2, 11, 20, 29, 37 and 45 cm.
SIZE M: 2, 11, 20, 29, 38 and 47 cm.
SIZE L: 4, 13, 22, 31, 40 and 49 cm.
SIZE XL: 4, 14, 23, 32, 41 and 50 cm.
SIZE XXL: 2, 12, 22, 32, 42 and 52 cm.
SIZE XXXL: 4, 14, 24, 34, 44 and 54 cm.
----------------------------------------------------------

JUMPER:
Worked back and forth in several pieces and sewn tog when finished. Garment can be turned and used as a jacket but is described as a jumper in pattern.

FRONT PIECE:
Cast on 102-110-120-130-144-156 sts (incl 1 edge st in each side) on circular needle size 3.5 mm with Karisma or Belle. Work 2 ridges in GARTER ST back and forth - see explanation above! Then switch to circular needle size 4 mm. Continue in stocking st with 1 edge st in garter st in each side. When piece measures 5 cm, dec in each side of piece - READ DECREASE TIP! Repeat dec every cm 7-7-8-8-8-8 more times = 86-94-102-112-126-138 sts. REMEMBER THE KNITTING TENSION!
Then inc in each side of piece and work pattern as follows: When piece measures 18-19-20-21-22-23 cm in total, inc 1 st inside 1 edge st in garter st - Read INCREASE TIP. Repeat inc every 3½ cm 3 more times = 94-102-110-120-134-146 sts. AT THE SAME TIME when piece measures 23-23-23-21-20-18 cm, work as follows from RS: 1 edge st in garter st, 2 sts in stocking st, A.2, stocking st until 10 sts remain, A.1, 2 sts in stocking st, 1 edge st in garter st. When A.1 and A.2 have been worked 1 time vertically, beg with 1 new repetition of A.2/A.1 inside 1 edge st in garter st and 2 sts in stocking st in the sides. Pattern (i.e. dec and YO) in repetitions will displace in towards middle of piece until it meets neck edge. NOTE: Repetitions are not worked over each other.
When piece measures 34-35-36-37-38-39 cm in total, dec 1 st in each side for armholes = 92-100-108-118-132-144 sts. Continue like this with displacement of pattern and beg 1 new repetition in the sides until a total of 4 repetitions A.1 have been started in left side and 4 repetitions A.2 in right side. When piece measures 45-47-49-50-52-54 cm, slip the middle 18-18-20-20-20-20 sts on a stitch holder for neck and finish each shoulder separately. Then cast off at beg of every row from neck: 3 sts 1 time, 2 sts 2 times and then 1 st 1-1-1-2-2-2 times = 29-33-36-41-47-53 sts remain for shoulder. Cast off when piece measures 52-54-56-58-60-62 cm. Work the other shoulder the same way.

LEFT BACK PIECE:
Cast on 56-60-65-70-77-83 sts (incl 1 edge st in garter st and 5 band sts in garter st) on circular needle size 3.5 mm with Karisma or Belle. Work 2 ridges. Then switch to circular needle size 4 mm and continue as follows from RS: 5 band sts in garter st, stocking st until 1 st remains, 1 edge st in garter st. Then dec in the side inside 1 edge st in garter st as on front piece. When all dec are done, there are 48-52-56-61-68-74 sts on needle.
Then inc in the side and work pattern as on front piece = 52-56-60-65-72-78 sts. NOTE: Work A.1 inside 2 sts in stocking st and 1 edge st in garter st. When piece measures 34-35-36-37-38-39 cm, dec 1 st in the side for armhole = 51-55-59-64-71-77 sts. When piece measures 45-47-49-50-52-54 cm, slip the first 14-14-15-15-15-15 sts on a stitch holder, then cast off as follows on every row from neck 3 sts 1 time, 2 sts 2 times and then 1 st 1-1-1-2-2-2 times = 29-33-36-41-47-53 sts remain for shoulder. Cast off when piece measures 52-54-56-58-60-62 cm.

RIGHT BACK PIECE:
Cast on and work as left back piece but reversed. I.e. work A.2 instead of A.1. Remember BUTTONHOLES - see explanation above.

SLEEVES:
The sleeve is worked back and forth on circular needle.
Cast on 50-52-54-56-56-58 sts on circular needle size 3.5 mm with Karisma or Belle. Work 2 ridges. Then switch to circular needle size 4 mm and work stocking st with 1 edge st in garter st in each side. When piece measures 6-8-11-9-5-6 cm, inc 1 st inside 1 edge st in garter st in each side of piece - remember INCREASE TIP. Repeat inc approx. every 3-2½-2-2-2-1½ cm 13-14-15-16-17-19 more times = 78-82-86-90-94-98 sts. Continue until sleeve measures 48-47-46-45-43-41 cm in total (shorter measurements in the larger sizes because of wider shoulders). Cast off.
Knit another sleeve the same way.

ASSEMBLY:
Sew the shoulder seams. Sew in sleeves in body, sew underarm and side seams in one inside 1 edge st in garter st. Cut the yarn and fasten. Sew the buttons on to left band.

NECK EDGE:
Pick up 110-124 sts around the neck (incl sts on stitch holders) on circular needle size 3.5 mm with Karisma or Belle. Work 2 ridges and loosely cast off.

Diagram

symbols = K from RS, P from WS
symbols = 1 YO, slip 1 st as if to K, K 1, psso
symbols = K 2 tog, 1 YO
diagram
diagram

Each of our patterns has specific tutorial videos to help you.

Do you have a question? See a list of frequently asked questions (FAQ)

Knitting tension is what determines the final measurements of your work, and is usually measured per 10 x 10 cm. It is provided like so: number of stitches in width x number of rows in height - eg: 19 stitches x 26 rows = 10 x 10 cm.

The knitting tension is very individual; some people knit/crochet loosely while others work tightly. You adjust the knitting tension with the needle size, which is why the suggested needle size is only meant as a guide! You need to adjust this (up or down) to ensure that YOUR knitting tension matches the knitting tension provided in the pattern. If you work with a different knitting tension than provided you will have a different yarn consumption, and your work will have different measurements than what the pattern suggests.

The knitting tension also determines which yarns can replace each other. As long as you achieve the same knitting tension you can replace one yarn with another.

See DROPS lesson: How to measure your tension/gauge

See DROPS video: How to make a gauge tension swatch

The required amount of yarn is provided in grams, eg: 450 g. To calculate how many balls you’ll need you first need to know how many grams are in 1 ball (25g, 50g or 100g). This information is available if you click on the individual yarn quality on our pages. Divide the amount required with the amount of each ball. For example, if each ball is 50g (the most common amount), the calculation will be as follows: 450 / 50 = 9 balls.

The important thing when changing from one yarn to another is that the knitting/crochet tension remains the same. This is so that the measurements of the finished piece will be the same as on the sketch provided. It is easier to achieve the same knitting tension using yarns from the same yarn group. It is also possible to work with multiple strands of a thinner yarn to achieve the knitting tension of a thicker one. Please try our yarn converter. We recommend you to always work a test swatch.

Please NOTE: when changing yarn the garment might have a different look and feel to the garment in the photo, due to individual properties and qualities of each yarn.

See DROPS lesson: Can I use a different yarn than the one mentioned in the pattern?

All our yarns are categorised into yarn groups (from A to F) according to thickness and knitting tension – group A contains the thinnest yarns and group F the thickest. This makes it easier for you to find alternative yarns to our patterns, should you wish to switch yarn. All yarns within the same group have a similar knitting tension and can easily replace each other. However, different yarn qualities have different structures and properties which will give the finished work a unique look and feel.

Click here for an overview of the yarns in each yarn group

At the top of all our patterns you’ll find a link to our yarn calculator, which is a helpful tool should you wish to use a different yarn than suggested. By filling in the yarn quality you wish to replace, the amount (in your size) and number of strands, the calculator will present good alternative yarns with the same knitting tension. Additionally it will tell you how much you’ll require in the new qualities and whether you’ll need to work with multiple strands. Most skeins are 50g (some are 25g or 100g).

If the pattern is worked with multiple colours, every colour will have to be calculated separately. Similarly, if the pattern is worked with several strands of different yarns (for example 1 strand Alpaca and 1 strand Kid-Silk) you will have to find alternatives for each, individually.

Click here to see our yarn calculator

Since different yarns have different qualities and textures we have chosen to keep the original yarn in our patterns. However, you can easily find options among our available qualities by using our yarn calculator, or simply pick a yarn from the same yarn group.

It is possible that some retailers still have discontinued yarns in stock, or that someone has a few skeins at home that they would like to find patterns for.

The yarn calculator will provide both alternative yarn as well as required amount in the new quality.

If you think it's hard to decide what size to make, it can be a good idea to measure a garment you own already and like the size of. Then you can pick the size by comparing those measures with the ones available in the pattern's size chart.

You'll find the size chart at the bottom of the pattern.

See DROPS lesson: How to read size chart

The needle size provided in the pattern serves only as a guide, the important thing is to follow the knitting tension. And since knitting tension is very individual, you will have to adjust the needle size to ensure that YOUR tension is the same as in the pattern – maybe you’ll have to adjust 1, or even 2 needle sizes, up or down to achieve the correct tension. For this, we recommend that you work test swatches.

Should you work with a different knitting tension than the one provided, the measurements of the finished garment might deviate from the measurement sketch.

See DROPS lesson: How to measure your tension/gauge

See DROPS video: How to make a tension/gauge swatch

Working a garment top-down provides more flexibility and room for personal adjustment. For example it is easier to try the garment on while working, as well as making adjustments to length of yoke and shoulder caps.

The instructions are carefully explaining every step, in the correct order. Diagrams are adjusted to the knitting direction and are worked as usual.

The diagram depicts all rows/rounds, and every stitch seen from the right side. It is read from bottom to top, from right to left. 1 square = 1 stitch.

When working back and forth, every other row is worked from the right side and every other row is worked from the wrong side. When working from the wrong side, the diagram will have to be worked reversed: from left to right, knit stitches are purled, purl stitches are knit etc.

When working in the round every round is worked from the right side and the diagram are worked from right to left on all rounds.

See DROPS lesson: How to read knitting diagrams

The diagram depicts all rows/rounds, and every stitch seen from the right side. It is worked from bottom to top, from right to left.

When working back and forth every other row is worked from the right side: from right to left and every other row is worked from the wrong side: from left to right.

When working in the round, every row in the diagram are worked from the right side, from right to left.

When working a circular diagram you start in the middle and work your way outwards, counter clockwise, row by row.

The rows usually start with a given number of chain stitches (equivalent to the height of the following stitch), this will either be depicted in the diagram or explained in the pattern.

See DROPS lesson: How to read crochet diagrams

Instructions for working several diagrams after each other on the same row/round, will often be written like so: “work A.1, A.2, A.3 a total of 0-0-2-3-4 times". This means you work A.1 once, then A.2 is worked once, and A.3 is repeated (in width) the number of times provided for your size – in this case like so: S = 0 times, M = 0 times, L=2 times, XL= 3 times and XXL = 4 times.

The diagrams are worked as usual: begin with the first row in A.1, then work the first row in A.2 etc.

See DROPS lesson: How to read knitting diagrams

See DROPS lesson: How to read crochet diagrams

The total width of the garment (from wrist-to-wrist) will be larger in the larger sizes, despite the actual sleeves being shorter. The larger sizes have longer sleeve caps and wider shoulders, so there will be a good fit in all sizes.

The measurement sketch/schematic drawing provides information regarding the full length of the garment. If it’s a jumper or a jacket the length is measured from the highest point on the shoulder closest to the neckline, and straight down to the bottom of the garment. It is NOT measured from the tip of shoulder. Similarly, the length of yoke is measured from the highest point on the shoulder and down to where yoke is split into body and sleeves.

On a jacket measures are never taken along bands, unless specifically stated. Always measure inside band stitches when measuring the length.

See DROPS lesson: How to read a schematic drawing

Diagrams are often repeated on the round or in height. 1 repeat is the diagram the way it appears in the pattern. If it says to work 5 repeats of A.1 in the round, then you work A.1 a total of 5 times after/next to each other in the round. If it says to work 2 repeats of A.1 vertically/in height you work the entire diagram once, then begin again at the start and work the entire diagram one more time.

Chain stitches are slightly narrower than other stitches and to avoid working the cast-on edge too tight, we simply chain more stitches to begin with. The stitch count will be adjusted on the following row to fit the pattern and measurement sketch.

The rib edge is more elastic and will contract slightly compared to, for example, stocking stitch. By increasing before the rib edge, you avoid a visible difference in width between the rib edge and the rest of the body.

It’s very easy to cast off too tightly, and by making yarn overs while casting off (and simultaneously casting these off) you avoid a too tight cast off edge.

See DROPS video: How to bind off with yarn overs (yo)

To achieve an even increase (or decrease) you can increase on, for example: every 3rd and 4th row alternately, like so: work 2 rows and increase on the 3rd row, work 3 rows and increase on the 4th. Repeat this until the increase is complete.

See DROPS lesson: Increase or decrease 1 st on every 3rd and 4th row alternately

Should you prefer to work in the round instead of back and forth, you may of course adjust the pattern. You’ll need to add steeks mid-front (usually 5 stitches), and follow the instructions. When you would normally turn and work from the wrong side, simply work across the steek and continue in the round. At the end you’ll cut the piece open, pick up stitches to work bands, and cover the cut edges.

See DROPS video: How to knit steeks and cut open

Should you prefer to work back and forth instead of in the round, you may of course adjust the pattern so you work the pieces separately and then assemble them at the end. Divide the stitches for the body in 2, add 1 edge stitch in each side (for sewing) and work the front and back pieces separately.

See DROPS lesson: Can I adapt a pattern for circular needles into straight needles?

Pattern repeats can vary slightly in the different sizes, in order to get the correct proportions. If you’re not working the exact same size as the garment in the photo, yours might deviate slightly. This has been carefully developed and adjusted so that the complete impression of the garment is the same in all sizes.

Make sure to follow instructions and diagrams for your size!

If you have found a pattern you like which is available in women’s size it’s not very difficult to convert it to men’s size. The biggest difference will be the length of sleeves and body. Start working on the women size that you think would fit across the chest. The additional length will be worked right before you cast off for the armhole/sleeve cap. If the pattern is worked top-down you can add the length right after the armhole or before the first decrease on sleeve.

Regarding additional yarn amount, this will depend on how much length you add, but it is better with a skein too many than too few.

All yarns will have excess fibres (from production) that might come off as lint or shedding. Brushed yarns (ie hairier yarns) have more of these loose, excess fibres, causing more shedding.

Shedding also depends on what is worn under or over the garment, and whether this pulls at the yarn fibres. It’s therefore not possible to guarantee that there will be no shedding

Below are some tips on how to get the best result when working with hairier yarns:

1. When the garment is finished (before you wash it) shake it vigorously so the looser hairs come off. NOTE: do NOT use a lint roller, brush or any method that pulls at the yarn.

2. Place the garment in a plastic bag and put it in your freezer - the temperature will cause the fibres to become less attached to each other, and excess fibres will come off easier.

3. Leave in the freezer for a few hours before taking it out and shaking it again.

4. Wash the garment according to the instructions on the yarn label.

Pilling is a natural process that happens to even the most exclusive of fibers. It's a natural sign of wear and tear that is hard to avoid, and that is most visible in high friction areas of your garment like a sweater's arms and cuffs.

You can make your garment look as new by removing the pilling, using a fabric comb or a pill/lint remover.

Still can't find the answer you need? Then scroll down and leave your question so one of our experts can try to help you. This will be done normally within 5 to 10 working days.
In the meantime, you can read the questions and answers that others have left to this pattern or join the DROPS Workshop on Facebook to get help from fellow knitters/crocheters!

You might also like...

Post a comment to pattern DROPS 156-36

We would love to hear what you have to say about this pattern!

If you want to leave a question, please make sure you select the correct category in the form below, to speed up the answering process. Required fields are marked *.

Comments / Questions (26)

country flag Maria wrote:

Wenn ich einen Pullover stricke, stricke ich: von unten oder von oben nach nach unten? Mfg

28.12.2021 - 13:27

DROPS Design answered:

Liebe Maria, dieses Modell wird von unten nach oben gestrickt. Viel Spaß beim stricken!

03.01.2022 - 09:21

country flag Beatriz wrote:

Bonjour, combien de mailles faut-il relever pour le col, taille M? L’indication 110-124 n’est pas claire. Merci!

25.04.2020 - 23:16

DROPS Design answered:

Bonjour Beatriz, relevez vos mailles tout autour de l'encolure, le nombre de mailles dépend de votre tension en hauteur (du nombre de rangs que vous avez tricoté pour le devant/le dos), ce qui est important est que vous ayez ni trop ni trop peu de mailles, suivez les règles habituelles et essayez le pull si nécessaire pour vérifier que le col n'est ni trop lâche, ni trop serré - retrouvez ici comment relever des mailles le long d'un côté ou le long d'un bord. Bon tricot!

27.04.2020 - 08:50

country flag Monique wrote:

Bonjour comment faites vous pour prolonger A1 et A2, j'ai arreté au 12 ème rang mercu

14.09.2018 - 20:31

DROPS Design answered:

Bonjour Monique, continuez les jours en diagonale en commençant dans A.1 une maille avant (tricotez jusqu'à ce qu'il reste 1 m avant la diminution de A.1 et tricotez la diminution et le jeté. Tricotez jusqu'au jeté de A.2 compris, faites 1 jeté, puis la diminution. Bon tricot!

17.09.2018 - 08:02

country flag Mette Mangset wrote:

Hei. Jeg lurer på om oppskriften er riktig? Forstykket.Skal det felles allerede etter 5cm? felle på hver cm 8 ganger(str L) da stemmer ikke maskeantallet? Syntes det var litt rart. På tengningen med målene,ser det ut som om fellingen er høyere opp? Vanskelig å forklare,men håper dere skjønner spørsmålet mitt. Vennlig hilsen Mette Mangset

16.08.2016 - 21:59

DROPS Design answered:

Hej Mette. Jo det er korrekt. Du feller ogsaa i alt 9 ganger. Der staar i teksten: Gjenta fellingen på hver cm 7-7-8-8-8-8 ganger til

08.09.2016 - 13:14

country flag Franziska Huber wrote:

Ist es normal dass sich das Vorderteil aufrollt? Legt sich das beim Zusammennähen oder muss man nach Fertigstellung dämpfen? Vielen Dank

15.06.2016 - 23:05

DROPS Design answered:

Halo Franziska, die Kante sollte sich nicht aufrollen. Versuchen Sie zunächst einmal, das Teil zu befeuchten und zu spannen.

16.06.2016 - 07:36

country flag Patrizia wrote:

Mi piace molto e con questo pattern ho realizzato due maglie (una a righe e l'altra con filato melange) Spiegazioni dettagliate e giuste nelle misure! Complimenti!

10.08.2015 - 18:28

country flag Simone wrote:

Klopt het wel dat na 18 cm het ajour patroon gebreid moet worden? Lijkt me zo kort gezien de foto's? Hoop op een spoedig antwoord

18.01.2015 - 23:43

DROPS Design answered:

Hoi Simone. Ja, dat klopt. Het ajourpatroon begint ruim onder de armsgaten.

19.01.2015 - 13:25

country flag Paula wrote:

Hallo hab eine blöde Frage:warum soll man rund Stricknadeln verwenden soll ja kein Schlauch werden ? Sorry

09.11.2014 - 13:41

DROPS Design answered:

Wir empfehlen Rundnadeln, weil es sich bei einer größeren M-Zahl damit etwas angenehmer stricken lässt, die M verteilen sich ja besser auf dem Seil, das länger ist als eine gerade Nadel. Sie können ja auch mit einer Rundnadel ganz normal in Hin- und Rück-R stricken. Sie können aber auch gerade Nadeln verwenden, wenn Sie damit besser zurechtkommen.

09.11.2014 - 22:09

country flag Vroni wrote:

Würde das gerne als Pullover stricken. Was muss ich denn da anders machen?danke!

12.09.2014 - 11:03

DROPS Design answered:

Liebe Vroni, das Teil ist ja insofern schon ein Pulli, wenn Sie die Knopfleiste hinten tragen. Wenn Sie die Knopfleiste allerdings ganz weglassen möchten, können Sie das Rückenteil einfach genauso wie das Vorderteil stricken. Da das Teil ja mit beiden Seiten nach vorne getragen werden kann, sind die Halsausschnitte bei beiden Teilen gleich konzipiert. Damit hat der Pulli hinten einen vergleichsweise tiefen Ausschnitt (das lässt sich ja auf der Rückansicht auch erkennen).

13.09.2014 - 10:23

country flag Rita wrote:

Prachtig patroon,zeer origineel

03.07.2014 - 17:26