The yarn cost is calculated from the pattern’s smallest size and the yarn’s cheapest product type. Looking for an even better price? You might find it on the DROPS Deals!
-------------------------------------------------------
Alternative Yarn – See how to change yarns here
Yarn Groups A to F – Use the same pattern and change the yarn here
Yarn usage using an alternative yarn – Use our yarn converter here
-------------------------------------------------------
The yarn cost is calculated from the pattern’s smallest size and the yarn’s cheapest product type. Looking for an even better price? You might find it on the DROPS Deals!
All measurements in charts are in cm.
= K from RS, P from WS | |
= P from RS, K from WS | |
= slip 1 st on cable needle behind piece, K 2, P/K 1 from cable needle | |
= slip 2 sts on cable needle in front of piece, P/K 1, K 2 from cable needle | |
= slip 2 sts on cable needle behind piece, K 2, K 2 from cable needle | |
= slip 2 sts on cable needle in front of piece, K 2, K 2 from cable needle |
Each of our patterns has specific tutorial videos to help you.
These step-by-step tutorials might also help you:
Why is the knitting/crochet tension so important?
Knitting tension is what determines the final measurements of your work, and is usually measured per 10 x 10 cm. It is provided like so: number of stitches in width x number of rows in height - eg: 19 stitches x 26 rows = 10 x 10 cm.
The knitting tension is very individual; some people knit/crochet loosely while others work tightly. You adjust the knitting tension with the needle size, which is why the suggested needle size only serve as a guide! You need to adjust this (up or down) to ensure that YOUR knitting tension matches the knitting tension provided in the pattern. If you work with a different knitting tension than provided you will have a different yarn consumption, and your work will have different measurements than what the pattern suggests.
The knitting tension also determines which yarns can replace each other. As long as you achieve the same knitting tension you can replace one yarn with another.
See DROPS lesson: How to measure your tension/gauge
See DROPS video: How to make a gauge tension swatch
How do I know how many balls of yarn I need?
The required amount of yarn is provided in grams, eg: 450 g. To calculate how many balls you’ll need you first need to know how many grams are in 1 ball (25g, 50g or 100g). This information is available if you click on the individual yarn quality on our pages. Divide the amount required with the amount of each ball. For example, if each ball is 50g (the most common amount), the calculation will be as follows: 450 / 50 = 9 balls.
Can I use a different yarn than what the pattern suggests?
The important thing when changing from one yarn to another is that the knitting/crochet tension remains the same. This is so that the measurements of the finished piece will be the same as on the sketch provided. It is easier to achieve the same knitting tension using yarns from the same yarn group. It is also possible to work with multiple strands of a thinner yarn to achieve the knitting tension of a thicker one. Please try our yarn converter. We recommend you to always work a test swatch.
Please NOTE: when changing yarn the garment might have a different look and feel to the garment in the photo, due to individual properties and qualities of each yarn.
See DROPS lesson: Can I use a different yarn than the one mentioned in the pattern?
What are the yarn groups?
All our yarns are categorised into yarn groups (from A to F) according to thickness and knitting tension – group A contains the thinnest yarns and group F the thickest. This makes it easier for you to find alternative yarns to our patterns, should you wish to switch yarn. All yarns within the same group have a similar knitting tension and can easily replace each other. However, different yarn qualities have different structures and properties which will give the finished work a unique look and feel.
How do I use the yarn converter?
At the top of all our patterns you’ll find a link to our yarn converter, which is a helpful tool should you wish to use a different yarn than suggested. By filling in the yarn quality you wish to replace, the amount (in your size) and number of strands, the converter will present good alternative yarns with the same knitting tension. Additionally it will tell you how much you’ll require in the new qualities and whether you’ll need to work with multiple strands. Most skeins are 50g (some are 25g or 100g).
If the pattern is worked with multiple colours, every colour will have to be converted separately. Similarly, if the pattern is worked with several strands of different yarns (for example 1 strand Alpaca and 1 strand Kid-Silk) you will have to find alternatives for each, individually.
Why do you show discontinued yarns in the patterns?
Since different yarns have different qualities and textures we have chosen to keep the original yarn in our patterns. However, you can easily find options among our available qualities by using our yarn converter, or simply pick a yarn from the same yarn group.
It is possible that some retailers still have discontinued yarns in stock, or that someone has a few skeins at home that they would like to find patterns for.
The yarn converter will provide both alternative yarn as well as required amount in the new quality.
What size should I knit?
If you think it's hard to decide what size to make, it can be a good idea to measure a garment you own already and like the size of. Then you can pick the size by comparing those measures with the ones available in the pattern's size chart.
You'll find the size chart at the bottom of the pattern.
See DROPS lesson: How to read size chart
Why do I get the wrong knitting tension with the suggested needle size?
The needle size provided in the pattern serves only as a guide, the important thing is to follow the knitting tension. And since knitting tension is very individual, you will have to adjust the needle size to ensure that YOUR tension is the same as in the pattern – maybe you’ll have to adjust 1, or even 2 needle sizes, up or down to achieve the correct tension. For this, we recommend that you work test swatches.
Should you work with a different knitting tension than the one provided, the measurements of the finished garment might deviate from the measurement sketch.
See DROPS lesson: How to measure your tension/gauge
See DROPS video: How to make a gauge tension swatch
Why is the pattern worked top-down?
Working a garment top-down provides more flexibility and room for personal adjustment. For example it is easier to try the garment on while working, as well as making adjustments to length of yoke and shoulder caps.
The instructions are carefully explaining every step, in the correct order. Diagrams are adjusted to the knitting direction and are worked as usual.
How do I work according to a knitting diagram?
The diagram depicts all rows/rounds, and every stitch seen from the right side. It is read from bottom to top, from right to left. 1 square = 1 stitch.
When working back and forth, every other row is worked from the right side and every other row is worked from the wrong side. When working from the wrong side, the diagram will have to be worked reversed: from left to right, knit stitches are purled, purl stitches are knit etc.
When working in the round every round is worked from the right side and the diagram are worked from right to left on all rounds.
See DROPS lesson: How to read knitting diagrams
How do I work according to a crochet diagram?
The diagram depicts all rows/rounds, and every stitch seen from the right side. It is worked from bottom to top, from right to left.
When working back and forth every other row is worked from the right side: from right to left and every other row is worked from the wrong side: from left to right.
When working in the round, every row in the diagram are worked from the right side, from right to left.
When working a circular diagram you start in the middle and work your way outwards, counter clockwise, row by row.
The rows usually start with a given number of chain stitches (equivalent to the height of the following stitch), this will either be depicted in the diagram or explained in the pattern.
See DROPS lesson: How to read crochet diagrams
How do I work several diagrams simultaneously on the same row/round?
Instructions for working several diagrams after each other on the same row/round, will often be written like so: “work A.1, A.2, A.3 a total of 0-0-2-3-4 times". This means you work A.1 once, then A.2 is worked once, and A.3 is repeated (in width) the number of times provided for your size – in this case like so: S = 0 times, M = 0 times, L=2 times, XL= 3 times and XXL = 4 times.
The diagrams are worked as usual: begin with the first row in A.1, then work the first row in A.2 etc.
See DROPS lesson: How to read knitting diagrams
See DROPS lesson: How to read crochet diagrams
Why are the sleeves shorter in larger sizes?
The total width of the garment (from wrist-to-wrist) will be larger in the larger sizes, despite the actual sleeves being shorter. The larger sizes have longer sleeve caps and wider shoulders, so there will be a good fit in all sizes.
Where on the garment is the length measured?
The measurement sketch/schematic drawing provides information regarding the full length of the garment. If it’s a jumper or a jacket the length is measured from the highest point on the shoulder (usually closest to the neckline), and straight down to the bottom of the garment. It is NOT measured from the tip of shoulder. Similarly, the length of yoke is measured from the highest point on the shoulder and down to where yoke is split into body and sleeves.
See DROPS lesson: How to read a schematic drawing
What is a repeat?
Diagrams are often repeated on the round or in height. 1 repeat is the diagram the way it appears in the pattern. If it says to work 5 repeats of A.1 in the round, then you work A.1 a total of 5 times after/next to each other in the round. If it says to work 2 repeats of A.1 vertically/in height you work the entire diagram once, then begin again at the start and work the entire diagram one more time.
Why does the piece start with more chain stitches than it’s worked with?
Chain stitches are slightly narrower than other stitches and to avoid working the cast-on edge too tight, we simply chain more stitches to begin with. The stitch count will be adjusted on the following row to fit the pattern and measurement sketch.
Why increase before the rib edge when the piece is worked top-down?
The rib edge is more elastic and will contract slightly compared to, for example, stocking stitch. By increasing before the rib edge, you avoid a visible difference in width between the rib edge and the rest of the body.
Why increase in the cast-off edge?
It’s very easy to cast off too tightly, and by making yarn overs while casting off (and simultaneously casting these off) you avoid a too tight cast off edge.
See DROPS video: How to bind off with yarn overs (yo)
How do I increase/decrease on every 3rd and 4th row/round alternately?
To achieve an even increase (or decrease) you can increase on, for example: every 3rd and 4th row alternately, like so: work 2 rows and increase on the 3rd row, work 3 rows and increase on the 4th. Repeat this until the increase is complete.
See DROPS lesson: Increase or decrease 1 st on every 3rd and 4th row alternately
How can I work a jacket in the round instead of back and forth?
Should you prefer to work in the round instead of back and forth, you may of course adjust the pattern. You’ll need to add steeks mid-front (usually 5 stitches), and follow the instructions. When you would normally turn and work from the wrong side, simply work across the steek and continue in the round. At the end you’ll cut the piece open, pick up stitches to work bands, and cover the cut edges.
See DROPS video: How to knit steeks and cut open
Can I work a jumper back and forth instead of in the round?
Should you prefer to work back and forth instead of in the round, you may of course adjust the pattern so you work the pieces separately and then assemble them at the end. Divide the stitches for the body in 2, add 1 edge stitch in each side (for sewing) and work the front and back pieces separately.
See DROPS lesson: Can I adapt a pattern for circular needles into straight needles?
Why is the pattern slightly different than what I see in the photo?
Pattern repeats can vary slightly in the different sizes, in order to get the correct proportions. If you’re not working the exact same size as the garment in the photo, yours might deviate slightly. This has been carefully developed and adjusted so that the complete impression of the garment is the same in all sizes.
Make sure to follow instructions and diagrams for your size!
How do I make a women’s size garment into a men’s size one?
If you have found a pattern you like which is available in women’s size it’s not very difficult to convert it to men’s size. The biggest difference will be the length of sleeves and body. Start working on the women size that you think would fit across the chest. The additional length will be worked right before you cast off for the armhole/sleeve cap. If the pattern is worked top-down you can add the length right after the armhole or before the first decrease on sleeve.
Regarding additional yarn amount, this will depend on how much length you add, but it is better with a skein too many than too few.
How do I prevent a hairy garment from shedding?
All yarns will have excess fibres (from production) that might come off as lint or shedding. Brushed yarns (ie hairier yarns) have more of these loose, excess fibres, causing more shedding.
Shedding also depends on what is worn under or over the garment, and whether this pulls at the yarn fibres. It’s therefore not possible to guarantee that there will be no shedding
Below are some tips on how to get the best result when working with hairier yarns:
1. When the garment is finished (before you wash it) shake it vigorously so the looser hairs come off. NOTE: do NOT use a lint roller, brush or any method that pulls at the yarn.
2. Place the garment in a plastic bag and put it in your freezer - the temperature will cause the fibres to become less attached to each other, and excess fibres will come off easier.
3. Leave in the freezer for a few hours before taking it out and shaking it again.
4. Wash the garment according to the instructions on the yarn label.
Why does my garment pill?
Pilling is a natural process that happens to even the most exclusive of fibers. It's a natural sign of wear and tear that is hard to avoid, and that is most visible in high friction areas of your garment like a sweater's arms and cuffs.
You can make your garment look as new by removing the pilling, using a fabric comb or a pill/lint remover.
Celtic Dancer |
|||||||||||||||||||
|
|
||||||||||||||||||
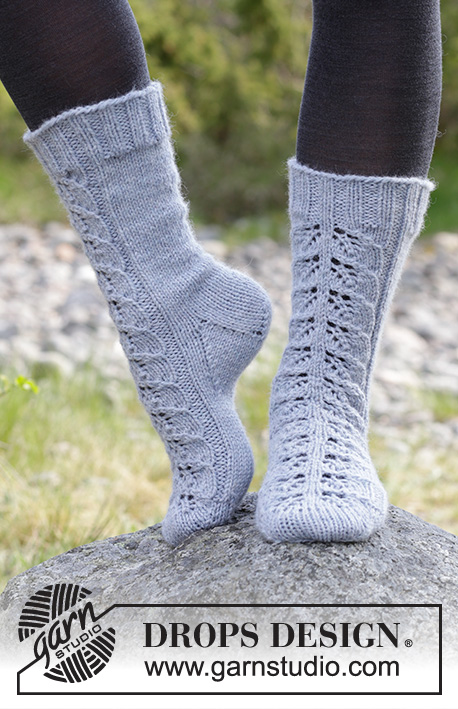
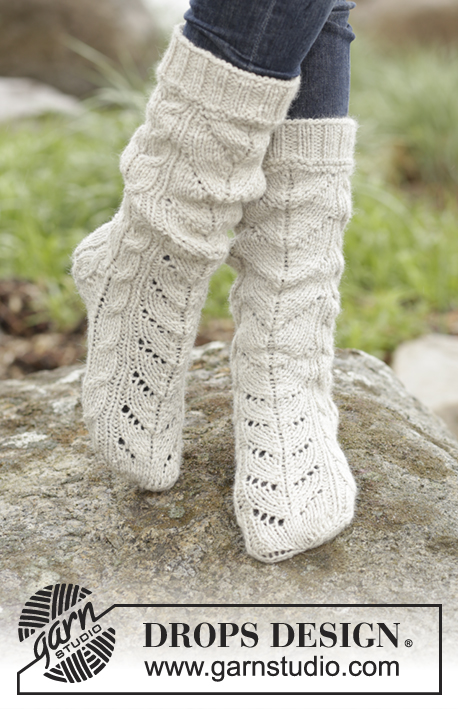
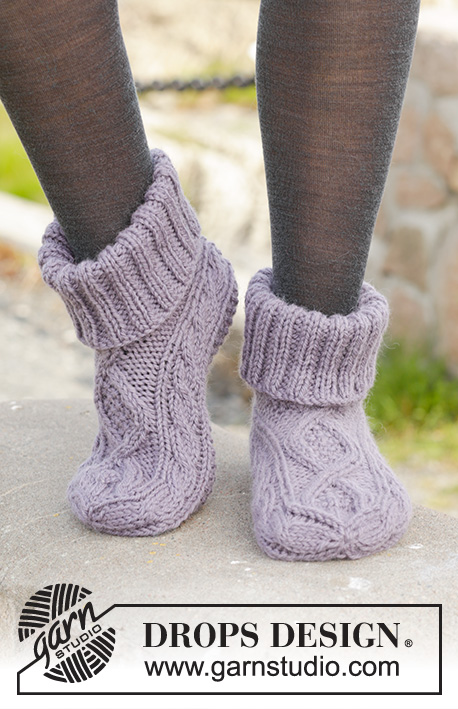
Knitted DROPS slippers with cables in "Nepal".
DROPS 156-55 |
|||||||||||||||||||
PATTERN: See diagrams A.1-A.3. The diagrams show the pattern seen from RS. DECREASE TIP: Dec 1 st before marker as follows: K 2 tog. Dec 1 st after marker as follows: K 2 twisted tog. GARTER ST (back and forth on needle): K all rows. 1 ridge = K2 rows. SEED ST: Row/round 1: * K 1, P 1 *, repeat from *-*. Row/round 2: K over P and P over K. Repeat 2nd row/round. MEASURING TIP: Measure in the middle of cable in A.1/A.3. ---------------------------------------------------------- SLIPPER: Worked back and forth from mid back. Cast on 33-33-35 sts on needle size 5 mm / US 8 with Nepal (let the yarn end be approx. 20 cm / 8"; used for assembly). Work 1 ridge in GARTER ST - see explanation above AT THE SAME TIME on last row inc 4 sts evenly = 37-37-39 sts. Then work as follows from RS: P 4, A.3 (= 8 sts), 13-13-15 sts SEED ST – see explanation above, A.1 (= 8 sts), finish with P 4. Continue the pattern like this, work P sts K from WS. Repeat A.1 and A.3 until finished measurements. REMEMBER THE GAUGE! When piece measures 10½-11½-13 cm / 4¼''-4½"-5" – see MEASURING TIP above, work as follows from RS: P 4, A.3, 13-13-15 sts seed st, A.1, P 4, cast on 4 new sts, work the first 4 sts, round beg here = 41-41-43 sts. Now work piece in the round on double pointed needles. Work pattern as before but now work A.2 (= 12 sts) over the 4 P sts in each side of piece and the 4 new sts. When A.2 has been worked 1 time vertically, work A.a until piece measures 17-19-22 cm / 6¾''-7½"-8¾". Now work in stockinette st over sts in A.a, or start stockinette st a bit earlier. Continue A.1 and A.3 until finished measurements. Now insert 4 markers in the piece as follows: Work A.3 but insert 1st marker between 1st and 2nd st and 2nd marker between 7th and 8th st in A.3, work seed st as before, work A.1 but insert 3rd marker between 1st and 2nd st and 4th marker between 7th and 8th st in A.1, K the remaining sts (= 14 sts on top of foot, 15-15-17 sts under foot and 6 sts in each side of piece). Now dec for toe on next round as follows: Dec 1 st after 2nd marker and 1 st before 3rd marker under foot 0-0-1 time in total – READ DECREASE TIP above, work the remaining sts = 14 sts on top of foot and 15 sts under foot (= 41 sts in total). On next round, dec as follows: Dec 1 st before 1st and 3rd marker and 1 st after 2nd and 4th marker (= 4 dec in total). Repeat dec every round 6 times in total AT THE SAME TIME on last dec work cable sts in A.1 and A.3 as follows: K 2 twisted tog, K 2 tog. After all dec there are 13 sts on needle. Piece measures approx. 20-22-25 cm / 8''-8¾"-9¾". Cut the yarn and pull it through the remaining sts, tighten tog and fasten. ASSEMBLY: Fold cast-on edge double (= mid back), use yarn end from beg to sew neatly tog mid back. EDGE: Work edge in the round on double pointed needles around the opening on slipper. Pick up 50-50-54 sts on double pointed needles size 4 mm / US 6 with Nepal. P 1 round. Then K 1 round while AT THE SAME TIME inc 10 sts evenly = 60-60-64 sts. Work rib = K 2/P 2 until piece measures approx. 12-13-14 cm / 4¾''-5"-5½". Bind off sts with K over K and P over P. Fold the edge double. Knit another slipper. |
|||||||||||||||||||
Diagram explanations |
|||||||||||||||||||
|
|||||||||||||||||||
Have you made this or any other of our designs? Tag your pictures in social media with #dropsdesign so we can see them! Do you need help with this pattern?You'll find tutorial videos, a Comments/Questions area and more by visiting the pattern on garnstudio.com. © 1982-2024 DROPS Design A/S. We reserve all rights. This document, including all its sub-sections, has copyrights. Read more about what you can do with our patterns at the bottom of each pattern on our site. |
With over 40 years in knitting and crochet design, DROPS Design offers one of the most extensive collections of free patterns on the internet - translated to 17 languages. As of today we count 304 catalogs and 11422 patterns - 11417 of which are translated into English (US/in).
We work hard to bring you the best knitting and crochet have to offer, inspiration and advice as well as great quality yarns at incredible prices! Would you like to use our patterns for other than personal use? You can read what you are allowed to do in the Copyright text at the bottom of all our patterns. Happy crafting!
Comments / Questions (166)
Alisa Mai wrote:
Ich habe eine Frage bezüglich des Bündchens.\r\nWieso soll ich nur 54 Maschen aufnehmen und dann 10 zunehmen, wenn ich in meinem Schaft doch insgesamt 68 habe. Dann macht es doch mehr Sinn, gleich daraus 64 aufzunehmen. \r\nUnd wenn nicht, welche Maschen lasse ich dann aus?\r\nDas ist meine erste Strickanleitung und das verwirrt mich noch alles sehr.\r\nDanke schon im Voraus!
16.12.2019 - 22:29DROPS Design answered:
Liebe Frau Mai, wenn mann Maschen seitlich auffast, nimmt man ca 3 M auf 4 R, so daß Sie (bei der Maschenprobe) 54 M auffassen können, dann zur 64 M zunehmen. Viel Spaß beim stricken!
17.12.2019 - 09:41S Leishman wrote:
I have never made anything in the round before. I've made the socks and understand the directions up to this point: 'work the first 4 sts, round beg here = 41-41-43 sts. Now work piece in the round on double pointed needles... ' I have watched tutorial on how to cast onto the round but this isn't saying this. How do I get the stitches from the straight needles to the round needles and how many per needle?
17.11.2019 - 14:10DROPS Design answered:
Dear S, you simply divide the stitches between 4 double pointed needles, more or less evenly (that means that for the smaller sizes 3 needles will have 10 stitches eaach and the fourth will have 11), and use the 5th needle to knit in the round. I hope that helps. Happy Knitting!
17.11.2019 - 17:10Nathalie wrote:
Petite précision sur mon précédent commentaire : j'ai procédé ainsi pour le motif A2 seulement. pour A3 et A1, les cases vides correspondent à du jersey donc mailles endroit sur les rangs impairs et envers sur les rangs pairs.( mailles envers sur les cases avec point). J'ai également continué au point de riz après Aa et non en jersey car je trouve cela plus joli. Un grand merci au site pour ces tutos gratuits !
13.11.2019 - 21:43Nathalie wrote:
Pour une lecture plus facile des diagrammes, un carré vide = 1 m endroit et un point=1 m envers.
11.11.2019 - 12:52Judith wrote:
Where the pattern says "Work as follows from right side; p4, A3,, 13/13/15 moss st, A1, p4, then says cast o 4 new sts, work the 1st 4sts..........I'm not sure which way the 4 newly cast on stitches are worked. Is it P4, A3, 13/13/15moss (or seed ), A1, P4, then the new cast on 4 are either knit or purl?
16.10.2019 - 10:36DROPS Design answered:
Dear Judith, the 4 new stitches will be now the middle 4 stitches in A.2, after you have join in the round, purl the next 4 stitches (= the first 4 sts at the beg of previous row), then work A.3, moss st, A.1 as before, then over the next P4 + 4 new sts + next P4 = work A.2. Happy knitting!
17.10.2019 - 09:21Judith Jeffery wrote:
I'm about to try this pattern for the first time; I've been knitting for more than 40 years , but have never tried knitting from a diagram like this, and have never come across a pattern written as a solid paragraph, so....absolutely no disrespect intended.....but far from being easy, it looks one of the most difficult patterns I've ever come across! This is going to be a real test, will let you know how I get on!
13.10.2019 - 11:22DROPS Design answered:
Dear Judith thank you for your note. In our experience diagrams are better, because you can see not only the actual stitch or row, but also how the stitches and rows above each otherrelate to each other, also they are universal, can be decipehered in almot any language. HERE is a DROPS lesson that might help you to use/ read diagrams more easily. Happy Knitting!
13.10.2019 - 13:49Ylva wrote:
Jeg holder på å strikke a. 2 diagrammet. Jeg ser at det ikke er noen forklaring til flettingen på linje 11,13,15 og 17. Det er bare forklaring på flettingen på a. 1, a. 3 og den nederste delen av a. 3. Hvordan strikker jeg den øverste delen?
30.09.2019 - 19:58DROPS Design answered:
Hej Ylva, Når du har strikket A.2 en gang, så fortsætter du med A.a over de midterste 12 masker. God fornøjelse!
02.10.2019 - 11:22Britt Fischer wrote:
Sticka 2 m vridna tills, 2 m räta tills Så står det i mönstret. Vad menar ni med 2 m vridna tills?
17.09.2019 - 18:48DROPS Design answered:
Hej Britt, Se hur du gör i vår video
How to decrease by knitting 2 stitches together (K2tog) from Garnstudio Drops design on Vimeo.
18.09.2019 - 10:03Jean Sweezie wrote:
I have always had trouble reading the Drops patterns because they are all written in one paragraph. However, I tried picking up the wording of the pattern and dropping it into a word file, and was able to increase the line height and put paragraphs where I wanted them, and this worked perfectly. Such an interesting pattern.
13.09.2019 - 15:58Dorothy Davis wrote:
Thank you for answering my question. I got another one for you, I am starting the A.2 & I am on the 3rd row. What does it mean when your doing the part with the cable needle P/K1. Do it mean p & k in the same stitch. Sorry if my country show something else before, I just noticed this. I am from Canada.
13.08.2019 - 23:30DROPS Design answered:
Dear Mrs Davis, when working the cables you will have to work the stitches on the side of the cable either P or K depending on the next row in diagram. The stitches on either side of the cable are purled and the stitches in the middle of the cables are worked in moss stitch, ie either K or P. Happy knitting!
14.08.2019 - 08:05