
Popular categories
Looking for a yarn?


|
|||||||||||||||||||
Celtic Dancer |
|||||||||||||||||||
 |
 |
||||||||||||||||||
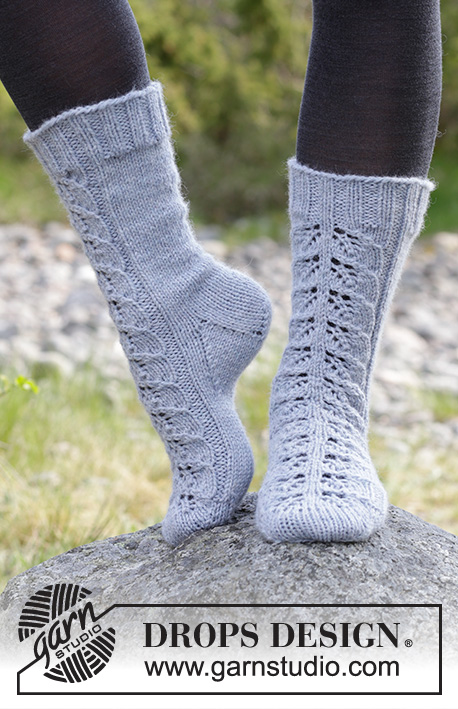
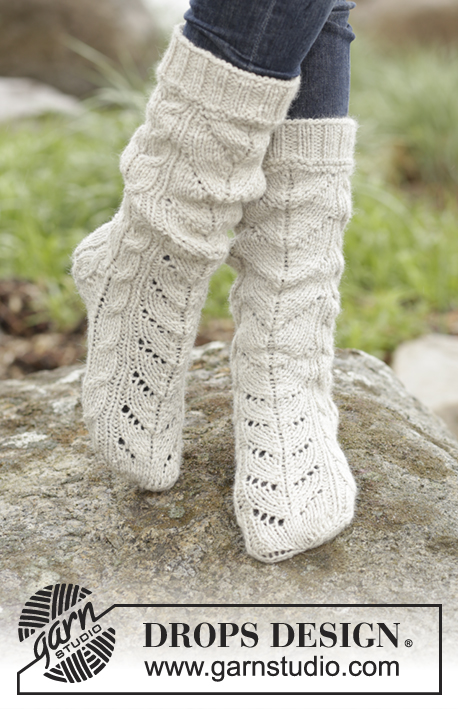
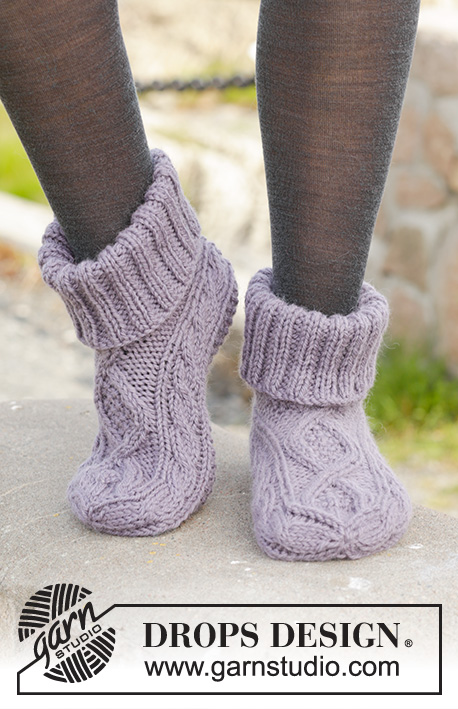
Knitted DROPS slippers with cables in "Nepal".
DROPS 156-55 |
|||||||||||||||||||
|
PATTERN: See diagrams A.1-A.3. The diagrams show the pattern seen from RS. DECREASE TIP: Dec 1 st before marker as follows: K 2 tog. Dec 1 st after marker as follows: K 2 twisted tog. GARTER ST (back and forth on needle): K all rows. 1 ridge = K2 rows. SEED ST: Row/round 1: * K 1, P 1 *, repeat from *-*. Row/round 2: K over P and P over K. Repeat 2nd row/round. MEASURING TIP: Measure in the middle of cable in A.1/A.3. ---------------------------------------------------------- SLIPPER: Worked back and forth from mid back. Cast on 33-33-35 sts on needle size 5 mm / US 8 with Nepal (let the yarn end be approx. 20 cm / 8"; used for assembly). Work 1 ridge in GARTER ST - see explanation above AT THE SAME TIME on last row inc 4 sts evenly = 37-37-39 sts. Then work as follows from RS: P 4, A.3 (= 8 sts), 13-13-15 sts SEED ST – see explanation above, A.1 (= 8 sts), finish with P 4. Continue the pattern like this, work P sts K from WS. Repeat A.1 and A.3 until finished measurements. REMEMBER THE GAUGE! When piece measures 10½-11½-13 cm / 4¼''-4½"-5" – see MEASURING TIP above, work as follows from RS: P 4, A.3, 13-13-15 sts seed st, A.1, P 4, cast on 4 new sts, work the first 4 sts, round beg here = 41-41-43 sts. Now work piece in the round on double pointed needles. Work pattern as before but now work A.2 (= 12 sts) over the 4 P sts in each side of piece and the 4 new sts. When A.2 has been worked 1 time vertically, work A.a until piece measures 17-19-22 cm / 6¾''-7½"-8¾". Now work in stockinette st over sts in A.a, or start stockinette st a bit earlier. Continue A.1 and A.3 until finished measurements. Now insert 4 markers in the piece as follows: Work A.3 but insert 1st marker between 1st and 2nd st and 2nd marker between 7th and 8th st in A.3, work seed st as before, work A.1 but insert 3rd marker between 1st and 2nd st and 4th marker between 7th and 8th st in A.1, K the remaining sts (= 14 sts on top of foot, 15-15-17 sts under foot and 6 sts in each side of piece). Now dec for toe on next round as follows: Dec 1 st after 2nd marker and 1 st before 3rd marker under foot 0-0-1 time in total – READ DECREASE TIP above, work the remaining sts = 14 sts on top of foot and 15 sts under foot (= 41 sts in total). On next round, dec as follows: Dec 1 st before 1st and 3rd marker and 1 st after 2nd and 4th marker (= 4 dec in total). Repeat dec every round 6 times in total AT THE SAME TIME on last dec work cable sts in A.1 and A.3 as follows: K 2 twisted tog, K 2 tog. After all dec there are 13 sts on needle. Piece measures approx. 20-22-25 cm / 8''-8¾"-9¾". Cut the yarn and pull it through the remaining sts, tighten tog and fasten. ASSEMBLY: Fold cast-on edge double (= mid back), use yarn end from beg to sew neatly tog mid back. EDGE: Work edge in the round on double pointed needles around the opening on slipper. Pick up 50-50-54 sts on double pointed needles size 4 mm / US 6 with Nepal. P 1 round. Then K 1 round while AT THE SAME TIME inc 10 sts evenly = 60-60-64 sts. Work rib = K 2/P 2 until piece measures approx. 12-13-14 cm / 4¾''-5"-5½". Bind off sts with K over K and P over P. Fold the edge double. Knit another slipper. |
|||||||||||||||||||
Diagram explanations |
|||||||||||||||||||
|
|||||||||||||||||||

|
|||||||||||||||||||
|
Have you made this or any other of our designs? Tag your pictures in social media with #dropsdesign so we can see them! Do you need help with this pattern?You'll find tutorial videos, a Comments/Questions area and more by visiting the pattern on garnstudio.com. © 1982-2024 DROPS Design A/S. We reserve all rights. This document, including all its sub-sections, has copyrights. Read more about what you can do with our patterns at the bottom of each pattern on our site. |
|||||||||||||||||||


With over 40 years in knitting and crochet design, DROPS Design offers one of the most extensive collections of free patterns on the internet - translated to 17 languages. As of today we count 304 catalogs and 11422 patterns - 11417 of which are translated into English (US/in).
We work hard to bring you the best knitting and crochet have to offer, inspiration and advice as well as great quality yarns at incredible prices! Would you like to use our patterns for other than personal use? You can read what you are allowed to do in the Copyright text at the bottom of all our patterns. Happy crafting!
Comments / Questions (166)
Pattern is written in far too complicated a way - discouraging before one ever starts
16.09.2021 - 18:45Nevermind the message I sent earlier. I think I was working from the wrong video and have since found another one. It looks more like the lighter stitch. I think I'm happy with the current seaming results.
10.07.2021 - 14:39Finally finished the first slipper - on to the second. I have a question about the assembly. Looking at the photo it looks like purl stitches as the seam for the back of the foot. The instructions just say sew together. Is there a fancier way to do it to get the look of the photo? It blends so nicely with the ribbing in the cuff but I can't seem to figure it out. Maybe pick up stitches and just purl your way up?
10.07.2021 - 02:54DROPS Design answered:
Dear Mrs Sullivan, the ridges on the picture are the ridge you started with at the beginning of the slipper, when folding the piece together, the ridge you started will make as if there were 2 ridges. Happy knitting!
12.07.2021 - 07:15Just a quick thank you for the guidance! So far so good - so excited for these slippers. My daughter used to do stepdance. Her first trip to Ireland was to compete. I know she'll love these.
07.07.2021 - 02:08I love the look of these slippers. I've just begun. Because I'm knitting flat- when I work on the wrong side, I change P to K. And I have the seed pattern ok. My cable stitches aren't forming a cable. Does A1 and A3 reverse on the WS? Are there corrections I should make in cabling when working on the WS other than changing K to P?
05.07.2021 - 02:42DROPS Design answered:
Dear Maureen, when you are working A.1 and A.3 from WS the white squares should be purled from WS (= K from RS) and the dots should be knitted from WS (P from WS). The cables should be worked only from right side (= on 5th row then on every 8th row). Happy knitting!
05.07.2021 - 08:22Very complicated instructions what does knit over purl and purl over knit mean. hankyou. Love the look of them but difficult pattern to follow
27.05.2021 - 01:39DROPS Design answered:
Dear Janice, knit over purl means you have to knit the stitches purled on previous row/round and purl over knit means you have to p url the stitches knitted on previous row/round. Happy knitting!
27.05.2021 - 09:42I am an experienced knitter, and love the Celtic Dancer slippers. I find your instructions very confusing, however. 1. I don't understand to measure from the middle of the chain - is that where the stitches cross? 2. Are the P4 sts at the beginning and end of the row knitted on the WS row? 3. When you say to start working "in a round" do I use 4 dp needles now? This is as far as I am, but the decreasing instructions look very confusing, but I will try them before I comment.
13.05.2021 - 23:19Tack så mycket för svaret. Nu har jag hittat halkspray i webbutiken.
07.04.2021 - 23:52Hej! Jag undrar hur kan man bearbeta sulor för att inte glida på golvet och gå säkert. Har ni ett förslag för det? Tack så mycket på förhand.
03.04.2021 - 10:14DROPS Design answered:
Hei Nonna. Hør i en garnbutikk om de har sånn anti skli spray du kan spraye på under sokkene eller om en tekstilbutikk har noe du kan stryke på under sokkene. Har sett slike produkter i butikker i Norge, usikker på hva de har i Sverige. mvh DROPS design
07.04.2021 - 15:22Det står att Aa ska stickas till arbetet mäter 19cm. Ska man börja mäta från där mönstret A2 börjar SULAN BLIR JU JÄTTE LÅNG redan och det är 9cm kvar till det blir 19cm.
18.03.2021 - 08:37DROPS Design answered:
Hej Monica, nej du måler fra starten af arbejdet. Det totale arbejde skal måle 20-22-25 cm. Men mål gerne arbejdet på foden :)
18.03.2021 - 14:14