DROPS Nepal
DROPS Nepal
65% Wool, 35% Alpaca
from 2.40 £ /50g
Get the yarn to make this pattern from 36.00£.

The yarn cost is calculated from the pattern’s smallest size and the yarn’s cheapest product type. Looking for an even better price? You might find it on the DROPS Deals!

DROPS SS24

Eir

Knitted DROPS jumper with Norwegian pattern and round yoke, worked top down in "Nepal". Size: S - XXXL.

DROPS 156-12
DROPS design: Pattern no ne-153
Yarn group C or A + A
----------------------------------------------------------
Size: S - M - L - XL - XXL - XXXL
Materials:
DROPS NEPAL from Garnstudio
600-650-700-800-850-950 g colour no 7120, light grey green
150-150-150-150-200-200 g colour no 0100, off white

DROPS DOUBLE POINTED NEEDLES AND CIRCULAR NEEDLE (40 and 80 cm) SIZE 5 mm - or size needed to get 17 sts x 22 rows in stocking st = 10 x 10 cm.
DROPS DOUBLE POINTED NEEDLES and CIRCULAR NEEDLE (40 and 80 cm) SIZE 4 mm - for rib.

-------------------------------------------------------

Alternative Yarn – See how to change yarns here
Yarn Groups A to F – Use the same pattern and change the yarn here
Yarn usage using an alternative yarn – Use our yarn converter here

-------------------------------------------------------

DROPS Nepal
DROPS Nepal
65% Wool, 35% Alpaca
from 2.40 £ /50g
Get the yarn to make this pattern from 36.00£.

The yarn cost is calculated from the pattern’s smallest size and the yarn’s cheapest product type. Looking for an even better price? You might find it on the DROPS Deals!

Pattern instructions

NOTE: This pattern is written in British English. All measurements in charts are in cm. For conversion from cm to inches - click here. There are different terms for crocheting in British and American English. If this pattern includes crochet, click for "crochet terms" here. For this pattern in American English, please click here.
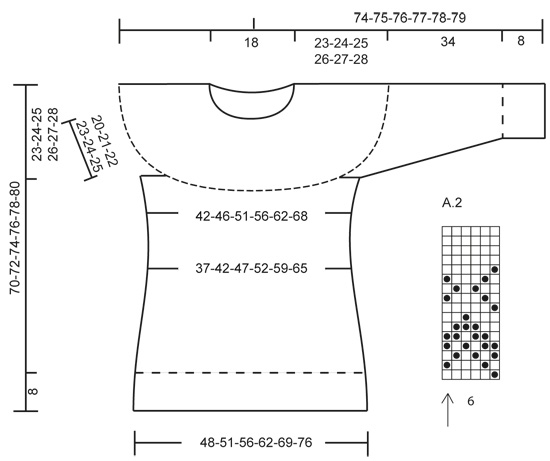
PATTERN:
See diagrams A.1-A.2. Work entire pattern in stocking st. See diagrams for correct size.

MEASURING TIP:
Because of the weight of the garment all measurements must be done by holding the piece up otherwise the garment will be too long when worn.

INCREASE TIP:
Inc 1 st by picking up a st from previous row, K this st.

DECREASE TIP:
Dec as follows after marker: Slip 1 st as if to K, K 1, psso.
Dec as follows 2 sts before marker: K 2 tog.
----------------------------------------------------------

YOKE:
Worked top down in the round on circular needle.
Cast on 102-102-108-108-114-114 sts on circular needle size 4 mm with light grey green. Work rib K 1/P 2 over all sts. REMEMBER THE KNITTING TENSION! When piece measures 14-14-15-15-16-16 cm, K 1 round while AT THE SAME TIME dec 26-22-24-20-22-18 sts evenly = 76-80-84-88-92-96 sts. Switch to circular needle size 5 mm. Then work an elevation back and forth in the neck from mid back as follows: Insert 1 marker at the beg of the round. K 9-10-11-12-13-14, turn piece and P 18-20-22-24-26-28. Turn piece, K 27-29-31-33-35-37, turn piece and P 36-38-40-42-44-46. Turn piece and K 45-47-49-51-53-55, turn piece and P 54-56-58-60-62-64. Turn piece and K over all sts until marker.
Now work in the round. K 1 round while AT THE SAME TIME inc 34-41-48-55-62-80 sts evenly = 110-121-132-143-154-176 sts. Then work and inc according to A.1 – choose diagram for correct size. Pattern beg at arrow in diagram for correct size. When A.1 has been worked 1 time vertically, there are 220-242-264-286-308-352 sts on needle. Piece measures approx. 23-24-25-26-27-28 cm - MEASURING TIP. K 1 round with light grey green while AT THE SAME TIME inc 8-10-8-10-16-0 sts evenly = 228-252-272-296-324-352 sts. Work the first 32-36-40-44-49-54 sts (= half back piece), slip the next 51-55-57-61-65-69 sts on stitch holder for sleeve, cast on 8 sts under these sts, work the next 63-71-79-87-97-107 sts (= front piece), slip the next 51-55-57-61-65-69 sts on stitch holder for sleeve, cast on 8 sts under these sts, work the remaining 31-35-39-43-49-53 sts = 142-158-174-190-210-230 sts.

BODY:
Work 1 round in stocking st while AT THE SAME TIME inc 2-4-0-2-0-4 sts evenly = 144-162-174-192-210-234 sts. Work A.2 (= 6 sts) while AT THE SAME TIME on last row dec 2-4-0-2-0-4 sts evenly = 142-158-174-190-210-230 sts.

When A.2 has been worked 1 time vertically, continue with light grey green. Insert 6 markers in the piece as follows: Work 15-16-17-17-18-20 sts, insert 1st marker, work 21-24-27-31-35-38 sts, insert 2nd marker (marks the side), work 21-24-27-31-35-38 sts, insert 3rd marker, work 29-31-33-33-35-39 sts, insert 4th marker, work 21-24-27-31-35-38 sts, insert 5th marker (marks the side) work 21-24-27-31-35-38 sts, insert 6th marker, work the remaining 14-15-16-16-17-19 sts. Move the markers upwards when working. Then dec as follows: Dec after 3rd and 6th marker and before 1st. and 4th marker - READ DECREASE TIP. Repeat dec every 1-1-1.5-1.5-3.5-3.5 cm 4-4-4-3-2-2 times in total =126-142-158-178-202-222 sts on needle.

READ ALL OF THE FOLLOWING SECTION BEFORE CONTINUING!
When piece measures 38-40-42-44-46-48 cm, inc after 3rd and 6th marker and before 4th and 1st marker - READ INCREASE TIP. Repeat inc every 4½ cm 5 times in total. AT THE SAME TIME when piece measures 38-40-42-44-46-48 cm, inc 1 st on each side of 2nd and 5th marker (= in the sides). Repeat inc in the sides every 6-9-9-9-9-6 cm 4-3-3-3-3-4 times in total. After all inc are done there are 162-174-190-210-234-258 sts on needle. Work until piece measures 62-64-66-68-70-72 cm. K 1 round while AT THE SAME TIME inc 42-45-50-66-78-90 sts evenly = 204-219-240-276-312-348 sts. Switch to circular needle size 4 mm and work rib = K 1/P 2. When piece measures 70-72-74-76-78-80 cm, cast off with K over K and P over P.

SLEEVE:
Slip sts from stitch holder back on circular needle size 5 mm (= 51-55-57-61-65-69 sts). Cast on 8 sts mid under sleeve = 59-63-65-69-73-77 sts. Insert 1 marker in the piece. NOW MEASURE PIECE FROM HERE!
Work A.2– NOTE: Adjust pattern according to the middle, arrow in diagram marks middle st on top of sleeve. AT THE SAME TIME when piece measures 4 cm from marker, beg dec – remember DECREASE TIP! Repeat dec every 2-1½-1½-1½-1½-1 cm 8-10-11-10-12-14 more times = 41-41-41-47-47-47 sts remain. When piece measures 34 cm, inc 4 sts evenly = 45-45-45-51-51-51 sts. Switch to double pointed needles size 4 mm. Work rib = K 1/P 2. Cast off with K over K and P over P when piece measures 42 cm. Work the other sleeve the same way.

ASSEMBLY:
Sew the openings under the sleeves.

Diagram

symbols = light grey green
symbols = off white
symbols = 1 YO between 2 sts, K YO twisted in next round
diagram
diagram

Each of our patterns has specific tutorial videos to help you.

Do you have a question? See a list of frequently asked questions (FAQ)

Knitting tension is what determines the final measurements of your work, and is usually measured per 10 x 10 cm. It is provided like so: number of stitches in width x number of rows in height - eg: 19 stitches x 26 rows = 10 x 10 cm.

The knitting tension is very individual; some people knit/crochet loosely while others work tightly. You adjust the knitting tension with the needle size, which is why the suggested needle size is only meant as a guide! You need to adjust this (up or down) to ensure that YOUR knitting tension matches the knitting tension provided in the pattern. If you work with a different knitting tension than provided you will have a different yarn consumption, and your work will have different measurements than what the pattern suggests.

The knitting tension also determines which yarns can replace each other. As long as you achieve the same knitting tension you can replace one yarn with another.

See DROPS lesson: How to measure your tension/gauge

See DROPS video: How to make a gauge tension swatch

The required amount of yarn is provided in grams, eg: 450 g. To calculate how many balls you’ll need you first need to know how many grams are in 1 ball (25g, 50g or 100g). This information is available if you click on the individual yarn quality on our pages. Divide the amount required with the amount of each ball. For example, if each ball is 50g (the most common amount), the calculation will be as follows: 450 / 50 = 9 balls.

The important thing when changing from one yarn to another is that the knitting/crochet tension remains the same. This is so that the measurements of the finished piece will be the same as on the sketch provided. It is easier to achieve the same knitting tension using yarns from the same yarn group. It is also possible to work with multiple strands of a thinner yarn to achieve the knitting tension of a thicker one. Please try our yarn converter. We recommend you to always work a test swatch.

Please NOTE: when changing yarn the garment might have a different look and feel to the garment in the photo, due to individual properties and qualities of each yarn.

See DROPS lesson: Can I use a different yarn than the one mentioned in the pattern?

All our yarns are categorised into yarn groups (from A to F) according to thickness and knitting tension – group A contains the thinnest yarns and group F the thickest. This makes it easier for you to find alternative yarns to our patterns, should you wish to switch yarn. All yarns within the same group have a similar knitting tension and can easily replace each other. However, different yarn qualities have different structures and properties which will give the finished work a unique look and feel.

Click here for an overview of the yarns in each yarn group

At the top of all our patterns you’ll find a link to our yarn calculator, which is a helpful tool should you wish to use a different yarn than suggested. By filling in the yarn quality you wish to replace, the amount (in your size) and number of strands, the calculator will present good alternative yarns with the same knitting tension. Additionally it will tell you how much you’ll require in the new qualities and whether you’ll need to work with multiple strands. Most skeins are 50g (some are 25g or 100g).

If the pattern is worked with multiple colours, every colour will have to be calculated separately. Similarly, if the pattern is worked with several strands of different yarns (for example 1 strand Alpaca and 1 strand Kid-Silk) you will have to find alternatives for each, individually.

Click here to see our yarn calculator

Since different yarns have different qualities and textures we have chosen to keep the original yarn in our patterns. However, you can easily find options among our available qualities by using our yarn calculator, or simply pick a yarn from the same yarn group.

It is possible that some retailers still have discontinued yarns in stock, or that someone has a few skeins at home that they would like to find patterns for.

The yarn calculator will provide both alternative yarn as well as required amount in the new quality.

If you think it's hard to decide what size to make, it can be a good idea to measure a garment you own already and like the size of. Then you can pick the size by comparing those measures with the ones available in the pattern's size chart.

You'll find the size chart at the bottom of the pattern.

See DROPS lesson: How to read size chart

The needle size provided in the pattern serves only as a guide, the important thing is to follow the knitting tension. And since knitting tension is very individual, you will have to adjust the needle size to ensure that YOUR tension is the same as in the pattern – maybe you’ll have to adjust 1, or even 2 needle sizes, up or down to achieve the correct tension. For this, we recommend that you work test swatches.

Should you work with a different knitting tension than the one provided, the measurements of the finished garment might deviate from the measurement sketch.

See DROPS lesson: How to measure your tension/gauge

See DROPS video: How to make a tension/gauge swatch

Working a garment top-down provides more flexibility and room for personal adjustment. For example it is easier to try the garment on while working, as well as making adjustments to length of yoke and shoulder caps.

The instructions are carefully explaining every step, in the correct order. Diagrams are adjusted to the knitting direction and are worked as usual.

The diagram depicts all rows/rounds, and every stitch seen from the right side. It is read from bottom to top, from right to left. 1 square = 1 stitch.

When working back and forth, every other row is worked from the right side and every other row is worked from the wrong side. When working from the wrong side, the diagram will have to be worked reversed: from left to right, knit stitches are purled, purl stitches are knit etc.

When working in the round every round is worked from the right side and the diagram are worked from right to left on all rounds.

See DROPS lesson: How to read knitting diagrams

The diagram depicts all rows/rounds, and every stitch seen from the right side. It is worked from bottom to top, from right to left.

When working back and forth every other row is worked from the right side: from right to left and every other row is worked from the wrong side: from left to right.

When working in the round, every row in the diagram are worked from the right side, from right to left.

When working a circular diagram you start in the middle and work your way outwards, counter clockwise, row by row.

The rows usually start with a given number of chain stitches (equivalent to the height of the following stitch), this will either be depicted in the diagram or explained in the pattern.

See DROPS lesson: How to read crochet diagrams

Instructions for working several diagrams after each other on the same row/round, will often be written like so: “work A.1, A.2, A.3 a total of 0-0-2-3-4 times". This means you work A.1 once, then A.2 is worked once, and A.3 is repeated (in width) the number of times provided for your size – in this case like so: S = 0 times, M = 0 times, L=2 times, XL= 3 times and XXL = 4 times.

The diagrams are worked as usual: begin with the first row in A.1, then work the first row in A.2 etc.

See DROPS lesson: How to read knitting diagrams

See DROPS lesson: How to read crochet diagrams

The total width of the garment (from wrist-to-wrist) will be larger in the larger sizes, despite the actual sleeves being shorter. The larger sizes have longer sleeve caps and wider shoulders, so there will be a good fit in all sizes.

The measurement sketch/schematic drawing provides information regarding the full length of the garment. If it’s a jumper or a jacket the length is measured from the highest point on the shoulder closest to the neckline, and straight down to the bottom of the garment. It is NOT measured from the tip of shoulder. Similarly, the length of yoke is measured from the highest point on the shoulder and down to where yoke is split into body and sleeves.

On a jacket measures are never taken along bands, unless specifically stated. Always measure inside band stitches when measuring the length.

See DROPS lesson: How to read a schematic drawing

Diagrams are often repeated on the round or in height. 1 repeat is the diagram the way it appears in the pattern. If it says to work 5 repeats of A.1 in the round, then you work A.1 a total of 5 times after/next to each other in the round. If it says to work 2 repeats of A.1 vertically/in height you work the entire diagram once, then begin again at the start and work the entire diagram one more time.

Chain stitches are slightly narrower than other stitches and to avoid working the cast-on edge too tight, we simply chain more stitches to begin with. The stitch count will be adjusted on the following row to fit the pattern and measurement sketch.

The rib edge is more elastic and will contract slightly compared to, for example, stocking stitch. By increasing before the rib edge, you avoid a visible difference in width between the rib edge and the rest of the body.

It’s very easy to cast off too tightly, and by making yarn overs while casting off (and simultaneously casting these off) you avoid a too tight cast off edge.

See DROPS video: How to bind off with yarn overs (yo)

To achieve an even increase (or decrease) you can increase on, for example: every 3rd and 4th row alternately, like so: work 2 rows and increase on the 3rd row, work 3 rows and increase on the 4th. Repeat this until the increase is complete.

See DROPS lesson: Increase or decrease 1 st on every 3rd and 4th row alternately

Should you prefer to work in the round instead of back and forth, you may of course adjust the pattern. You’ll need to add steeks mid-front (usually 5 stitches), and follow the instructions. When you would normally turn and work from the wrong side, simply work across the steek and continue in the round. At the end you’ll cut the piece open, pick up stitches to work bands, and cover the cut edges.

See DROPS video: How to knit steeks and cut open

Should you prefer to work back and forth instead of in the round, you may of course adjust the pattern so you work the pieces separately and then assemble them at the end. Divide the stitches for the body in 2, add 1 edge stitch in each side (for sewing) and work the front and back pieces separately.

See DROPS lesson: Can I adapt a pattern for circular needles into straight needles?

Pattern repeats can vary slightly in the different sizes, in order to get the correct proportions. If you’re not working the exact same size as the garment in the photo, yours might deviate slightly. This has been carefully developed and adjusted so that the complete impression of the garment is the same in all sizes.

Make sure to follow instructions and diagrams for your size!

If you have found a pattern you like which is available in women’s size it’s not very difficult to convert it to men’s size. The biggest difference will be the length of sleeves and body. Start working on the women size that you think would fit across the chest. The additional length will be worked right before you cast off for the armhole/sleeve cap. If the pattern is worked top-down you can add the length right after the armhole or before the first decrease on sleeve.

Regarding additional yarn amount, this will depend on how much length you add, but it is better with a skein too many than too few.

All yarns will have excess fibres (from production) that might come off as lint or shedding. Brushed yarns (ie hairier yarns) have more of these loose, excess fibres, causing more shedding.

Shedding also depends on what is worn under or over the garment, and whether this pulls at the yarn fibres. It’s therefore not possible to guarantee that there will be no shedding

Below are some tips on how to get the best result when working with hairier yarns:

1. When the garment is finished (before you wash it) shake it vigorously so the looser hairs come off. NOTE: do NOT use a lint roller, brush or any method that pulls at the yarn.

2. Place the garment in a plastic bag and put it in your freezer - the temperature will cause the fibres to become less attached to each other, and excess fibres will come off easier.

3. Leave in the freezer for a few hours before taking it out and shaking it again.

4. Wash the garment according to the instructions on the yarn label.

Pilling is a natural process that happens to even the most exclusive of fibers. It's a natural sign of wear and tear that is hard to avoid, and that is most visible in high friction areas of your garment like a sweater's arms and cuffs.

You can make your garment look as new by removing the pilling, using a fabric comb or a pill/lint remover.

Still can't find the answer you need? Then scroll down and leave your question so one of our experts can try to help you. This will be done normally within 5 to 10 working days.
In the meantime, you can read the questions and answers that others have left to this pattern or join the DROPS Workshop on Facebook to get help from fellow knitters/crocheters!

You might also like...

Post a comment to pattern DROPS 156-12

We would love to hear what you have to say about this pattern!

If you want to leave a question, please make sure you select the correct category in the form below, to speed up the answering process. Required fields are marked *.

Comments / Questions (53)

country flag Nicol wrote:

Hallo liebes Drops-Team, ich hätte eine generelle Frage bei der Anleitung: ich habe nun schön öfter festgestellt, dass in der Beschreibung steht (nachdem man das hohe Halsbündchen gestrickt hat), dass erst Maschen abgenommen werden sollen, die ein paar wenige Reihen später wieder aufgenommen werden, und irgendwie mag sich mir der Grund dafür nicht erschließen. Schon im Voraus lieben Dank fürs "aufklären". :)

28.10.2019 - 14:18

DROPS Design answered:

Liebe Nicol, beim Hals strickt man Bündchen/Rippenmuster mit kleineren Nadeln, dann muss man abnehmen bei der 1. Runde mit der grösseren Nadeln um den richtigen Umfang zu haben, dann strickt man hier verkürzten Reihen und dann wird es zugenommen, damit es die richtige Breite und die richtige Maschenanzahl für das Muster gibt. Viel Spaß beim stricken!

04.11.2019 - 12:59

country flag Caroline wrote:

Dear Drops, Thank you very much for your quick reply about knitting the sleeve. Please could you tell me how to find the middle stitch on top of the sleeve as I'm not sure what this is. Best wishes Caroline

23.05.2019 - 09:31

DROPS Design answered:

Dear Caroline, the middle stitch on top of sleeve is the one in the middle of the round (start counting from beg of the round = mid under arm) - read more about how to center a diagram here. Happy knitting!

23.05.2019 - 09:57

country flag Caroline wrote:

Hello drops, I've just started the sleeve using the M sizes, and I have 63 sts in accordance with your pattern. I now need to knit chart A2 which is a pattern of 6-stitch repeats. As 63 is not divisible by 6, I can't see how this will work without losing the pattern at some point under the sleeve, which will look a mess. Please could you give me some advice about what to do here. Best wishes Caroline

21.05.2019 - 08:56

DROPS Design answered:

Hi Caroline, Under the sleeve the pattern will not fit as you say and you will be decreasing as you go as well. So stop working A.2 wherever you are at the end of the round and start the next round where you began A.2 on the previous round - the most important thing is to get the stitch with the arrow (middle stitch in A.2) to match the middle stitch on top of sleeve. I hope this helps and happy knitting!

21.05.2019 - 09:52

country flag Anita Danell wrote:

Hej! På mönstret är det precis i början (vid markeringarna S M L ) som ett sprund/ 2 ben de första varven. Vad ska jag göra där, hoppa över en maska? För det är väl ingen utökning eftersom det inte är markerat med ökningssymbolen? Vänliga hälsningar Anita Danell

22.02.2019 - 15:29

DROPS Design answered:

Hej, här ska du bara fortsätta till följande ruta i diagrammet. Senare ökas det maskor, så då fortsätter diagrammet som vanligt.

22.02.2019 - 16:26

country flag Marion wrote:

Skal jeg på 1. økning øke 1 maske etter hver 5. maske, og så etter hver 6. maske annenhver gang? Og på neste omgang øke etter hver 13. maske?

16.08.2018 - 11:57

DROPS Design answered:

Hei Marion Ja, det stemmer at du på 5 omgang øker helt på starten av omgangen, og så videre etter hver 5 og 6 maske annenhver gang. Det stemmer også at du på 6 omgang øker først etter 11 masker, og så etter 13 masker på resten av omgangen. Om du syntes det er vanskelig å holde oversikten kan du sette 1 merke mellom hver rapport av mønsteret så er det lettere å se hvor du er i arbeidet ditt. God fornøyelse.

23.08.2018 - 11:33

country flag Marion wrote:

Hei. Jeg kommer helt feil ut når jeg øker i mønsteret, men greier ikke å se hvor jeg gjør feil. Savner at det står hvor mange masker en skal ha på pinnen etter hver økning!

16.08.2018 - 11:42

DROPS Design answered:

Se svar på spørsmål over :)

23.08.2018 - 11:33

country flag Monica Ruud wrote:

Hei. Skal strikke Drops 156-12 aldri strikket ovenfra og ned og finner ikke noen video jeg kan se på. Kan du hjelpe meg så jeg garantert noe å lære etter. Vennlig hilsen Monica Ruud

02.08.2018 - 17:46

DROPS Design answered:

Hei Monica. Du skal strikke på samme måte som du ville strikket om du strikket nedenfra og opp, bare at du øker når du ville felt, og feller når du ville økt – Men dette står forklart i oppskriften, så det er bare å gjøre akkurat som det står: Du begynner altså med halskanten, når denne er ferdig strikkes det forhøyning i nakken (forkortede pinner) så strikkes bærestykke (mønster leses som vanlig fra nederste til øverst, fra høyre mot venstre), alle økinger er markert i diagrammet. Videre settes masker av til ermer, nye masker legges opp og bolen strikkes nedover. God fornøyelse.

17.08.2018 - 13:24

country flag Lousha wrote:

According to the pattern I'm supposed to put the sleeve stitches on holders once A1 chart is fully worked. But according to the picture that is pretty much at the stomach... Certainly much lower than the armpit. So if I knit like this, I won't be able to lift my arms up. Is this a mistake in the pattern or just some strange design?

07.06.2018 - 19:31

DROPS Design answered:

Dear Lousha, you will divide sts for sleeves and body after A.1 has been worked (deep armholes - see measurements in chart: 23-28 cm)) and then work A.2 on body - make sure your tension in height is right (=22 rows stocking st = 10 cm). Happy knitting!

08.06.2018 - 08:17

LYDIA CARSERAS wrote:

I do not understand how to make the elevated back neck on your video. It is very confusing. Do I start from the center of the back neck if knitting in the round for a top down jumper? Do you have any written instructions for this specific method? It would be nice if you explained things verbally because it is very very confusing. Can you please give more detailed instructions. Thanks

30.03.2018 - 17:18

DROPS Design answered:

Dear Lydia, since the videos are available for all the languages the site uses, we cannot add verbal explanations other than the written instructions given to the videos. For this particular sweater the elevation starts at the middle back, and you knit short rows (where you turn the piece mid-row) back and forth according to the description. Happy Knitting!

01.04.2018 - 12:57

country flag Pia Östgård wrote:

Menar att det ej står hur många maskor och var jag ska minska!!!

20.01.2018 - 22:31