
Popular categories
Looking for a yarn?


|
||||||||||
Simply Sweet |
||||||||||
|
|
||||||||||
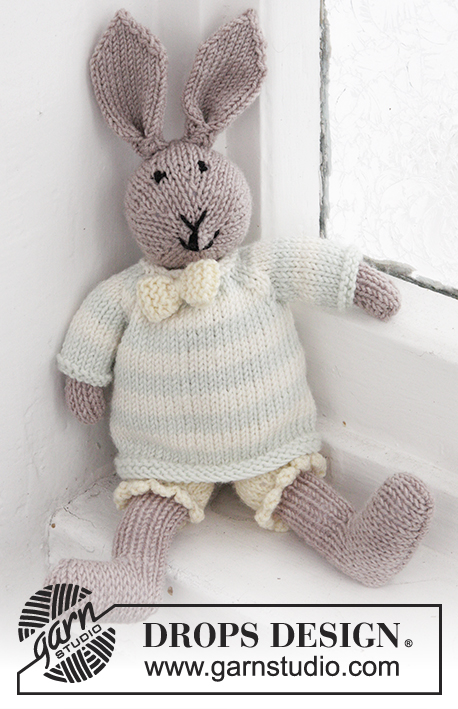
Knitted baby body in rib, worked top down in DROPS BabyMerino. Size premature – 4 years.
DROPS Baby 25-30 |
||||||||||
|
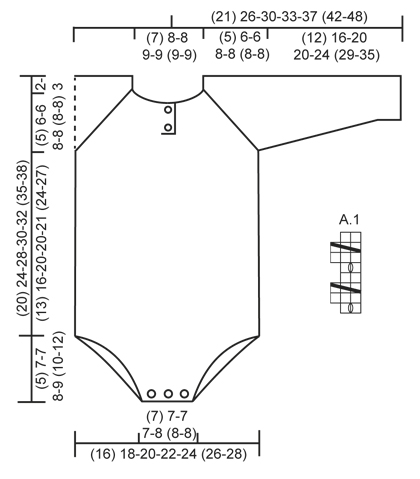
GARTER ST (back and forth on needle): K all rows. 1 ridge = 2 rows K. PATTERN: See diagram A.1. The diagram shows all rows in pattern seen from RS. RAGLAN: All inc are done from RS. Inc 1 st on each side of the 4 raglan lines by making 1 YO on each side of the 2 sts K in each raglan line (seen from RS). Work YOs into rib, i.e. P the first 2 sts from WS, K the next 2 sts from WS etc. – NOTE: Do not work YOs twisted (i.e. there should be holes on each side of the 2 K sts in raglan line). BUTTONHOLES: Dec for buttonholes on right band. 1 buttonhole = K tog third and fourth st from edge and make 1 YO (dec for buttonholes from WS). Dec for buttonholes when piece measures: SIZE (premature): 1 and 3 cm. SIZE 0/1 month + 1/3 months: 1 and 4 cm. SIZE 6/9 months + 1218 months: 1 and 4½ cm. SIZE (2 years + 3/4 years): 1 and 5 cm. DECREASE TIP 1 (applies to leg opening): Dec inside 3 edge sts in garter st. FROM RS: Dec after 3 sts in garter st as follows: P 2 twisted tog. Dec as follows before 3 sts in garter st (beg when 5 sts remain on row): P 2 tog. FROM WS: Dec after 3 sts in garter st as follows: K 2 twisted tog. Dec as follows before 3 sts in garter st (beg when 5 sts remain on row): K 2 tog. DECREASE TIP 2 (applies to sleeves): Work until 3 sts remain before marker, work 2 sts tog (in rib), work 2 sts (marker is between these 2 sts) and then work 2 sts twisted tog (in rib). ---------------------------------------------------------- BODY: The piece is worked top down. Work back and forth on circular needle to after neck vent, then work piece in the round on double pointed needles/circular needles before dividing for legs. Work sleeves in the round on double pointed needles. YOKE: Cast on (54) 60-60-64-74 (74-74) sts (incl 6 band sts in each side towards mid front) on circular needle size 3.5 mm with off white Baby Merino. Work 2 RIDGES in garter st - see explanation above (1st row = RS). Then work an elevation in the back of neck as follows (1st row = RS): K until (6) 8-8-8-10 (10-10) sts remain, turn, tighten yarn and work until (6) 8-8-8-10 (10-10) sts remain in the other side. Turn piece, tighten yarn and work until (12) 16-16-16-20 (20-20) sts remain, turn piece, tighten yarn and work back until (12) 16-16-16-20 (20-20) sts remain. Turn piece, tighten yarn and work until (18) 24-24-24-30 (30-30) sts remain, turn, tighten yarn and work until (18) 24-24-24-30 (30-30) sts remain in the other side. Turn piece, tighten yarn and work the rest of the row. Work next row as follows from WS: K 6 band sts, P the next (42) 48-48-52-62 (62-62) sts AT THE SAME TIME inc (32) 26-42-38-44 (60-60) sts evenly over these sts and finish with K 6 band sts (remember BUTTONHOLES on band – see explanation above) = (86) 86-102-102-118 (134-134) sts on needle. WORK NEXT ROW AS FOLLOWS FROM RS: SIZE (premature) + 0/1 month: 6 band sts in GARTER ST – see explanation above, K 2, P 2, A.1 (= 2 sts), P 2, K 2 (insert 1 marker in the middle of these 2 sts = raglan line), * P 2, K 2 *, repeat from *-* 3 times in total, P 2, K 2 (insert 1 marker in the middle of these 2 sts = raglan line), * P 2, K 2 *, repeat from *-* 5 times in total, P 2, K 2 (insert 1 marker in the middle of these 2 sts = raglan line), * P 2, K 2 *, repeat from *-* 3 times in total, P 2, K 2 (insert 1 marker in the middle of these 2 sts = raglan line), P 2, A.1 (= 2 sts), P 2, K 2 and 6 band sts in GARTER ST. SIZE 1/3 months + 6/9 months + 12/18 months: 6 band sts in GARTER ST – see explanation above, K 2, P 2, A.1 (= 2 sts), P 2, K 2, P 2, K 2 (insert 1 marker in the middle of these 2 sts = raglan line), * P 2, K 2 *, repeat from *-* 3-3-5 times in total, P 2, K 2 (insert 1 marker in the middle of these 2 sts = raglan line), * P 2, K 2 *, repeat from *-* 7 times in total, P 2, K 2 (insert 1 marker in the middle of these 2 sts = raglan line), * P 2, K 2 *, repeat from *-* 3-3-5 times in total, P 2, K 2 (insert 1 marker in the middle of these 2 sts = raglan line), P 2, K 2, P 2, A.1 (= 2 sts), P 2, K 2 and 6 band sts in GARTER ST. SIZE (2 years + 3/4 years): 6 band sts in GARTER ST – see explanation above, ** K 2, P 2, A.1 (= 2 sts), P 2 **, repeat from **-** 2 times in total, K 2 (insert 1 marker in the middle of these 2 sts = raglan line), * P 2, K 2 *, repeat from *-* 5 times in total, P 2, K 2 (insert 1 marker in the middle of these 2 sts = raglan line), * P 2, K 2 *, repeat from *-* 9 times in total, P 2, K 2 (insert 1 marker in the middle of these 2 sts = raglan line), * P 2, K 2 *, repeat from *-* 5 times in total, P 2, K 2 (insert 1 marker in the middle of these 2 sts = raglan line), ** P 2, A.1 (= 2 sts), P 2, K 2 **, repeat from **-** 2 times in total and finish with 6 band sts in GARTER ST. ALL SIZES: Continue pattern like this back and forth. AT THE SAME TIME on next row from RS inc for RAGLAN – see explanation above (= 8 sts inc). Repeat inc every other row/round (i.e. every row from RS) (7) 7-7-11-11 (11-11) more times (= (8) 8-8-12-12 (12-12) inc in total on each side of every raglan line). AT THE SAME TIME when piece measures (4) 5-5-6-6 (7-7) cm, band ends and piece is worked in the round on needle as follows (adjust so that next row is worked from RS): Place piece tog with sts from right band at the top (so that bands are on top of each other and buttonholes are at the edge). Work 1 round in the round AT THE SAME TIME K tog the 6 sts from right and left band 2 by 2, work the rest of round, cut the yarn and beg next round mid back. Continue rib and pattern in the round AT THE SAME TIME continue inc for raglan as before but work the 6 sts mid front as follows: P 2, A.1 (= 2 sts) and P 2. After last inc for raglan there are (144) 144-160-192-208 (224-224) sts on needle. Work (0) 2-2-2-2 (2-2) more rounds as before, piece measures approx. (7) 8-8-10-11 (11-11) cm from shoulder. On next round slip the (32) 32-32-40-48 (48-48) sts between each marker over sleeve on stitch holders (work sts before slipping them on stitch holder) = (40) 40-48-56-56 (64-64) sts remain on front and back piece. BODY: = (80) 80-96-112-112 (128-128) sts. On next round cast on (8) 16-12-12-16 (16-20) LOOSE sts under each sleeve = (96) 112-120-136-144 (160-168) sts on body – NOW MEASURES PIECE FROM HERE. Place a marker each side. Continue rib in the round as before (= K 2/P 2) with A.1 at the front as before. When piece measures (13) 16-20-20-21 (24-27) cm from armhole, divide at the markers in each side and finish front and back piece separately. BACK PIECE: = (48) 56-60-68-72 (80-84) sts. Work rib back and forth as before but work the outermost 3 sts in each side in garter st. AT THE SAME TIME dec 1 st inside the 3 edge sts in each side – READ DECREASE TIP 1 (= 2 sts dec). Repeat dec on every row (i.e. from both RS and WS) (6) 10-12-16-14 (18-14) more times (= (7) 11-13-17-15 (19-15) times in total) and then every other row (i.e. every row from RS) (5) 5-5-5-7 (7-11) times in total = (24) 24-24-24-28 (28-32) sts remain on needle. K 1 row from RS while AT THE SAME TIME dec (8) 8-8-8-10 (10-12) sts evenly = (16) 16-16-16-18 (18-20) sts remain on needle. K 10 rows (= 5 ridges) and loosely cast off with K from WS. FRONT PIECE: = (48) 56-60-68-72 (80-84) sts. Work rib back and forth as before but work the outermost 3 sts in each side in garter st. AT THE SAME TIME dec 1 st inside the 3 edge sts in each side – READ DECREASE TIP 1 (= 2 sts dec). Repeat dec on every row (i.e. from both RS and WS) (11) 13-17-21-19 (23-17) more times (= (12) 14-18-22-20 (24-18) times in total) and then every other row (i.e. every row from RS) (0) 2-0-0-2 (2-8) times in total = (24) 24-24-24-28 (28-32) sts remain on needle. K 1 row from RS while AT THE SAME TIME dec (8) 8-8-8-10 (10-12) sts evenly = (16) 16-16-16-18 (18-20) sts on needle. K 1 row from WS. On next row (= RS), dec for 3 buttonholes as follows: K (3) 3-3-3-3 (3-4), * 1 YO, K 2 tog, K (2) 2-2-2-3 (3-3) *, repeat from *-* 1 more time, K 2 tog, 1 YO and K (3) 3-3-3-3 (3-4). K 4 rows (= 2 ridges) and loosely cast off with K from WS. SLEEVE: = (32) 32-32-40-48 (48-48) sts. Cast on (8) 16-12-12-16 (16-20) LOOSE sts under sleeve = (40) 48-44-52-64 (64-68) sts on needle (work in the round on double pointed needles). Insert 1 marker at beg of round (= mid under sleeve) - NOW MEASURE PIECE FROM HERE. Continue rib in the round as before (= K 2/P 2). AT THE SAME TIME when sleeve measures 1 cm, dec 1 st on each side of marker - READ DECREASE TIP 2. Repeat dec every (4) 4-6-6-6 (8-8) rows (3) 7-3-7-7 (7-7) more times (= (4) 8-4-8-8 (8-8) times in total) = (32) 32-36-36-48 (48-52) sts remain on needle. When sleeve measures (12) 16-20-20-24 (29-35) cm, loosely cast off with K over K and P over P. Work the other sleeve the same way. ASSEMBLY: Sew the openings under the sleeves. Sew 2 buttons on to left button band in the neck and 3 buttons at the bottom of body. |
||||||||||
Diagram explanations |
||||||||||
|
||||||||||
|
||||||||||
|
Have you made this or any other of our designs? Tag your pictures in social media with #dropsdesign so we can see them! Do you need help with this pattern?You'll find tutorial videos, a Comments/Questions area and more by visiting the pattern on garnstudio.com. © 1982-2024 DROPS Design A/S. We reserve all rights. This document, including all its sub-sections, has copyrights. Read more about what you can do with our patterns at the bottom of each pattern on our site. |
||||||||||


With over 40 years in knitting and crochet design, DROPS Design offers one of the most extensive collections of free patterns on the internet - translated to 17 languages. As of today we count 304 catalogues and 11422 patterns - 11422 of which are translated into English (UK/cm).
We work hard to bring you the best knitting and crochet have to offer, inspiration and advice as well as great quality yarns at incredible prices! Would you like to use our patterns for other than personal use? You can read what you are allowed to do in the Copyright text at the bottom of all our patterns. Happy crafting!
Comments / Questions (50)
Thank you for your video it cleared my confusion If you have any tutorial video for the dec where it says twisted purl and knit dec I'll be grateful
20.01.2016 - 00:06DROPS Design answered:
Dear Mrs Syed, please have a look on the tab "Videos" at the right of the one "Materials" to find relevant videos to that pattern - and check all our videos here. Happy knitting!
20.01.2016 - 11:52And also when you said inc 16 st do you mean all at one time or what and then you said go round ribbing the body but how will you do that when in the middle we have st on the holder And also you said put marker on both the side but there is already holder there
16.01.2016 - 23:08If anybody has worked on simply sweet onesie please need some help
16.01.2016 - 18:42Under the sleeves what does that mean I have 32 st for the sleeve on the holder now what does under the sleeve means and then you are talking about 80 st and then inc of 16 st under the sleeves are these front and back 40 st do you have any tutorial video for this If you can explain it I would appreciate I know I am asking too many questions sorry about that I do so much knitting but this is the most complicated one and then you are inc 16 st again under the sleeves when you would do sleeves
16.01.2016 - 18:03DROPS Design answered:
Dear Nasreen, the video below is a standard tutoriel for top down jumper - you will figure out how to place sts for sleeve on a thread/st holder and how to cast on new sts for armhole (under sleeve). Happy knitting!
18.01.2016 - 13:58Hi I am so confuse here first I want to know how are we joining the work with button band on top of each other Secondly when you come to the point where you slip the 32 stitches between the markers on the st holder then what do you do with it Then the first inc of 16 st under the sleeves what does that mean and there is another 2 times 16 st increase under the sleeves it's too confusing Can you please walk me through it I'll appreciate it please Thanks
16.01.2016 - 08:57DROPS Design answered:
Dear Nasreen, work tog the sts from right band with the sts from left band; K the 1st st from right band tog with the 1st st from left band, then work 2nd st from right band tog with the 2nd st from left band, etc. 2)these 32 sts are for sleeves and will be worked afterwards (see "Sleeve" in pattern) - on next round after the 32 st are on a st holder, cast on 16 sts under each sleeve for armhole. Happy knitting!
16.01.2016 - 11:21In your explanation for A1 In round 2 it p3 (k3) means I need to do both the st like p3 and k3 and the dec p2 k2 how is the devil happening
16.11.2015 - 17:07DROPS Design answered:
Dear Nasreen, when working rib in the round, as well as back and forth you will always work K over K and P over P. Remember you will get all individual assistance from your DROPS store. Happy knitting!
16.11.2015 - 17:56And also about the raglan I am doing the inc like Yo before the Kst then yo before the Kst like after the marker but the inc st are all Kst so how do I pattern them or just leave them as it is like Kst Please explain I am really appreciating your help thanks
16.11.2015 - 17:00DROPS Design answered:
Dear Nasreen, you will work the inc sts in rib : the first 2 yos will be worked P then next 2 will be worked K and so on - see "raglan" at the beg of the pattern. Happy knitting!
16.11.2015 - 18:03Thank you so much for your explanation Now I am working the pattern on the circular needle so how do I join the work and as you say in the pattern the 2 bands will come on top of each other so how that will happen and dec the band stitches how is that happening Thanks please explain it I'll appreciate sorry to bother you this much but the pattern is so precious that I really want to do it
16.11.2015 - 16:56DROPS Design answered:
Dear Nasreen, when you start to work in the round after the split for neck, work together the 6 sts from right and left band 2 by 2 (= 1 st from right front band with 1 st from left front band) until all 6 sts are worked together and continue in pattern as stated Happy knitting!
16.11.2015 - 17:54Sorry still can't understand the diagram A1 if u can specifically tell me how it is worked I'll appreciate meaning what do you mean by 2 stitches 8 rows are they being knitted or they are purl stitches it's not clearly indicated
14.11.2015 - 01:29DROPS Design answered:
Dear Nasreen, A.1 is worked either back and forth or in the round - following the pattern- as follows : Row1(from RS= = Round1): K1, YO, K1 Row 2 = from WS (Round 2): P3 (K3) Row 3 = from RS = Round3 = dec 1 st as in diagram text Row 4 from WS (Rond 4): P2 (K2) Repeat these 4 rows (from RS + WS when working back and forth) or these 4 rounds (= from RS when working in the round). Happy knitting!
16.11.2015 - 09:04It's me again Nasreen about the simply sweet pattern. Where it says A1 in the bracket it =2 what does that mean what r we doing to this 2 And the markers where r we putting them between the knit 2 and purl 2 I will really appreciate the answers I am stuck and my first grand child is about to be born Thanks
13.11.2015 - 10:04DROPS Design answered:
Dear Nasreen, diagram A.1 - see at the very bottom of the pattern - is worked over 2 sts and 8 rows. Start reading diagram at the bottom corner on the right side from the left every row from RS/every round - and from the left towards the right from WS. Happy knitting!
13.11.2015 - 14:35